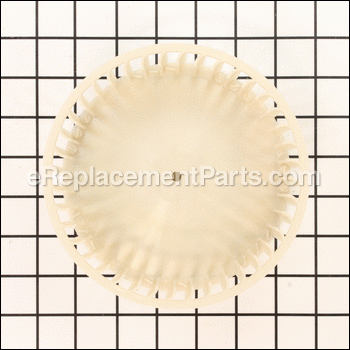
This is an authentic Nutone replacement part, sold individually. Includes wheel and clip.
The Blower Wheel is the part that rotates inside the fan housing, producing airflow.
It is compatible with the fan models listed below.
Repair is fairly easy, requiring only a screwdriver.
Blower Wheel SNT5901A000
OEM part for: Nutone, Broan
Part Number: SNT5901A000
Jump To:
Product Description ?
- Classification: Part
- Weight: 0.38 lbs.
- Shipping: Ships Worldwide
Frequently Purchased Together ?
Compatibility
This Blower Wheel will fit the following 105 machines. Confirm this part works with your model, and view the detailed model diagrams and repair help we have to offer.
This item works with the following types of products:
- Ventilation Parts
- Heater Parts
This part replaces obsolete part #: S5901A000, 5901A000, NT5901A000
Customer Part Reviews ?
- 1
- 2
- 3
Questions & Answers ?
Our customer Service team is at the ready daily to answer your part and product questions.

Ask our Team
We have a dedicated staff with decades of collective experience in helping customers just like you purchase parts to repair their products.
Does this fit my product?Questions & Answers for Blower Wheel
Customer Repair Instructions ?
All our customer repair instructions are solicited directly from other customers just like you who have purchased and replaced this exact part.
Blower wheel was cracked
Tool Type
Ventilation
Difficulty
Easy
Time
30-60 minutes
Tools Used
Nutdriver
Parts Used
2. Removed blower wheel from the motor shaft.
3. Disassembled, cleaned, oiled (motor), reassembled entire unit and placed back in service.
4. Having found "ereplacementparts.com" made finding replacement parts easy. They provided a complete parts diagram including availability and price. Completely satisfied, will use them again when the need arises.
The plastic drum that rotates to pull air from the room was warped and cracked from heat and age causing it to loosen from the motor shaft resulting in failure to turn and causing a jam-up.
Tool Type
Ventilation
Difficulty
Medium
Time
15-30 minutes
Tools Used
Screwdriver, Pliers
Parts Used
2. Use pliers to remove the nut on center shaft holding decorative vent frame.
3. Use a screwdriver to loosen three screws holding the motor in place.
4. Rotate motor frame to free it from the housing.
5. Unplug AC cord for the motor so it can be taken all the way out.
6. Use a screwdriver to pry off the old drum. It will probably on the shaft very tightly.
7. Place new drum hole on motor shaft ling up flat spots of each.
8. Use a piece of wood to tap the new drum into place. It will be a tight fit.
9. Make sure the new drum is not crooked--it should not spin wobbly.
Vibration & excessive noise
Tool Type
Ventilation
Difficulty
Easy
Time
Less than 15 minutes
Tools Used
Screwdriver
Parts Used
2. Removed the fan by loosening 3 three screws & rotating the fan assembly so the assembly mounting holes cleared the screw head.
3. Pulled blower wheel from the fan motor shaft.
4. Pushed the new blower wheel onto the motor shaft. Line up flat spot on the shaft with the flat spot on blower wheel before pushing.
5. Reinstall fan assembly into fan housing.
6. Reinstall the fan trim.
Bathroom ventilation fan was very noisy and out of balance.
Tool Type
Ventilation
Difficulty
Easy
Time
15-30 minutes
Tools Used
Screwdriver, Nutdriver
Parts Used
2. Unplugged light assembly, removed screws holding it in place and removed the light unit from the housing.
3. Unplugged fan assembly, removed screws and removed the fan assembly from the housing.
4. Removed the defective blower wheel from the fan unit and replaced it with the new blower wheel using the written instruction that came with the replacement blower wheel.
5. Reassembled and reconnected both units to the fan/light housing in the ceiling, plugged them in and replaced the outer cover.
Everything worked perfectly.
Bathroom vent was extremely noisy.
Tool Type
Ventilation
Difficulty
Easy
Time
15-30 minutes
Tools Used
Screwdriver
Parts Used
Blower wheel made a lot of noise
Tool Type
Ventilation
Difficulty
Easy
Time
15-30 minutes
Tools Used
Screwdriver, Pliers
Parts Used
Unscrewed three screws
Removed the motor
Removed the blower wheel
Replaced the blower wheel
Put motor back
Put back three screws
Replaced grill
Blower wheel flat was wore and would not spin on motor shaft
Tool Type
Ventilation
Difficulty
Easy
Time
30-60 minutes
Tools Used
Screwdriver, Pliers, Wrench Set
Parts Used
2. Remove motor mount
3. Remove motor and blower wheel
4. Install new blower wheel on motor
5. Reinstall motor, blower wheel, and cover
The inside of the blower wheel had worn out.
Tool Type
Ventilation
Difficulty
Easy
Time
Less than 15 minutes
Tools Used
Screwdriver
Parts Used
Blower wheels were old and worn out
Tool Type
Ventilation
Difficulty
Easy
Time
30-60 minutes
Tools Used
Screwdriver
Parts Used
Worn blower wheel
Tool Type
Ventilation
Difficulty
Easy
Time
Less than 15 minutes
Tools Used
Screwdriver
Parts Used
OEM stands for Original Equipment Manufacturer and means the part you’re buying is sourced directly from the manufacturer who made your product. At eReplacementParts, we sell only genuine OEM parts, guaranteeing the part you’re purchasing is of better design and of higher quality than aftermarket parts.
Our product descriptions are a combination of data sourced directly from the manufacturers who made your product as well as content researched and curated by our content & customer service teams. This content is edited and reviewed internally before being made public to customers.
Our customer service team are at the ready daily to answer your part and product questions. We have a dedicated staff with decades of collective experience in helping customers just like you purchase parts to repair their products.
All our part reviews are solicited directly from other customers who have purchased this exact part. While we moderate these reviews for profanity, offensive language or personally identifiable information, these reviews are posted exactly as submitted and no alterations are made by our team.
All our customer repair instructions are solicited directly from other customers just like you who have purchased and replaced this exact part. While we moderate these reviews for profanity, offensive language or personally identifiable information, these reviews are posted exactly as submitted and no alterations are made by our team.
Based on data from past customer purchasing behaviors, these parts are most commonly purchased together along with the part you are viewing. These parts may be necessary or helpful to replace to complete your current repair.
All our installation videos are created and produced in collaboration with our in-house repair technician, Mark Sodja, who has helped millions of eReplacementParts customers over the last 13 years repair their products. Mark has years of experience in selling and repairing both commercial and residential products with a specialty in gas-powered equipment.
This data is collected from customers who submitted a repair instruction after replacing this exact part. Customers can rate how easy the repair was to complete and how long it took. We aggregate this data to provide a repair rating that allows customers to quickly determine the difficulty and time needed to perform their own repair.


