eReplacementParts.com
877-346-4814
Waring Parts
Repair Parts Home
  
Appliance Parts
  
Waring Parts
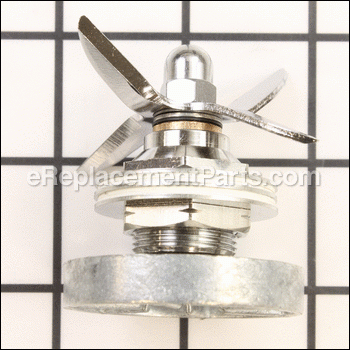
  007314W Blending Assembly

Blending Assembly 007314W

OEM part for: Waring

Part Number: 007314W


Install
Videos!
Grid squares measure 1x1 inch
In Stock
Order within the next 10 hours and your part ships today!
Easy 15-30 minutes (25 rated repairs)?
OEM: Original Equipment Manufacturer ?
Waring
Does this d-block d-md-none fit my product?

Product Description ?

This is a Genuine OEM sourced replacement part designed for use with Waring Blenders. This is the Blade that cuts food inside the container. It is made out of Metal and it is Sold Individually.

To replace it you would need a Wrench or Pliers.

• First you want to remove the Nut that secures the old blade assembly
• Remove the cutter assembly and make sure to clean the gaskets
• Secure the new blade assembly using the Nut

  • Classification: Part
  • Weight: 0.45 lbs.
  • Shipping: Ships Worldwide

Frequently Purchased Together ?

Compatibility

This part will fit the following 72 machines

Waring

38BL47 Blender View Diagrams & Manuals
19BL62 Blender View Diagrams & Manuals
51BL29 Blender View Diagrams & Manuals
WF2111221 Blender View Diagrams & Manuals
7000GBS Blender View Diagrams & Manuals
34BL85 Blender View Diagrams & Manuals
34BL83 Blender View Diagrams & Manuals
502470 Blender View Diagrams & Manuals
502342 Blender View Diagrams & Manuals
503274 Blender View Diagrams & Manuals
34BL58 Blender View Diagrams & Manuals
CAC34 Blender View Diagrams & Manuals
19BL49 Blender View Diagrams & Manuals
51BL26 Blender View Diagrams & Manuals
PB201C Blender View Diagrams & Manuals
PB203C Blender View Diagrams & Manuals
PB205C Blender View Diagrams & Manuals
PB209C Blender View Diagrams & Manuals
PB211C Blender View Diagrams & Manuals
PB202C Blender View Diagrams & Manuals
PB204C Blender View Diagrams & Manuals
PB206C Blender View Diagrams & Manuals
PB210C Blender View Diagrams & Manuals
PB212C Blender View Diagrams & Manuals
18BL92 Blender View Diagrams & Manuals
19BL46 Blender View Diagrams & Manuals
15BL69 Blender View Diagrams & Manuals
36BL94 Blender View Diagrams & Manuals
37BL35 Blender View Diagrams & Manuals
37BL41 Blender View Diagrams & Manuals
51BL23 Blender View Diagrams & Manuals
WF2111211 Blender View Diagrams & Manuals
39BL12 Blender View Diagrams & Manuals
39BL48 Blender View Diagrams & Manuals
51BL33 Blender View Diagrams & Manuals
5000GBO (Black_Onyx) 50Th Anniversary Blenders View Diagrams & Manuals
R500GBO (Black_Onyx) 50Th Anniversary Blenders View Diagrams & Manuals
5000GB (Blue) 50Th Anniversary Blenders View Diagrams & Manuals
5000GC (Chrome) 50Th Anniversary Blenders View Diagrams & Manuals
B5000G (Chrome) 50Th Anniversary Blenders View Diagrams & Manuals
R500GC (Chrome) 50Th Anniversary Blenders View Diagrams & Manuals
5000GE (Ebony) 50Th Anniversary Blenders View Diagrams & Manuals
5000GG (Green) 50Th Anniversary Blenders View Diagrams & Manuals
R500GG (Green) 50Th Anniversary Blenders View Diagrams & Manuals
5000GGT (Garnet_Red) 50Th Anniversary Blenders View Diagrams & Manuals
R500GGT (Garnet_Red) 50Th Anniversary Blenders View Diagrams & Manuals
5000GJ (Jadite_Green) 50Th Anniversary Blenders View Diagrams & Manuals
R500GJ (Jadite_Green) 50Th Anniversary Blenders View Diagrams & Manuals
5000GR (Burgundy_Red) 50Th Anniversary Blenders View Diagrams & Manuals
5000GW (White) 50Th Anniversary Blenders View Diagrams & Manuals
R500GW (White) 50Th Anniversary Blenders View Diagrams & Manuals
5000TN (Tangerine) 50Th Anniversary Blenders View Diagrams & Manuals
R500TN (Tangerine) 50Th Anniversary Blenders View Diagrams & Manuals
RB203S (Yellow) 50Th Anniversary Blenders View Diagrams & Manuals
RB204S (Chili_Red) 50Th Anniversary Blenders View Diagrams & Manuals
R500B (Cobalt_Blue) 50Th Anniversary Blenders View Diagrams & Manuals
R500CB (Copper) 50Th Anniversary Blenders View Diagrams & Manuals
R500GE (Black) 50Th Anniversary Blenders View Diagrams & Manuals
34BL87 50Th Anniversary Blenders View Diagrams & Manuals
36BL96 50Th Anniversary Blenders View Diagrams & Manuals
51BL25 50Th Anniversary Blenders View Diagrams & Manuals
BB900M Blender View Diagrams & Manuals
WF2111213 Blender View Diagrams & Manuals
BB900G Blender - Glass Container View Diagrams & Manuals
BB900S Blender - Stainless Steel Container View Diagrams & Manuals
BB900P Blender - Plastic Container View Diagrams & Manuals
BC900G Blender - CSA With Glass Container View Diagrams & Manuals
BC900S Blender - CSA W/Stainless Steel Container View Diagrams & Manuals
BC900P Blender - CSA W/Plastic Container View Diagrams & Manuals
CAC35 Stainless Steel Container View Diagrams & Manuals
Show More Compatible Models
Don't see yours? Try searching our site for :

This item works with the following types of products:

  • Blender Parts

This part replaces obsolete part #: 028114, 503273, 503161, 502470, 502344

Customer Part Reviews ?

4.4
Average Rating (out of 5):
15 Reviews
Click to filter by ratings:
5 stars
11
4 stars
2
3 stars
0
2 stars
1
1 stars
1
  • Highest Rating
  • Most Recent
< PREV
  • 1
  • 2
NEXT >
  • Blender works like new.
    The blender blades were not turning to spin the material in the glass jar. I replaced the entire blending assembly and now works like new. It was a little difficult getting the old pieces out but the new one went run without any trouble. Be sure to notice that the nut that secures the assembly on the bottom is reverse threaded.
    Guest - March 27, 2024 Verified Purchase
    Got what was needed
    Information on site was very helpful. Had parts for an old blender.
    Guest - February 9, 2023 Verified Purchase
    Replacement Part Saved Mondy
    The new part came quickly and my husband installed it without difficulty.
    Guest - January 3, 2023 Verified Purchase
    eReplacementParts was very easy to work with. very pleased
    replacement (blending assembly) has yet to be installed. waiting for the upcoming local Repair Cafe to have it installed (I don't have tools) which they will do for free. I took the blender jar to Repair Cafe to have the original part removed.
    Guest - December 20, 2022 Verified Purchase
    Excellent Replacement Component Set
    It took the original blending assembly many years of use & abuse to wear out, and this replacement setup looks as though it will last many more years. Replacing the assembly is quite straight forward, as everything just unthreads/re-threads. Good Stuff. Warring blenders are quite impressive.
    Guest - March 18, 2022 Verified Purchase
    Part and instructions (bonus) Easy!
    The website made it very easy to find the part I needed. And affordable. Plus, this company shipped it to me very quickly. The part (with the instructions included which I appreciated) was super easy to install and my Waring blender up and running better than it was. Was having a smoothie in days. Solid website, quick service, helpful information. Thank you!
    Guest - January 18, 2021 Verified Purchase
    Easy and simple to repair
    Fast delivery, brand new item.
    Guest - November 3, 2020 Verified Purchase
    Amazing that the ‘BLENDING ASSEMBLY’ was still available for the ‘50th Anniversary Edition’ of a blender invented in 1933.
    No down time for HAPPY HOUR! In 1983 I purchased the chrome, 2 speed replica of the original blender Ronald Regan awarded Waring the Gold Medal Award. They don’t make them like that anymore! I broke the blade being too generous with ice before adding tequila. My Bad. I repaired by simply looking at the illustration. eReplacements came to the rescue within 48 hours! No tequila was sacrificed in the process. Olé!
    Guest - March 3, 2020 Verified Purchase
    The blender assembly is entirely satisfactory. It took some time to replace, as working in the limited space inside the vessel with wrench & pliers was challenging but doable.
    The blender assembly arrived in good time, well packed.
    iGlobal - February 15, 2020 Verified Purchase
    Broken blade repair
    It was brand new, exactly what we needed. Bought whole new blending assembly to fix leak. It seemed to work but we may end up needing to buy new glass carafe also, noticed it was chipping around bottom.
    Guest - August 3, 2019 Verified Purchase
    t
    t
    t - t days ago Verified Purchase
    eReplacementParts Team
    t

    Questions & Answers ?

    Our customer Service team is at the ready daily to answer your part and product questions.

    photo of team member
    Ask our Team

    We have a dedicated staff with decades of collective experience in helping customers just like you purchase parts to repair their products.

    Does this fit my product?

    Questions & Answers for Blending Assembly


    which parts goes inside the glass and which part goes outside the glass?
    MI asked on 2023-10-31
    Hello MI, Thank you for your inquiry. Everything from the bearing holder and washers upwards goes inside the blender, the hex nut is what holds it on the outside of the blender. We hope this helps you.
    eReplacementParts Team October 31, 2023
    Does the blending assemble part 804 include the entire assemble from part 3-11, all the washers, nut, coupler blades etc.
    Wayne for model number 34BL87 asked on 2023-01-03
    Hello Wayne, Thank you for the question. The Blending Assembly Part Number: 007314W includes everything from #3 to #11 on the Diagram. Thanks again for your great question!
    eReplacementParts Team January 03, 2023

    Customer Repair Instructions ?

    All our customer repair instructions are solicited directly from other customers just like you who have purchased and replaced this exact part.

    Easy 15-30 minutes (25 rated repairs)?

    Original equipment has missing washers. Discovered later when disassembled after leaking started.

    Michael - January 8, 2017
    👍 5 of 5 people found this instruction helpful
    Tool Type

    Blender

    Difficulty

    Easy

    Time

    Less than 15 minutes

    Tools Used

    Nutdriver

    Replaced the entire blade assembly by removing the cap nut.
    Did you find this story helpful?
    Thanks for voting and helping fellow customers!

    Was not performing well / assembly was wobbly and chafing

    c. - May 11, 2016
    👍 7 of 9 people found this instruction helpful
    Tool Type

    Blender

    Difficulty

    Easy

    Time

    15-30 minutes

    Tools Used

    Adjustable Wrench, leather pot holder

    The repair was simple, taking it apart (and figuring out the tools) was the hard part, and that wasn't really hard either....

    Here's how I replaced the blending assembly:
    I turned the glass container on its side and used a thick leather pot holder to hold the assembly from the inside and grasped the coupling at the bottom with an adjustable wrench from the outside.

    After taking it apart I noticed, that someone had obviously cleaned and then put the assembly back the wrong way (washer on the outside) which had caused the chafing and had worn out the thread for the bottom hex nut.

    But since I ordered the whole assembly replacing everything was was super easy.

    CR
    Did you find this story helpful?
    Thanks for voting and helping fellow customers!

    Leaking pitcher at base

    Dan - December 7, 2016
    👍 3 of 3 people found this instruction helpful
    Tool Type

    Blender

    Difficulty

    Easy

    Time

    Less than 15 minutes

    Tools Used

    Pliers, Socket set

    New parts fit perfectly!
    Did you find this story helpful?
    Thanks for voting and helping fellow customers!

    Blender blade nearing froze.

    Gary - July 28, 2016
    👍 3 of 3 people found this instruction helpful
    Tool Type

    Blender

    Difficulty

    Easy

    Time

    Less than 15 minutes

    Tools Used

    Socket set

    Simple repair, the only issue, know that the nuts are reverse threads.
    Did you find this story helpful?
    Thanks for voting and helping fellow customers!

    Screaming, squeaky bearing in blending assembly

    Stephen - May 3, 2016
    👍 4 of 5 people found this instruction helpful
    Tool Type

    Blender

    Difficulty

    Easy

    Time

    Less than 15 minutes

    Tools Used

    Socket set

    Used a socket and extensions to reach nut on top of blending assembly inside pitcher. Came apart easily with the correct nut size and simply holding the drive wheel on the bottom of the pitcher. Take care to watch the order that the gaskets and washers come off as you'll need to duplicate it upon reassembly.
    Did you find this story helpful?
    Thanks for voting and helping fellow customers!

    Bolt became stripped

    roger - September 13, 2016
    👍 1 of 1 people found this instruction helpful
    Tool Type

    Blender

    Difficulty

    Easy

    Time

    Less than 15 minutes

    Tools Used

    Pliers, Adjustable Wrench

    1. Unscrewed reverse-threaded nut.
    2. Removed old assembly.
    3. Inserted new assembly.
    4. Screwed on reverse-threaded nut.
    5. Screwed on the wagon-wheel-looking-thingie.
    Did you find this story helpful?
    Thanks for voting and helping fellow customers!

    The blade rotor stripped

    Dory - August 3, 2016
    👍 1 of 1 people found this instruction helpful
    Tool Type

    Blender

    Difficulty

    Hard

    Time

    Less than 15 minutes

    Tools Used

    Pliers, Socket set

    Remove the nut that secures the blade assembly, then remove the blade assembly. Install the new blade assembly and secure it with the nut.
    Did you find this story helpful?
    Thanks for voting and helping fellow customers!

    Couldn't loosen old one that leaked.

    Michael - July 3, 2016
    👍 1 of 1 people found this instruction helpful
    Tool Type

    Blender

    Difficulty

    Easy

    Time

    Less than 15 minutes

    Tools Used

    Put it together, ran it on blender, let it sit over night, didn't leak. Not going to put in the dishwasher any more.
    Did you find this story helpful?
    Thanks for voting and helping fellow customers!

    Leaking assembly

    Richard - June 6, 2016
    👍 1 of 1 people found this instruction helpful
    Tool Type

    Blender

    Difficulty

    Easy

    Time

    15-30 minutes

    Tools Used

    Socket set, Wrench Set, Extension on the socket set to get into the blender

    Used an extension socket set and some other wrenches to get it apart. Kept original parts in same order so that I could re-assemble and install the new parts. Worked like a charm.
    Did you find this story helpful?
    Thanks for voting and helping fellow customers!

    Blender gaskets leaking

    Carl - January 14, 2021
    Tool Type

    Blender

    Difficulty

    Easy

    Time

    Less than 15 minutes

    Tools Used

    Socket set

    Removed old blender assembly, cleaned glass container and installed new parts.

    Blender was obsolete but customer rep was very helpful. There was a universal assembly that will fit 72 different blenders and recommend that and if it didn’t work, return it. It fit perfectly and was an improved design. Thanks for the help!
    Blender is now good for another 50 years.
    Did you find this story helpful?
    Thanks for voting and helping fellow customers!

    OEM stands for Original Equipment Manufacturer and means the part you’re buying is sourced directly from the manufacturer who made your product. At eReplacementParts, we sell only genuine OEM parts, guaranteeing the part you’re purchasing is of better design and of higher quality than aftermarket parts.

    Our product descriptions are a combination of data sourced directly from the manufacturers who made your product as well as content researched and curated by our content & customer service teams. This content is edited and reviewed internally before being made public to customers.

    Our customer service team are at the ready daily to answer your part and product questions. We have a dedicated staff with decades of collective experience in helping customers just like you purchase parts to repair their products.

    All our part reviews are solicited directly from other customers who have purchased this exact part. While we moderate these reviews for profanity, offensive language or personally identifiable information, these reviews are posted exactly as submitted and no alterations are made by our team.

    All our customer repair instructions are solicited directly from other customers just like you who have purchased and replaced this exact part. While we moderate these reviews for profanity, offensive language or personally identifiable information, these reviews are posted exactly as submitted and no alterations are made by our team.

    Based on data from past customer purchasing behaviors, these parts are most commonly purchased together along with the part you are viewing. These parts may be necessary or helpful to replace to complete your current repair.

    All our installation videos are created and produced in collaboration with our in-house repair technician, Mark Sodja, who has helped millions of eReplacementParts customers over the last 13 years repair their products. Mark has years of experience in selling and repairing both commercial and residential products with a specialty in gas-powered equipment.

    This data is collected from customers who submitted a repair instruction after replacing this exact part. Customers can rate how easy the repair was to complete and how long it took. We aggregate this data to provide a repair rating that allows customers to quickly determine the difficulty and time needed to perform their own repair.

    eReplacementParts.com
    7174 South 400 West
    Suite 5
    Midvale, UT 84047
    visa mastercard discover american express PayPal