

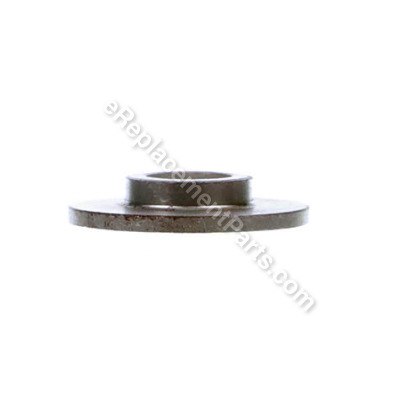


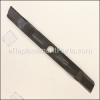
This is a Genuine Manufacturer Approved replacement Spacer for a Blade used on certain Black and Decker Lawn Mowers. It is made out of Metal and is Sold Individually. This Spacer sits on top of the Fan and it allows it to spin freely and with less friction.
Blade Spacer 680812-00
OEM part for: Black and Decker
Part Number: 680812-00
$7.04
In Stock
Jump To:
Frequently Purchased Together ?


Compatibility
This Blade Spacer will fit the following 120 machines. Confirm this part works with your model, and view the detailed model diagrams and repair help we have to offer.
Black and Decker
Show More Compatible ModelsThis item works with the following types of products:
- Lawn Mower Parts
Customer Part Reviews ?
Average Rating (out of 5):
Click to filter by ratings:
5 stars
4
4 stars
1
3 stars
0
2 stars
0
1 stars
0
< PREV
- 1
Easy to put on
fit great fast delivery
Guest -
June 19, 2020
Verified Purchase
Mower Blade Spacer
The part was a perfect replacement and shipping was fast. Thank you ereplacementparts!
Richard -
June 19, 2020
Verified Purchase
Ordered 5 parts. Got 2 and 1 was wrong.
Totally wrong order. Goodbye
martin -
April 14, 2020
Verified Purchase
Ideal part. Delivered quickly.
It's the part I expected to get but the service from eReplacement Parts is unexpectedly prompt. Thanks for the quick service.
Peter -
August 5, 2019
Verified Purchase
Super service by RP. just the pesky international postal puzzle.
great to get these parts precisely what was needed, at a nice parts price and got my old mower working. Shipping: well, now.... not the vendor's fault, butg took almost a month. by air, mostly. from Utah, los angeles, then Denver, then Toronto, then Winnipeg. Reporting by usps was precise. many airport steps all the way. Golly....... the word 'departed' made a great pun this month. Great to know the parts suppliers are still there.
iGlobal -
June 25, 2022
Verified Purchase
Questions & Answers ?
Our customer Service team is at the ready daily to answer your part and product questions.

Ask our Team
We have a dedicated staff with decades of collective experience in helping customers just like you purchase parts to repair their products.
Does this fit my product?Questions & Answers for Blade Spacer
No questions have been asked yet
Customer Repair Instructions ?
All our customer repair instructions are solicited directly from other customers just like you who have purchased and replaced this exact part.
The blade and fan needed to be replaced.
Daniel - April 12, 2017
👍 4 of 4 people found this instruction helpful
Tool Type
Lawn Mower
Difficulty
Easy
Time
Less than 15 minutes
Tools Used
Wrench Set
Last summer I took the blade off to sharpen. I didn't give enough attention on how the items on the blade/fan shaft went back together, which resulted with the blade not being secure, and untimely being out of balance, which damaged the fan. I decided to replace everything on the blade/fan shaft.
Starting closest to the mower, I replaced the Spacer, no problem there. Next was the Fan, once again, no problem. Followed by the Blade, and it tells you what side should face the ground written right on it. Now, this is the point where you need to pay attention. What is next is called an Insulator followed by another spacer. The insulator has ridges on each side of it, that will straddle the blade on one side, and the metal spacer on the other side. Each have a oval hole in the center and you need to make sure each is pushed far enough on to the shaft to fit snugly on the oval part of the shaft. The tricky part for me was to keep everything lined up and inside of the ridges, plus keeping everything pushed up on the shaft to expose the threads for the Hex Nut to get started. Once the Hex Nut is started, the only thing you need to do at that point is to make sure everything stays lined up as you tighten the Hex Nut. As you tighten Hex Nut, and the blade and insulator and the metal spacer become not aligned, loosen the Hex Nut enough to get everything back in line and start tightening again. Hope this helps.
Starting closest to the mower, I replaced the Spacer, no problem there. Next was the Fan, once again, no problem. Followed by the Blade, and it tells you what side should face the ground written right on it. Now, this is the point where you need to pay attention. What is next is called an Insulator followed by another spacer. The insulator has ridges on each side of it, that will straddle the blade on one side, and the metal spacer on the other side. Each have a oval hole in the center and you need to make sure each is pushed far enough on to the shaft to fit snugly on the oval part of the shaft. The tricky part for me was to keep everything lined up and inside of the ridges, plus keeping everything pushed up on the shaft to expose the threads for the Hex Nut to get started. Once the Hex Nut is started, the only thing you need to do at that point is to make sure everything stays lined up as you tighten the Hex Nut. As you tighten Hex Nut, and the blade and insulator and the metal spacer become not aligned, loosen the Hex Nut enough to get everything back in line and start tightening again. Hope this helps.
Did you find this story helpful?
Thanks for voting and helping fellow customers!
Nothing was wrong at all. It worked right the first try
Ken - April 16, 2017
👍 1 of 1 people found this instruction helpful
Tool Type
Lawn Mower
Difficulty
Easy
Time
15-30 minutes
Tools Used
Wrench Set, Adjustable Wrench, Channel Lock Pliers
1. Used Channel Lock pliers to hold the spacer
2. Turned the hex nut counter clockwise to loosen and remove the hex nut.
3. Removed all of the old parts.
4. Replaced old parts in the same order with the new parts
5. Gripped the spacer with the channel lock pliers.
6. Tightened the hex nut till tight.
2. Turned the hex nut counter clockwise to loosen and remove the hex nut.
3. Removed all of the old parts.
4. Replaced old parts in the same order with the new parts
5. Gripped the spacer with the channel lock pliers.
6. Tightened the hex nut till tight.
Did you find this story helpful?
Thanks for voting and helping fellow customers!
Replaced above parts to repair blade mounting
jon - April 8, 2016
👍 1 of 1 people found this instruction helpful
Tool Type
Lawn Mower
Difficulty
Medium
Time
15-30 minutes
Tools Used
Adjustable Wrench
Removed damaged parts and replaced with new parts. Very easy.
Did you find this story helpful?
Thanks for voting and helping fellow customers!
Lawn mower fan broke
William - July 11, 2018
Tool Type
Lawn Mower
Difficulty
Medium
Time
Less than 15 minutes
Tools Used
Pliers
Removed blade.
Pried off broken fan
Replaced fan with new fan
Slid on blade spacer
Slid on blade
Slid on blade insulator
Attached blade.
Pried off broken fan
Replaced fan with new fan
Slid on blade spacer
Slid on blade
Slid on blade insulator
Attached blade.
Did you find this story helpful?
Thanks for voting and helping fellow customers!
Fan blades broken, plastic spacer worn out.
Christopher - June 21, 2018
Tool Type
Lawn Mower
Difficulty
Easy
Time
Less than 15 minutes
Tools Used
Adjustable Wrench, Large slip joint pliers.
1. Removed nut.
2. Removed spacer, insulator, fan.
3. Replaced parts in reverse order.
4. I looked at the exploded diagram on the parts ordering page to be sure I put the parts back in correct order. Print screen that when you order your parts. Make sure you are looking at the correct model and version number.
2. Removed spacer, insulator, fan.
3. Replaced parts in reverse order.
4. I looked at the exploded diagram on the parts ordering page to be sure I put the parts back in correct order. Print screen that when you order your parts. Make sure you are looking at the correct model and version number.
Did you find this story helpful?
Thanks for voting and helping fellow customers!
Blade kept slipping
Anita - June 16, 2018
Tool Type
Lawn Mower
Difficulty
Easy
Time
15-30 minutes
Tools Used
Wrench Set
Replaced all parts and tightened the blade. Works great.
Did you find this story helpful?
Thanks for voting and helping fellow customers!
Fan and spacer were damaged, and the blade was not engaged with the drive mechanism. It was just spinning freely.
Kenneth - June 1, 2018
Tool Type
Lawn Mower
Difficulty
Easy
Time
Less than 15 minutes
Tools Used
Wrench Set
Removed the fan, spacers and blade and associated components on the shaft, and replaced them all in the reverse sequence from which they were removed. Only needed one wrench to do the job.
Side note: I was ready to throw the mower away during the annual citywide curbside pickup day, until I took one last look. All 6 parts I needed to replace were easily found on eReplacementParts.
This mower should be good for another 15 years!
Very pleased!
Side note: I was ready to throw the mower away during the annual citywide curbside pickup day, until I took one last look. All 6 parts I needed to replace were easily found on eReplacementParts.
This mower should be good for another 15 years!
Very pleased!
Did you find this story helpful?
Thanks for voting and helping fellow customers!
Old lawnmower blade, and broken fan
James - April 12, 2018
Tool Type
Lawn Mower
Difficulty
Easy
Time
Less than 15 minutes
Tools Used
Socket set, Adjustable Wrench
Removed bolt holding blade and removed: blade, fan and blade spacer.
Installed new blade spacer, fan, blade, and hex nut.
Done! Super easy, and the parts were perfect. Should have done this years ago.
Installed new blade spacer, fan, blade, and hex nut.
Done! Super easy, and the parts were perfect. Should have done this years ago.
Did you find this story helpful?
Thanks for voting and helping fellow customers!
Elec fan blade broken, & missing parts
John - April 12, 2018
Tool Type
Lawn Mower
Difficulty
Easy
Time
15-30 minutes
Tools Used
Socket set
Did you find this story helpful?
Thanks for voting and helping fellow customers!
Lawn mower was vibrating and making loud noise.
Terry - February 15, 2018
Tool Type
Lawn Mower
Difficulty
Easy
Time
15-30 minutes
Tools Used
Screwdriver, Socket set, Wrench Set
1. Removed the blade and all associated parts including spacer & fan.
2. Replace Fan spacer and blade tighten all bolts and run engine.
2. Replace Fan spacer and blade tighten all bolts and run engine.
Did you find this story helpful?
Thanks for voting and helping fellow customers!
Load More Install Stories
OEM stands for Original Equipment Manufacturer and means the part you’re buying is sourced directly from the manufacturer who made your product. At eReplacementParts, we sell only genuine OEM parts, guaranteeing the part you’re purchasing is of better design and of higher quality than aftermarket parts.
Our product descriptions are a combination of data sourced directly from the manufacturers who made your product as well as content researched and curated by our content & customer service teams. This content is edited and reviewed internally before being made public to customers.
Our customer service team are at the ready daily to answer your part and product questions. We have a dedicated staff with decades of collective experience in helping customers just like you purchase parts to repair their products.
All our part reviews are solicited directly from other customers who have purchased this exact part. While we moderate these reviews for profanity, offensive language or personally identifiable information, these reviews are posted exactly as submitted and no alterations are made by our team.
All our customer repair instructions are solicited directly from other customers just like you who have purchased and replaced this exact part. While we moderate these reviews for profanity, offensive language or personally identifiable information, these reviews are posted exactly as submitted and no alterations are made by our team.
Based on data from past customer purchasing behaviors, these parts are most commonly purchased together along with the part you are viewing. These parts may be necessary or helpful to replace to complete your current repair.
All our installation videos are created and produced in collaboration with our in-house repair technician, Mark Sodja, who has helped millions of eReplacementParts customers over the last 13 years repair their products. Mark has years of experience in selling and repairing both commercial and residential products with a specialty in gas-powered equipment.
This data is collected from customers who submitted a repair instruction after replacing this exact part. Customers can rate how easy the repair was to complete and how long it took. We aggregate this data to provide a repair rating that allows customers to quickly determine the difficulty and time needed to perform their own repair.