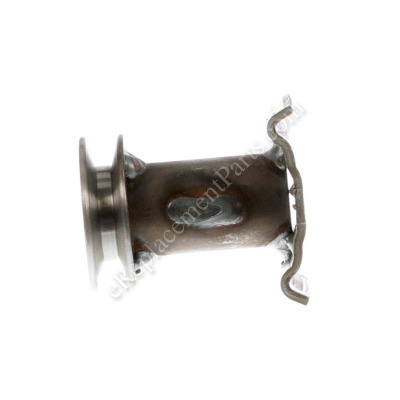
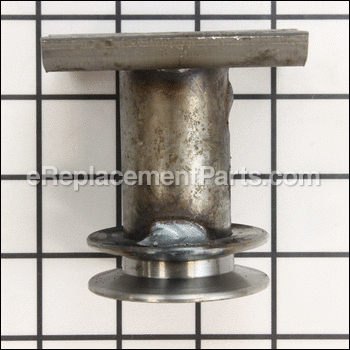
The metal blade driver assembly attaches to the blade with the guide belt wrapped around it. The spacer will go inside the driver. This part is used in lawn mowers. If the lawn mower wheels will not turn you may need to replace the blade driver. A wrench will be needed to replace this part if it becomes damaged. The driver is available as an individual replacement item and is an original Toro part.
Blade Driver Asm 106-3987
OEM part for: Toro
Part Number: 106-3987
Jump To:
Frequently Purchased Together ?
Compatibility
This Blade Driver Asm will fit the following 619 machines. Confirm this part works with your model, and view the detailed model diagrams and repair help we have to offer.
This item works with the following types of products:
- Lawn Mower Parts
Repair Videos ?
Customer Part Reviews ?
- 1
Questions & Answers ?
Our customer Service team is at the ready daily to answer your part and product questions.

Ask our Team
We have a dedicated staff with decades of collective experience in helping customers just like you purchase parts to repair their products.
Does this fit my product?Questions & Answers for Blade Driver Asm
Customer Repair Instructions ?
All our customer repair instructions are solicited directly from other customers just like you who have purchased and replaced this exact part.
Blade driver arm split and lost keyway structure.
Tool Type
Lawn Mower
Difficulty
Medium
Time
15-30 minutes
Tools Used
Socket set, Dead Blow Hammer
Parts Used
Worn drive belt pulley (made belt replacement ineffective).
Tool Type
Lawn Mower
Difficulty
Hard
Time
15-30 minutes
Tools Used
Socket set, Gear puller, propane torch
Parts Used
2. Attach gear puller to blade driver assembly (pulley) utilize the blade bolt as a place to set the puller center button.
3. Apply pressure with a wrench to the puller. The puller may or may not be adequate to remove the pulley. In which case apply heat to the pulley assembly just on the sleeve portion of the assembly in front of the pulley. Keep the heat away from the crankcase to avoid heat damage to the seal.
4. Upon removal of the old assembly, you will find a special spacer inside of it required for the new assembly. It may fall out or you may have to tap it out, but remember you will need it.
5. Reverse the procedure for assembling, use a little anti-seize on the crankshaft and use the blade bolt to draw the driver assembly onto the crankshaft.
Self drive was not working properly.
Tool Type
Lawn Mower
Difficulty
Easy
Time
15-30 minutes
Tools Used
Screwdriver, Socket set, Gear puller
2. Put the new ones on.
3. Had to use a gear puller to remove blade drive assembly.
Blade drive assembly
Tool Type
Lawn Mower
Difficulty
Medium
Time
15-30 minutes
Tools Used
Socket set, 32oz hammer
hammer like a mad because of short stroke clearance. ( yes I tried prying with 2x4 and crowbar, dont own a puller big enough). Upon removal I inspected and cleaned the shaft then lubricated it with greaseless spray, inserted the spacer into new drive and aligned the key way and it pushed on about an inch before it stopped cold, placed 2x4 on drive and hit it with aforementioned 32oz hammer like it owed me money, and drive slid right on. Hooked belt and installed blade in the usual way and righted the mower. Let the mower sit for a couple of hours to allow oil to settle, checked oil and gas then cut the grass. BTW pull the plug wire whenever I work on blade end stuff and use cardboard to catch any fluid when turned on side. All in all a $42 repair job on an 8 year old mower beats $400 for a new one.
Shield was old and worn and broken
Tool Type
Lawn Mower
Difficulty
Easy
Time
Less than 15 minutes
Tools Used
Pliers
Parts Used
Lawn mower was not self-propelling properly
Tool Type
Lawn Mower
Difficulty
Medium
Time
1-2 hours
Tools Used
Pliers, Socket set, Wrench Set
Parts Used
BLADE DRIVER ADAPTER NEEDED REPLACED ALONG WITH A NEW CUTTING BLADE
Tool Type
Lawn Mower
Difficulty
Easy
Time
30-60 minutes
Tools Used
Socket set, HAMMER TO REMOVE OLD DRIVER ADAPTER
Struck a rock and ruined the original blade and drive coupling keyway hub for the front wheel drive
Tool Type
Lawn Mower
Difficulty
Easy
Time
15-30 minutes
Tools Used
Socket set
Blade driver became loose because of a loose bolt and damaged the blade driver assembly and blade bolt.
Tool Type
Lawn Mower
Difficulty
Easy
Time
Less than 15 minutes
Tools Used
Screwdriver, Wrench Set
Blade driver asm broke. Went to sharpen lawn mower and realized spacer-driver was broke and blade driver assembly was broke.
Tool Type
Lawn Mower
Difficulty
Easy
Time
Less than 15 minutes
Tools Used
Socket set
Parts diagram for replacement parts was a great help.
OEM stands for Original Equipment Manufacturer and means the part you’re buying is sourced directly from the manufacturer who made your product. At eReplacementParts, we sell only genuine OEM parts, guaranteeing the part you’re purchasing is of better design and of higher quality than aftermarket parts.
Our product descriptions are a combination of data sourced directly from the manufacturers who made your product as well as content researched and curated by our content & customer service teams. This content is edited and reviewed internally before being made public to customers.
Our customer service team are at the ready daily to answer your part and product questions. We have a dedicated staff with decades of collective experience in helping customers just like you purchase parts to repair their products.
All our part reviews are solicited directly from other customers who have purchased this exact part. While we moderate these reviews for profanity, offensive language or personally identifiable information, these reviews are posted exactly as submitted and no alterations are made by our team.
All our customer repair instructions are solicited directly from other customers just like you who have purchased and replaced this exact part. While we moderate these reviews for profanity, offensive language or personally identifiable information, these reviews are posted exactly as submitted and no alterations are made by our team.
Based on data from past customer purchasing behaviors, these parts are most commonly purchased together along with the part you are viewing. These parts may be necessary or helpful to replace to complete your current repair.
All our installation videos are created and produced in collaboration with our in-house repair technician, Mark Sodja, who has helped millions of eReplacementParts customers over the last 13 years repair their products. Mark has years of experience in selling and repairing both commercial and residential products with a specialty in gas-powered equipment.
This data is collected from customers who submitted a repair instruction after replacing this exact part. Customers can rate how easy the repair was to complete and how long it took. We aggregate this data to provide a repair rating that allows customers to quickly determine the difficulty and time needed to perform their own repair.


