
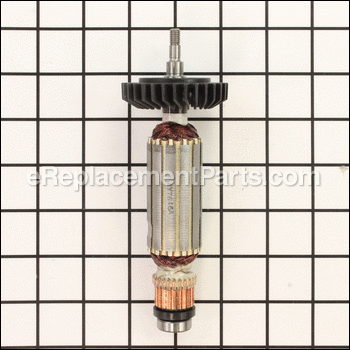
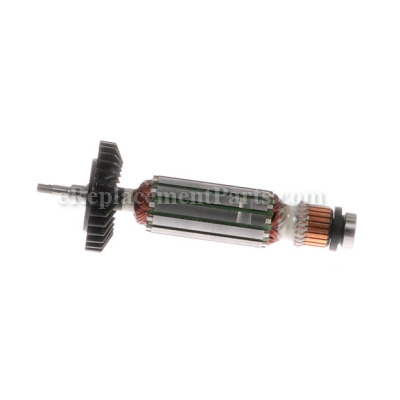


This is a genuine OEM sourced replacement part which is specially designed for Makita power tools. This is a complete assembly which is sold individually, keep in mind, it includes the armature, the fan, the armature bearing and the commutator end bearing. Due to constant contact with carbon brushes armature will eventually wear out and would need to be replaced to maintain peak performance. It is highly recommended to replace both carbon brushes when replacing an armature. Please make sure to refer to the appropriate diagrams of your model for the correct location and application of this component.
Armature Assembly 115v 517646-0
OEM part for: Makita
Part Number: 517646-0
$21.89
In Stock
Jump To:
Frequently Purchased Together ?

Compatibility
This part will fit the following 9 machines
Makita
GA4030K 4" Angle Grinder View Diagrams & Manuals
GA4530 4-1/2" Angle Grinder View Diagrams & Manuals
GA4534 Paddle Switch Angle Grinder View Diagrams & Manuals
PJ7000 Plate Joiner View Diagrams & Manuals
GA4030 4" Angle Grinder View Diagrams & Manuals
GA4530X Grinder View Diagrams & Manuals
GA5030K (Type 1) Grinder View Diagrams & Manuals
GA5030K (Type 2) Grinder View Diagrams & Manuals
GA5030K (Type 3) Grinder View Diagrams & Manuals
Show More Compatible Models
This item works with the following types of products:
- Grinder Parts
- Plate Joiner Parts
Repair Videos ?
Watch the Repair Video for
Armature Assembly 115v

Customer Part Reviews ?
Average Rating (out of 5):
Click to filter by ratings:
5 stars
1
4 stars
0
3 stars
0
2 stars
0
1 stars
0
< PREV
- 1
great parts great job
I just installed and working like new from factory if you need great parts my recommendation is eReplacementParts great service 👍 thank you guys for your service
iGlobal -
February 18, 2022
Verified Purchase
t
t
t -
t days ago
Verified Purchase
eReplacementParts Team
t
Questions & Answers ?
Our customer Service team is at the ready daily to answer your part and product questions.

Ask our Team
We have a dedicated staff with decades of collective experience in helping customers just like you purchase parts to repair their products.
Does this fit my product?Questions & Answers for Armature Assembly 115v
No questions have been asked yet
Customer Repair Instructions ?
All our customer repair instructions are solicited directly from other customers just like you who have purchased and replaced this exact part.
Armature had gotten wet, shorted at the brush contact pointed burning it.
Jack - November 15, 2015
👍 5 of 5 people found this instruction helpful
Tool Type
Grinder
Difficulty
Medium
Time
30-60 minutes
Tools Used
Screwdriver, Wrench Set
Parts Used
Remove one screw on cord end allowing cover to slide back over power cord exposing brushes and hold down springs, lift springs gently removed brushes. On grinder end removed 4 screws removing grinder wheel shaft, remover armature end shaft nut, remove 4 screws holding front housing along with old armature replace in reverse order using light oil on brush end of new armature only at bearing seal to help it slide in. Of course check before installing for dirt or debris that might impede assembly.
Did you find this story helpful?
Thanks for voting and helping fellow customers!
Armature was missing a big section
Jim - July 25, 2017
👍 4 of 4 people found this instruction helpful
Tool Type
Grinder
Difficulty
Medium
Time
15-30 minutes
Tools Used
Screwdriver, Pliers, 10mm open end wrench
Remove grinder head, remove brush cover, (1 screw at cord end) remove 10mm nut from head end. Remove both brushes. Install new armature, install grinder head, install new brushes, install brush cover. After all that, I turned on and it jerked 2 times, tried to start. But failed. I then removed brush cover & inspected brushes. I could see the brush holders were bent, possibly from hitting the old armature section. Slightly adjusted brush holders so brushes would contact armature all the way. Reinstalled & it worked great!
Did you find this story helpful?
Thanks for voting and helping fellow customers!
Armature and brushes were burnt out.1
Jimmy - September 1, 2018
👍 3 of 3 people found this instruction helpful
Tool Type
Grinder
Difficulty
Easy
Time
15-30 minutes
Tools Used
Screwdriver, Pliers, Wrench Set, 90 degree pick to pull back brush springs.
1. Opened up Makita grinder.
2. Removed 10mm but to separate armature from drive gear.
3. Removed both brush hold down springs with pick.
4. Removed both brushes.
5 Removed armature.
6. Installed new armature.
7. Installed brushes and placed hold down springs onto brushes.
8. Installed drive gear and nut on new armature.
9. Closed up grinder housing.
10. Tested grinder which worked great.
Did you find this story helpful?
Thanks for voting and helping fellow customers!
All the smoke escaped from the motor
Chris - March 3, 2019
👍 1 of 1 people found this instruction helpful
Tool Type
Grinder
Difficulty
Easy
Time
15-30 minutes
Tools Used
Screwdriver, Pliers, Wrench Set, volt meter
The grinder was overloaded on low voltage and overheated. The first thing I did was to determine if the grinder was worth fixing. I took the gear head apart to look at the gears. They looked perfect, so I proceeded with the repair.
1. Remove the end cap at the cord end.
2. Lift the brush spring off the brushes and extract and inspect the brushes. Looked good.
3. Remove 4 screws holding the gear case to the body, and pull the head and armature out.
4. Remove the nut hoding the spur gear on the armature and pull it from the case. The armature had small black holes in the windings where the smoke escaped. Inspect the field windings. Check for shorts between the wires and the case. None found. Looks like a good candidate for repair.
Order the parts (armature). Wait a few days for shippment, ressemble in reverse order.
Plug it in and look for more smoke. None found. Great inexpensive repair.
Did you find this story helpful?
Thanks for voting and helping fellow customers!
Armature burnt up where brushes make contact
michael - August 23, 2017
👍 2 of 3 people found this instruction helpful
Tool Type
Grinder
Difficulty
Easy
Time
15-30 minutes
Tools Used
Screwdriver, Wrench Set, Hammer, vise
Removed handle this is held on by 4 screws and it allowed me to see burnt armature . Removed 4 more screw to separate head and gear assembly. Removed nut at the top of armature to release gear and pull top of armature through head assembly. Released spring tension on brushes disconnected brush wire contact and pulled brushes out and replaced installed armature back into head assembly reinstalled gear nut and put handle back on then released brushes installed 4 screws.
Did you find this story helpful?
Thanks for voting and helping fellow customers!
Armature burned out.
Richard - April 11, 2022
Tool Type
Grinder
Difficulty
Easy
Time
15-30 minutes
Tools Used
Screwdriver
Parts Used
Removed old armature and replaced with new one.
Did you find this story helpful?
Thanks for voting and helping fellow customers!
OEM stands for Original Equipment Manufacturer and means the part you’re buying is sourced directly from the manufacturer who made your product. At eReplacementParts, we sell only genuine OEM parts, guaranteeing the part you’re purchasing is of better design and of higher quality than aftermarket parts.
Our product descriptions are a combination of data sourced directly from the manufacturers who made your product as well as content researched and curated by our content & customer service teams. This content is edited and reviewed internally before being made public to customers.
Our customer service team are at the ready daily to answer your part and product questions. We have a dedicated staff with decades of collective experience in helping customers just like you purchase parts to repair their products.
All our part reviews are solicited directly from other customers who have purchased this exact part. While we moderate these reviews for profanity, offensive language or personally identifiable information, these reviews are posted exactly as submitted and no alterations are made by our team.
All our customer repair instructions are solicited directly from other customers just like you who have purchased and replaced this exact part. While we moderate these reviews for profanity, offensive language or personally identifiable information, these reviews are posted exactly as submitted and no alterations are made by our team.
Based on data from past customer purchasing behaviors, these parts are most commonly purchased together along with the part you are viewing. These parts may be necessary or helpful to replace to complete your current repair.
All our installation videos are created and produced in collaboration with our in-house repair technician, Mark Sodja, who has helped millions of eReplacementParts customers over the last 13 years repair their products. Mark has years of experience in selling and repairing both commercial and residential products with a specialty in gas-powered equipment.
This data is collected from customers who submitted a repair instruction after replacing this exact part. Customers can rate how easy the repair was to complete and how long it took. We aggregate this data to provide a repair rating that allows customers to quickly determine the difficulty and time needed to perform their own repair.