
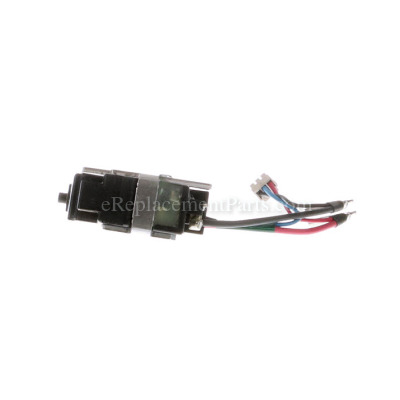


This trigger switch is an authentic replacement part from original manufacturer. It is compatible with various models of Makita handheld power tools including impact drivers and impact wrenches. This item sold individually. Note that F/R change lever is sold separately.
Switch Tg553fsb-1 650564-0
OEM part for: Makita
Part Number: 650564-0
$48.58
In Stock
Jump To:
Frequently Purchased Together ?
Compatibility
This part will fit the following 53 machines
Makita
BTD130FW Impact Driver View Diagrams & Manuals
BTD140 Impact Driver View Diagrams & Manuals
BTD142 18V Compact Lithium-Ion Cordless Impact Driver View Diagrams & Manuals
BTW251 18V LXT Lithium-Ion Cordless 1/2" Impact Wrench View Diagrams & Manuals
BTD141 18V LXT Lithium-Ion Cordless Impact Driver View Diagrams & Manuals
BTW253 18V LXT Lithium-Ion Cordless 3/8" Impact Wrench View Diagrams & Manuals
BTD141Z 18V LXT Lithium-Ion Cordless Impact Driver View Diagrams & Manuals
BTD130FSFEW (Type 1) Drill / Driver View Diagrams & Manuals
BTD130FSFEW (Type 2) Drill / Driver View Diagrams & Manuals
BTD130FSFEW (Type 3) Drill / Driver View Diagrams & Manuals
BTD130F (Type 1) Drill / Driver View Diagrams & Manuals
BTD130F (Type 2) Drill / Driver View Diagrams & Manuals
BTD130F (Type 3) Drill / Driver View Diagrams & Manuals
BTD130FZ (Type 1) Drill / Driver View Diagrams & Manuals
BTD130FZ (Type 2) Drill / Driver View Diagrams & Manuals
BTD130FZ (Type 3) Drill / Driver View Diagrams & Manuals
BTD140 (Type 1) Drill / Driver View Diagrams & Manuals
BTD140 (Type 2) Drill / Driver View Diagrams & Manuals
BTD140 (Type 3) Drill / Driver View Diagrams & Manuals
BTD140Z (Type 1) Drill / Driver View Diagrams & Manuals
BTD140Z (Type 2) Drill / Driver View Diagrams & Manuals
BTD140Z (Type 3) Drill / Driver View Diagrams & Manuals
BTD141H2 (Type 1) Drill / Driver View Diagrams & Manuals
BTD141H2 (Type 2) Drill / Driver View Diagrams & Manuals
BTD141H2 (Type 3) Drill / Driver View Diagrams & Manuals
BTD141HW (Type 1) Drill / Driver View Diagrams & Manuals
BTD141HW (Type 2) Drill / Driver View Diagrams & Manuals
BTD141HW (Type 3) Drill / Driver View Diagrams & Manuals
BTD141 (Type 1) Drill / Driver View Diagrams & Manuals
BTD141 (Type 2) Drill / Driver View Diagrams & Manuals
BTD141 (Type 3) Drill / Driver View Diagrams & Manuals
BTD141Z (Type 1) Drill / Driver View Diagrams & Manuals
BTD141Z (Type 2) Drill / Driver View Diagrams & Manuals
BTD141Z (Type 3) Drill / Driver View Diagrams & Manuals
BTD142H (Type 1) Drill / Driver View Diagrams & Manuals
BTD142H (Type 2) Drill / Driver View Diagrams & Manuals
BTD142HW (Type 1) Drill / Driver View Diagrams & Manuals
BTD142HW (Type 2) Drill / Driver View Diagrams & Manuals
BTS130 (Type 1) Drill / Driver View Diagrams & Manuals
BTS130 (Type 2) Drill / Driver View Diagrams & Manuals
BTW250 (Type 1) Drill / Driver View Diagrams & Manuals
BTW250 (Type 3) Drill / Driver View Diagrams & Manuals
BTW250Z (Type 1) Drill / Driver View Diagrams & Manuals
BTW250Z (Type 3) Drill / Driver View Diagrams & Manuals
BTW251F (Type 1) Drill / Driver View Diagrams & Manuals
BTW251FX1 (Type 1) Drill / Driver View Diagrams & Manuals
BTW251 (Type 1) Drill / Driver View Diagrams & Manuals
BTW251X (Type 1) Drill / Driver View Diagrams & Manuals
BTW251Z (Type 1) Drill / Driver View Diagrams & Manuals
BTW251ZX1 (Type 1) Drill / Driver View Diagrams & Manuals
BTW253F (Type 1) Drill / Driver View Diagrams & Manuals
BTW253 (Type 1) Drill / Driver View Diagrams & Manuals
BTW253Z (Type 1) Drill / Driver View Diagrams & Manuals
Show More Compatible Models
This item works with the following types of products:
- Impact Driver Parts
- Impact Wrench Parts
Customer Part Reviews ?
Average Rating (out of 5):
Click to filter by ratings:
5 stars
1
4 stars
0
3 stars
0
2 stars
0
1 stars
0
< PREV
- 1
Easy swap
Replacing the switch was actually easier than replacing the gun if you figure in the time to go to the store, pick it.... With the new switch and brushes the screw gun works as good as new for pennies compared to a new gun.
Jeff -
August 28, 2019
Verified Purchase
t
t
t -
t days ago
Verified Purchase
eReplacementParts Team
t
Questions & Answers ?
Our customer Service team is at the ready daily to answer your part and product questions.

Ask our Team
We have a dedicated staff with decades of collective experience in helping customers just like you purchase parts to repair their products.
Does this fit my product?Questions & Answers for Switch Tg553fsb-1
No questions have been asked yet
Customer Repair Instructions ?
All our customer repair instructions are solicited directly from other customers just like you who have purchased and replaced this exact part.
Impact was working intermittently.
ABRAM - April 30, 2016
👍 2 of 2 people found this instruction helpful
Tool Type
Impact Driver
Difficulty
Easy
Time
15-30 minutes
Tools Used
Screwdriver
Parts Used
Remove the rear cover, then remove the screws from the housings. Remove one half of the housing. Take a picture of the internal parts so you know where they go. Make a wiring diagram. Remove the wires from the old switch and connect them to the new switch. Make sure all the parts are where they should be. Then Screw the housings together and attach the rear cover
Did you find this story helpful?
Thanks for voting and helping fellow customers!
No variable speed
Scott - December 17, 2015
👍 2 of 2 people found this instruction helpful
Tool Type
Impact Driver
Difficulty
Easy
Time
Less than 15 minutes
Tools Used
Screwdriver, Pliers
Parts Used
Split impact driver housing take a picture or make a wiring diagram of how the switch is wired. Remove old switch and replace with new one.
Did you find this story helpful?
Thanks for voting and helping fellow customers!
Switch stuck in reverse only
Daniel - April 30, 2017
👍 2 of 3 people found this instruction helpful
Tool Type
Impact Driver
Difficulty
Easy
Time
Less than 15 minutes
Tools Used
Screwdriver
Parts Used
Unscrewed the two halves of the housing.
Made a wiring diagram
Changed out switches
Then screwed the two halves back together
Made a wiring diagram
Changed out switches
Then screwed the two halves back together
Did you find this story helpful?
Thanks for voting and helping fellow customers!
I previously had ordered a new brush assembly and the case .I didn't repair at that time .I. Rigged one of the brushes to work.
Dan - February 22, 2022
Tool Type
Impact Wrench
Difficulty
Easy
Time
15-30 minutes
Tools Used
Screwdriver, Pliers
SonI previously had orderd a new case and brush assembly . I didn't replace those parts at that time .Then the switch started failing So I ordered a new switch and rear cover . So I disassembled my 3\8 impact that is about 5 years old .Cleaned everything and reinstalled all new componets into the new case .I also sanded the end of the motor with some 400 grit sandpaper cleaned down between the poles .Works like a new one.db
Did you find this story helpful?
Thanks for voting and helping fellow customers!
Makita impact driver only had high speed
Wes - April 6, 2019
Tool Type
Impact Driver
Difficulty
Easy
Time
30-60 minutes
Tools Used
Screwdriver, Pliers, Gentle air bower & a tissue or paper towel
Parts Used
1. Remove 2 screws & remove rear cover. (Small Phillips screw driver)
2. Remove screws to split driver in half.
3. Disconnect & remove defective variable switch.
4. Clean & wipe parts
5. Connect & install new switch.
6. Put together with screws.
Hmm, this is kind of easy, a child could do it, so have fun with it.
2. Remove screws to split driver in half.
3. Disconnect & remove defective variable switch.
4. Clean & wipe parts
5. Connect & install new switch.
6. Put together with screws.
Hmm, this is kind of easy, a child could do it, so have fun with it.
Did you find this story helpful?
Thanks for voting and helping fellow customers!
Lost variable speed
Mary - February 14, 2019
Tool Type
Impact Driver
Difficulty
Easy
Time
15-30 minutes
Tools Used
Screwdriver
Parts Used
All you need is a screwdriver and maybe some needle nose pliers. I needed to drill out one rusted screw head but that happened as quick as I could put a drill in the gun.
Did you find this story helpful?
Thanks for voting and helping fellow customers!
OEM stands for Original Equipment Manufacturer and means the part you’re buying is sourced directly from the manufacturer who made your product. At eReplacementParts, we sell only genuine OEM parts, guaranteeing the part you’re purchasing is of better design and of higher quality than aftermarket parts.
Our product descriptions are a combination of data sourced directly from the manufacturers who made your product as well as content researched and curated by our content & customer service teams. This content is edited and reviewed internally before being made public to customers.
Our customer service team are at the ready daily to answer your part and product questions. We have a dedicated staff with decades of collective experience in helping customers just like you purchase parts to repair their products.
All our part reviews are solicited directly from other customers who have purchased this exact part. While we moderate these reviews for profanity, offensive language or personally identifiable information, these reviews are posted exactly as submitted and no alterations are made by our team.
All our customer repair instructions are solicited directly from other customers just like you who have purchased and replaced this exact part. While we moderate these reviews for profanity, offensive language or personally identifiable information, these reviews are posted exactly as submitted and no alterations are made by our team.
Based on data from past customer purchasing behaviors, these parts are most commonly purchased together along with the part you are viewing. These parts may be necessary or helpful to replace to complete your current repair.
All our installation videos are created and produced in collaboration with our in-house repair technician, Mark Sodja, who has helped millions of eReplacementParts customers over the last 13 years repair their products. Mark has years of experience in selling and repairing both commercial and residential products with a specialty in gas-powered equipment.
This data is collected from customers who submitted a repair instruction after replacing this exact part. Customers can rate how easy the repair was to complete and how long it took. We aggregate this data to provide a repair rating that allows customers to quickly determine the difficulty and time needed to perform their own repair.