eReplacementParts.com
877-346-4815
DeWALT Parts
Repair Parts Home
  
Power Tool Parts
  
DeWALT Parts
  N003306SV Pressure Switch

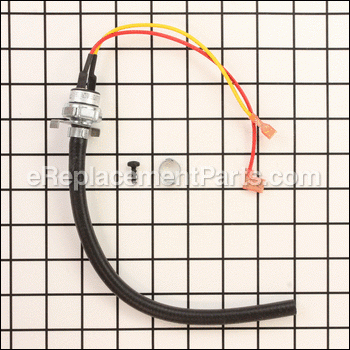
Pressure Switch N003306SV

OEM part for: DeWALT

Part Number: N003306SV


Install
Videos!
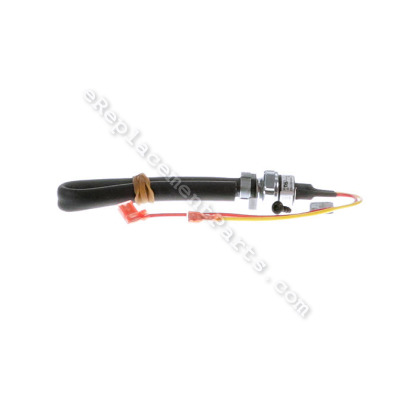
Pressure Switch - N003306SV:DeWALT 360 View
Pressure Switch - N003306SV:DeWALTPressure Switch - N003306SV:DeWALTPressure Switch - N003306SV:DeWALT 360 View
In Stock
Ships within 1 business day
Easy 15-30 minutes (23 rated repairs)?
OEM: Original Equipment Manufacturer ?
DeWALT
Does this d-block d-md-none fit my product?

Product Description ?

This is a Genuine Manufacturer Approved replacement part designed to work with some DeWALT Air Compressors. The pressure switch tells your compressor when to stop and when to start. There are multiple reasons a Pressure Switch could be leaking air. If it is leaking air the Pressure Switch should be replaced for a compressor to operate properly and safely.

Includes: Pressure Switch, 2 Leads, Attached Hose, Hose Clamp, Mounting Screw.

  • Classification: Part
  • Weight: 0.20 lbs.
  • Shipping: Ships Worldwide

Frequently Purchased Together ?

Compatibility

This part will fit the following 6 machines

DeWALT

D55141 Type 1 Compressor View Diagrams & Manuals
D55141 Type 2 Compressor View Diagrams & Manuals
D55141 Type 3 Compressor View Diagrams & Manuals
D55141 Type 4 Compressor View Diagrams & Manuals
D55141 Type 5 Compressor View Diagrams & Manuals
D55141 (Type 6) Compressor Power Tool View Diagrams & Manuals
Show More Compatible Models
Don't see yours? Try searching our site for :

This item works with the following types of products:

  • Compressor Parts

This part replaces obsolete part #: N003306

Customer Part Reviews ?

4.9
Average Rating (out of 5):
8 Reviews
Click to filter by ratings:
5 stars
7
4 stars
1
3 stars
0
2 stars
0
1 stars
0
  • Highest Rating
  • Most Recent
< PREV
  • 1
NEXT >
  • Perfect parts
    The perfect part, arrived quick, was easy to find and order.
    Guest - March 6, 2024 Verified Purchase
    This was the exact part I needed.
    This part was the one I needed even after the manufacturer's service center told me they could not repair my compressor. Came with easy to read installation instructions too! Thank you.
    Guest - March 1, 2023 Verified Purchase
    good service
    Arrived on time and worked as expected
    Guest - January 4, 2021 Verified Purchase
    First off, great site for us old timers, easy navigation, and ordering process. Part came quickly and I installed as per Inclosed directions. Have used them before and will again, cheaper than the real big e-commerce business.
    Great part
    Brian - July 16, 2020 Verified Purchase
    Easy repair
    Came quick, easy fix
    Guest - November 29, 2019 Verified Purchase
    Repair compressors
    Part received was identical to defective one rep that handled order was great once installed unit worked like new . Thanks
    Guest - October 28, 2019 Verified Purchase
    Perfect
    Worked exactly as specified. Perfect.
    Guest - June 20, 2019 Verified Purchase
    worked as expected
    I got it quick compressor runs again
    Guest - August 28, 2019 Verified Purchase
    t
    t
    t - t days ago Verified Purchase
    eReplacementParts Team
    t

    Questions & Answers ?

    Our customer Service team is at the ready daily to answer your part and product questions.

    photo of team member
    Ask our Team

    We have a dedicated staff with decades of collective experience in helping customers just like you purchase parts to repair their products.

    Does this fit my product?

    Questions & Answers for Pressure Switch


    What is the on off pressure for this switch it would be nice if it was in the description
    Mike for model number D55146 asked on 2022-12-28
    Hello Mike, Thank you for your inquiry. We show that this part is set for 120-150 PSI, but does not show as compatible to the model number that you have provided. The compatible pressure switch is part# AB-9063158. Good luck with your repair.
    eReplacementParts Team December 28, 2022

    Customer Repair Instructions ?

    All our customer repair instructions are solicited directly from other customers just like you who have purchased and replaced this exact part.

    Easy 15-30 minutes (23 rated repairs)?

    Replace pressure switch due to condensation

    Len - May 5, 2016
    👍 19 of 22 people found this instruction helpful
    Tool Type

    Compressor

    Difficulty

    Easy

    Time

    15-30 minutes

    Tools Used

    Screwdriver, Nutdriver, Adjustable Wrench, Crimper

    Remove cover plate from compressor. Remove retaining screw and slide motor assembly out of compressor housing. remove 4 screws from the motor unit and separate the two halves of the plastic motor housing. Cut and detach the air line from the manifold to the pressure switch. remove screw holding pressure switch in and remove switch. Disconnect the wires from the power switch and the motor that go to the old pressure switch. replace with the same wires from the new switch. Put switch and retaining screw back into the motor housing. connect the air line from the pressure switch to the manifold and crimp the metal hose clamp. Reassemble the motor housing and install it back into the compressor housing. Screw the metal cover plate back on the compressor. Test compressor.
    Did you find this story helpful?
    Thanks for voting and helping fellow customers!

    Pressure switch quit working

    Richard - February 12, 2017
    👍 11 of 12 people found this instruction helpful
    Tool Type

    Compressor

    Difficulty

    Easy

    Time

    15-30 minutes

    Tools Used

    Screwdriver, Pliers, Nutdriver

    https://www.youtube.com/watch?v=XC5knqVm66k
    This is the link to a repair video that showed me how to replace the pressures switch. Thank you.
    Did you find this story helpful?
    Thanks for voting and helping fellow customers!

    Pressure switch failed; compressor would not shut off when up to pressure.

    H - November 12, 2017
    👍 2 of 2 people found this instruction helpful
    Tool Type

    Compressor

    Difficulty

    Medium

    Time

    15-30 minutes

    Tools Used

    Screwdriver, Socket set, Torx drivers, end cutters.

    Remove the top panel for easier access to the manifold.
    Disconnect the pressure switch hose from the manifold.
    Disconnect the second hose to the manifold.
    Removed the compressor unit from the frame.
    Opened the plastic enclosure and removed the compressor.
    Removed the old pressure switch and disconnected its two spade connectors.
    Install and connect the new pressure switch. (Removal and replacement was one screw.)
    Install the compressor back into the enclosure and install 5 torx screws.
    Install the compressor unit back into the frame.
    Connect the "second hose" to the manifold - do before fully sliding the compressor in.
    Slide the compressor unit fully into its mounts in the frame and secure with the lock screw.
    Reconnect the hose from the pressure switch to the manifold.
    Re-mount the top plate to the frame and the manifold to the top plate.
    Plug it in, start it up, let it come up to pressure and make sure it shuts off at 150 psi.
    Bleed off some air and make sure the compressor starts at about 120 psi.
    You're done!


    Did you find this story helpful?
    Thanks for voting and helping fellow customers!

    Needed new pressure switch

    Peter - May 26, 2016
    👍 3 of 4 people found this instruction helpful
    Tool Type

    Compressor

    Difficulty

    Easy

    Time

    30-60 minutes

    Tools Used

    Screwdriver, Pliers, Plumbers crimping tool worked better than hose claps

    By following the installation instructions included with the pressure switch. I had my compressor up and running on no time.
    Did you find this story helpful?
    Thanks for voting and helping fellow customers!

    Pressure switch

    JIMMY - November 9, 2017
    👍 1 of 1 people found this instruction helpful
    Tool Type

    Compressor

    Difficulty

    Medium

    Time

    30-60 minutes

    Tools Used

    Screwdriver, Pliers, Power Drill, Wrench Set

    Remove compressor from housing / split compressor casing /remove n replace pressure switch/install compressor n housing / did run ck compressor cut off @ 150 psi all's well
    Did you find this story helpful?
    Thanks for voting and helping fellow customers!

    Would trip overflow and not cut off

    Benjamin - April 2, 2024
    Tool Type

    Compressor

    Difficulty

    Medium

    Time

    30-60 minutes

    Tools Used

    Screwdriver, Socket set

    Un bolt the motor from frame. Remove air hose st pull out the motor. Unscrew the motor housing. Open up and unplug electrical wires. One screw to pull out old compressor switch. Install new one and put housing all together. I had issues with the hose clamps, so I put on screw hose clamps. Replaced the motor back in frame. Bolted back in.
    Works like new.
    Did you find this story helpful?
    Thanks for voting and helping fellow customers!

    compressor failed to exceed 150psi to activate the high pressure cutoff.

    Alan - October 24, 2023
    Tool Type

    Compressor

    Difficulty

    Medium

    Time

    15-30 minutes

    Tools Used

    Screwdriver, Nutdriver

    1 watch youtube videos to familiarize me with the task.
    2. read the instructions sent with the part.
    3. disassembled the unit to remove and replace the defective part.
    4. reassembled the unit and tested.
    Did you find this story helpful?
    Thanks for voting and helping fellow customers!

    Compressor ran until pressure got too high and release valve opened

    Thomas - December 15, 2020
    Tool Type

    Compressor

    Difficulty

    Medium

    Time

    30-60 minutes

    Tools Used

    Screwdriver, Pliers, Crimp tool and torx screwdrivers

    Followed instructions provided with new pressure switch.
    1. Opened case and removed old switch and hose (torx screwdriver and pliers)
    2. Installed new switch
    3. Closed case and attached new hose with crimping pliers
    4. Compressor works like new

    PS. The old compressor pressure switch became rusty and stopped working because the tank was not vented/drained when not in use.
    Did you find this story helpful?
    Thanks for voting and helping fellow customers!

    Pressure Switch was disfective would not shot off

    Gerald - July 16, 2020
    Tool Type

    Compressor

    Difficulty

    Easy

    Time

    15-30 minutes

    Tools Used

    Screwdriver, Star wrench, screw driver

    Removed compressor, Remove covers, replace pressure switch.
    Did you find this story helpful?
    Thanks for voting and helping fellow customers!

    Pressure switch replacement

    Ronald - April 8, 2020
    Tool Type

    Compressor

    Difficulty

    Medium

    Time

    30-60 minutes

    Tools Used

    Screwdriver, Adjustable Wrench, Knife and dykes to tighten the clamp

    Split the casing with s screwdriver,cut the old pressure line,removed the old pressure switch and replaced..assemble.. note: pay attention to the position of the wiring and switch due to new switch has different color on one wire so if you pay attention it is easy to install correctly
    Did you find this story helpful?
    Thanks for voting and helping fellow customers!

    OEM stands for Original Equipment Manufacturer and means the part you’re buying is sourced directly from the manufacturer who made your product. At eReplacementParts, we sell only genuine OEM parts, guaranteeing the part you’re purchasing is of better design and of higher quality than aftermarket parts.

    Our product descriptions are a combination of data sourced directly from the manufacturers who made your product as well as content researched and curated by our content & customer service teams. This content is edited and reviewed internally before being made public to customers.

    Our customer service team are at the ready daily to answer your part and product questions. We have a dedicated staff with decades of collective experience in helping customers just like you purchase parts to repair their products.

    All our part reviews are solicited directly from other customers who have purchased this exact part. While we moderate these reviews for profanity, offensive language or personally identifiable information, these reviews are posted exactly as submitted and no alterations are made by our team.

    All our customer repair instructions are solicited directly from other customers just like you who have purchased and replaced this exact part. While we moderate these reviews for profanity, offensive language or personally identifiable information, these reviews are posted exactly as submitted and no alterations are made by our team.

    Based on data from past customer purchasing behaviors, these parts are most commonly purchased together along with the part you are viewing. These parts may be necessary or helpful to replace to complete your current repair.

    All our installation videos are created and produced in collaboration with our in-house repair technician, Mark Sodja, who has helped millions of eReplacementParts customers over the last 13 years repair their products. Mark has years of experience in selling and repairing both commercial and residential products with a specialty in gas-powered equipment.

    This data is collected from customers who submitted a repair instruction after replacing this exact part. Customers can rate how easy the repair was to complete and how long it took. We aggregate this data to provide a repair rating that allows customers to quickly determine the difficulty and time needed to perform their own repair.

    eReplacementParts.com
    7174 South 400 West
    Suite 5
    Midvale, UT 84047
    visa mastercard discover american express PayPal