


This is an authentic OEM part for use with Craftsman Leaf Blowers. The engine gasket set includes the major gaskets to replace when rebuilding the engine. The most common reasons for installing the kit are when the leaf blower won’t start or runs poorly. Here is a list of tools that are needed to replace the engine gasket kit. Needle nose pliers, T-27 Torx bit, Phillips head screwdriver and a flat head screwdriver. Let the engine cool before installing this part.
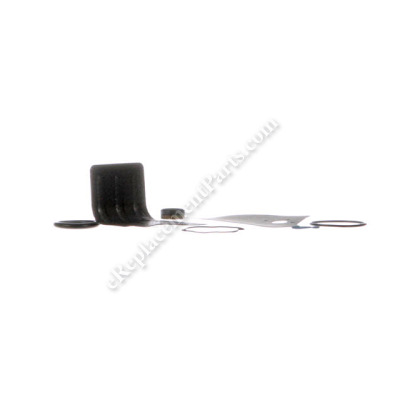
O-ring Gasket Kit 545081832
OEM part for: Craftsman
Part Number: 545081832
$18.68
In Stock
Jump To:
Frequently Purchased Together ?

Compatibility
This part will fit the following 35 machines
Craftsman
358794770 Gas Blower View Diagrams & Manuals
358794650 25Cc 210Mph / 450 Cfm Gas Blower View Diagrams & Manuals
358794600 25Cc 200 Mph / 430 Cfm Gas Blower View Diagrams & Manuals
358794780 Blower View Diagrams & Manuals
358794765 Blower View Diagrams & Manuals
358794774 Blower View Diagrams & Manuals
358794741 Blower View Diagrams & Manuals
358794773 Blower View Diagrams & Manuals
944518250 Blower View Diagrams & Manuals
944518252 Blower View Diagrams & Manuals
358794700 Blower View Diagrams & Manuals
358794701 Blower View Diagrams & Manuals
358794702 Blower View Diagrams & Manuals
358794703 Blower View Diagrams & Manuals
358794704 Blower View Diagrams & Manuals
358794730 Blower View Diagrams & Manuals
358794731 Blower View Diagrams & Manuals
358794732 Blower View Diagrams & Manuals
358794733 Blower View Diagrams & Manuals
358794740 Blower View Diagrams & Manuals
358794742 Blower View Diagrams & Manuals
358794743 Blower View Diagrams & Manuals
358794744 Blower View Diagrams & Manuals
358794750 Blower View Diagrams & Manuals
358794751 Blower View Diagrams & Manuals
358794760 Blower View Diagrams & Manuals
358794761 Blower View Diagrams & Manuals
358794762 Blower View Diagrams & Manuals
358794763 Blower View Diagrams & Manuals
358794764 Blower View Diagrams & Manuals
358794771 Blower View Diagrams & Manuals
358794772 Blower View Diagrams & Manuals
358794775 Blower View Diagrams & Manuals
358794776 Blower View Diagrams & Manuals
358794781 Blower View Diagrams & Manuals
Show More Compatible Models
This item works with the following types of products:
- Blower Parts
Questions & Answers ?
Our customer Service team is at the ready daily to answer your part and product questions.

Ask our Team
We have a dedicated staff with decades of collective experience in helping customers just like you purchase parts to repair their products.
Does this fit my product?Questions & Answers for O-ring Gasket Kit
No questions have been asked yet
Customer Repair Instructions ?
All our customer repair instructions are solicited directly from other customers just like you who have purchased and replaced this exact part.
head gasket blew out
Bruce - February 25, 2019
👍 1 of 1 people found this instruction helpful
Tool Type
Blower
Difficulty
Medium
Time
30-60 minutes
Tools Used
Screwdriver, modified allen wrench and torque head driver
Removed air cleaner,carburetor,intake manifold and muffler
Removed side cover for head side of engine
I modified allen wench (by grinding some off the wrench) so i could get head bolts out. Changed piston ring sense i was all ready right there to freshen up engine. Cleaned all parts, decarbon piston and cleaned ring groove with old ring (broke in half and ground 45 degrees angle on one end to clean groove out. Deglazed piston head bore with the finest sand paper i could find (did not take much) Lubed up moving parts (with a little bit of two cycle oil) and put the rest of engine back together.
Did you find this story helpful?
Thanks for voting and helping fellow customers!
head was lose
Bob - July 27, 2020
Tool Type
Blower
Difficulty
Easy
Time
30-60 minutes
Tools Used
Screwdriver, Nutdriver, Torque bit
Parts Used
removed head and replaced gasket. Cylinder and piston were shot so it ended up in garbage
Did you find this story helpful?
Thanks for voting and helping fellow customers!
Hesitated at throttle pull, hard to start.
Mark - September 16, 2019
Tool Type
Blower
Difficulty
Easy
Time
15-30 minutes
Tools Used
Screwdriver, Star driver
Removed air cleaner and carburetor with gasket.
Installed new gasket and new carburetor.
Installed new foam air cleaner.
Started blower and adjusted idle.
Works like brand new.
Installed new gasket and new carburetor.
Installed new foam air cleaner.
Started blower and adjusted idle.
Works like brand new.
Did you find this story helpful?
Thanks for voting and helping fellow customers!
Very hard to start
Dan - December 28, 2018
👍 1 of 2 people found this instruction helpful
Tool Type
Blower
Difficulty
Medium
Time
1-2 hours
Tools Used
Screwdriver, Pliers, Power Drill, Socket set, Wrench Set, Nutdriver, used broken ring to clean piston groove
Sears 25cc blower had a clogged piston/ring. Burnt oily/varnishy deposits Ring broke on disassembly, after cleaning the piston, new ring installed easily. New head seal fit correctly. This machine was free, who knows how it was treated. Runs well now!
Did you find this story helpful?
Thanks for voting and helping fellow customers!
Losing compression
Corey - August 14, 2016
👍 1 of 2 people found this instruction helpful
Tool Type
Blower
Difficulty
Medium
Time
15-30 minutes
Tools Used
Screwdriver, Pliers, Socket set, Wrench Set, Nutdriver
Parts Used
Had to remove cylinder head and replace head gasket (oring)
Did you find this story helpful?
Thanks for voting and helping fellow customers!
Trouble starting
John - December 30, 2018
👍 0 of 1 people found this instruction helpful
Tool Type
Blower
Difficulty
Medium
Time
More than 2 hours
Tools Used
Screwdriver, Socket set, Wrench Set, Cordless drill with various long extension bits
Parts Used
Took off cylinder head, carberator. O ring gasket kit had other parts with no explanation where all parts went!!
Did you find this story helpful?
Thanks for voting and helping fellow customers!
OEM stands for Original Equipment Manufacturer and means the part you’re buying is sourced directly from the manufacturer who made your product. At eReplacementParts, we sell only genuine OEM parts, guaranteeing the part you’re purchasing is of better design and of higher quality than aftermarket parts.
Our product descriptions are a combination of data sourced directly from the manufacturers who made your product as well as content researched and curated by our content & customer service teams. This content is edited and reviewed internally before being made public to customers.
Our customer service team are at the ready daily to answer your part and product questions. We have a dedicated staff with decades of collective experience in helping customers just like you purchase parts to repair their products.
All our part reviews are solicited directly from other customers who have purchased this exact part. While we moderate these reviews for profanity, offensive language or personally identifiable information, these reviews are posted exactly as submitted and no alterations are made by our team.
All our customer repair instructions are solicited directly from other customers just like you who have purchased and replaced this exact part. While we moderate these reviews for profanity, offensive language or personally identifiable information, these reviews are posted exactly as submitted and no alterations are made by our team.
Based on data from past customer purchasing behaviors, these parts are most commonly purchased together along with the part you are viewing. These parts may be necessary or helpful to replace to complete your current repair.
All our installation videos are created and produced in collaboration with our in-house repair technician, Mark Sodja, who has helped millions of eReplacementParts customers over the last 13 years repair their products. Mark has years of experience in selling and repairing both commercial and residential products with a specialty in gas-powered equipment.
This data is collected from customers who submitted a repair instruction after replacing this exact part. Customers can rate how easy the repair was to complete and how long it took. We aggregate this data to provide a repair rating that allows customers to quickly determine the difficulty and time needed to perform their own repair.