
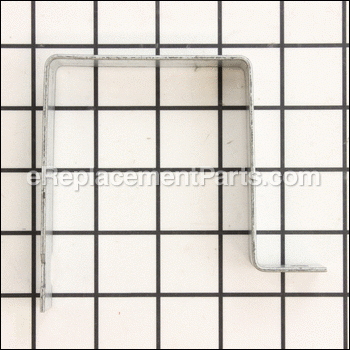


This motor bracket is an original part from Campbell Hausfeld. The metal bracket is compatible with many air compressors. This item has been designed to secure the pump/motor assembly to the compressor tank. A wrench and a screwdriver are helpful in making the removal and repair. The motor bracket is sold individually.
Motor Bracket BA018300AV
OEM part for: Campbell Hausfeld, Husky
Part Number: BA018300AV
$43.30
Usually ships in 7 - 12 business days
7 - 12 business days
Jump To:
Frequently Purchased Together ?

Compatibility
This part will fit the following 73 machines
Campbell Hausfeld
WL660001 Oilless Air Compressor View Diagrams & Manuals
WL650001 Oilless Air Compressor View Diagrams & Manuals
WL650101 Oilless Air Compressor View Diagrams & Manuals
WL650201 Oilless Air Compressor View Diagrams & Manuals
WL650500 Oilless Air Compressor View Diagrams & Manuals
WL016900AV Oilless Air Compressor View Diagrams & Manuals
WL660004 Oilless Air Compressor View Diagrams & Manuals
WL660102 Oilless Air Compressor View Diagrams & Manuals
WL611106 Oilless Air Compressor View Diagrams & Manuals
WL660402 Oilless Air Compressor View Diagrams & Manuals
WL660700 Oilless Air Compressor View Diagrams & Manuals
WL6701 Oilless Compressor View Diagrams & Manuals
WL6703 Oilless Compressor View Diagrams & Manuals
WL650002 Oilless Air Compressor View Diagrams & Manuals
WL650102 Oilless Air Compressor View Diagrams & Manuals
WL650202 Oilless Air Compressor View Diagrams & Manuals
WL650501 Oilless Air Compressor View Diagrams & Manuals
WL650601 Oilless Air Compressor View Diagrams & Manuals
WL650003 Oilless Air Compressor View Diagrams & Manuals
WL651300 Oilless Air Compressor View Diagrams & Manuals
WL650801 Oilless Air Compressor View Diagrams & Manuals
WL650901 Oilless Air Compressor View Diagrams & Manuals
WL651101 Oilless Air Compressor View Diagrams & Manuals
WL650100 Oilless Air Compressor View Diagrams & Manuals
WL650000 Oilless Air Compressor View Diagrams & Manuals
WL604010 Oilless Air Compressor View Diagrams & Manuals
WL650200 Oilless Air Compressor View Diagrams & Manuals
WL650300 Oilless Air Compressor View Diagrams & Manuals
WL650400 Oilless Air Compressor View Diagrams & Manuals
WL650600 Oilless Air Compressor View Diagrams & Manuals
WL660302 Oilless Air Compressor View Diagrams & Manuals
WL651001 Oilless Air Compressor View Diagrams & Manuals
WL651003 Oilless Air Compressor View Diagrams & Manuals
WL651004 Oilless Air Compressor View Diagrams & Manuals
WL651700 Oilless Air Compressor View Diagrams & Manuals
WL650702 Oilless Air Compressor View Diagrams & Manuals
WL651100 Oilless Air Compressor View Diagrams & Manuals
WL650800 Oilless Air Compressor View Diagrams & Manuals
WL650900 Oilless Air Compressor View Diagrams & Manuals
WL650101AJ Oilless Air Compressor View Diagrams & Manuals
WL660000 Oilless Air Compressor View Diagrams & Manuals
WL660100 Oilless Air Compressor View Diagrams & Manuals
WL660200 Oilless Air Compressor View Diagrams & Manuals
WL611104 Oilless Air Compressor View Diagrams & Manuals
WL660300 Oilless Air Compressor View Diagrams & Manuals
WL660400 Oilless Air Compressor View Diagrams & Manuals
WL660900 Oilless Air Compressor View Diagrams & Manuals
WL651400 Oilless Air Compressor View Diagrams & Manuals
WL650000AJ Oilless Air Compressor View Diagrams & Manuals
WL650102AJ Oilless Air Compressor View Diagrams & Manuals
WL660002 Oilless Air Compressor View Diagrams & Manuals
WL660003 Oilless Air Compressor View Diagrams & Manuals
WL660101 Oilless Air Compressor View Diagrams & Manuals
WL611105 Oilless Air Compressor View Diagrams & Manuals
WL660301 Oilless Air Compressor View Diagrams & Manuals
WL660401 Oilless Air Compressor View Diagrams & Manuals
Wl661100 Air Compressor View Diagrams & Manuals
WL651102 (2006) Oilless Air Compressors View Diagrams & Manuals
WL650903 (2006) Oilless Air Compressors View Diagrams & Manuals
WL675000 8 Gallon Wall Mount Air Compressor View Diagrams & Manuals
WL651500 Air Compressor View Diagrams & Manuals
WL650802 Compressor View Diagrams & Manuals
WL650103 Oilless Air Compressor View Diagrams & Manuals
WL650203 Oilless Air Compressor View Diagrams & Manuals
WL650602 Oilless Air Compressor View Diagrams & Manuals
WL651900 Oilless Air Compressor View Diagrams & Manuals
WL670100 Portable Air Compressor View Diagrams & Manuals
WL651600 Oilless Air Compressor View Diagrams & Manuals
WL611107 (2006.10) Oilless Air Compressor View Diagrams & Manuals
WL611107 (2007.08) Oilless Air Compressor View Diagrams & Manuals
WL651800 Oilless Air Compressor View Diagrams & Manuals
WL650902 Oilless Air Compressor View Diagrams & Manuals
WL660800 Oillless Air Compressor View Diagrams & Manuals
Show More Compatible Models
This item works with the following types of products:
- Compressor Parts
Customer Part Reviews ?
Average Rating (out of 5):
Click to filter by ratings:
5 stars
1
4 stars
0
3 stars
0
2 stars
0
1 stars
0
< PREV
- 1
Part fit perfectly, easy to install.
More than just the part, it's amazing to have a resource like eReplacementParts.com to get this rather obscure parts. This is for a compressor that is close to 15 years old, and the parts were easy to find with the model number.
Guest -
February 4, 2020
Verified Purchase
t
t
t -
t days ago
Verified Purchase
eReplacementParts Team
t
Questions & Answers ?
Our customer Service team is at the ready daily to answer your part and product questions.

Ask our Team
We have a dedicated staff with decades of collective experience in helping customers just like you purchase parts to repair their products.
Does this fit my product?Questions & Answers for Motor Bracket
No questions have been asked yet
Customer Repair Instructions ?
All our customer repair instructions are solicited directly from other customers just like you who have purchased and replaced this exact part.
It would pump up to 25 psi only
Wendell - May 29, 2016
👍 1 of 1 people found this instruction helpful
Tool Type
Compressor
Difficulty
Medium
Time
30-60 minutes
Tools Used
Screwdriver, Wrench Set
Remove the motor bracket then remove the pump and motor assembly. Remove the four bolts that hold the head, gaskets, valve plate and place them all in the order that you removed them. Unscrew the piston assembly and remove the piston and cylinder. Install the new piston with the cylinder. Place all of the gaskets valve plat, etc back on the cylinder head, then Install the four bolts that hold it all together. I also replaced the motor bracket and the isolator pad.
Did you find this story helpful?
Thanks for voting and helping fellow customers!
motor mount broke and snapped exhaust pipe
Patrick - April 3, 2019
Tool Type
Compressor
Difficulty
Medium
Time
15-30 minutes
Tools Used
Screwdriver, Power Drill, Socket set, Nutdriver, Adjustable Wrench
fixed it
Did you find this story helpful?
Thanks for voting and helping fellow customers!
R - April 2, 2018
Tool Type
Compressor
Difficulty
Medium
Time
1-2 hours
Tools Used
Screwdriver, Power Drill, Socket set, Nutdriver, Adjustable Wrench, Needle nose and clamps
Unplugged the compressor. Removed the old pressure switch and the broken bracket. Successfully installed both by using a phone camera (to get a picture of wiring) and tools listed above. All works well!
Did you find this story helpful?
Thanks for voting and helping fellow customers!
Tube had a hole in it.
Gene - October 12, 2017
Tool Type
Compressor
Difficulty
Easy
Time
15-30 minutes
Tools Used
Wrench Set, Tube cutter
The motor bracket I ordered had to be replaced. When it broke for sometime, this let the motor rotate back and copper tube I ordered had to be replaced due to rubbing against the back. As you stated in the instructions the copper tube had to be cut to fit. With a tube cutter I cut the tube to right size and installed the tube with hardware I ordered and everything works fine (no leaks). I'm glad I founded your Web site, I have had this Campbell Hausfeld Compressor for quite a few years Thanks for your support Gene S.
Did you find this story helpful?
Thanks for voting and helping fellow customers!
Air compressor was constantly running and wasn't building pressure above 20 psi.
Otto - September 29, 2017
Tool Type
Compressor
Difficulty
Medium
Time
15-30 minutes
Tools Used
Screwdriver, Socket set, Wrench Set, Tubing cutter, Teflon Tape, Blue Thread Lock
Parts Used
I received a used air compressor from a friend. He said his neighbor was throwing it away and he thought I could at least use the tank or other items off it for spare parts. Once I got it home, I plugged it in to see if it would run at all and if there may be a way to fix it. It ran fine but wouldn't build pressure above 20psi. I thought for sure it would need a pump rebuild which would be expensive. I visited the ereplacementparts.com website and after entering the compressor information, I was able to see what the common cause of the symptoms were, to this specific compressor. I learned that a great percentage of the time the cause was a broken fill tube. I took the removed the plastic cover off the compressor and sure enough, the tube had a crack in it! Talk about a cost and time saver.
The reason, I started the directions with telling you this story is to illustrate how valuable this website's ability to help diagnose or at least help you narrow the causes, is! So, now with the help of EREPLACEMENTPARTS.COM and about $30, I have a $300+ air compressor!!
Okay, enough of the accolades and on with the steps:
SAFETY FIRST!!! Make sure the switch on the compressor is off and that it is unplugged from the wall socket. If it's hardwired into your power supply, shut off the breaker and tag it out.
1) Remove the female quick-connect outlet (the connector you plug your air hose into) using a 13/16" open- end wrench. This will allow you access to one of the cowling screws.
2) Using a Phillip's head screwdriver remove 2 screws holding down the top part of the plastic cowling covering the pump and motor.
3) This part may be optional, but I removed the bottom cowling using a 3/8" socket with extension. I also removed the intake muffler/filter/baffle and set it aside. I like lots of room to work.
4) In my case, the motor bracket was broken so I had to remove it using a flat head screwdriver. I believe you can also use a 5/16" wrench or nut driver. I removed the bolt that secures the pump to the frame, using a 3/8" socket wrench. This allows you some 'wiggle" room to install the Air Tube.
5) Remove both of the brass compression nuts that secure the Air Tube to the pump and check valve using either a 11/16", 3/4" or 13/16" (I can't remember exactly which one was used and I'm not going to disassemble my compressor just to check! LOL. I'm pretty sure it was 3/4". If you don't have all three, carefully use a large crescent wrench.
6) Carefully remove the old Air tube, preferably intact. Compare it to the new one and if the new one is larger, use a scribe or permanent marker to mark which end is longer than the original.
NOTE: It's okay to be generous in leaving a little extra on the new tube when marking it. You'd rather leave a little too much and have to trim or cut it again, rather than cut it too short and have to order another one. If you removed or loosened the motor bracket bolts it will easily allow you to install a tube that's a little longer and make it much easier to install the tube all together.
7) Cut the new Air tube using a tubing cutter. If you don't have one you can buy one online or at your local auto-parts or hardware store for around $10. If you haven't used one before, you can practice on the old tubing after measurements are made. You can also use a high speed cut off tool or hack saw but using those tools and getting a clean, 90 degree cut can be difficult. For me the tubing cutter is much easier and provides a clean, 90 degree cut.
8) Without the nuts or rubber seals, temporarily install the tubing for fitment and trim again if necessary.
9) Next clean the threads on the pump and check valve where the new tubing will be installed. Be careful not to allow any debris to get in the pump or the check valve. Also if the check valve has a screen to catch any debris, make sure it is clean and free of any oxidation. Make sure the new tube is free of any internal debris.
10) Put the compression nuts on the new tube (Back to back) and then slide the rubber seals on. Put the tubing in place, wiggle the tube to make sure it seats on both ends and finger tighten the compression nuts.
11) Reinstall the motor bracket and finger tighten the screw as well as the bolt that secures the pump to the frame. Because air compressors vibrate, a lot, I applied blue thread lock before installing this screw and bolt.
12) Now, tighten the compression nuts to the point where the rubber seal just starts to squeeze through the back side of the compression nuts. Don't tighten any further, you'll break or strip something. This is enough to provide a good seal.
13) Tighten up the motor bracket screw and pump bolt.
14) Re-install the lower and upper cowling and the corresponding screws and bolts. Apply Blue Thread-Lock.
15) Clean the threads on the female quick connector's threads, apply new Teflon tape and reinstall.
16) Plug in the air compressor, turn it on, allow it to build a little pressure, shut it off and listen for leaks. If there are no leaks, turn it back on allow it to build pressure all the way up to where it shuts off automatically. If it does and you hear no leaks, you're done! If you hear leaks, you make have forgot to tighten something down or you may have an unrelated leak in the offloading tube or at another connection. If not; success!!
Did you find this story helpful?
Thanks for voting and helping fellow customers!
Regulator leaking, Broke & Missing Filter, Motor Bracket Broke
James - February 1, 2017
Tool Type
Compressor
Difficulty
Medium
Time
30-60 minutes
Tools Used
Screwdriver, Wrench Set, Adjustable Wrench, utility knife
1. Remove top shroud.
2. Remove broken motor bracket & replace new one.
3. Remove old regulator & install new regulator.
4. Trim top shroud because 2" diameter filter would not line up for installation.
5. Replaced top shroud & tested compressor.
6. Runs quite & hold air for days.
2. Remove broken motor bracket & replace new one.
3. Remove old regulator & install new regulator.
4. Trim top shroud because 2" diameter filter would not line up for installation.
5. Replaced top shroud & tested compressor.
6. Runs quite & hold air for days.
Did you find this story helpful?
Thanks for voting and helping fellow customers!
Motor bracket broke and exhaust tube cracked
Clint - January 16, 2017
Tool Type
Compressor
Difficulty
Easy
Time
15-30 minutes
Tools Used
Screwdriver, Adjustable Wrench, Tubing cutter
1. Removed cover off of the compressor
2. Remove the old motor bracket and replace the motor bracket
3. Remove old exhaust tube cut new exhaust tube to length and replace
2. Remove the old motor bracket and replace the motor bracket
3. Remove old exhaust tube cut new exhaust tube to length and replace
Did you find this story helpful?
Thanks for voting and helping fellow customers!
Exhaust tube was cracked and ferrule worn
Juan - December 29, 2016
Tool Type
Pump
Difficulty
Easy
Time
15-30 minutes
Tools Used
Screwdriver, Nutdriver, Adjustable Wrench
Removed the top cover
Removed the cracked exhaust tube
Installed the new tube with the new ferrules and compression nut
Remove the old motor bracket and installed the new on
Removed the cracked exhaust tube
Installed the new tube with the new ferrules and compression nut
Remove the old motor bracket and installed the new on
Did you find this story helpful?
Thanks for voting and helping fellow customers!
Bracket broke holding the motor causing the bolt on the crank to shear off.
Robert - December 4, 2016
Tool Type
Compressor
Difficulty
Easy
Time
15-30 minutes
Tools Used
Screwdriver, Socket set, Nutdriver
Removed the bottom side cover, removed the motor and compressor. I used an easy out to get the sheared bolt out and replaced it with the new one. Put it all back together and the compressor is running like new again!
Did you find this story helpful?
Thanks for voting and helping fellow customers!
Plugged compressor in and while it was building up psi, the motor sparked and caught on fire, so i figured it was time for a new motor
Stevo - September 25, 2016
Tool Type
Compressor
Difficulty
Medium
Time
15-30 minutes
Tools Used
Screwdriver, Star wrench
1. Took cover off compressor cover
2. Took off the white and black connector
3. Took off the bolt for the bracket, and the bolt on the side of the motor
4. Took old one out, installed new one
5. Put everything back together
2. Took off the white and black connector
3. Took off the bolt for the bracket, and the bolt on the side of the motor
4. Took old one out, installed new one
5. Put everything back together
Did you find this story helpful?
Thanks for voting and helping fellow customers!
OEM stands for Original Equipment Manufacturer and means the part you’re buying is sourced directly from the manufacturer who made your product. At eReplacementParts, we sell only genuine OEM parts, guaranteeing the part you’re purchasing is of better design and of higher quality than aftermarket parts.
Our product descriptions are a combination of data sourced directly from the manufacturers who made your product as well as content researched and curated by our content & customer service teams. This content is edited and reviewed internally before being made public to customers.
Our customer service team are at the ready daily to answer your part and product questions. We have a dedicated staff with decades of collective experience in helping customers just like you purchase parts to repair their products.
All our part reviews are solicited directly from other customers who have purchased this exact part. While we moderate these reviews for profanity, offensive language or personally identifiable information, these reviews are posted exactly as submitted and no alterations are made by our team.
All our customer repair instructions are solicited directly from other customers just like you who have purchased and replaced this exact part. While we moderate these reviews for profanity, offensive language or personally identifiable information, these reviews are posted exactly as submitted and no alterations are made by our team.
Based on data from past customer purchasing behaviors, these parts are most commonly purchased together along with the part you are viewing. These parts may be necessary or helpful to replace to complete your current repair.
All our installation videos are created and produced in collaboration with our in-house repair technician, Mark Sodja, who has helped millions of eReplacementParts customers over the last 13 years repair their products. Mark has years of experience in selling and repairing both commercial and residential products with a specialty in gas-powered equipment.
This data is collected from customers who submitted a repair instruction after replacing this exact part. Customers can rate how easy the repair was to complete and how long it took. We aggregate this data to provide a repair rating that allows customers to quickly determine the difficulty and time needed to perform their own repair.