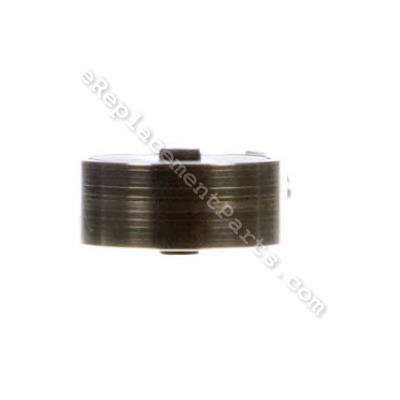
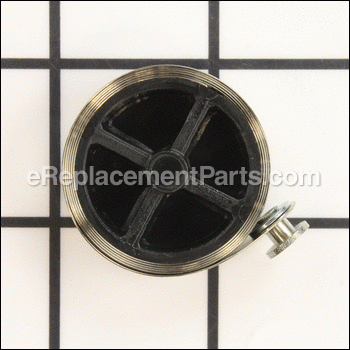


This authentic OEM sourced replacement part is designed for use with Bostitch nailers. It provides spring action for the magazine. It is made out of metal with a plastic hub and it is sold individually. To complete this repair you would need a screwdriver.
Constant Force Spring 115143
OEM part for: Bostitch
Part Number: 115143
$26.72
In Stock
Jump To:
Frequently Purchased Together ?

Compatibility
This part will fit the following 25 machines
Bostitch
F21PL Pneumatic Stick Nailer View Diagrams & Manuals
F21PL2 Pneumatic Stick Nailer View Diagrams & Manuals
F28WW Pneumatic Stick Nailer View Diagrams & Manuals
F33PT Pneumatic Stick Nailer View Diagrams & Manuals
N89RH17 Pneumatic Stick Nailer View Diagrams & Manuals
N88WWB Pneumatic Stick Nailer View Diagrams & Manuals
N88WW Pneumatic Stick Nailer View Diagrams & Manuals
N88RH17-2 Pneumatic Stick Nailer View Diagrams & Manuals
N88RH-2MCN Pneumatic Stick Nailer View Diagrams & Manuals
N88RH Pneumatic Stick Nailer View Diagrams & Manuals
N89RH17-2MCN Pneumatic Stick Nailer View Diagrams & Manuals
F33PTSM (Type 0) Stick Nailer View Diagrams & Manuals
F33PTSM (Type 140020000 and Higher) Stick Nailer View Diagrams & Manuals
F21PL (140020000 and Higher) Nailer Power Tool View Diagrams & Manuals
F21PL (Type 0) Nailer Power Tool View Diagrams & Manuals
F21PL2 (140020000 and Higher) Stick Nailer Power Tool View Diagrams & Manuals
F21PL2 (Type 0) Stick Nailer Power Tool View Diagrams & Manuals
F28WW (140020000 and Higher) Nailer Power Tool View Diagrams & Manuals
F28WW (Type 0) Nailer Power Tool View Diagrams & Manuals
F33PT (140020000 and Higher) Nailer Power Tool View Diagrams & Manuals
F33PT (Type 0) Nailer Power Tool View Diagrams & Manuals
N88RH (Type 0) Stick Nailer Power Tool View Diagrams & Manuals
N88RH17-2 (Type 0) Stick Nailer Power Tool View Diagrams & Manuals
N88WW (Type 0) Stick Nailer Power Tool View Diagrams & Manuals
N88WWB (Type 0) Stick Nailer Power Tool View Diagrams & Manuals
Show More Compatible Models
This item works with the following types of products:
- Nailer Parts
Repair Videos ?
Watch the Repair Video for
Constant Force Spring

Customer Part Reviews ?
Average Rating (out of 5):
Click to filter by ratings:
5 stars
2
4 stars
1
3 stars
0
2 stars
0
1 stars
0
< PREV
- 1
It’s very easy to fix mi tool
The part is exactly I need and I can fix my tool very easy and the part arrive to fast thank you
Juan -
May 22, 2020
Verified Purchase
exactly what i wanted
this was great condition
Guest -
June 13, 2019
Verified Purchase
With a little effort it worked
The part I really needed isn't made anymore, so I figured I would try this one, it was close enough. This worked with a little effort, I had to pull and pry the button through the end of the magazine until it caught. I accidentally bent the spring and now there is a slight hesitation, but nothing I can't work with. The nail gun is 23 years old, so a slight hesitation is to be expected. Would recommend and buy from ereplacementparts.com again.
Guest -
May 20, 2021
Verified Purchase
t
t
t -
t days ago
Verified Purchase
eReplacementParts Team
t
Questions & Answers ?
Our customer Service team is at the ready daily to answer your part and product questions.

Ask our Team
We have a dedicated staff with decades of collective experience in helping customers just like you purchase parts to repair their products.
Does this fit my product?Questions & Answers for Constant Force Spring
No questions have been asked yet
Customer Repair Instructions ?
All our customer repair instructions are solicited directly from other customers just like you who have purchased and replaced this exact part.
Constant Force Spring that keeps pressure on the nails was broken
CESAR - December 30, 2018
Tool Type
Nailer
Difficulty
Easy
Time
15-30 minutes
Tools Used
Socket set, Alex Wrench Set
Parts Used
This is the first time repairing this tool, and I removed more parts than necessary.
In order to replace the Constant Force Spring, I had to remove the nailer magazine from the nailer body. This task was not difficult. I used a socket wrench and an alex wrench to remove the screws. Once the magazine was out, I made a mistake removing the part in back of the magazine that holds the spring while you load the nails. That was not necessary because the Force Spring and housing comes out of the front of the magazine. It was very easy to replace it with the new spring.
In order to replace the Constant Force Spring, I had to remove the nailer magazine from the nailer body. This task was not difficult. I used a socket wrench and an alex wrench to remove the screws. Once the magazine was out, I made a mistake removing the part in back of the magazine that holds the spring while you load the nails. That was not necessary because the Force Spring and housing comes out of the front of the magazine. It was very easy to replace it with the new spring.
Did you find this story helpful?
Thanks for voting and helping fellow customers!
Constant force spring broke which keeps nails pushed to front of nail gun.
Michele - June 1, 2018
👍 0 of 1 people found this instruction helpful
Tool Type
Nailer
Difficulty
Easy
Time
Less than 15 minutes
Tools Used
Nutdriver, Allen wrench
Parts Used
1. Removed the magazine. (remove one allen screw that connects about the middle of magazine to back end of gun) Then lift magazine up at front of gun.
2. Removed handle pusher which housed the spring.
3. Slid other end of broken spring off front end of magazine.
4. Put new spring into handle pusher keeping it all the way at front of magazine.
5. Slide rivet on end of spring into slot at front of magazine, then pull handle pusher all the way to end of magazine
6. Put magazine back on gun, loaded up nails and fired away.
Did you find this story helpful?
Thanks for voting and helping fellow customers!
Constant Spring became unattached
Corbin - February 24, 2018
👍 0 of 1 people found this instruction helpful
Tool Type
Nailer
Difficulty
Easy
Time
15-30 minutes
Tools Used
Wrench Set
Removed the Nail tray mechanism - 3 Allen wrench bolts (the hardest part)
Removed the defective spring and installed the new spring, making sure it was caught in the retaining latch .
Replaced the nail tray assembly.
Tested the tool.
Removed the defective spring and installed the new spring, making sure it was caught in the retaining latch .
Replaced the nail tray assembly.
Tested the tool.
Did you find this story helpful?
Thanks for voting and helping fellow customers!
OEM stands for Original Equipment Manufacturer and means the part you’re buying is sourced directly from the manufacturer who made your product. At eReplacementParts, we sell only genuine OEM parts, guaranteeing the part you’re purchasing is of better design and of higher quality than aftermarket parts.
Our product descriptions are a combination of data sourced directly from the manufacturers who made your product as well as content researched and curated by our content & customer service teams. This content is edited and reviewed internally before being made public to customers.
Our customer service team are at the ready daily to answer your part and product questions. We have a dedicated staff with decades of collective experience in helping customers just like you purchase parts to repair their products.
All our part reviews are solicited directly from other customers who have purchased this exact part. While we moderate these reviews for profanity, offensive language or personally identifiable information, these reviews are posted exactly as submitted and no alterations are made by our team.
All our customer repair instructions are solicited directly from other customers just like you who have purchased and replaced this exact part. While we moderate these reviews for profanity, offensive language or personally identifiable information, these reviews are posted exactly as submitted and no alterations are made by our team.
Based on data from past customer purchasing behaviors, these parts are most commonly purchased together along with the part you are viewing. These parts may be necessary or helpful to replace to complete your current repair.
All our installation videos are created and produced in collaboration with our in-house repair technician, Mark Sodja, who has helped millions of eReplacementParts customers over the last 13 years repair their products. Mark has years of experience in selling and repairing both commercial and residential products with a specialty in gas-powered equipment.
This data is collected from customers who submitted a repair instruction after replacing this exact part. Customers can rate how easy the repair was to complete and how long it took. We aggregate this data to provide a repair rating that allows customers to quickly determine the difficulty and time needed to perform their own repair.