
This is a genuine Porter Cable replacement part, it is sold individually.
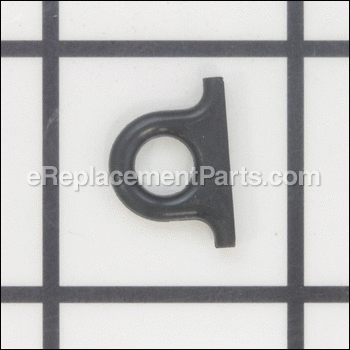
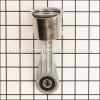
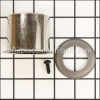
The purpose of the N044359 Tube Seal is to prevent an air leak.
It is placed on the outlet tube coming from the head of the compressor.
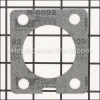
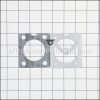
Tube Seal N044359
OEM part for: Porter Cable, Delta, DeWALT, DeVilbiss, Black and Decker, Bostitch, Husky
Part Number: N044359
$4.99
In Stock
Jump To:
Product Description ?
- Classification: Part
- Weight: 0.01 lbs.
- Shipping: Ships Worldwide
Frequently Purchased Together ?
Compatibility
This Tube Seal will fit the following 169 machines. Confirm this part works with your model, and view the detailed model diagrams and repair help we have to offer.
Porter Cable
Delta
DeWALT
DeVilbiss
Black and Decker
Bostitch
Husky
Show More Compatible ModelsThis item works with the following types of products:
- Compressor Parts
This part replaces obsolete part #: 1000001269, CAC-1212
Repair Videos ?
Watch the Repair Video for
Tube Seal

Articles:
|
This article will show you how to remove and install the tube seal in an air compressor....
November 18, 2014
|

Customer Part Reviews ?
Average Rating (out of 5):
Click to filter by ratings:
5 stars
26
4 stars
1
3 stars
0
2 stars
0
1 stars
0
< PREV
- 1
- 2
- 3
Perfect fit
Easy install
Michael -
March 31, 2023
Verified Purchase
Finally Fixed
My pancake compressor had an air leak and would not shut off. The gadget was easy to install and fixed the problem.
Guest -
March 28, 2023
Verified Purchase
Compressor repair parts
all parts fit and worked as expected
Guest -
December 27, 2022
Verified Purchase
Correct Part
Part worked well and fixed my problem
Guest -
March 6, 2022
Verified Purchase
FAST DELIVERY, PART WORKED WELL!
Parts fit perfect, compressor is working well!
Guest -
January 11, 2022
Verified Purchase
Fixed my compressor!
This tiny little part made the whole compressor useless. A simple replacement with plenty of walkthroughs on YouTube got me back in business.
Guest -
October 19, 2021
Verified Purchase
Parts fit correctly and was a breeze to replace
Received without a huge wait and parts fit correctly
Guest -
September 27, 2021
Verified Purchase
The fit was very tight which was great.
The part was a nice tight fit. I tried to be careful not to damage the gaskets because the top gasket is very pricey. I ended up replacing both gaskets any way.
Guest -
August 16, 2021
Verified Purchase
Air compressor seal.
The correct part.Quick service.
Guest -
August 13, 2021
Verified Purchase
Always have what I need
Perfect every time I need a part they have it and the price is right. My first place to start my search! great doing business with them
Guest -
June 19, 2021
Verified Purchase
Questions & Answers ?
Our customer Service team is at the ready daily to answer your part and product questions.

Ask our Team
We have a dedicated staff with decades of collective experience in helping customers just like you purchase parts to repair their products.
Does this fit my product?Questions & Answers for Tube Seal
No questions have been asked yet
Customer Repair Instructions ?
All our customer repair instructions are solicited directly from other customers just like you who have purchased and replaced this exact part.
Tube seal leak caused the compressor to cycle very often.
John - April 2, 2016
👍 24 of 26 people found this instruction helpful
Tool Type
Compressor
Difficulty
Medium
Time
30-60 minutes
Tools Used
Screwdriver, Pliers, Socket set
Parts Used
The top portion of the Porter-Cable compressor is somewhat difficult to access. There are two screws that keep the upper assembly intact. Once removed the top part slides about 1" and then there are 4 screws that hold the upper pieces (2) together. The compressor head must be removed taking care not to damage the gasket. The tube seal has a seat in which it sets. Push the seal over the tube, insert the seal in its place and put the head back on the compressor.
To make it easier, I removed the clamp that held the rubber hose going into the tank and replaced the clamp with a screw type. It offered a lot of movement that had been restricted.
There are a number of rubber bumpers that protect the components. They are easily knocked off. Take note of where they belong and ensure all are in place before reassembly.
Did you find this story helpful?
Thanks for voting and helping fellow customers!
Tub seal was shot and leaking air not letting the compressor build pressure.
Rick - July 31, 2016
👍 6 of 7 people found this instruction helpful
Tool Type
Compressor
Difficulty
Medium
Time
30-60 minutes
Tools Used
Screwdriver, Power Drill
Parts Used
Removed the screws holding the two half''s of the compressor and removing the hose clamps. Then remove the old tub seal and install the new tub seal. Put it all back together. It works just fine and no more air leaks.
Did you find this story helpful?
Thanks for voting and helping fellow customers!
Air leaking from tube seal
Don - June 8, 2016
👍 4 of 5 people found this instruction helpful
Tool Type
Compressor
Difficulty
Medium
Time
15-30 minutes
Tools Used
Screwdriver, Nutdriver
Parts Used
I found your YouTube video on how to replace the seal. It is a excellent video and very informative. I followed it and had my compressor working with no air leaks. Here is a copy of the link. I hope it will help some others with the same problem.
https://www.youtube.com/watch?v=ot_urG5olPM
https://www.youtube.com/watch?v=ot_urG5olPM
Did you find this story helpful?
Thanks for voting and helping fellow customers!
Access to one of the torx screws holding the cover together
Jay - April 25, 2016
👍 2 of 2 people found this instruction helpful
Tool Type
Compressor
Difficulty
Medium
Time
30-60 minutes
Tools Used
Screwdriver, Socket set, Extra-long neck torx screwdriver
I had to 'make' a long torx screwdriver to access one of the screws holding the top plastic housing halves together. I used a piece of brass bar, bored a hole in one end to receive a torx bit of the right size and then used a vice to squeeze the sides of the bored area to hold the torx bit in place in order to disassemble then reassemble the plastic housing. (I also used plumber's putty to make sure the bit did not fall out.) It would have been good to have known what size and length screw driver to have before beginning the repair. Everything else was straight-forward.
Did you find this story helpful?
Thanks for voting and helping fellow customers!
Air seal burst
Alec - May 2, 2018
Tool Type
Compressor
Difficulty
Easy
Time
15-30 minutes
Tools Used
Screwdriver, Socket set, Nutdriver, Adjustable Wrench, torque wrench
Parts Used
I watched the e-replacement parts video than completed the steps as they instructed piece of cake
Did you find this story helpful?
Thanks for voting and helping fellow customers!
Air leak.
don - April 23, 2018
Tool Type
Compressor
Difficulty
Easy
Time
30-60 minutes
Tools Used
Screwdriver, Socket set, Torque wrench
Parts Used
Removed the plastic, the cylinder head and reassembled.
Did you find this story helpful?
Thanks for voting and helping fellow customers!
Tube from motor to tank was broken
Duane - April 19, 2018
Tool Type
Compressor
Difficulty
Medium
Time
30-60 minutes
Tools Used
Screwdriver, Pliers, Socket set
Remove the motor and casing and tube from the tank and then remove the tube from the motor Replaced it reinstalled project went real smooth and parts were exactly what I wanted and needed would order again from this company
Did you find this story helpful?
Thanks for voting and helping fellow customers!
Air Leak above 60 psi
David - February 23, 2018
Tool Type
Compressor
Difficulty
Easy
Time
30-60 minutes
Tools Used
Screwdriver, Socket set, Torx Drivers
Disassembled compressor cylinder, replaced tube seal, gaskets and valve plate, reassembled. There was a YouTube video from eReplacementParts available if necessary. Some of the screws in the housing were in deep pockets and required torx driver with long shafts, but otherwise simple and straightforward. The location of the air leak at the tube seal was easy to diagnose once the housing was disassembled, by pressurizing and listening for the leak. Over time, heat will degrade the seal, fairly common problem for this compressor.
Did you find this story helpful?
Thanks for voting and helping fellow customers!
Tube seal on compressor came apart
James - December 22, 2017
Tool Type
Compressor
Difficulty
Easy
Time
15-30 minutes
Tools Used
Screwdriver, Pliers, Nutdriver, Scraper
Parts Used
Removed compressor from tank.
Removed covers
Slid motor out
Removed cylinder head
Put new seal in a cup of HOT water for a couple minutes (to soften it, makes it way easier).
Slid seal over pipe
Put seal into cylinder head.
Reinstalled head, motor, covers, compressor to tank.
Would suggest ordering head gasket at the same time, I saved mine, but I have a lot of experience with engines and gaskets.
Did you find this story helpful?
Thanks for voting and helping fellow customers!
Tube seal dry rotted.
James - December 20, 2017
Tool Type
Compressor
Difficulty
Easy
Time
30-60 minutes
Tools Used
Screwdriver, Torx bit
Parts Used
Disassembled, replaced the seal and reassembled. I was an industrial mechanic for 45+ years so I am lucky enough to be mechanically inclined and able to do this type of work.
Did you find this story helpful?
Thanks for voting and helping fellow customers!
Load More Install Stories
OEM stands for Original Equipment Manufacturer and means the part you’re buying is sourced directly from the manufacturer who made your product. At eReplacementParts, we sell only genuine OEM parts, guaranteeing the part you’re purchasing is of better design and of higher quality than aftermarket parts.
Our product descriptions are a combination of data sourced directly from the manufacturers who made your product as well as content researched and curated by our content & customer service teams. This content is edited and reviewed internally before being made public to customers.
Our customer service team are at the ready daily to answer your part and product questions. We have a dedicated staff with decades of collective experience in helping customers just like you purchase parts to repair their products.
All our part reviews are solicited directly from other customers who have purchased this exact part. While we moderate these reviews for profanity, offensive language or personally identifiable information, these reviews are posted exactly as submitted and no alterations are made by our team.
All our customer repair instructions are solicited directly from other customers just like you who have purchased and replaced this exact part. While we moderate these reviews for profanity, offensive language or personally identifiable information, these reviews are posted exactly as submitted and no alterations are made by our team.
Based on data from past customer purchasing behaviors, these parts are most commonly purchased together along with the part you are viewing. These parts may be necessary or helpful to replace to complete your current repair.
All our installation videos are created and produced in collaboration with our in-house repair technician, Mark Sodja, who has helped millions of eReplacementParts customers over the last 13 years repair their products. Mark has years of experience in selling and repairing both commercial and residential products with a specialty in gas-powered equipment.
This data is collected from customers who submitted a repair instruction after replacing this exact part. Customers can rate how easy the repair was to complete and how long it took. We aggregate this data to provide a repair rating that allows customers to quickly determine the difficulty and time needed to perform their own repair.