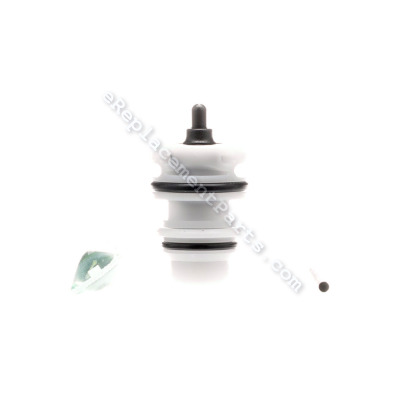
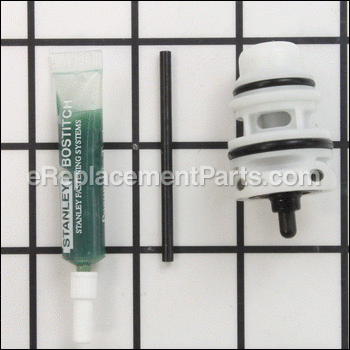


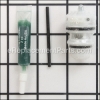
Genuine Bostitch replacement parts kit.
This Kit contains a new Trigger Valve with O-Rings, Push Pin & Lube.
This kit is used in the models below to repair a worn Trigger Valve.
A few symptoms of a worn trigger valve may be, a stuck trigger, gun not firing or an air leak.
Trigger Valve Kit TVA11
OEM part for: Bostitch
Part Number: TVA11
$50.58
In Stock
Jump To:
Product Description ?
- Classification: Part
- Weight: 0.03 lbs.
- Shipping: Ships Worldwide
Frequently Purchased Together ?


Compatibility
This part will fit the following 28 machines
Bostitch
N88WWB Pneumatic Stick Nailer View Diagrams & Manuals
N88WW Pneumatic Stick Nailer View Diagrams & Manuals
N88RH-2MCN Pneumatic Stick Nailer View Diagrams & Manuals
N88RH Pneumatic Stick Nailer View Diagrams & Manuals
N80SBM Pneumatic Stick Nailer View Diagrams & Manuals
N80SB Pneumatic Stick Nailer View Diagrams & Manuals
N52FN Industrial Oil Free Angled Finish Nailer View Diagrams & Manuals
N79WW Pneumatic Stick Nailer View Diagrams & Manuals
N79RH Pneumatic Stick Nailer View Diagrams & Manuals
N79PT Pneumatic Stick Nailer View Diagrams & Manuals
N95RHN Pneumatic Stick Nailer View Diagrams & Manuals
N90PT Pneumatic Stick Nailer View Diagrams & Manuals
N62FN Industrial Oil Free Angled Finish Nailer View Diagrams & Manuals
SF150C (Type 0) 1-1/2 X15 Degree Coil Nai View Diagrams & Manuals
N62FNK-2 (Type 0) 15-Gauge "Fn" Style Finish Nailer Kit View Diagrams & Manuals
N52FN (Type 0) Finish Nailer Power Tool View Diagrams & Manuals
N62FN (Type 0) Finish Nailer Power Tool View Diagrams & Manuals
N79PT (Type 0) Stick Nailer Power Tool View Diagrams & Manuals
N79RH (Type 0) Stick Nailer Power Tool View Diagrams & Manuals
N79WW (Type 0) Stick Nailer Power Tool View Diagrams & Manuals
N80SB (Type 0) Stick Nailer Power Tool View Diagrams & Manuals
N80SBM (Type 0) Stick Nailer Power Tool View Diagrams & Manuals
N88RH (Type 0) Stick Nailer Power Tool View Diagrams & Manuals
N88RH17-2 (Type 0) Stick Nailer Power Tool View Diagrams & Manuals
N88WW (Type 0) Stick Nailer Power Tool View Diagrams & Manuals
N88WWB (Type 0) Stick Nailer Power Tool View Diagrams & Manuals
N90PT (Type 0) Stick Nailer Power Tool View Diagrams & Manuals
N95RHN (Type 0) Stick Nailer Power Tool View Diagrams & Manuals
Show More Compatible Models
This item works with the following types of products:
- Nailer Parts
This part replaces obsolete part #: TVA11-1
Customer Part Reviews ?
Average Rating (out of 5):
Click to filter by ratings:
5 stars
3
4 stars
1
3 stars
0
2 stars
1
1 stars
0
< PREV
- 1
part was correct, fast service easy to do
part was correct, fast del service, easy to change
Guest -
July 31, 2023
Verified Purchase
Better than buying a new mail gun
Nail gun is working like new again, bought extra just to have
Guest -
May 27, 2020
Verified Purchase
ereplacement keeps me working.
Part arrived on time. I use ereplacement parts for all my parts. They ship fast and you will get the right part the first time.
Guest -
May 18, 2020
Verified Purchase
Fit and worked
The Trigger valve worked great the only rub was the waiting for the part but at this time it was understandable - Covid -19 . Past orders also fit and worked !
Tom Buendorf
Guest -
July 23, 2020
Verified Purchase
disappointed outcome
I ordered a kit, I received the part only,no other parts. I tried to get in touch through your web site, but got nowhere. I couldn't contact anyone. I tried to do a chat, but got an E mail back saying I had the wrong place. So I went on U tube and watched a video on how to replace a trigger valve. I had a nail the approximate diameter and used that to drive out the pins. I also felt payed more than the part was worth, Ended up that wasn't the problem, so now I'm going to do a rebuild on the nailer. Im going to get the kit from another company.
Guest -
May 27, 2020
Verified Purchase
t
t
t -
t days ago
Verified Purchase
eReplacementParts Team
t
Questions & Answers ?
Our customer Service team is at the ready daily to answer your part and product questions.

Ask our Team
We have a dedicated staff with decades of collective experience in helping customers just like you purchase parts to repair their products.
Does this fit my product?Questions & Answers for Trigger Valve Kit
Hi, I was wondering what the lube is for installing a new Trigger Valve?
Ben
for model number N95RHN
asked on 2022-12-30
Hello Ben, Thank you for the question. You will need to use it on the the Seals on the valve before installing so it can seal and function properly. We hope this helps!
eReplacementParts Team December 30, 2022
Customer Repair Instructions ?
All our customer repair instructions are solicited directly from other customers just like you who have purchased and replaced this exact part.
Air leakage around trigger
Robert - February 4, 2016
👍 13 of 14 people found this instruction helpful
Tool Type
Nailer
Difficulty
Easy
Time
Less than 15 minutes
Tools Used
, Roll pin extraction tool (Supplied with Kit)
Parts Used
Removed two roll pins from trigger assembly and pulled trigger valve. Lubricated new trigger valve with lubrication supplied in kit. Installed new trigger valve and replaced both roll pins.
Did you find this story helpful?
Thanks for voting and helping fellow customers!
Trigger assembly was leaking air. Took it apart and there was a broken oring.
Kirk - November 14, 2015
👍 6 of 7 people found this instruction helpful
Tool Type
Nailer
Difficulty
Easy
Time
Less than 15 minutes
Tools Used
, Small hammer to tap in pins.
Parts Used
I popped the pins out and the trigger assembly slides out. Bought new assembly and it fit in snuggly. Once in place set the pins back to lock in trigger assembly. Works perfect.
Did you find this story helpful?
Thanks for voting and helping fellow customers!
Leaking trigger
Tyler - February 8, 2016
👍 4 of 4 people found this instruction helpful
Tool Type
Nailer
Difficulty
Easy
Time
15-30 minutes
Tools Used
, Punch and hammer
Parts Used
Removed roll pins with punch and hammer and replaced trigger valve, worked great! This kit also includes instructions which did help with the repair.
Did you find this story helpful?
Thanks for voting and helping fellow customers!
Air leaking around trigger.
Jeff - May 23, 2017
👍 3 of 3 people found this instruction helpful
Tool Type
Nailer
Difficulty
Easy
Time
Less than 15 minutes
Tools Used
Parts Used
Removed two roll pins, greased the new part, installed the new part, replaced the pins..
Did you find this story helpful?
Thanks for voting and helping fellow customers!
I had a bad trigger valve to a Bostitch framing nailer.
James - September 24, 2016
👍 3 of 3 people found this instruction helpful
Tool Type
Nailer
Difficulty
Easy
Time
Less than 15 minutes
Tools Used
, Small punch and a hammer
Parts Used
The instructions come with the valve. I had no problems a tall.
Did you find this story helpful?
Thanks for voting and helping fellow customers!
Air leaked out of trigger
Mark - May 2, 2016
👍 4 of 5 people found this instruction helpful
Tool Type
Nailer
Difficulty
Easy
Time
Less than 15 minutes
Tools Used
Parts Used
Followed the included installation instructions. And the gun was working better then ever.
Did you find this story helpful?
Thanks for voting and helping fellow customers!
Air leaking continuously
Geryl - May 13, 2017
👍 2 of 2 people found this instruction helpful
Tool Type
Nailer
Difficulty
Easy
Time
30-60 minutes
Tools Used
, hex wrench, small hammer, included punch
Followed the simple instructions included with the parts. The only hiccup was that one drawing on the trigger kit, sequential pointed to the wrong pin to remove the trigger, but that became obvious when I looked closely at the tool. The hint to use compressed air to expel the old trigger valve was valuable.
Did you find this story helpful?
Thanks for voting and helping fellow customers!
Leaking from trigger.
Tim - July 27, 2016
👍 2 of 2 people found this instruction helpful
Tool Type
Nailer
Difficulty
Easy
Time
Less than 15 minutes
Tools Used
, hammer and push out pin
Parts Used
There are two pins that hold the the trigger and trigger valve Assembly. They have a pin that comes with the kit that pushes out the spring pins, I put a rag over the TVA and apply air and it pops the TVA out. clean out trigger port and add grease tom new TVA. Line up slots in TVA and hammer the new spring pins in.
Did you find this story helpful?
Thanks for voting and helping fellow customers!
Leaking air from the trigger valve
Joseph - May 5, 2017
👍 1 of 1 people found this instruction helpful
Tool Type
Nailer
Difficulty
Easy
Time
15-30 minutes
Tools Used
Nutdriver
Parts Used
Remove the cotter pin from the trigger assembly
Removed the trigger to make room to slide the valve out
Removed the pin holding the valve in
Replace with new valve and trigger
Works like new
Removed the trigger to make room to slide the valve out
Removed the pin holding the valve in
Replace with new valve and trigger
Works like new
Did you find this story helpful?
Thanks for voting and helping fellow customers!
Pneumatic nailer trigger assembly was leaking air.
Michael - November 20, 2016
👍 1 of 1 people found this instruction helpful
Tool Type
Nailer
Difficulty
Easy
Time
Less than 15 minutes
Tools Used
, punch and hammer
Parts Used
Removed the old trigger assembly as per the instructions included with the replacement part. Lubed o rings with supplied lube and inserted the replacement into the chamber. Lined up and replaced pin. Very quick and easy. Nailer working as good as new. The pin punch was included with the replacement part.
Did you find this story helpful?
Thanks for voting and helping fellow customers!
Load More Install Stories
OEM stands for Original Equipment Manufacturer and means the part you’re buying is sourced directly from the manufacturer who made your product. At eReplacementParts, we sell only genuine OEM parts, guaranteeing the part you’re purchasing is of better design and of higher quality than aftermarket parts.
Our product descriptions are a combination of data sourced directly from the manufacturers who made your product as well as content researched and curated by our content & customer service teams. This content is edited and reviewed internally before being made public to customers.
Our customer service team are at the ready daily to answer your part and product questions. We have a dedicated staff with decades of collective experience in helping customers just like you purchase parts to repair their products.
All our part reviews are solicited directly from other customers who have purchased this exact part. While we moderate these reviews for profanity, offensive language or personally identifiable information, these reviews are posted exactly as submitted and no alterations are made by our team.
All our customer repair instructions are solicited directly from other customers just like you who have purchased and replaced this exact part. While we moderate these reviews for profanity, offensive language or personally identifiable information, these reviews are posted exactly as submitted and no alterations are made by our team.
Based on data from past customer purchasing behaviors, these parts are most commonly purchased together along with the part you are viewing. These parts may be necessary or helpful to replace to complete your current repair.
All our installation videos are created and produced in collaboration with our in-house repair technician, Mark Sodja, who has helped millions of eReplacementParts customers over the last 13 years repair their products. Mark has years of experience in selling and repairing both commercial and residential products with a specialty in gas-powered equipment.
This data is collected from customers who submitted a repair instruction after replacing this exact part. Customers can rate how easy the repair was to complete and how long it took. We aggregate this data to provide a repair rating that allows customers to quickly determine the difficulty and time needed to perform their own repair.