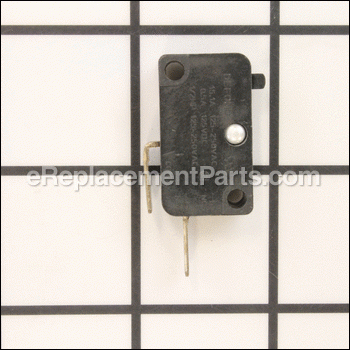
This is a genuine replacement part manufactured for use with trimmers from Craftsman. This part manages electrical power to the trimmer. It is recommended to review your models diagram to verify the parts compatibility. This trigger switch is sold individually and made of durable material.
Trigger Switch 530402879
OEM part for: Craftsman
Part Number: 530402879
Compatibility
This part will fit the following 26 machines
Craftsman
This item works with the following types of products:
- Chain Saw Parts
- Saw Parts
- Trimmer Parts
Customer Part Reviews ?
- 1
Questions & Answers ?
Our customer Service team is at the ready daily to answer your part and product questions.

Ask our Team
We have a dedicated staff with decades of collective experience in helping customers just like you purchase parts to repair their products.
Does this fit my product?Questions & Answers for Trigger Switch
Customer Repair Instructions ?
All our customer repair instructions are solicited directly from other customers just like you who have purchased and replaced this exact part.
Electric Chain saw would not work.
Tool Type
Chain Saw
Difficulty
Medium
Time
15-30 minutes
Tools Used
Screwdriver, Socket set, Allen Wrenches, Ohm Meter,retainer ring pliers
Parts Used
2. Cleaned away oily saw dust from around oiler and chain drive gear
3. Removed the kick-back plate and handle.
4. Removed chain drive gear using retainer ring pliers.
5. Opened up compartment containing switch using allen wrenches
6. Tested switch to see if open by connecting ohm meter across switch and operating switch
7. Ordered switch and new chain saw blade
8. Thoroughly cleaned out saw interior of oily saw dust
8. Changed Switch
9. Removed high speed (small gear on motor shaft) pinion gear using retainer ring pliers
10. Tested switch by starting motor
11. Reinstalled high speed gear
12. Reinstalled large gear, being careful to make sure the washer stays in place
13. Closed up the switch compartment
14. Reinstalled kick-back plate and handle
15. Reinstalled chain drive gear
16. Reinstalled bar and new chain
17. Greased the bearing in the bar tip.
18. Installed the chain cover, leaving the bolts loose
19. Adjusted the chain tension.
20. Tightened the chain cover bolts
21. Tested the chainsaw.
Thought the switch was no good.
Tool Type
Chain Saw
Difficulty
Easy
Time
15-30 minutes
Tools Used
Parts Used
Kept the switch since this is usually the item that fails on this saw.
OEM stands for Original Equipment Manufacturer and means the part you’re buying is sourced directly from the manufacturer who made your product. At eReplacementParts, we sell only genuine OEM parts, guaranteeing the part you’re purchasing is of better design and of higher quality than aftermarket parts.
Our product descriptions are a combination of data sourced directly from the manufacturers who made your product as well as content researched and curated by our content & customer service teams. This content is edited and reviewed internally before being made public to customers.
Our customer service team are at the ready daily to answer your part and product questions. We have a dedicated staff with decades of collective experience in helping customers just like you purchase parts to repair their products.
All our part reviews are solicited directly from other customers who have purchased this exact part. While we moderate these reviews for profanity, offensive language or personally identifiable information, these reviews are posted exactly as submitted and no alterations are made by our team.
All our customer repair instructions are solicited directly from other customers just like you who have purchased and replaced this exact part. While we moderate these reviews for profanity, offensive language or personally identifiable information, these reviews are posted exactly as submitted and no alterations are made by our team.
Based on data from past customer purchasing behaviors, these parts are most commonly purchased together along with the part you are viewing. These parts may be necessary or helpful to replace to complete your current repair.
All our installation videos are created and produced in collaboration with our in-house repair technician, Mark Sodja, who has helped millions of eReplacementParts customers over the last 13 years repair their products. Mark has years of experience in selling and repairing both commercial and residential products with a specialty in gas-powered equipment.
This data is collected from customers who submitted a repair instruction after replacing this exact part. Customers can rate how easy the repair was to complete and how long it took. We aggregate this data to provide a repair rating that allows customers to quickly determine the difficulty and time needed to perform their own repair.


