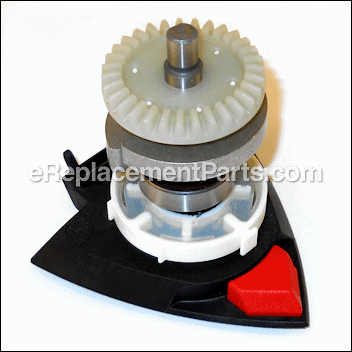

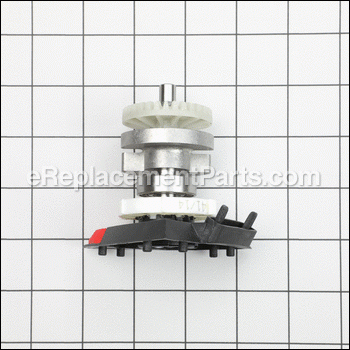

Tool Holding Fixture 2601098900
OEM part for: Bosch
Part Number: 2601098900
$71.70
In Stock
Compatibility
This part will fit the following 4 machines
Bosch
1294VS (0601294739) Detail Sander View Diagrams & Manuals
PDA240E (0603346735) Delta Sander View Diagrams & Manuals
1294VSK (0601294739) Corner / Detail Sander View Diagrams & Manuals
GDA 280 E (0601294703) Delta Sander View Diagrams & Manuals
This item works with the following types of products:
- Sander Parts
Customer Part Reviews ?
Average Rating (out of 5):
Click to filter by ratings:
5 stars
1
4 stars
0
3 stars
0
2 stars
0
1 stars
0
< PREV
- 1
Great fast service.
Ordered from NewZealand. Arrived in less than two weeks. Really good service. Thanks.
iGlobal -
April 1, 2023
Verified Purchase
t
t
t -
t days ago
Verified Purchase
eReplacementParts Team
t
Questions & Answers ?
Our customer Service team is at the ready daily to answer your part and product questions.

Ask our Team
We have a dedicated staff with decades of collective experience in helping customers just like you purchase parts to repair their products.
Does this fit my product?Questions & Answers for Tool Holding Fixture
No questions have been asked yet
Customer Repair Instructions ?
All our customer repair instructions are solicited directly from other customers just like you who have purchased and replaced this exact part.
This Bosch sander over heats around the end bearing and melts the plastic tool holder.
Lemuel - April 6, 2024
Tool Type
Sander
Difficulty
Easy
Time
Less than 15 minutes
Tools Used
Screwdriver, tweezers for placing shims
Parts Used
Laid the tool with triangular holder pointing right.
Used proper star bits to remove all screws, removing retainer ring around power cord, and carefully removing face-up cover.
Lifting entire tool holder gear and bearings out, collect the 4 C shaped shims.
Replace with new unit, fitting notches in top bearing, mesh gears, drop unit into handle.
With tweezers, place shims two on either side of lower bearing so that they remain
in place.
Make sure all parts are in proper position, replace handle cover and install all screws. Slip power cord retainer ring back onto the handle.
It's a good idea to survey the innards of the machine once you remove the cover so
as not to forget what goes where.
Did you find this story helpful?
Thanks for voting and helping fellow customers!
bearing at foot of fixture overheated, melting triangular mount
Lemuel - January 20, 2022
Tool Type
Sander
Difficulty
Easy
Time
Less than 15 minutes
Tools Used
, Torx wrench, mimi needlenose pliers
Parts Used
place unit on left side, remove all screws, pull away collar where cord enters unit,
carefully remove right side of plastic tool body, lift out gear assembly, rubber exhaust duct comes with it. Remove four "C" shaped shims. Remove small bearing
at top of assembly. Bearing has two slots to secure seating in unit. For first timers, it pays to down load exploded diagram of unit as well as writing down each step of disassembly. Everything goes back in reverse order. Once assembly is back in place with rubber duct aligned, tweezers or small needle nose pliers can be used to re-insert "C" shims in place making sure all four are secured within the plastic housing above and below middle bearing with shim openings pointing downward. If slightly bent, to avoid
a leg on the shim catching on the housing, each can be flipped over to eliminate any protrusion. Carefully line up right tool cover with left side making sure all parts are properly seated. Without lifting tool, press together covers and place one screw in the nose area and one toward the rear. Tighten screws. Test run the sander. If it is running properly, install the rest of the screws and push collar at the cord end back onto the chassis.
Did you find this story helpful?
Thanks for voting and helping fellow customers!
Tool holding fixture has a bearing located within the triangular portion which seized up and melted the plastic.
Lemuel - May 29, 2019
Tool Type
Sander
Difficulty
Easy
Time
Less than 15 minutes
Tools Used
Screwdriver, tweezers
Parts Used
1. Lay the sander flat on its left side.
2. Remove all screws with a T-20 torx bit. Remove ring where cord emerges from rear.
3. Carefully pry apart tool casing leaving the tool flat on table. Observe how assembly is placed.
4. Lift assembly from unit. Includes all parts mounted on shaft and rubber dust duct.
5. Collect all four shims. These will be re-installed on either side of center bearing.
6. Drop in new assembly with dust duct on assembly, other end of duct slides into handle.
7. Align top bearing slotted side down on shaft so it will drop into place.
8. Center bearing seats in a plastic cradle. With assembly firmly in place, install "C"
shaped shims against the bearing with a strong pair of tweezers, two above bearing and two below. Make sure shims are inside the cradle with the bearing. Most easily done if
inserted with open ends down, two at a time. If a shim is bent and presents an open lip
appearance, turn one shim around so the two press closed against each other. This will facilitate replacing the handle cover.
9. Check that all parts are properly seated.
10. Align right side handle placing dust duct in its slot.
11. Carefully press handle in place, making sure shims enter the opposing bearing cradle in the right side handle and the dust duct fits in its slot.
12. Re-install screws and retainer ring by the cord end.
It may take a couple of tries. You can download exploded diagram from Bosch.
Did you find this story helpful?
Thanks for voting and helping fellow customers!
Sander plate melted
Lemuel - April 25, 2018
Tool Type
Sander
Difficulty
Easy
Time
Less than 15 minutes
Tools Used
, Torx wrench, needle-nosed pliers
Parts Used
1.Removed assembly screws with torx wrench, lifted right half of sander housing with left
side and all remaining parts lying flat on table
2.Lifted out tool holding assembly
3.Removed the four "C" shaped shims above and below bearing
4.Placed tool holding assembly in handle housing, making sure bearing above white gear
has notches seated properly in handle housing and gear teeth meshed properly, and exhaust port connector aligned
5.Inserted shims, two above large bearing and two below with pliers, between bearing and plastic part of handle that serves as the bearing's seat
6. Carefully replaced right half of sander housing making sure all parts are aligned
7. Re-installed screws
Did you find this story helpful?
Thanks for voting and helping fellow customers!
Broken.
Agata - July 21, 2017
Tool Type
Sander
Difficulty
Easy
Time
Less than 15 minutes
Tools Used
Screwdriver
Parts Used
Removed the old and attached the new.
Did you find this story helpful?
Thanks for voting and helping fellow customers!
Plastic section which aligned clamp sheared off
John - March 13, 2017
Tool Type
Sander
Difficulty
Easy
Time
Less than 15 minutes
Tools Used
Screwdriver
Parts Used
Remove one half of the housing
Remove the old assembly
Put the bearing and needle bushing on the new assembly
Installed the new assembly
Screwed the housings back together
Remove the old assembly
Put the bearing and needle bushing on the new assembly
Installed the new assembly
Screwed the housings back together
Did you find this story helpful?
Thanks for voting and helping fellow customers!
OEM stands for Original Equipment Manufacturer and means the part you’re buying is sourced directly from the manufacturer who made your product. At eReplacementParts, we sell only genuine OEM parts, guaranteeing the part you’re purchasing is of better design and of higher quality than aftermarket parts.
Our product descriptions are a combination of data sourced directly from the manufacturers who made your product as well as content researched and curated by our content & customer service teams. This content is edited and reviewed internally before being made public to customers.
Our customer service team are at the ready daily to answer your part and product questions. We have a dedicated staff with decades of collective experience in helping customers just like you purchase parts to repair their products.
All our part reviews are solicited directly from other customers who have purchased this exact part. While we moderate these reviews for profanity, offensive language or personally identifiable information, these reviews are posted exactly as submitted and no alterations are made by our team.
All our customer repair instructions are solicited directly from other customers just like you who have purchased and replaced this exact part. While we moderate these reviews for profanity, offensive language or personally identifiable information, these reviews are posted exactly as submitted and no alterations are made by our team.
Based on data from past customer purchasing behaviors, these parts are most commonly purchased together along with the part you are viewing. These parts may be necessary or helpful to replace to complete your current repair.
All our installation videos are created and produced in collaboration with our in-house repair technician, Mark Sodja, who has helped millions of eReplacementParts customers over the last 13 years repair their products. Mark has years of experience in selling and repairing both commercial and residential products with a specialty in gas-powered equipment.
This data is collected from customers who submitted a repair instruction after replacing this exact part. Customers can rate how easy the repair was to complete and how long it took. We aggregate this data to provide a repair rating that allows customers to quickly determine the difficulty and time needed to perform their own repair.