
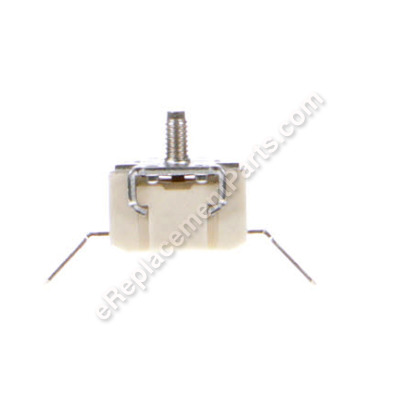


Thermostat 145 Degrees 5232100000
OEM part for: DeLonghi
Part Number: 5232100000
$8.32
In Stock
Jump To:
Frequently Purchased Together ?


Compatibility
This part will fit the following 18 machines
DeLonghi
BCO120T Espresso/Cappuccino Combo Cafe Figaro View Diagrams & Manuals
BCO130T Espresso/Cappuccino Combo Cafe Figaro View Diagrams & Manuals
BCO264B Espresso/Cappuccino/Coffee Combo Cafe Nero View Diagrams & Manuals
CC100B Coffee/Cappuccino Combo Black View Diagrams & Manuals
CC100IU Coffee/Cappuccino Combo View Diagrams & Manuals
CC100W Coffee/Cappuccino Combo View Diagrams & Manuals
CC80 Coffee/Cappuccino Combo View Diagrams & Manuals
CC80IU Coffee/Cappuccino Combo View Diagrams & Manuals
BCO330T Coffee Maker Steel / Black View Diagrams & Manuals
BCO320T (132411001) Espresso/Cappucino Machine View Diagrams & Manuals
BCO430 Cappuccino Espresso And Coffee Maker View Diagrams & Manuals
CC100IU (132310000) Espresso Coffee Combination Machine View Diagrams & Manuals
BCO130T (132407029) Coffee Combination Machine View Diagrams & Manuals
BCO120T (132402019) Espresso Coffee Combination Machine View Diagrams & Manuals
BCO264B (132552001) Cafe Nero Combo Coffee And Espresso Maker View Diagrams & Manuals
BCO430BM Cappuccino Espresso And Coffee Maker View Diagrams & Manuals
BCO330T Cappuccino Espresso And Coffee Maker View Diagrams & Manuals
BCO432 (132510002) Family Espresso Machine View Diagrams & Manuals
Show More Compatible Models
This item works with the following types of products:
- Espresso Parts
- Coffee Maker Parts
Questions & Answers ?
Our customer Service team is at the ready daily to answer your part and product questions.

Ask our Team
We have a dedicated staff with decades of collective experience in helping customers just like you purchase parts to repair their products.
Does this fit my product?Questions & Answers for Thermostat 145 Degrees
No questions have been asked yet
Customer Repair Instructions ?
All our customer repair instructions are solicited directly from other customers just like you who have purchased and replaced this exact part.
Thermostat leads burned, wire connector burned, part of wiring insulation burned off, bottom of coffee maker's plastic bottom melted when thermostat failed/burned.
Eli - May 19, 2017
👍 1 of 1 people found this instruction helpful
Tool Type
Coffee Maker
Difficulty
Easy
Time
15-30 minutes
Tools Used
Screwdriver, Wire stripper, wire cutter, long-nose pliers
1. Removed the bottom of the coffee maker to expose all the electrical parts.
2. Disconnected the wiring from the failed thermostat.
3. Removed the thermostat.
4. Removed the heating elements and the wire leads to the thermostat and heating element.
5. Cut off bad piece of wire, installed a new connector.
6. Installed new thermostat.
7. Reinstalled heating element and leads - probably the most difficult task because of the need to clamp heat sensors in the wire-leads onto the heating element.
8. Installed new coffeemaker bottom.
9. Tested the coffeemaker with water.
Did you find this story helpful?
Thanks for voting and helping fellow customers!
Our coffee maker was tripping the circuit breaker, the water heating element was shorting
Robert - February 11, 2017
👍 1 of 1 people found this instruction helpful
Tool Type
Coffee Maker
Difficulty
Medium
Time
15-30 minutes
Tools Used
Screwdriver, Pliers
1. Remove bottom of unit to access the area for repair & take photo for reference
2. Remove water hoses & wiring
3. Unscrew element from base
4. Replace heating element & thermostat. (Thermostat changed as a matter of course)
5. Reassemble the machine, plug in & make coffee
6. Sit back have a cup of coffee & reflect on a great company Replacement parts, for having the spares delivered so quickly & inexpensive.
Did you find this story helpful?
Thanks for voting and helping fellow customers!
Coffee Maker Leaked
Donald - January 17, 2017
👍 1 of 1 people found this instruction helpful
Tool Type
Coffee Maker
Difficulty
Easy
Time
Less than 15 minutes
Tools Used
Screwdriver, Pliers, Nutdriver
1 Unplugged coffee maker and completely emptied water tanks.
2 Turned upside down and removed 5 screws.
3 Using pliers pulled electrical connectors off Heating Element and Thermostat.
4 Using pliers removed spring clamps holding hoses and disconnected from element.
5 Removed pressure rod holding element and thermostat in place.
6 Using nut driver removed thermostat from element saving the washer and nut.
7 Parts stating with 6 and going back to 1.
* I put a tube of heat shrink on the pressure rod, I believed this to be the culprit in rubbing a hole in the heating element.
Very simple fix.
Did you find this story helpful?
Thanks for voting and helping fellow customers!
heater element had corrosion holes, thermostate rusted and thermo fuses open.
edward - December 13, 2021
Tool Type
Coffee Maker
Difficulty
Medium
Time
30-60 minutes
Tools Used
Screwdriver, Pliers, Nutdriver, krimp tool, razor knife
opened bottom, took photo, disconnected and replaced parts, reassembled.
Did you find this story helpful?
Thanks for voting and helping fellow customers!
Thermostat went bad
Carlos - March 19, 2019
Tool Type
Coffee Maker
Difficulty
Easy
Time
Less than 15 minutes
Tools Used
Screwdriver, Adjustable Wrench
Parts Used
UNPLUGGED machine from the electrical socket
Removed bottom cover, unscrewed the nut holding the thermostat, unplugged the two connectors and replaced it, the put everything back the way it was.
Removed bottom cover, unscrewed the nut holding the thermostat, unplugged the two connectors and replaced it, the put everything back the way it was.
Did you find this story helpful?
Thanks for voting and helping fellow customers!
Evan - February 6, 2019
Tool Type
Coffee Maker
Difficulty
Easy
Time
15-30 minutes
Tools Used
Screwdriver, Pliers, Nutdriver, Torx security bit
Did you find this story helpful?
Thanks for voting and helping fellow customers!
Heating element and thermal fuse open circuit
stuart - January 23, 2019
Tool Type
Coffee Maker
Difficulty
Medium
Time
30-60 minutes
Tools Used
Screwdriver, Pliers, Nutdriver, Soldering iron
Did you find this story helpful?
Thanks for voting and helping fellow customers!
OEM stands for Original Equipment Manufacturer and means the part you’re buying is sourced directly from the manufacturer who made your product. At eReplacementParts, we sell only genuine OEM parts, guaranteeing the part you’re purchasing is of better design and of higher quality than aftermarket parts.
Our product descriptions are a combination of data sourced directly from the manufacturers who made your product as well as content researched and curated by our content & customer service teams. This content is edited and reviewed internally before being made public to customers.
Our customer service team are at the ready daily to answer your part and product questions. We have a dedicated staff with decades of collective experience in helping customers just like you purchase parts to repair their products.
All our part reviews are solicited directly from other customers who have purchased this exact part. While we moderate these reviews for profanity, offensive language or personally identifiable information, these reviews are posted exactly as submitted and no alterations are made by our team.
All our customer repair instructions are solicited directly from other customers just like you who have purchased and replaced this exact part. While we moderate these reviews for profanity, offensive language or personally identifiable information, these reviews are posted exactly as submitted and no alterations are made by our team.
Based on data from past customer purchasing behaviors, these parts are most commonly purchased together along with the part you are viewing. These parts may be necessary or helpful to replace to complete your current repair.
All our installation videos are created and produced in collaboration with our in-house repair technician, Mark Sodja, who has helped millions of eReplacementParts customers over the last 13 years repair their products. Mark has years of experience in selling and repairing both commercial and residential products with a specialty in gas-powered equipment.
This data is collected from customers who submitted a repair instruction after replacing this exact part. Customers can rate how easy the repair was to complete and how long it took. We aggregate this data to provide a repair rating that allows customers to quickly determine the difficulty and time needed to perform their own repair.