
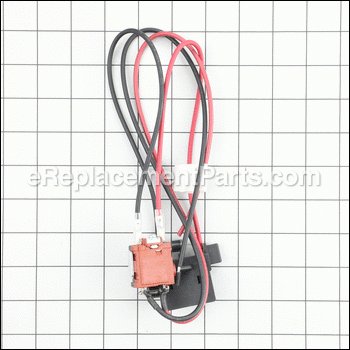
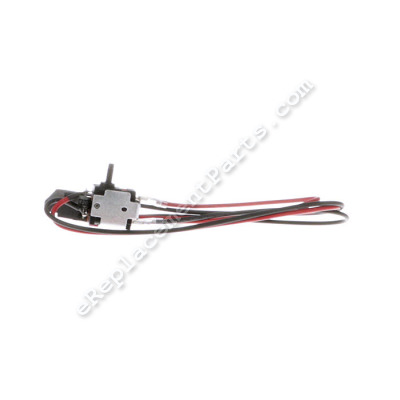


Switch Assembly 270504001
OEM part for: Ryobi
Part Number: 270504001
$31.25
In Stock
Compatibility
This part will fit the following 3 machines
Ryobi
RY40402 Blower View Diagrams & Manuals
RY40402VN (107966014) Blower View Diagrams & Manuals
RY40402VNM (107966101) Blower View Diagrams & Manuals
This item works with the following types of products:
- Blower Parts
Customer Part Reviews ?
Average Rating (out of 5):
Click to filter by ratings:
5 stars
9
4 stars
1
3 stars
1
2 stars
0
1 stars
0
< PREV
- 1
- 2
Factory part delivered on time
The part I needed was easy to find on the website. It was the exact replacement part in the included instructions were perfect thank you
Guest -
October 28, 2022
Verified Purchase
Very Satisfied
Replacement switch arrived on time and parts fit perfectly (with some wire trimming). Saved me having to buy a new blower.
Guest -
August 26, 2022
Verified Purchase
Replacement part took care of the problem!
Exact replacement was easy to find, order and replace
David -
June 16, 2022
Verified Purchase
Perfect fit
Original switch in my Ryobi RY40402A blower shorted out, replaced with new one and now it's working great..
Joe -
November 30, 2021
Verified Purchase
Good as new
Part arrived and replaced with ease. Takes a little time for the part to arrive but this will happen when ordering parts specific to your equipment. Still, $15.95 is a lot cheaper than over $100.
Good job guys!
Guest -
November 27, 2021
Verified Purchase
exact part replacement
i have a Ryobi leaf blower and when i was using it, sometimes the fan would slow down and not blow as hard. I read on line about this problem and most said it was the switch. Sure enough, iI ordered a new switch from replacement parts and its a match. Runs like a new one again. Very pleased.
James -
November 8, 2021
Verified Purchase
Easy to install and works great.
Perfect.
Guest -
October 19, 2021
Verified Purchase
Pretty easy repair, part works great, like new again.
Had this RYOBI 40v blower since 2019 and it worked fine except at some point this switch went bad and it would only operate wide open and to shut it down you had to take the battery out of the unit. Someone suggested this switch was cheap so for $20 I took a gamble and it works like new again!
Guest -
May 15, 2021
Verified Purchase
Exact Replacement
Just what I needed for my Ryobi Blower. A little tough getting the wires stuffed back into the handle section. Price was good and easy ordering from ReplacementParts website. Would order from them again when needed.
Guest -
July 2, 2019
Verified Purchase
Great factory replacement part, a bit of a tight fit however....
This worked perfectly once installed. Make sure you do not cut the existing wires that connect to this, as you will not have enough slack to connect them. I found it easier to take the entire 2 part handle off, and connect and stuff the wires. Much easier with 3 or 4 hands, and smaller ones at that!
Guest -
July 7, 2020
Verified Purchase
t
t
t -
t days ago
Verified Purchase
eReplacementParts Team
t
Questions & Answers ?
Our customer Service team is at the ready daily to answer your part and product questions.

Ask our Team
We have a dedicated staff with decades of collective experience in helping customers just like you purchase parts to repair their products.
Does this fit my product?Questions & Answers for Switch Assembly
No questions have been asked yet
Customer Repair Instructions ?
All our customer repair instructions are solicited directly from other customers just like you who have purchased and replaced this exact part.
blower won't turn off
John - September 15, 2022
👍 2 of 2 people found this instruction helpful
Tool Type
Blower
Difficulty
Hard
Time
1-2 hours
Tools Used
Screwdriver, Pliers, Long T15 Torx screwdriver, wire crimper
Parts Used
Split the case by removing the T-15 Torx fasteners.
A long Torx screw driver must be used to remove some of the recessed screws.
Take picture to document how factory installed the original harness
Removed switch assembly and remover two permanent wire nuts
Installed new switch assembly and installed two new crimp style wire nuts.. It is important to place the wires in the exact same position. I used hot melt glue to secure the wires in the channels.
Do not shorten any of the wires.
Be sure to bend the wires exactly as the original wires or the case will not close completely.
Did you find this story helpful?
Thanks for voting and helping fellow customers!
Quit running
Lonnie - June 27, 2023
👍 1 of 1 people found this instruction helpful
Tool Type
Blower
Difficulty
Easy
Time
1-2 hours
Tools Used
, Long torx screwdriver. I think it was a T5?
Parts Used
1. Disassemble whole unit.
2. Remove switch assembly and wires at the point where they're crush fitted together with wires to the motor. Pay attention to wire routing ( take pictures).
3. Install new switch and wires in same fashion, use wire nuts or other to join new wires to motor wires.
4. Put 'er all back together!
2. Remove switch assembly and wires at the point where they're crush fitted together with wires to the motor. Pay attention to wire routing ( take pictures).
3. Install new switch and wires in same fashion, use wire nuts or other to join new wires to motor wires.
4. Put 'er all back together!
Did you find this story helpful?
Thanks for voting and helping fellow customers!
Blower would start and stop and had reduced cfm velocity
Steve - June 4, 2022
👍 1 of 1 people found this instruction helpful
Tool Type
Blower
Difficulty
Medium
Time
1-2 hours
Tools Used
, Torx Key Set, Electrical heat shrink
Parts Used
1. Split the case by removing the Torx fasteners
2. Removed the faulty switch and wiring harness
3. Installed new switch and harness by mechanically connecting wires and installing heat shrink to connections.
4. special instructions would be to closely examine how the factory installed the original harness and mirror that same install to enable proper reassemble of the blower housing.
Did you find this story helpful?
Thanks for voting and helping fellow customers!
Blower worked or not randomly
ralph - October 15, 2023
Tool Type
Blower
Difficulty
Easy
Time
30-60 minutes
Tools Used
Screwdriver
Parts Used
Opened case, 13 Torx head screws.
Removed all wiring, switches, battery adapter.
Replaced wiring harness with new part.
Reassembled case.
Installed battery.
Done.
Removed all wiring, switches, battery adapter.
Replaced wiring harness with new part.
Reassembled case.
Installed battery.
Done.
Did you find this story helpful?
Thanks for voting and helping fellow customers!
Trigger switch failed
Robert - January 3, 2023
Tool Type
Blower
Difficulty
Medium
Time
1-2 hours
Tools Used
Screwdriver, Nutdriver, Wire cutter
1. Dismantle unit by removing screws
2. Remove old part by cutting wires of failed part near the motor housing
3. Splice wires of new part to existing wires leading to motor.
4. Reassemble
Note that there is very little slack in the replacement part wiring.
2. Remove old part by cutting wires of failed part near the motor housing
3. Splice wires of new part to existing wires leading to motor.
4. Reassemble
Note that there is very little slack in the replacement part wiring.
Did you find this story helpful?
Thanks for voting and helping fellow customers!
Switch burned out
David - June 17, 2022
Tool Type
Blower
Difficulty
Medium
Time
15-30 minutes
Tools Used
Screwdriver, Pliers, Wire nut crimper
Parts Used
1. Remove screws holding case together
2. Removed switch assembly and remover two permanent wire nuts
3. Installed new switch assembly and installed two new crimp style wire nuts
4. Assembled blower case
5. Successfully tested unit
2. Removed switch assembly and remover two permanent wire nuts
3. Installed new switch assembly and installed two new crimp style wire nuts
4. Assembled blower case
5. Successfully tested unit
Did you find this story helpful?
Thanks for voting and helping fellow customers!
Blower was stuck in the ON position would not shut down without removing battery
Victor - May 27, 2021
Tool Type
Blower
Difficulty
Easy
Time
Less than 15 minutes
Tools Used
Screwdriver, Wire crimping tool
Parts Used
1. Unscrewed housing
2. Removed old switch
3. Replaced with new switch
2. Removed old switch
3. Replaced with new switch
Did you find this story helpful?
Thanks for voting and helping fellow customers!
Broken switch
Ty - November 13, 2020
Tool Type
Blower
Difficulty
Easy
Time
Less than 15 minutes
Tools Used
Screwdriver
Parts Used
Removed old switch and installed new one.
Did you find this story helpful?
Thanks for voting and helping fellow customers!
Switch on Ryobi leaf blower failed
James - March 14, 2020
Tool Type
Blower
Difficulty
Medium
Time
15-30 minutes
Tools Used
Screwdriver, Pliers, Wire stripper
Parts Used
Replaced switch on Ryobi leaf blower. Dismantled case, snipped out old switch mechanism/wiring. Installed new switch. Works fine now.
Did you find this story helpful?
Thanks for voting and helping fellow customers!
Swtch over eheated and would not turn off
Bill - August 12, 2019
Tool Type
Blower
Difficulty
Medium
Time
30-60 minutes
Tools Used
, star tipped screwdeiver or attachment size t-15
Parts Used
SEPARATED THE HANDLE AND REWIRED SWITCH. WIRE AND CONNECTORS INNCLUDED.
STAR SCREWDRIVER SIZE T-15 NECESSARY. (OR SIMILAR TOOL) TO REMOVE STUDS.
STAR SCREWDRIVER SIZE T-15 NECESSARY. (OR SIMILAR TOOL) TO REMOVE STUDS.
Did you find this story helpful?
Thanks for voting and helping fellow customers!
OEM stands for Original Equipment Manufacturer and means the part you’re buying is sourced directly from the manufacturer who made your product. At eReplacementParts, we sell only genuine OEM parts, guaranteeing the part you’re purchasing is of better design and of higher quality than aftermarket parts.
Our product descriptions are a combination of data sourced directly from the manufacturers who made your product as well as content researched and curated by our content & customer service teams. This content is edited and reviewed internally before being made public to customers.
Our customer service team are at the ready daily to answer your part and product questions. We have a dedicated staff with decades of collective experience in helping customers just like you purchase parts to repair their products.
All our part reviews are solicited directly from other customers who have purchased this exact part. While we moderate these reviews for profanity, offensive language or personally identifiable information, these reviews are posted exactly as submitted and no alterations are made by our team.
All our customer repair instructions are solicited directly from other customers just like you who have purchased and replaced this exact part. While we moderate these reviews for profanity, offensive language or personally identifiable information, these reviews are posted exactly as submitted and no alterations are made by our team.
Based on data from past customer purchasing behaviors, these parts are most commonly purchased together along with the part you are viewing. These parts may be necessary or helpful to replace to complete your current repair.
All our installation videos are created and produced in collaboration with our in-house repair technician, Mark Sodja, who has helped millions of eReplacementParts customers over the last 13 years repair their products. Mark has years of experience in selling and repairing both commercial and residential products with a specialty in gas-powered equipment.
This data is collected from customers who submitted a repair instruction after replacing this exact part. Customers can rate how easy the repair was to complete and how long it took. We aggregate this data to provide a repair rating that allows customers to quickly determine the difficulty and time needed to perform their own repair.