
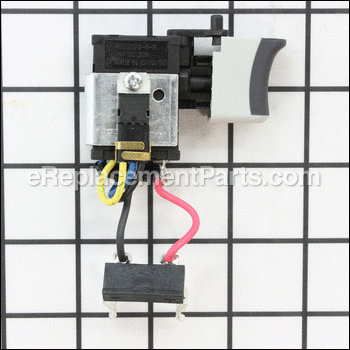
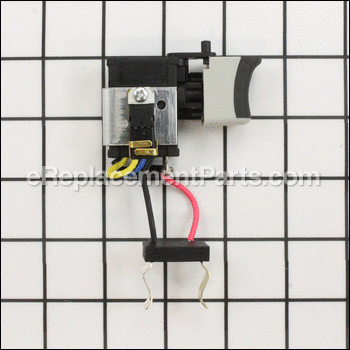

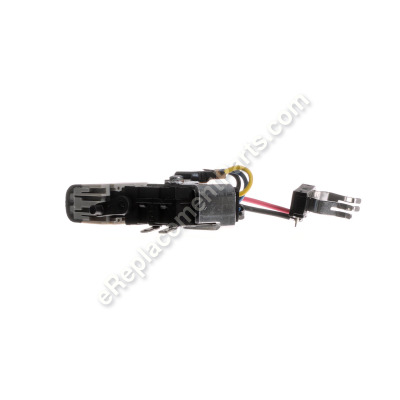


This is an original Ryobi replacement part manufactured for use with impact drivers. The switch transfers electricity to the brushes, and can wear out over time. Symptoms of a bad switch are not turning on or off, and not changing speeds or directions. Replacing the switch on an impact driver is straight forward. You start by separating the two housing halves, and removing the motor. Disconnect the brushes, and remove the faulty switch. Then align the new switch, and reconnect the brushes. Be sure to run the wires in a direction to avoid pinching. Then just reconnect the motor, and halves of the housing. This switch is sold individually, the tools required are a screwdriver, and possibly needle nose pliers.
Assembly Switch 270016166
OEM part for: Ryobi
Part Number: 270016166
$18.45
In Stock
Compatibility
This part will fit the following 2 machines
Ryobi
P236 18V Impact Driver View Diagrams & Manuals
P236A 18 Volt Impact Driver View Diagrams & Manuals
This item works with the following types of products:
- Impact Driver Parts
Customer Part Reviews ?
Questions & Answers ?
Our customer Service team is at the ready daily to answer your part and product questions.

Ask our Team
We have a dedicated staff with decades of collective experience in helping customers just like you purchase parts to repair their products.
Does this fit my product?Questions & Answers for Assembly Switch
No questions have been asked yet
Customer Repair Instructions ?
All our customer repair instructions are solicited directly from other customers just like you who have purchased and replaced this exact part.
Ryobi impact trigger switch
Steve - August 29, 2020
👍 1 of 1 people found this instruction helpful
Tool Type
Impact Driver
Difficulty
Easy
Time
15-30 minutes
Tools Used
Nutdriver, Soldering iron
Fairly simple. There is a YouTube video that explains how to do it. Soldering the small wires from motor to the switch was the most difficult but not bad.
Did you find this story helpful?
Thanks for voting and helping fellow customers!
Switch failed to go into reverse
john - March 17, 2020
Tool Type
Impact Driver
Difficulty
Medium
Time
1-2 hours
Tools Used
Screwdriver, Power Drill, Wrench Set, Nutdriver, Solder gun, small pic, magnet and greese
Parts Used
Seperated the housing to gain access to the switch to unsolder then resolder. I took out the clutch/motor assembly for ease of soldering at my desk. I disassembled the clutch for cleaning and regressing(Be careful to not lose any of the 6 pins or 6 ball bearings). Resoldered the new switch and reassembled the clutch back to the motor. Mounted the speed switch and direction switch...
Good or better than new.
Good or better than new.
Did you find this story helpful?
Thanks for voting and helping fellow customers!
Reverse switch failed
Tim - October 1, 2019
Tool Type
Impact Driver
Difficulty
Medium
Time
15-30 minutes
Tools Used
Screwdriver
Parts Used
Remove drill housing case with star bit.
Desolder red and black leads to original switch.
Note their orientation and take photo.
Solder leads to replacement switch.
Seat switch assembly wires so that housing case fits back together without crimping wires.
Test switch reverse and forward with battery.
Reassemble case housing.
Desolder red and black leads to original switch.
Note their orientation and take photo.
Solder leads to replacement switch.
Seat switch assembly wires so that housing case fits back together without crimping wires.
Test switch reverse and forward with battery.
Reassemble case housing.
Did you find this story helpful?
Thanks for voting and helping fellow customers!
Trigger switch was bad.
earl - March 27, 2017
👍 1 of 3 people found this instruction helpful
Tool Type
Impact Driver
Difficulty
Easy
Time
15-30 minutes
Tools Used
Screwdriver, Solder gun
Parts Used
1. Opened case.
2. Unsoldered wires on trigger assembly and removed.
3. Soldered in new trigger assembly and reassembled case.
2. Unsoldered wires on trigger assembly and removed.
3. Soldered in new trigger assembly and reassembled case.
Did you find this story helpful?
Thanks for voting and helping fellow customers!
Worked intermittent
Mark - February 16, 2017
👍 0 of 1 people found this instruction helpful
Tool Type
Impact Driver
Difficulty
Easy
Time
15-30 minutes
Tools Used
Screwdriver, Soldering Gun
Parts Used
Opened the housing and separated them
Made a wiring diagram
With a soldering gun removed the old switch
Soldered in the new switch
Put the housings back together
Made a wiring diagram
With a soldering gun removed the old switch
Soldered in the new switch
Put the housings back together
Did you find this story helpful?
Thanks for voting and helping fellow customers!
Ryobi Impact driver would not reverse.
Stephen - August 9, 2016
👍 0 of 1 people found this instruction helpful
Tool Type
Impact Driver
Difficulty
Medium
Time
15-30 minutes
Tools Used
Screwdriver, Pliers, Torx bit, sordering iron
Parts Used
Remove screws holding case together
Separate case
Un-solder wires to switch
Reconnect solder wires to switch
Put case back together
Tighten screws holding case together
Separate case
Un-solder wires to switch
Reconnect solder wires to switch
Put case back together
Tighten screws holding case together
Did you find this story helpful?
Thanks for voting and helping fellow customers!
Switch went bad
William - August 15, 2017
👍 0 of 2 people found this instruction helpful
Tool Type
Impact Driver
Difficulty
Easy
Time
15-30 minutes
Tools Used
Screwdriver, Soldering iron
Parts Used
Removed the screws from the housings and separated them
Unsoldered the old switch
Soldered the new switch in
Put the housings back together
Unsoldered the old switch
Soldered the new switch in
Put the housings back together
Did you find this story helpful?
Thanks for voting and helping fellow customers!
Switch failed
Gary - March 11, 2018
👍 0 of 3 people found this instruction helpful
Tool Type
Impact Driver
Difficulty
Medium
Time
15-30 minutes
Tools Used
Screwdriver, Screwdriver with assorted torx bits
Parts Used
Took the driver apart, clipped the wires from the old switch, attached push on fittings to the wires coming from the motor, attached these wires to the new switch and put it all back together. pretty simple fix. Have to hand it to Ryobi for ease of repair.
Did you find this story helpful?
Thanks for voting and helping fellow customers!
OEM stands for Original Equipment Manufacturer and means the part you’re buying is sourced directly from the manufacturer who made your product. At eReplacementParts, we sell only genuine OEM parts, guaranteeing the part you’re purchasing is of better design and of higher quality than aftermarket parts.
Our product descriptions are a combination of data sourced directly from the manufacturers who made your product as well as content researched and curated by our content & customer service teams. This content is edited and reviewed internally before being made public to customers.
Our customer service team are at the ready daily to answer your part and product questions. We have a dedicated staff with decades of collective experience in helping customers just like you purchase parts to repair their products.
All our part reviews are solicited directly from other customers who have purchased this exact part. While we moderate these reviews for profanity, offensive language or personally identifiable information, these reviews are posted exactly as submitted and no alterations are made by our team.
All our customer repair instructions are solicited directly from other customers just like you who have purchased and replaced this exact part. While we moderate these reviews for profanity, offensive language or personally identifiable information, these reviews are posted exactly as submitted and no alterations are made by our team.
Based on data from past customer purchasing behaviors, these parts are most commonly purchased together along with the part you are viewing. These parts may be necessary or helpful to replace to complete your current repair.
All our installation videos are created and produced in collaboration with our in-house repair technician, Mark Sodja, who has helped millions of eReplacementParts customers over the last 13 years repair their products. Mark has years of experience in selling and repairing both commercial and residential products with a specialty in gas-powered equipment.
This data is collected from customers who submitted a repair instruction after replacing this exact part. Customers can rate how easy the repair was to complete and how long it took. We aggregate this data to provide a repair rating that allows customers to quickly determine the difficulty and time needed to perform their own repair.