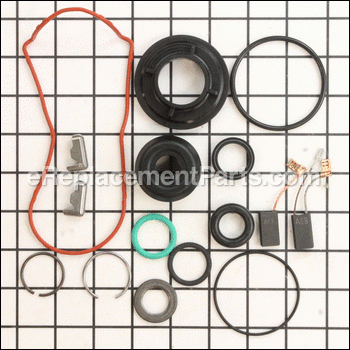
This is a complete OEM service pack for a rotary hammer (16 parts total). This service pack is a common fix for a rotary hammer that has stopped working. These are common wear parts that should be inspected regularly, especially if you are having issues. This kit includes O-rings, various seals and carbon brushes. To access these parts, you will need to remove the bottom plastic cover using an Allen wrench, the nose piece assembly, secondary handle, and the top lid. It is also advised to drain the oil.
Service Pack 1617000430
OEM part for: Bosch
Part Number: 1617000430
Jump To:
Frequently Purchased Together ?
Compatibility
This part will fit the following 1 machine
Bosch
This item works with the following types of products:
- Rotary Hammer Parts
Customer Part Reviews ?
Questions & Answers ?
Our customer Service team is at the ready daily to answer your part and product questions.

Ask our Team
We have a dedicated staff with decades of collective experience in helping customers just like you purchase parts to repair their products.
Does this fit my product?Questions & Answers for Service Pack
Customer Repair Instructions ?
All our customer repair instructions are solicited directly from other customers just like you who have purchased and replaced this exact part.
The device rotated but would not hammer.
Tool Type
Rotary Hammer
Difficulty
Hard
Time
1-2 hours
Tools Used
Screwdriver, Pliers, Wrench Set, Adjustable Wrench, snap-ring pliers; vice; clamps
Parts Used
The striker was frozen in the hammer pipe, and freeing it took a lot of prying and tapping. That may have been all that was wrong, but I purchased the kit, so I used it all. Removing the striker was the trickiest part: there is a split ring at the base the striker that can just barely be seen through the holes in the pipe. You have to pry that down and off just working through the holes, and that was crazy hard. A lot of it may have been that I wasn't even sure it came off. The rest is just very carefully minding the parts. It can help to use a small clamp to hold the two stopping device parts in place while juggling the whole thing back in place. A lot of grief, but the tool works like new now.
Just needed a service before internals broke
Tool Type
Rotary Hammer
Difficulty
Easy
Time
1-2 hours
Tools Used
Power Drill, Torx bit T10, T25, snap ring pliers, long pick/hook, vice
2. Remove power cord(optional)
3. Remove nose piece assembly
4. Remove secondary handle
5. Remove top lid via. 6 T25 torx screws. Note: Machine thread
6. Drain oil
7. Place in vice holding on to neck right where secondary handle mounts
8. Looking into nose area with snap ring pliers remove retaining ring, large keyed washer, and
large metal collar
9. Now standing in front of and looking down at the spot that you removed the lid rotate
piston so where it connects to the gear is either farthest or closest to you and use a flat
screw driver to gentle wedge the arm off the dowel that connects it to the gear and
pull out entire piston assembly
10. Now this next step your going to have to PAY ATTENTION, slide the barrel out thru the
Nose and place to the side. Back where the piston "was" at the very front of that pocket
there is a assemble that includes a gear sleeve, usually two shims, an outer sleeve,
and an inner sleeve. Don't scratch, bend, tweak, or mar these shims in anyway.
11. Now for the last piece, inside the nose body after everything is removed, look and you
will see an O-ring right in the middle, its no wider than 1/16th or 5/64ths of an inch.
Remove it.
12. Now inside the barrel there is a retaining ring, use a very small flat head screwdriver
from the outside thru one of those little holes and pry up just enough so as to pop it
out of the groove it is in. Now from the inside of the barrel use one of your looong looks, the one that looks like it was from captain hooks missing hand, and stick it down the
inside of the barrel and hook that ring, now gently wiggle that ring so it is perpendicular
to original position and yank with one hard pull and it should come right out of the barrel
Tap the upright barrel lightly on your work bench and the three other pieces should come falling out.
13. Now remove roto from vice and clean in side mechanical compartment with break cleaner. If you use a water based cleaner make sure to dry it out completely, like take an air
compressor to it when you think you got it all out. Also clean each part that you removed
as well
14. Now do these steps backwards up until step two.
15. Remove brushes one at a time. Note one brush has two wires, this is why I say one at a
time.
16 . Now just finish the assembly and don't forget to add your oil res. before running.
Would not hammer
Tool Type
Rotary Hammer
Difficulty
Medium
Time
1-2 hours
Tools Used
Screwdriver, Pliers, Snap ring pliers, scribe/pick, 90 degree scribe/pick
Lots of good advice here already. Take good pictures along the way, you won't regret it. It's easy enough that I was glad I didn't pay the Bosch factory $340 + Shipping.
The little internal snap ring that holds one of the strikers inside the tube - likely the part that's bad to remove. As one user explained, you have to work it through the holes in the side of the tube. It's a puzzle and you'll need a little patience. Everything else is straight forward - seals, etc. It's a little like working on an automatic transmission.
Will not hammer.
Tool Type
Rotary Hammer
Difficulty
Medium
Time
1-2 hours
Tools Used
Screwdriver, Inside Snap ring pliers
Machine would drill but no hammer action
Tool Type
Rotary Hammer
Difficulty
Medium
Time
More than 2 hours
Tools Used
Screwdriver, Pliers, Socket set, Wrench Set, snap ring pliers/ vice/ mre tools than I want to list
Wouldn’t hammer
Tool Type
Rotary Hammer
Difficulty
Medium
Time
1-2 hours
Tools Used
Screwdriver, Pliers, Wrench Set, Nutdriver
Put unit back together and it still won’t work so I scraped it and bought a new one
Would cost more than it’s worth
Already spent money on the repair kit
Demolition hammer stopped hammering
Tool Type
Rotary Hammer
Difficulty
Hard
Time
More than 2 hours
Tools Used
Screwdriver, Pliers, Snap ring removal tool
Parts Used
overworked burned gasket worn out brushes
Tool Type
Rotary Hammer
Difficulty
Medium
Time
30-60 minutes
Tools Used
Screwdriver, Pliers, clamp and bench vice
Parts Used
replaced the brushes .
put all new grease on components, and re assembled.
Hardest part is removing the function switch . push the red selector button all the way in turn clockwise past the hammer, and use a flathead to pop it off.
be careful with the brush housing its plastic tabs can break easy housing its a pressure clip
No hammer action
Tool Type
Rotary Hammer
Difficulty
Medium
Time
1-2 hours
Tools Used
Screwdriver, Pliers, Snap ring pliers, mallet
Parts Used
2. Cleaned all components.
3. Replaced components included in service kit.
4. Re-assembled unit referencing exploded view and using plenty of oil for gearbox components and grease for chuck components.
...the repair is more simple than the number of components implies. I recommend buying the Bosch oil as I got lucky to find equivalent oil at work, otherwise I would have probably compromised for something local and sub-par.
Rotary Hammer action was intermittant
Tool Type
Rotary Hammer
Difficulty
Easy
Time
15-30 minutes
Tools Used
Screwdriver
OEM stands for Original Equipment Manufacturer and means the part you’re buying is sourced directly from the manufacturer who made your product. At eReplacementParts, we sell only genuine OEM parts, guaranteeing the part you’re purchasing is of better design and of higher quality than aftermarket parts.
Our product descriptions are a combination of data sourced directly from the manufacturers who made your product as well as content researched and curated by our content & customer service teams. This content is edited and reviewed internally before being made public to customers.
Our customer service team are at the ready daily to answer your part and product questions. We have a dedicated staff with decades of collective experience in helping customers just like you purchase parts to repair their products.
All our part reviews are solicited directly from other customers who have purchased this exact part. While we moderate these reviews for profanity, offensive language or personally identifiable information, these reviews are posted exactly as submitted and no alterations are made by our team.
All our customer repair instructions are solicited directly from other customers just like you who have purchased and replaced this exact part. While we moderate these reviews for profanity, offensive language or personally identifiable information, these reviews are posted exactly as submitted and no alterations are made by our team.
Based on data from past customer purchasing behaviors, these parts are most commonly purchased together along with the part you are viewing. These parts may be necessary or helpful to replace to complete your current repair.
All our installation videos are created and produced in collaboration with our in-house repair technician, Mark Sodja, who has helped millions of eReplacementParts customers over the last 13 years repair their products. Mark has years of experience in selling and repairing both commercial and residential products with a specialty in gas-powered equipment.
This data is collected from customers who submitted a repair instruction after replacing this exact part. Customers can rate how easy the repair was to complete and how long it took. We aggregate this data to provide a repair rating that allows customers to quickly determine the difficulty and time needed to perform their own repair.


