
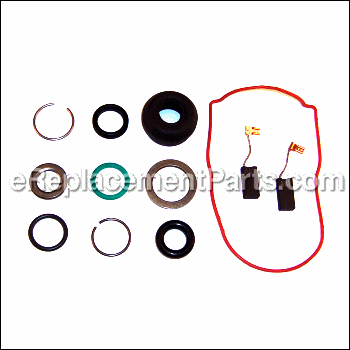
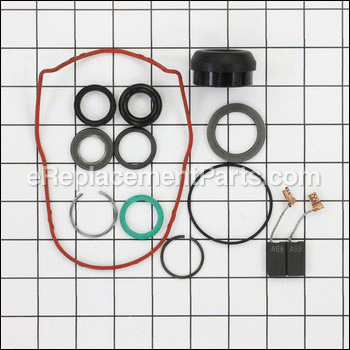
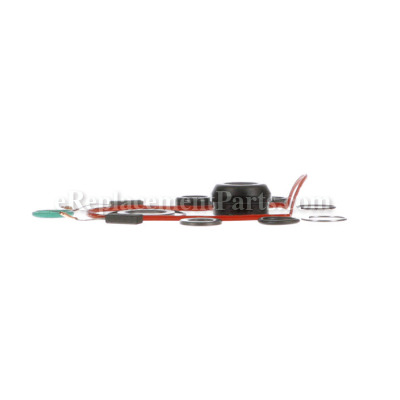


It is a genuine service pack which is supplied directly from the original equipment manufacturer for Bosch rotary hammers. Unfortunately, over time components may wear out causing intermittent performance and eventually requiring replacements. The service pack includes all the necessary gaskets and seals to rebuild your tool. Note, it also includes two carbon brushes with attached lead wires to ensure the electric motor runs properly. Make sure to refer to the owner's manual and the diagrams for your model to ensure the correct application of these parts. You will need a screwdriver and pliers to perform this repair.
Service Pack 1617000A16
OEM part for: Bosch
Part Number: 1617000A16
$38.91
In Stock
Jump To:
Frequently Purchased Together ?


Compatibility
This part will fit the following 1 machine
Bosch
11240 (0611240039) Rotary Hammer View Diagrams & Manuals
This item works with the following types of products:
- Rotary Hammer Parts
This part replaces obsolete part #: 1617000424
Customer Part Reviews ?
Average Rating (out of 5):
Click to filter by ratings:
5 stars
1
4 stars
0
3 stars
0
2 stars
0
1 stars
0
< PREV
- 1
No hammer? No problem
It was reassuring to hear that the loss of hammer function was fairly common, and easy to fix. Turns out to be true. The only special tool required was a pair of snap ring pliers skinny enough to get to the snap ring.
Guest -
July 12, 2022
Verified Purchase
t
t
t -
t days ago
Verified Purchase
eReplacementParts Team
t
Questions & Answers ?
Our customer Service team is at the ready daily to answer your part and product questions.

Ask our Team
We have a dedicated staff with decades of collective experience in helping customers just like you purchase parts to repair their products.
Does this fit my product?Questions & Answers for Service Pack
No questions have been asked yet
Customer Repair Instructions ?
All our customer repair instructions are solicited directly from other customers just like you who have purchased and replaced this exact part.
Weak Hammer
Bill - March 31, 2021
👍 1 of 1 people found this instruction helpful
Tool Type
Rotary Hammer
Difficulty
Medium
Time
30-60 minutes
Tools Used
Screwdriver, Torx Set
1. Drain Oil
2. Remove Nose Cone
3. Remove Snap Rings
4. Remove Tube
5. Remove Clutch Assembly (Note Spacer location)
6. Clean and Inspect all parts
7. Replace O rings from Service Kit
8.Note O Ring location inside of Housing ( easy to miss)
9. Grease and reinstall
10. Don't miss Housing Top Gasket
11. eReplacement has good U tube Link to Video
12. Pay close attention to the Clutch installation(Video has Correction in it).
Did you find this story helpful?
Thanks for voting and helping fellow customers!
Bosch rotary hammer 11240 did not hammer
Thomas - July 15, 2018
👍 1 of 1 people found this instruction helpful
Tool Type
Rotary Hammer
Difficulty
Easy
Time
30-60 minutes
Tools Used
, Torx drivers, snap ring pliers
1. Remove top cover
2. Drain oil
3. Remove rubber boot at collet
4. Remove external snap ring and spring/collar assembly
5. Remove internal snap ring and slide out shaft taking care to note order and orientation of gears.
6. Disassemble shaft and all hammer components
7. Clean all metal parts and replace all o-rings and washers included in kit
8. Reassemble is the reverse of removal
9. Refill oil reservoir with only 1 bottle of fluid and replace cover with new gasket
Did you find this story helpful?
Thanks for voting and helping fellow customers!
OEM stands for Original Equipment Manufacturer and means the part you’re buying is sourced directly from the manufacturer who made your product. At eReplacementParts, we sell only genuine OEM parts, guaranteeing the part you’re purchasing is of better design and of higher quality than aftermarket parts.
Our product descriptions are a combination of data sourced directly from the manufacturers who made your product as well as content researched and curated by our content & customer service teams. This content is edited and reviewed internally before being made public to customers.
Our customer service team are at the ready daily to answer your part and product questions. We have a dedicated staff with decades of collective experience in helping customers just like you purchase parts to repair their products.
All our part reviews are solicited directly from other customers who have purchased this exact part. While we moderate these reviews for profanity, offensive language or personally identifiable information, these reviews are posted exactly as submitted and no alterations are made by our team.
All our customer repair instructions are solicited directly from other customers just like you who have purchased and replaced this exact part. While we moderate these reviews for profanity, offensive language or personally identifiable information, these reviews are posted exactly as submitted and no alterations are made by our team.
Based on data from past customer purchasing behaviors, these parts are most commonly purchased together along with the part you are viewing. These parts may be necessary or helpful to replace to complete your current repair.
All our installation videos are created and produced in collaboration with our in-house repair technician, Mark Sodja, who has helped millions of eReplacementParts customers over the last 13 years repair their products. Mark has years of experience in selling and repairing both commercial and residential products with a specialty in gas-powered equipment.
This data is collected from customers who submitted a repair instruction after replacing this exact part. Customers can rate how easy the repair was to complete and how long it took. We aggregate this data to provide a repair rating that allows customers to quickly determine the difficulty and time needed to perform their own repair.