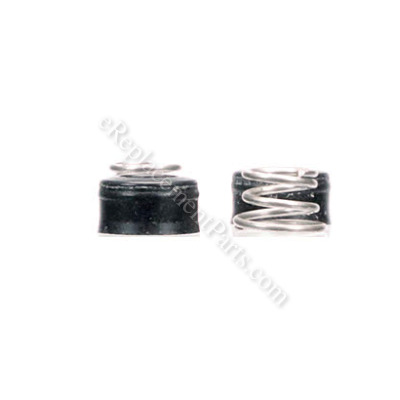
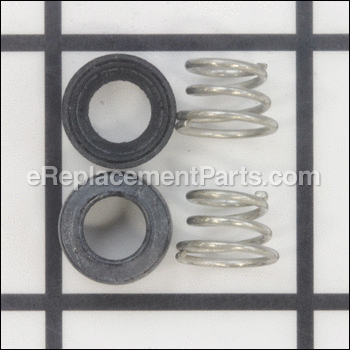


This is a genuine manufacturer sourced replacement part designed for use with Delta faucets. This kit repairs common issues associated with a leaking faucet. This assembly includes two (2) rubber seats and two (2) metal springs. Please note ball valves are not included.
To complete this repair you would need a wrench.
• Shut off water supply
• Remove handle
• Remove cap, adjusting ring , cam, packing and bail assembly
• Lift old seats and springs out of the body
• Replace springs in two small holes in the valve body
• Place new seats on top of springs
• Reassemble in reverse order
Seat And Spring Assembly 131139
OEM part for: Delta Faucet
Part Number: 131139
$10.59
Usually ships in 7 - 12 business days
7 - 12 business days
Jump To:
Product Description ?
- Classification: Part
- Weight: 0.01 lbs.
- Shipping: Ships Worldwide
Frequently Purchased Together ?


Compatibility
This part will fit the following 82 machines
Delta Faucet
1323 Shower Fixture View Diagrams & Manuals
1324 Shower Fixture View Diagrams & Manuals
132900 Shower Fixture View Diagrams & Manuals
142910 Shower Fixture View Diagrams & Manuals
BT14096 Shower Fixture View Diagrams & Manuals
BT14296 Shower Fixture View Diagrams & Manuals
R1827 Shower Fixture View Diagrams & Manuals
T14038 Shower Fixture View Diagrams & Manuals
T14051 Shower Fixture View Diagrams & Manuals
T14082 Shower Fixture View Diagrams & Manuals
T14085 Shower Fixture View Diagrams & Manuals
T14086 Shower Fixture View Diagrams & Manuals
T14092 Shower Fixture View Diagrams & Manuals
T14238 Shower Fixture View Diagrams & Manuals
T14251 Shower Fixture View Diagrams & Manuals
T14253-H2O Shower Fixture View Diagrams & Manuals
T14282 Shower Fixture View Diagrams & Manuals
T14285 Shower Fixture View Diagrams & Manuals
T14286 Shower Fixture View Diagrams & Manuals
T14292 Shower Fixture View Diagrams & Manuals
1343 Tub / Shower View Diagrams & Manuals
134900 Tub / Shower View Diagrams & Manuals
144910 Tub / Shower View Diagrams & Manuals
144984 Tub / Shower View Diagrams & Manuals
BT14496 Tub / Shower View Diagrams & Manuals
T14438 Tub / Shower View Diagrams & Manuals
T14438-H2O Tub / Shower View Diagrams & Manuals
T14440-LHP H740 Tub / Shower View Diagrams & Manuals
T14451 Tub / Shower View Diagrams & Manuals
T14453-H2O Tub / Shower View Diagrams & Manuals
T14455-LHP H716 Tub / Shower View Diagrams & Manuals
T14482 Tub / Shower View Diagrams & Manuals
T14485 Tub / Shower View Diagrams & Manuals
T14486 Tub / Shower View Diagrams & Manuals
T14492 Tub / Shower View Diagrams & Manuals
T14140-LHP H740 Tub Faucet View Diagrams & Manuals
T14155-LHP H716 Tub Faucet View Diagrams & Manuals
T14169-LHP H769 Tub Faucet View Diagrams & Manuals
T14185 Tub Faucet View Diagrams & Manuals
T14186 Tub Faucet View Diagrams & Manuals
44 Bidet Fixture View Diagrams & Manuals
44-LHP H21 Bidet Fixture View Diagrams & Manuals
570-WF Specialty Faucet View Diagrams & Manuals
2256-RBLHP H216RB Kitchen Faucet View Diagrams & Manuals
2276-LHP H24 A24 Kitchen Faucet View Diagrams & Manuals
2274-LHP H24 A24 Kitchen Faucet View Diagrams & Manuals
2476-LHP H24 A24 Kitchen Faucet View Diagrams & Manuals
2176-LHP H24 A24 Kitchen Faucet View Diagrams & Manuals
2402-LHP H215 Kitchen Faucet View Diagrams & Manuals
175-WF Kitchen Faucet View Diagrams & Manuals
300-WF Kitchen Faucet View Diagrams & Manuals
400-WF Kitchen Faucet View Diagrams & Manuals
120 Kitchen Faucet View Diagrams & Manuals
100-WF Kitchen Faucet View Diagrams & Manuals
2400 Kitchen Faucet View Diagrams & Manuals
R4707 Roman Tub Fixture View Diagrams & Manuals
R2707 Roman Tub Fixture View Diagrams & Manuals
R2700 Roman Tub Fixture View Diagrams & Manuals
4555-RBLHP H216RB Bathroom Faucet View Diagrams & Manuals
3551LF Bathroom Faucet View Diagrams & Manuals
3530-24 Bathroom Faucet View Diagrams & Manuals
4592 Bathroom Faucet View Diagrams & Manuals
4551 Bathroom Faucet View Diagrams & Manuals
4540-LHP H240 Bathroom Faucet View Diagrams & Manuals
4569-LHP H269 Bathroom Faucet View Diagrams & Manuals
2551LF Bathroom Faucet View Diagrams & Manuals
2592LF Bathroom Faucet View Diagrams & Manuals
4538 Bathroom Faucet View Diagrams & Manuals
4575 Bathroom Faucet View Diagrams & Manuals
3544-WF Bathroom Faucet View Diagrams & Manuals
2592 Bathroom Faucet View Diagrams & Manuals
2522-PB Bathroom Faucet View Diagrams & Manuals
2521-LHP H21 Bathroom Faucet View Diagrams & Manuals
2520 Bathroom Faucet View Diagrams & Manuals
2500 Bathroom Faucet View Diagrams & Manuals
11946-SD Single Lever Widespread Kitchen Faucet View Diagrams & Manuals
144710-RB-I Delta Monitor 14 Series Tub and Shower with In2ition Two-in-One Shower View Diagrams & Manuals
156SSWF Victorian Single-Handle Kitchen Faucet View Diagrams & Manuals
2497LF-RB Cassidy Kitchen Faucet with Spray View Diagrams & Manuals
2255-RBLHP H216RB Kitchen Facuet View Diagrams & Manuals
21902LF Lewiston Two Handle Faucet with Spray View Diagrams & Manuals
474-SS Waterfall Pull-Out Kitchen Faucet View Diagrams & Manuals
Show More Compatible Models
This item works with the following types of products:
- Faucet Parts
This part replaces obsolete part #: RP4993
Customer Part Reviews ?
Average Rating (out of 5):
Click to filter by ratings:
5 stars
4
4 stars
0
3 stars
0
2 stars
0
1 stars
0
< PREV
- 1
Delta Faucet repair parts
Exactly the parts I needed for the repair. Easy to order and arrived when promised.
Scott -
April 6, 2023
Verified Purchase
Easy repair
Parts fit great, no more leak in faucet
Guest -
October 8, 2021
Verified Purchase
Perfect replacement parts
ereplacementparts.com had what I needed and shipped asap, zero hassle. The Delta parts fit and work perfectly. In the case of my 400LF-WF faucet the replacement cam replaced the 2-piece original and the original adjustment ring gets discarded. Delta replaced 3 parts with one! Way to go ereplacementparts.com and Delta!
Guest -
September 14, 2021
Verified Purchase
Worked as expected.
Arrived quickly. Works great.
Guest -
June 3, 2020
Verified Purchase
t
t
t -
t days ago
Verified Purchase
eReplacementParts Team
t
Questions & Answers ?
Our customer Service team is at the ready daily to answer your part and product questions.

Ask our Team
We have a dedicated staff with decades of collective experience in helping customers just like you purchase parts to repair their products.
Does this fit my product?Questions & Answers for Seat And Spring Assembly
How do I remove plug hiding set screw?
Mel
for model number 3551LF
asked on 2023-01-09
Hello Mel, Thank you for the question. The Set screw can be removed with a Allen Wrench. We hope this helps!
eReplacementParts Team January 09, 2023
Customer Repair Instructions ?
All our customer repair instructions are solicited directly from other customers just like you who have purchased and replaced this exact part.
Leaking
John - November 15, 2017
👍 5 of 7 people found this instruction helpful
Tool Type
Faucet
Difficulty
Easy
Time
15-30 minutes
Tools Used
Adjustable Wrench, Allen wrench
Removed faucet head allen screw plug and screw, removed lock nut and washer, removed ball assembly, removed seats and springs. Installed new parts in reverse order and checked for leaks. Rebuilt faucet works great just like new.
Did you find this story helpful?
Thanks for voting and helping fellow customers!
Shower valve body was leaking
Glen - April 21, 2016
👍 5 of 8 people found this instruction helpful
Tool Type
Faucet
Difficulty
Easy
Time
15-30 minutes
Tools Used
, allen wrench.
Turned off the water. Removed the handle. Pulled out the valve body. Replaced the rubber seats and o-rings. Put the valve body back in the housing, Replaced the handle, turned the water back on and NO MORE LEAKING...
Did you find this story helpful?
Thanks for voting and helping fellow customers!
Leaky bathroom faucet
William - May 24, 2020
👍 1 of 1 people found this instruction helpful
Tool Type
Faucet
Difficulty
Medium
Time
Less than 15 minutes
Tools Used
Screwdriver, Adjustable Wrench
Parts Used
Note that in order to perform the repair, it is first necessary yo turn off the water supply to the faucet.
Removed the old seat and spring assembly, replaced with the new ones - then turned the water supply back on at the completion.
Removed the old seat and spring assembly, replaced with the new ones - then turned the water supply back on at the completion.
Did you find this story helpful?
Thanks for voting and helping fellow customers!
faucet delta
Manuel - January 1, 2021
Tool Type
Faucet
Difficulty
Easy
Time
Less than 15 minutes
Tools Used
Screwdriver, Pliers, Nutdriver
replace seals
Did you find this story helpful?
Thanks for voting and helping fellow customers!
Faucets leaking badly
Judie - April 5, 2020
Tool Type
Faucet
Difficulty
Easy
Time
15-30 minutes
Tools Used
Screwdriver, Adjustable Wrench, Small pocket knife, and Emory to smooth existing parts
Parts Used
Friend completed repair easily after receiving seat and spring assembly for both faucets of Delta kitchen faucets.
Did you find this story helpful?
Thanks for voting and helping fellow customers!
Leaking faucet
Jeff - November 13, 2019
Tool Type
Faucet
Difficulty
Easy
Time
Less than 15 minutes
Tools Used
Adjustable Wrench, allen wrench, needle nose pliers
Parts Used
1. shut water off under sink
2. removed faucet handle with Allen wrench
3. removed valve nut with adjustable wrench
4. remove valve by pulling straight up (may need to jiggle slightly to loosen)
5. remove seat and spring with needle nose pliers
6. remove remaining water in seat area with towel
7. set spring in seat area with needle nose pliers
8. put rubber seat over spring using needle nose pliers
9. press rubber seat to ensure it is not offside and fully around spring
10. re-install valve, and ensure it is in the notches
11. re-install valve nut and tighten slightly (do not overtighten)
12. re-install handle, and tighten Allen nut slightly
13. turn water back on and wait to see if any dripping
14. turn handle to ensure water comes out
Did you find this story helpful?
Thanks for voting and helping fellow customers!
Faucet was leaking from the spout
Michael - October 3, 2018
Tool Type
Faucet
Difficulty
Easy
Time
Less than 15 minutes
Tools Used
Screwdriver, Pliers
Parts Used
1. Removed the faucet handle by removing the set-screw beneath.
2. Unscrewed the large top nut by hand
3. Removed the ball water diverter
4. With needle nose pliers, removed the pair of springs and plastic seats
5. Replaced with new seats and springs, making sure the seats installed the correct way up
6. Reassembled by reversing the order of disassembly
Note: If faucet is leaking from the base of the faucet itself, a different part has worn out and requires a different repair.
Did you find this story helpful?
Thanks for voting and helping fellow customers!
Drip from faucet
David - August 4, 2018
👍 1 of 2 people found this instruction helpful
Tool Type
Faucet
Difficulty
Easy
Time
15-30 minutes
Tools Used
Screwdriver, Pliers, Wrench Set
Parts Used
Removed handle, the escutcheon,the valve. Took out the old seat and springs. Replaced everything in reverse order.
Did you find this story helpful?
Thanks for voting and helping fellow customers!
Faucet was leaking
Charles - August 11, 2017
👍 1 of 2 people found this instruction helpful
Tool Type
Faucet
Difficulty
Easy
Time
15-30 minutes
Tools Used
Adjustable Wrench, Allen wrench
Parts Used
Turned water off ! Removed handle by loosening set screw. Removed large nut and removed cam and ball assembly. Used a hook to remove seats and springs and cleaned surfaces. Installed new seats and springs. Reassembled in reverse order of disassembly. Leak fixed! Thank you eReplacement parts.com
Did you find this story helpful?
Thanks for voting and helping fellow customers!
Valve seats were worn and faucet leaked
Charles - July 3, 2017
👍 1 of 2 people found this instruction helpful
Tool Type
Faucet
Difficulty
Easy
Time
Less than 15 minutes
Tools Used
Screwdriver, Socket set
Parts Used
1. Removed cover for the allen set screw,
2. Found correct bit for the screw.
3. Removed screw, faucet handle and cap and ball valve.
4. Removed old seats and springs with small screwdriver.
5. Replaced with new seats and springs with small screwdriver.
6. Replaced ball and cap--noting keys for correct alignment.
7. Refastened handle with set screw and replaced cover.
Did you find this story helpful?
Thanks for voting and helping fellow customers!
Load More Install Stories
OEM stands for Original Equipment Manufacturer and means the part you’re buying is sourced directly from the manufacturer who made your product. At eReplacementParts, we sell only genuine OEM parts, guaranteeing the part you’re purchasing is of better design and of higher quality than aftermarket parts.
Our product descriptions are a combination of data sourced directly from the manufacturers who made your product as well as content researched and curated by our content & customer service teams. This content is edited and reviewed internally before being made public to customers.
Our customer service team are at the ready daily to answer your part and product questions. We have a dedicated staff with decades of collective experience in helping customers just like you purchase parts to repair their products.
All our part reviews are solicited directly from other customers who have purchased this exact part. While we moderate these reviews for profanity, offensive language or personally identifiable information, these reviews are posted exactly as submitted and no alterations are made by our team.
All our customer repair instructions are solicited directly from other customers just like you who have purchased and replaced this exact part. While we moderate these reviews for profanity, offensive language or personally identifiable information, these reviews are posted exactly as submitted and no alterations are made by our team.
Based on data from past customer purchasing behaviors, these parts are most commonly purchased together along with the part you are viewing. These parts may be necessary or helpful to replace to complete your current repair.
All our installation videos are created and produced in collaboration with our in-house repair technician, Mark Sodja, who has helped millions of eReplacementParts customers over the last 13 years repair their products. Mark has years of experience in selling and repairing both commercial and residential products with a specialty in gas-powered equipment.
This data is collected from customers who submitted a repair instruction after replacing this exact part. Customers can rate how easy the repair was to complete and how long it took. We aggregate this data to provide a repair rating that allows customers to quickly determine the difficulty and time needed to perform their own repair.