
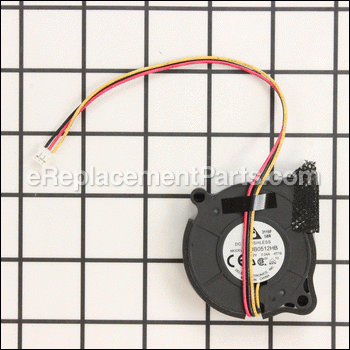
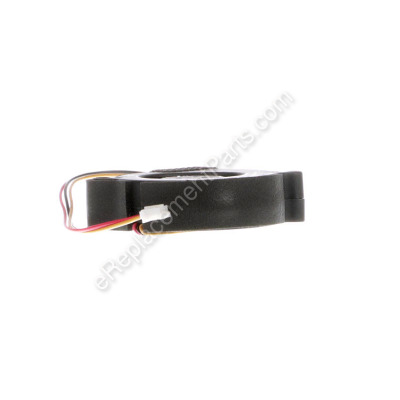


It is a high quality item that is specially produced for Makita chargers. This is an authentic OEM sourced item that helps to prevent the charger from overheating. One durable plastic scirocco fan is included per order, replacing it is a simple task that should only require a screwdriver.
Scirocco Fan 638499-5
OEM part for: Makita
Part Number: 638499-5
$24.27
In Stock
Compatibility
This part will fit the following 11 machines
Makita
DC24SA 24 Volt Charger View Diagrams & Manuals
DC14SA Charger View Diagrams & Manuals
DC18SC Charger View Diagrams & Manuals
DC18RA Rapid Battery Charger View Diagrams & Manuals
DC18RC 18v Lxt Lithium-Ion Rapid Optimum Charger View Diagrams & Manuals
DC18RD 18v Lxt Lithium-Ion Dual Port Rapid Optimum Charger View Diagrams & Manuals
DC18SE 18v Lxt Lithium-Ion Optimum Automotive Charger View Diagrams & Manuals
DC18RC (Type S) Misc View Diagrams & Manuals
DC18RC (Type T) Misc View Diagrams & Manuals
DC18RD (Type 1) Misc View Diagrams & Manuals
DC18RD (Type 2) Misc View Diagrams & Manuals
Show More Compatible Models
This item works with the following types of products:
- Charger Parts
This part replaces obsolete part #: 638084-4, 638008-0
Customer Part Reviews ?
Average Rating (out of 5):
Click to filter by ratings:
5 stars
2
4 stars
0
3 stars
0
2 stars
0
1 stars
0
< PREV
- 1
Good part and easy to install
By replacing the part the charger work fine
Guest -
July 18, 2020
Verified Purchase
Fair pricing, exact replacement.
The Makita charger is now working fine.
Guest -
August 5, 2019
Verified Purchase
t
t
t -
t days ago
Verified Purchase
eReplacementParts Team
t
Questions & Answers ?
Our customer Service team is at the ready daily to answer your part and product questions.

Ask our Team
We have a dedicated staff with decades of collective experience in helping customers just like you purchase parts to repair their products.
Does this fit my product?Questions & Answers for Scirocco Fan
No questions have been asked yet
Customer Repair Instructions ?
All our customer repair instructions are solicited directly from other customers just like you who have purchased and replaced this exact part.
Fan failing - very noisy
Gus - January 26, 2017
👍 4 of 4 people found this instruction helpful
Tool Type
Charger
Difficulty
Medium
Time
15-30 minutes
Tools Used
Screwdriver, needle nose pliers
Parts Used
0. Unplugged unit first;
1. Removed rubber feet exposing screw heads;
2. Removed 4 phillips head screws;
3. Removed lower case carefully;
4. Pulled fan plug with needle nose;
5. Carefully removed wire from plastic wire clip;
6. Old fan pulls out;
7. Install new fan in same position as old;
8. Plug new fan in and route wires thru plastic clip;
9 Insure battery plug assembly spring and guides fit in to the posts provided;
10. Assembly is the reverse of disassembly;
11. New fan is very quiet.
Did you find this story helpful?
Thanks for voting and helping fellow customers!
Cooling fan quit
Moe - September 6, 2017
👍 2 of 2 people found this instruction helpful
Tool Type
Charger
Difficulty
Easy
Time
Less than 15 minutes
Tools Used
Screwdriver
Parts Used
Remove the old fan and replace with the new one. Works great save a lot of money instead of buying a new charger.
Did you find this story helpful?
Thanks for voting and helping fellow customers!
Fan was Broken.
Chad - August 12, 2018
👍 1 of 1 people found this instruction helpful
Tool Type
Charger
Difficulty
Medium
Time
15-30 minutes
Tools Used
Screwdriver, Pliers
Parts Used
1.) Open the charger. 4 screws under the rubber feet.
2.) Unplug the fan clip. ( This was very difficult and needed to be pulled with pliers.)
3.) Place the new fan into position.
4.) Weave the wire and clip gently into place.
5.) Plug in the new fan clip.
6.) Replace the 4 screws folowed by the rubber feet.
Works good as new!
2.) Unplug the fan clip. ( This was very difficult and needed to be pulled with pliers.)
3.) Place the new fan into position.
4.) Weave the wire and clip gently into place.
5.) Plug in the new fan clip.
6.) Replace the 4 screws folowed by the rubber feet.
Works good as new!
Did you find this story helpful?
Thanks for voting and helping fellow customers!
fan died, charger stopped working.
Daniel - April 22, 2022
Tool Type
Charger
Difficulty
Easy
Time
Less than 15 minutes
Tools Used
, battery charger
Parts Used
removed covered
removed old fan
added new fan
added cover back on
tested ok
removed old fan
added new fan
added cover back on
tested ok
Did you find this story helpful?
Thanks for voting and helping fellow customers!
The fan was making noises and was not charging anymore
Laura - July 23, 2018
Tool Type
Charger
Difficulty
Easy
Time
Less than 15 minutes
Tools Used
Screwdriver
Parts Used
I remove the screws of the cover of the charger then
I unplug the old fan and remove it then I put the new one and plug it put the cover back with the screws and that's it, the charger was working perfectly.
I unplug the old fan and remove it then I put the new one and plug it put the cover back with the screws and that's it, the charger was working perfectly.
Did you find this story helpful?
Thanks for voting and helping fellow customers!
Charger not working -- giving fan error message
William - December 4, 2016
Tool Type
Charger
Difficulty
Easy
Time
Less than 15 minutes
Tools Used
Screwdriver
Parts Used
Opened case, removed defective fan and replaced it with the new one, closed case.
Simple fix, worked as expected.
Simple fix, worked as expected.
Did you find this story helpful?
Thanks for voting and helping fellow customers!
The fan was making a high pitched whining noise.
david - May 8, 2016
Tool Type
Charger
Difficulty
Easy
Time
Less than 15 minutes
Tools Used
Screwdriver
Parts Used
Simply unscrew the base, remove the fan, be careful not to break the harness retainer when you are unwinding the harness on the old fan. reuse the harness clip so the new fan wires don't rub. Simple repair.
Did you find this story helpful?
Thanks for voting and helping fellow customers!
My Makita dc18sc charger fan would stop and the red lights would blink.
anthony - March 22, 2016
Tool Type
Charger
Difficulty
Easy
Time
Less than 15 minutes
Tools Used
Screwdriver
Parts Used
I removed the screws from the bottom, remove the green top, unplug the connector from the circuit board remove the old fan and install the new one in reversed order.
Did you find this story helpful?
Thanks for voting and helping fellow customers!
Fan not working
Shamus - March 16, 2016
Tool Type
Charger
Difficulty
Easy
Time
Less than 15 minutes
Tools Used
Screwdriver, Pliers, None
Parts Used
Very easy, remove the four screws at the bottom of the charger. Lift the top off. Then unplug the old fan , then plug in the new fan. And put back together. Done.
Did you find this story helpful?
Thanks for voting and helping fellow customers!
Fan whent out
Norman - November 21, 2015
Tool Type
Charger
Difficulty
Easy
Time
Less than 15 minutes
Tools Used
Screwdriver
Parts Used
Unscrew the screws with small Philips head. Take out fan. Plug back in the new fan and screw back together. Plug in and the charge the battery. It took 3 minutes.
Did you find this story helpful?
Thanks for voting and helping fellow customers!
OEM stands for Original Equipment Manufacturer and means the part you’re buying is sourced directly from the manufacturer who made your product. At eReplacementParts, we sell only genuine OEM parts, guaranteeing the part you’re purchasing is of better design and of higher quality than aftermarket parts.
Our product descriptions are a combination of data sourced directly from the manufacturers who made your product as well as content researched and curated by our content & customer service teams. This content is edited and reviewed internally before being made public to customers.
Our customer service team are at the ready daily to answer your part and product questions. We have a dedicated staff with decades of collective experience in helping customers just like you purchase parts to repair their products.
All our part reviews are solicited directly from other customers who have purchased this exact part. While we moderate these reviews for profanity, offensive language or personally identifiable information, these reviews are posted exactly as submitted and no alterations are made by our team.
All our customer repair instructions are solicited directly from other customers just like you who have purchased and replaced this exact part. While we moderate these reviews for profanity, offensive language or personally identifiable information, these reviews are posted exactly as submitted and no alterations are made by our team.
Based on data from past customer purchasing behaviors, these parts are most commonly purchased together along with the part you are viewing. These parts may be necessary or helpful to replace to complete your current repair.
All our installation videos are created and produced in collaboration with our in-house repair technician, Mark Sodja, who has helped millions of eReplacementParts customers over the last 13 years repair their products. Mark has years of experience in selling and repairing both commercial and residential products with a specialty in gas-powered equipment.
This data is collected from customers who submitted a repair instruction after replacing this exact part. Customers can rate how easy the repair was to complete and how long it took. We aggregate this data to provide a repair rating that allows customers to quickly determine the difficulty and time needed to perform their own repair.