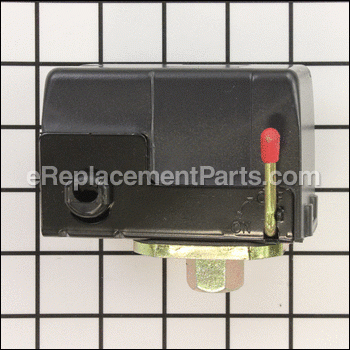

It is an authentic Senco replacement pressure switch which is specially manufactured for use with an air compressor. The pressure switch is designed to control when the compressor should start and stop building up the pressure in the tank. Common symptoms of a faulty pressure switch include a motor that continues to run regardless of pressure until the safety valve opens, or a compressor that simply will not turn on at all. Please note this part is sold individually.
Pressure Switch 2E21013TBQJ
OEM part for: Senco
Part Number: 2E21013TBQJ
$37.67
In Stock
Jump To:
Frequently Purchased Together ?
Compatibility
This part will fit the following 1 machine
Senco
PC0968 Electric Air Compressor View Diagrams & Manuals
This item works with the following types of products:
- Compressor Parts
Questions & Answers ?
Our customer Service team is at the ready daily to answer your part and product questions.

Ask our Team
We have a dedicated staff with decades of collective experience in helping customers just like you purchase parts to repair their products.
Does this fit my product?Questions & Answers for Pressure Switch
The on/off switch is stuck on the on position. Will turn off.
George
for model number Pc0968
asked on 2023-01-08
Hello George, thank you for your question. Yes, the Switch 2E21013TBQJ you had chosen is compatible with your model. Please feel free to give us a call. We look forward to hearing from you.
eReplacementParts Team January 08, 2023
Customer Repair Instructions ?
All our customer repair instructions are solicited directly from other customers just like you who have purchased and replaced this exact part.
Pressure switch not working
bert - May 8, 2016
👍 4 of 4 people found this instruction helpful
Tool Type
Compressor
Difficulty
Medium
Time
30-60 minutes
Tools Used
Screwdriver, Socket set
Parts Used
Removed all of the existing parts from the defective switch that do not come with the new switch. Removed the cover and then removed the wires. Removed the old switch. Then installed the new switch, then connected the wires to the new switch, replaced all of the parts that were taken of of the old defective switch. Done.
Did you find this story helpful?
Thanks for voting and helping fellow customers!
didnt shut off
Joseph - December 11, 2023
Tool Type
Compressor
Difficulty
Medium
Time
1-2 hours
Tools Used
Socket set, Wrench Set, Adjustable Wrench
removed the old and replaced with new
Did you find this story helpful?
Thanks for voting and helping fellow customers!
Pressure switch was broken.
Charles - June 15, 2023
Tool Type
Compressor
Difficulty
Easy
Time
1-2 hours
Tools Used
Screwdriver, Socket set, Wrench Set, A cheaters pipe.
Parts Used
1. Disconnect the 1/4 inch copper pressure line to the old switch. Note: Use two wrenches so as not to kink the copper line. Disconnect the line from the old switch first, but only loosen the other end so it can be swung out of the way when removing the old switch, and when installing the new switch.
2. Remove the fan housing from the motor. Three Phillips screws, but one is in a very tight spot. You must use a very low profile socket with a Phillips tip.
3. Remove broken switch form the switch base mount leaving all wires connected. Take out the four screws that hold this part to the base
4. Remove the switch base using the cheaters pipe with a wrench.
5. Install the new pressure switch.
6. Open up the housing on the new switch to expose the electrical connection.
7. Remove the wires from the old switch and install them on the new switch, one wire at a time! Being careful not to cross, or place any on the wrong terminal.
8. Replace the housing on the new switch.
9. Reinstall the fan housing on the motor.
10. Reinstall the 1/4 inch copper pressure line to the new switch first, then tighten the other end using the same two wrenches.
11. Plug it in, and switch it on.
Did you find this story helpful?
Thanks for voting and helping fellow customers!
pressure switch was leaking air due to condensation that caused corrosion
Raymond - December 22, 2020
Tool Type
Compressor
Difficulty
Medium
Time
30-60 minutes
Tools Used
Screwdriver, Wrench Set
Parts Used
replaced pressure switch
Did you find this story helpful?
Thanks for voting and helping fellow customers!
losing air
Dale - January 2, 2020
Tool Type
Compressor
Difficulty
Easy
Time
Less than 15 minutes
Tools Used
Wrench Set
Parts Used
just took old part out and replaced it with new part.
Did you find this story helpful?
Thanks for voting and helping fellow customers!
OEM stands for Original Equipment Manufacturer and means the part you’re buying is sourced directly from the manufacturer who made your product. At eReplacementParts, we sell only genuine OEM parts, guaranteeing the part you’re purchasing is of better design and of higher quality than aftermarket parts.
Our product descriptions are a combination of data sourced directly from the manufacturers who made your product as well as content researched and curated by our content & customer service teams. This content is edited and reviewed internally before being made public to customers.
Our customer service team are at the ready daily to answer your part and product questions. We have a dedicated staff with decades of collective experience in helping customers just like you purchase parts to repair their products.
All our part reviews are solicited directly from other customers who have purchased this exact part. While we moderate these reviews for profanity, offensive language or personally identifiable information, these reviews are posted exactly as submitted and no alterations are made by our team.
All our customer repair instructions are solicited directly from other customers just like you who have purchased and replaced this exact part. While we moderate these reviews for profanity, offensive language or personally identifiable information, these reviews are posted exactly as submitted and no alterations are made by our team.
Based on data from past customer purchasing behaviors, these parts are most commonly purchased together along with the part you are viewing. These parts may be necessary or helpful to replace to complete your current repair.
All our installation videos are created and produced in collaboration with our in-house repair technician, Mark Sodja, who has helped millions of eReplacementParts customers over the last 13 years repair their products. Mark has years of experience in selling and repairing both commercial and residential products with a specialty in gas-powered equipment.
This data is collected from customers who submitted a repair instruction after replacing this exact part. Customers can rate how easy the repair was to complete and how long it took. We aggregate this data to provide a repair rating that allows customers to quickly determine the difficulty and time needed to perform their own repair.