eReplacementParts.com
877-346-4814
Vision Fitness Parts

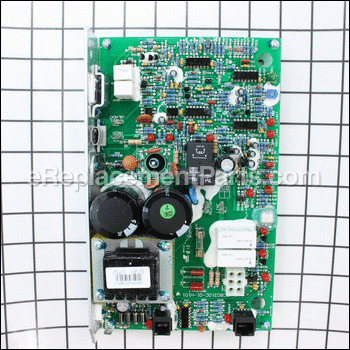
Motor Control Board 013680-DI

OEM part for: Vision Fitness

Part Number: 013680-DI


Install
Videos!
Grid squares measure 1x1 inch
$459.58
Usually ships in 7 - 12 business days
Leaves our warehouse within
7 - 12 business days
Easy 15-30 minutes (9 rated repairs)?
OEM: Original Equipment Manufacturer ?
Vision Fitness
Does this d-block d-md-none fit my product?

Product Description ?

  • Classification: Part
  • Weight: 2.85 lbs.
  • Shipping: Ships Worldwide

Compatibility

This part will fit the following 68 machines

Vision Fitness

T9450 (TM188-Deluxe-TC174B-6-Window)(2006) Treadmill - Folding View Diagrams & Manuals
T9450 (TM188-Premier-TC176B)(2006) Treadmill - Folding View Diagrams & Manuals
T9450 (TM188-Deluxe-TC42G-4-Window)(2006) Treadmill - Folding View Diagrams & Manuals
T9450 (TM245-Simple-TC172W)(2007) Treadmill - Folding View Diagrams & Manuals
T9450 (TM245-Deluxe-TC174W)(2007) Treadmill - Folding View Diagrams & Manuals
T9450 (TM245-Premier-TC176W)(2007) Treadmill - Folding View Diagrams & Manuals
T7000 (TM30)(1998-2000) Treadmill - Non-Folding View Diagrams & Manuals
T7200 (TM26)(1998-2000) Treadmill - Non-Folding View Diagrams & Manuals
T7400 (TM22)(1998-2000) Treadmill - Non-Folding View Diagrams & Manuals
T8400HRC (TM16-TM28)(1998-2000) Treadmill - Non-Folding View Diagrams & Manuals
T9000 (TM78)(2002-2004) Treadmill - Non-Folding View Diagrams & Manuals
T9100 (TM70)(2002-2004) Treadmill - Non-Folding View Diagrams & Manuals
T9200 (TM186-Simple-TC171)(2006) Treadmill - Non-Folding View Diagrams & Manuals
T9200 (TM186-Deluxe-TC17305-4-Window)(2006) Treadmill - Non-Folding View Diagrams & Manuals
T9200 (TM186-Deluxe-TC173B-6-Window)(2006) Treadmill - Non-Folding View Diagrams & Manuals
T9200 (TM186-Premier-TC175B)(2006) Treadmill - Non-Folding View Diagrams & Manuals
T9200 (TM240-Simple-TC171W)(2007) Treadmill - Non-Folding View Diagrams & Manuals
T9200 (TM240-Deluxe-TC173W)(2007) Treadmill - Non-Folding View Diagrams & Manuals
T9200 (TM240-Premier-TC175W)(2007) Treadmill - Non-Folding View Diagrams & Manuals
T9200 (TM49)(2002-2003) Treadmill - Non-Folding View Diagrams & Manuals
T9200 (TM49C)(2004) Treadmill - Non-Folding View Diagrams & Manuals
T9300 (TM55)(2002-2003) Treadmill - Non-Folding View Diagrams & Manuals
T9300 (TM55C)(2004) Treadmill - Non-Folding View Diagrams & Manuals
T9400HRT (TM56)(2002-2003) Treadmill - Non-Folding View Diagrams & Manuals
T9500HRT (TM54)(2002-2003) Treadmill - Non-Folding View Diagrams & Manuals
T8200 (TM10-TM29)(1998-2000) Treadmill - Folding View Diagrams & Manuals
T9250 (TM187-Simple-TC172)(2006) Treadmill - Folding View Diagrams & Manuals
T9250 (TM187-Deluxe-TC174B-6-Window)(2006) Treadmill - Folding View Diagrams & Manuals
T9250 (TM187-Premier-TC176B)(2006) Treadmill - Folding View Diagrams & Manuals
T9250 (TM187-Deluxe-TC42G-4-Window)(2006) Treadmill - Folding View Diagrams & Manuals
T9250 (TM244-Simple-TC172W)(2007) Treadmill - Folding View Diagrams & Manuals
T9250 (TM244-Deluxe-TC174W)(2007) Treadmill - Folding View Diagrams & Manuals
T9250 (TM244-Premier-TC176W)(2007) Treadmill - Folding View Diagrams & Manuals
T9250 (TM43)(2002-2003) Treadmill - Folding View Diagrams & Manuals
T9250 (TM43C)(2004) Treadmill - Folding View Diagrams & Manuals
T9250 (TM43E-TM43F)(2005) Treadmill - Folding View Diagrams & Manuals
T9350HRT (TM42E)(2005) Treadmill - Folding View Diagrams & Manuals
T9350 (TM42)(2002-2003) Treadmill - Folding View Diagrams & Manuals
T9350 (TM42C)(2004) Treadmill - Folding View Diagrams & Manuals
T9450HRT (TM47)(2002-2003) Treadmill - Folding View Diagrams & Manuals
T9450HRT (TM47C)(2004) Treadmill - Folding View Diagrams & Manuals
T9450HRT (TM47E-TM47F)(2005) Treadmill - Folding View Diagrams & Manuals
T9450 (TM188-Simple-TC172)(2006) Treadmill - Folding View Diagrams & Manuals
T9200 (TM186)(TC171)(Simple)(Platform)(2006) View Diagrams & Manuals
T9200 (TM186)(TC17305-4 Window)(Deluxe)(Platform)(2006) View Diagrams & Manuals
T9200 (TM186)(TC173B-6 Window)(Deluxe)(Platform)(2006) View Diagrams & Manuals
T9200 (TM186)(TC175B)(Premier)(Platform)(2006) View Diagrams & Manuals
T9200 (TM240)(TC171W)(Simple)(Platform)(2007) View Diagrams & Manuals
T9200 (TM240)(TC173W)(Deluxe)(Platform)(2007) View Diagrams & Manuals
T9200 (TM240)(TC175W)(Premier)(Platform)(2007) View Diagrams & Manuals
T9200 (TM49)(TM49D)(2002-2003) View Diagrams & Manuals
T9250 (TM187)(TC172)(Simple)(2006) View Diagrams & Manuals
T9250 (TM187)(TC174B-6 Window)(Deluxe)(2006) View Diagrams & Manuals
T9250 (TM187)(TC176B)(Premier)(2006) View Diagrams & Manuals
T9250 (TM187)(TC42G-4 Window)(Deluxe)(2006) View Diagrams & Manuals
T9250 (TM244)(TC172W)(Simple)(2007) View Diagrams & Manuals
T9250 (TM244)(TC174W)(Deluxe)(2007) View Diagrams & Manuals
T9250 (TM244)(TC176W)(Premier)(2007) View Diagrams & Manuals
T9300 (TM55)(2002) View Diagrams & Manuals
T9400HRT (TM56)(2002) View Diagrams & Manuals
T9450 (TM188)(TC172)(Simple)(2006) View Diagrams & Manuals
T9450 (TM188)(TC174B-6 Window)(Deluxe)(2006) View Diagrams & Manuals
T9450 (TM188)(TC176B)(Premier)(2006) View Diagrams & Manuals
T9450 (TM188)(TC42G-4 Window)(Deluxe)(2006) View Diagrams & Manuals
T9450 (TM245)(TC172W)(Simple)(2007) View Diagrams & Manuals
T9450 (TM245)(TC174W)(Deluxe)(2007) View Diagrams & Manuals
T9450 (TM245)(TC176W)(Premier)(2007) View Diagrams & Manuals
T9500HRT (TM54)(2002) View Diagrams & Manuals
Show More Compatible Models
Don't see yours? Try searching our site for :

This item works with the following types of products:

  • Treadmill Parts

Customer Part Reviews ?

5
Average Rating (out of 5):
1 Review
Click to filter by ratings:
5 stars
1
4 stars
0
3 stars
0
2 stars
0
1 stars
0
  • Highest Rating
  • Most Recent
< PREV
  • 1
NEXT >
  • Works like as intended. Just make sure you remember where all the wires connect
    Use your smart phone to take a photo of all the wire connections. MCB was packaged well. Unlike the experience of some other reviewers my old board was not fastened underneath by double stick tape. So, all I needed to do was remove the two screws from the side to remove the old board. One tip: you probably do not need to remove the three grounding wires which are connected to an upright bolt. Just re-connect and turn it the machine on. No additional programming needed. It just works.
    Lou - May 21, 2019 Verified Purchase
    t
    t
    t - t days ago Verified Purchase
    eReplacementParts Team
    t

    Questions & Answers ?

    Our customer Service team is at the ready daily to answer your part and product questions.

    photo of team member
    Ask our Team

    We have a dedicated staff with decades of collective experience in helping customers just like you purchase parts to repair their products.

    Does this fit my product?

    Questions & Answers for Motor Control Board


    Is replacing the motor control board a simple "plug and play" procedure? The picture looks different from mine. Does it fit t7000 without modifying?
    Vince for model number t7000 asked on 2022-05-13
    Hello Vince, thank you for the question. Change the wiring from the old board to the new board one wire at a time. Each wire should be changed over as follows. From the old, remove the red motor wire from the A+ terminal and put it on the new one on the terminal by the fuse array labeled A+. Next, remove the black motor wire from the A- terminal change the wiring from the old board to the new board one wire at a time. Each wire should be changed over as follows. From the old MC-80, remove the red motor wire from the A+ terminal and put it on the new board on the terminal by the fuse array labeled A+. Next, remove the black motor wire from the A- terminal and then put it on the terminal by the fuse array labeled A-.nd then put it on the terminal by the fuse array labeled A-. Next, remove the blue AC wire from the LG1 input on the old board and put it on the AC input terminal labeled L1. If your new one has two inputs labeled L1, you can put it on either terminal. Then, remove the white wire from the LG2 input and put it on the new board on the terminal labeled L2. Once again, if your upgrade has two inputs labeled L2, it can be placed on either one. The speed wire connections are very easy to do. Your Upgrade MC-80 will come with the three-speed wires preinstalled. Find the harness labeled H, W, and L right next to the MAX SPD pot on the old board and follow the wire harness to the power board. Remove the plugin on the power board and the plugin the speed wire harness (H, W, L) from the new board on the same terminal on the power board. The final step is the calibration of your unit. If you need help placing an order, customer service is open 7 days a week. Please feel free to give us a call. We look forward to hearing from you!
    eReplacementParts Team May 13, 2022

    Customer Repair Instructions ?

    All our customer repair instructions are solicited directly from other customers just like you who have purchased and replaced this exact part.

    Easy 15-30 minutes (9 rated repairs)?

    Replace Original Motor Control board on Vision Fitness T9250

    Robert - May 4, 2016
    👍 7 of 7 people found this instruction helpful
    Tool Type

    Treadmill

    Difficulty

    Medium

    Time

    1-2 hours

    Tools Used

    Screwdriver, Pliers, Power Drill, 1.5\\

    The replacement of the board was not so hard overall. I should have used my Makita cordless drill with a phillips head bit from the start and saved my self a lot of strain on my wrists. What really threw me at first was the original board has a section that is adhered to its mount with a large double sided sticky pad. That caused the delay. I thought I had overlooked a screw and couldn't find how I had missed anything. Once I levered a putty knife in to break the seal and scrape the residue out everything went ok. The connections are fairly idiot proof but if one was cautious he should take a picture first. When replacing original parts look for the glued in sticky pad.
    Did you find this story helpful?
    Thanks for voting and helping fellow customers!

    Vision Fitness T9200 Treadmill - belt not moving

    David - November 23, 2017
    👍 3 of 3 people found this instruction helpful
    Tool Type

    Treadmill

    Difficulty

    Medium

    Time

    30-60 minutes

    Tools Used

    Screwdriver, Thermal compound

    1. Isolated trouble to motor control board (MCB) before ordering replacement:
    - Verified control panel was working.
    - Verified working motor by removing leads from MCB and briefly connecting 12V car battery directly to motor (red lead to positive terminal, black to negative).
    - Compared status LEDs on MCB to info in downloaded maintenance manual and determined that motor control circuit not working.
    2. Unplugged treadmill.
    3. Disconnected all wires from MCB, noting where they attach (photos).
    4. Removed two screws holding MCB heat sink to chassis and removed MCB.
    5. Cleaned off old thermal compound and applied new.
    6. Placed new MCB in position and screwed tightly to chassis.
    7. Reconnected all wires.
    8. Plugged in treadmill and verified operation.
    Did you find this story helpful?
    Thanks for voting and helping fellow customers!

    Control board failed

    Steven - December 21, 2015
    👍 2 of 2 people found this instruction helpful
    Tool Type

    Treadmill

    Difficulty

    Easy

    Time

    15-30 minutes

    Tools Used

    Screwdriver

    Several Phillip head screws and 8 electrical plug ins was all it took. It was much easier than I thought it would be.
    Did you find this story helpful?
    Thanks for voting and helping fellow customers!

    Treadmill stopped working.

    Brenda - February 6, 2021
    Tool Type

    Treadmill

    Difficulty

    Medium

    Time

    30-60 minutes

    Tools Used

    Screwdriver, Socket set, Magnet on an expandable handle, for retrieving dropped screw

    Removed screws holding in the board.
    Transferred one wire at a time from old board to new. It was helpful to remove the zip ties on the old. Even though the board looks complicated, there are not that many wires to be switched over.
    One thing to note: on some of the wires you need to pinch in the tabs to get the connector to release.
    Only 3 of the 4 screws holding in the new board were able to be placed. One set of holes did not line up at all.
    The part that took the longest was putting the rest of the treadmill back together again. As you remove screws make note of where each type belongs.
    If a 62 year old woman and her 85 year old dad can do this repair, you can, too!
    Did you find this story helpful?
    Thanks for voting and helping fellow customers!

    Treadmill belt not working

    david - January 24, 2018
    Tool Type

    Treadmill

    Difficulty

    Easy

    Time

    Less than 15 minutes

    Tools Used

    Screwdriver, Pliers

    Removed the old control board out and connected each wire one at a time from the old one to the new one.
    Did you find this story helpful?
    Thanks for voting and helping fellow customers!

    The treadmill belt wouldn't run.

    Paul - November 8, 2016
    Tool Type

    Treadmill

    Difficulty

    Easy

    Time

    Less than 15 minutes

    Tools Used

    Screwdriver

    I diagnosed the problem by watching online videos, ordered the part from ereplacementparts, removed the old component and installed the new board. Tested. Works great!
    Did you find this story helpful?
    Thanks for voting and helping fellow customers!

    Motor controller board (relay chattering, no belt movement)

    Stan - August 13, 2016
    Tool Type

    Treadmill

    Difficulty

    Easy

    Time

    30-60 minutes

    Tools Used

    Screwdriver, Wrench Set

    Removed old motor controller and replaced with new one.
    Did you find this story helpful?
    Thanks for voting and helping fellow customers!

    The treadmill belt would not move. The motor control board needed replaced.

    James - July 18, 2016
    Tool Type

    Treadmill

    Difficulty

    Easy

    Time

    15-30 minutes

    Tools Used

    Screwdriver, Pliers

    1. Unplugged all wires and cables.
    2. Removed the damaged motor control board.
    3. Installed the new motor control board.
    4. Plugged wires and cables back in.

    It was an easy do it yourself project. Saved hundreds by not hiring a repairman.
    Did you find this story helpful?
    Thanks for voting and helping fellow customers!

    Treadmill would not run.

    David - April 21, 2016
    Tool Type

    Treadmill

    Difficulty

    Easy

    Time

    15-30 minutes

    Tools Used

    Screwdriver, Pliers, Socket set, Nutdriver, Adjustable Wrench

    Replace control board. Simple and easy repair. All wires are labeled and identified on the control board also.
    Did you find this story helpful?
    Thanks for voting and helping fellow customers!

    OEM stands for Original Equipment Manufacturer and means the part you’re buying is sourced directly from the manufacturer who made your product. At eReplacementParts, we sell only genuine OEM parts, guaranteeing the part you’re purchasing is of better design and of higher quality than aftermarket parts.

    Our product descriptions are a combination of data sourced directly from the manufacturers who made your product as well as content researched and curated by our content & customer service teams. This content is edited and reviewed internally before being made public to customers.

    Our customer service team are at the ready daily to answer your part and product questions. We have a dedicated staff with decades of collective experience in helping customers just like you purchase parts to repair their products.

    All our part reviews are solicited directly from other customers who have purchased this exact part. While we moderate these reviews for profanity, offensive language or personally identifiable information, these reviews are posted exactly as submitted and no alterations are made by our team.

    All our customer repair instructions are solicited directly from other customers just like you who have purchased and replaced this exact part. While we moderate these reviews for profanity, offensive language or personally identifiable information, these reviews are posted exactly as submitted and no alterations are made by our team.

    Based on data from past customer purchasing behaviors, these parts are most commonly purchased together along with the part you are viewing. These parts may be necessary or helpful to replace to complete your current repair.

    All our installation videos are created and produced in collaboration with our in-house repair technician, Mark Sodja, who has helped millions of eReplacementParts customers over the last 13 years repair their products. Mark has years of experience in selling and repairing both commercial and residential products with a specialty in gas-powered equipment.

    This data is collected from customers who submitted a repair instruction after replacing this exact part. Customers can rate how easy the repair was to complete and how long it took. We aggregate this data to provide a repair rating that allows customers to quickly determine the difficulty and time needed to perform their own repair.

    eReplacementParts.com
    7174 South 400 West
    Suite 5
    Midvale, UT 84047
    visa mastercard discover american express PayPal