
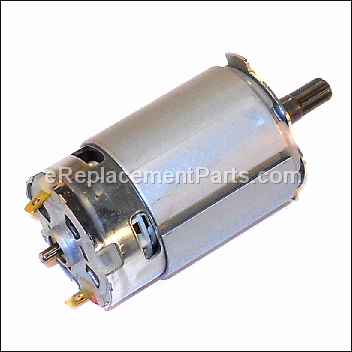

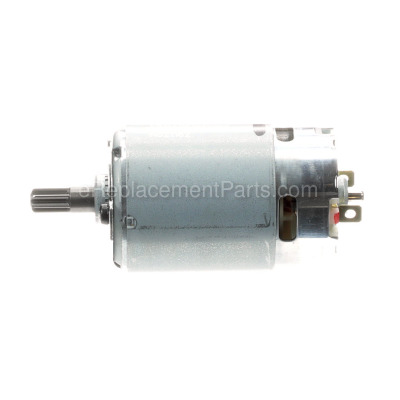


This is a genuine motor and pinion from DeWALT. The metal motor and pinion is compatible with some impact drivers. This item has been designed to power the driver devices, and is secured to the mechanism assembly. A screwdriver may be required when replacing this part. This part is sold individually.
Motor And Pinion N076006
OEM part for: DeWALT
Part Number: N076006
$32.47
In Stock
Compatibility
This part will fit the following 4 machines
DeWALT
DCF815S2 Type 1 12V 1/4" Impact Driver View Diagrams & Manuals
DCF813S2 Type 1 12V 3/8" Impact Wrench View Diagrams & Manuals
DCF813S2 (Type 2) 12v Impact Wrench Power Tool View Diagrams & Manuals
DCF815S2 (Type 2) Impact Driver Power Tool View Diagrams & Manuals
This item works with the following types of products:
- Impact Driver Parts
- Impact Wrench Parts
Customer Part Reviews ?
Average Rating (out of 5):
Click to filter by ratings:
5 stars
1
4 stars
0
3 stars
0
2 stars
0
1 stars
0
< PREV
- 1
Impact Driver Replacement Motor
The motor was exactly what I ordered, right size.
Too bad, it wasn't the part that was broken like I thought it was. Oh well; another dead tool on my bench!
Allen -
April 22, 2020
Verified Purchase
t
t
t -
t days ago
Verified Purchase
eReplacementParts Team
t
Questions & Answers ?
Our customer Service team is at the ready daily to answer your part and product questions.

Ask our Team
We have a dedicated staff with decades of collective experience in helping customers just like you purchase parts to repair their products.
Does this fit my product?Questions & Answers for Motor And Pinion
No questions have been asked yet
Customer Repair Instructions ?
All our customer repair instructions are solicited directly from other customers just like you who have purchased and replaced this exact part.
Motor had a dead spot and would only start half the time. I could get it to start by spinning the motor.
joaquin - March 27, 2016
👍 5 of 5 people found this instruction helpful
Tool Type
Impact Driver
Difficulty
Easy
Time
Less than 15 minutes
Tools Used
Screwdriver
Parts Used
Remove battery from tool, remove the nine screws holding the two halves of the tool together, split the tool(you will need to cut the label on top of the tool), remove the motor, remove the wires from the motor, connect the wires(noting positive and negative)to the new motor, install new motor in tool, put tool back together. make sure the motor is fitted correctly in the tool before you tighten the screws.
Did you find this story helpful?
Thanks for voting and helping fellow customers!
Had power but wouldn't work/bound up
jon-paul - March 23, 2018
👍 2 of 2 people found this instruction helpful
Tool Type
Impact Driver
Difficulty
Easy
Time
30-60 minutes
Tools Used
Screwdriver
Parts Used
Removed the 9 fasteners (t10). Pulled all the guts out and removed the motor from the front chuck piece (with the gears and all). Took just the motor to my vice and grabbed it with a pair of channel locks to make sure the motor was bound up.(it was) ordered the new part replaced it and did the 2 electrical connections. Managed to get the plastic housing lined up. (hardest part.) then replaced the 9 fasteners and it was good to go. However took it back apart because the gears in the front piece shifted slightly causing a lot of wobble and kick. Lined them up properly. (they really only go one way) replaces the fasteners yet again and was ready to roll.
Did you find this story helpful?
Thanks for voting and helping fellow customers!
Motor was burnt out
Andrew - June 7, 2018
👍 1 of 1 people found this instruction helpful
Tool Type
Impact Driver
Difficulty
Easy
Time
15-30 minutes
Tools Used
Screwdriver, .
Parts Used
1 Removed all the screws.
2 Disconnected the 2 wires from the motor.
3 Cleaned up all parts.
4 Installed the new motor.
5 Installed all screws.
6 Test, all set
2 Disconnected the 2 wires from the motor.
3 Cleaned up all parts.
4 Installed the new motor.
5 Installed all screws.
6 Test, all set
Did you find this story helpful?
Thanks for voting and helping fellow customers!
The motor wore down.
Michael - July 12, 2017
👍 1 of 1 people found this instruction helpful
Tool Type
Impact Driver
Difficulty
Medium
Time
15-30 minutes
Tools Used
, Soldering iton
Parts Used
Swapped motor and replaced connecting wire by soldier into place.
Did you find this story helpful?
Thanks for voting and helping fellow customers!
Motor fried
Daniel - February 4, 2019
Tool Type
Impact Driver
Difficulty
Easy
Time
Less than 15 minutes
Tools Used
Parts Used
Separated case
Pulled front drive off
Lifted drive motor out
Disconnected 3 electric leads
Reversed process for assembly
Pulled front drive off
Lifted drive motor out
Disconnected 3 electric leads
Reversed process for assembly
Did you find this story helpful?
Thanks for voting and helping fellow customers!
No torque
Gary - December 22, 2016
Tool Type
Impact Driver
Difficulty
Easy
Time
Less than 15 minutes
Tools Used
Screwdriver, Soldering gun
Parts Used
Remove the plastic housing, removed the motor, un-soldered the old motor and soldered in the new one. Reassembled
Did you find this story helpful?
Thanks for voting and helping fellow customers!
Improperly working motor
Carl - August 21, 2016
Tool Type
Impact Driver
Difficulty
Easy
Time
15-30 minutes
Tools Used
, Multi torq driver
Parts Used
1. Remove 9 torq screws
2. Remove shell carefully
3. Lift motor out from bottom shell and remove wires.
4. Replace with new motor,connect wires.
5. Replace top shell and screws.
6. Job well done
2. Remove shell carefully
3. Lift motor out from bottom shell and remove wires.
4. Replace with new motor,connect wires.
5. Replace top shell and screws.
6. Job well done
Did you find this story helpful?
Thanks for voting and helping fellow customers!
Dead dc motor
George - April 7, 2016
Tool Type
Impact Driver
Difficulty
Easy
Time
Less than 15 minutes
Tools Used
Power Drill
Parts Used
Remove the screws from the cordless drill, split the case open, carefully lift the old dc motor from the housing, pay close attention of the layout. Remove the positive (red) and negative (black) leads from the old dc motor. Place the positive (red) lead to the positive lead on the motor, there is a red indicator on the motor, then place the negative (black) to the negative lead on the motor. Push the motor into the gear assembly housing making sure the gears align. Place the dc motor on the case and screw the case together.
Did you find this story helpful?
Thanks for voting and helping fellow customers!
Burnt motor
Jose - February 26, 2016
Tool Type
Impact Driver
Difficulty
Easy
Time
15-30 minutes
Tools Used
, 15T torch
Parts Used
Remove the screws from the housing. Then take a few picture of how all the parts where installed. I also made a diagram of the wiring. Remove the wires from the motor. And removed motor. Make note on how the motor is placed in the housing the are some nubs on the motor that have to fit into the housing to make it fit correctly. Install new motor, install the wires. Make sure all the internal parts are where they should be. Then assemble the housing back together.
Did you find this story helpful?
Thanks for voting and helping fellow customers!
Impact driver cordless spins eratically and loses power to drive screws
Herman - November 24, 2015
Tool Type
Impact Driver
Difficulty
Easy
Time
15-30 minutes
Tools Used
, Star bit & cordless drill
Parts Used
Tried to isolate problem by substitution by replacing least costly part first. If it exceeded the cost of the drill it was time to discard it and move up to a more improve version. The only logical replacement was the motor being it was only around $20. The other related parts were the switch and gear which is $40-$50 each. The suspected motor was the culprit made the switch respond differently when applying pressure on areas of the switch. Repacked the gear with grease suspect it was a clutch issue which not the case. Once the new motor was reinstalled torque was renewed. Remove the screws from the housing, remove one side of the housing, take a picture of how all of the internal parts are placed. Remove motor and gear box. Note how they are placed in the housing, they have indents on them that have to go back into the housing the exact same way. Reinstall motor and gear case. and reverse disassembly.
Did you find this story helpful?
Thanks for voting and helping fellow customers!
OEM stands for Original Equipment Manufacturer and means the part you’re buying is sourced directly from the manufacturer who made your product. At eReplacementParts, we sell only genuine OEM parts, guaranteeing the part you’re purchasing is of better design and of higher quality than aftermarket parts.
Our product descriptions are a combination of data sourced directly from the manufacturers who made your product as well as content researched and curated by our content & customer service teams. This content is edited and reviewed internally before being made public to customers.
Our customer service team are at the ready daily to answer your part and product questions. We have a dedicated staff with decades of collective experience in helping customers just like you purchase parts to repair their products.
All our part reviews are solicited directly from other customers who have purchased this exact part. While we moderate these reviews for profanity, offensive language or personally identifiable information, these reviews are posted exactly as submitted and no alterations are made by our team.
All our customer repair instructions are solicited directly from other customers just like you who have purchased and replaced this exact part. While we moderate these reviews for profanity, offensive language or personally identifiable information, these reviews are posted exactly as submitted and no alterations are made by our team.
Based on data from past customer purchasing behaviors, these parts are most commonly purchased together along with the part you are viewing. These parts may be necessary or helpful to replace to complete your current repair.
All our installation videos are created and produced in collaboration with our in-house repair technician, Mark Sodja, who has helped millions of eReplacementParts customers over the last 13 years repair their products. Mark has years of experience in selling and repairing both commercial and residential products with a specialty in gas-powered equipment.
This data is collected from customers who submitted a repair instruction after replacing this exact part. Customers can rate how easy the repair was to complete and how long it took. We aggregate this data to provide a repair rating that allows customers to quickly determine the difficulty and time needed to perform their own repair.