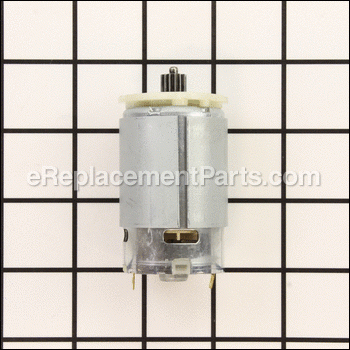

Genuine Dewalt replacement part used on a Drill/Driver. Includes an Electric Motor and a Pinion Gear. This part Connects to the Transmission Assembly and it is what drives the Bits. Pinion Gear is not sold separately. To open Drill Housing/Clamshell you would need a T10 Torx Screwdriver.
Motor And Pinion Assembly N075847
OEM part for: DeWALT
Part Number: N075847
$28.54
Usually ships in 7 - 12 business days
7 - 12 business days
Compatibility
This part will fit the following 2 machines
DeWALT
DCD710S2 Type 1 12V 3/8" Drill / Driver View Diagrams & Manuals
DCD710B (Type 1) 12v Li-Io Drill Tool Power Tool View Diagrams & Manuals
This item works with the following types of products:
- Drill Parts
Customer Part Reviews ?
Average Rating (out of 5):
Click to filter by ratings:
5 stars
9
4 stars
1
3 stars
0
2 stars
1
1 stars
0
< PREV
- 1
- 2
Just what the (drill) doctor ordered
My Dewalt cordless drill started to smoke. Following the internet guidance, I was able to identify the needed replacement part. eReplacementParts.com had the right part for my make and model at a good price. The correct part was delivered in just a few days. It fit perfectly and my drill is now good as new.
Guest -
June 30, 2023
Verified Purchase
PERFECT Fit for my DeWalt !!! My drill is new again
I had a DeWalt Drill that only had one problem it had a motor that smoked. All I had to do was find a replacement motor that was of quality and a direct replacement. I found eRaplacement from a friend and the order was placed and 4 days later I dropped the motor in my drill. Ran like a charm !! No More Sparking or Smoking motor.
Guest -
April 5, 2023
Verified Purchase
Dewalt drill repair
Delivery time was great 2 days. Drill works great.
Kim -
February 25, 2023
Verified Purchase
Excellent!
The right replacement part arrived when they said it would, and it worked. What more can you ask for?
Guest -
August 2, 2022
Verified Purchase
New life for my compact drill!
Exact OE replacement for my drill. I was fully expecting to have to buy a new drill when the motor burned out. The instructions were a very helpful, and I was back in business in five days. At the good price, I should have purchased a couple of replacement motors to have a spare.
Guest -
November 4, 2021
Verified Purchase
Favorite drill driver working again
Perfect fit, took longer to open case than to replace motor.
Guest -
June 25, 2021
Verified Purchase
Easy repair
Part fit great and works like it used to.
Guest -
May 25, 2020
Verified Purchase
Awesome deal and easy repair!
The motor went out in my drill, called e replacement and the lady found what I needed. Everything including the shipping was under $30 and it only took 5 minutes to replace the motor in the drill. Works like new again! Saved me the $100 I would have had to go spend on a new drill
Guest -
June 29, 2019
Verified Purchase
Worked great.
I like that this company has these parts to make tools work again rather than throwing out the whole tool. Thanks
Guest -
May 8, 2019
Verified Purchase
Drill motor works like a champ
The assemply of the motor wasnt difficult at all. The part seems to work well and im actually impressed by the overall performance.
Guest -
April 3, 2021
Verified Purchase
t
t
t -
t days ago
Verified Purchase
eReplacementParts Team
t
Questions & Answers ?
Our customer Service team is at the ready daily to answer your part and product questions.

Ask our Team
We have a dedicated staff with decades of collective experience in helping customers just like you purchase parts to repair their products.
Does this fit my product?Questions & Answers for Motor And Pinion Assembly
No questions have been asked yet
Customer Repair Instructions ?
All our customer repair instructions are solicited directly from other customers just like you who have purchased and replaced this exact part.
Drill motor started smoking.
Phil - June 17, 2016
👍 7 of 7 people found this instruction helpful
Tool Type
Cordless Drill
Difficulty
Medium
Time
15-30 minutes
Tools Used
Screwdriver
Parts Used
Unscrewed the necessary screws. Was careful to note the location of the 2-speed motor switch and its components. The motor has slots that need to match the pinion assembly. Careful to re-position the wiring into the proper grooves. Placed the half-section of the cover into position and screwed it down.
Did you find this story helpful?
Thanks for voting and helping fellow customers!
Stopped working on&off then smoked then completely stopped
kendall - April 17, 2016
👍 3 of 3 people found this instruction helpful
Tool Type
Cordless Drill
Difficulty
Easy
Time
Less than 15 minutes
Tools Used
Screwdriver
Parts Used
Just remove screws open half of gun disconnect wires to motor , take out motor. Now install in reverse order and your ready to go.
Did you find this story helpful?
Thanks for voting and helping fellow customers!
Drill was smoking
Glen - November 16, 2017
👍 2 of 2 people found this instruction helpful
Tool Type
Cordless Drill
Difficulty
Easy
Time
Less than 15 minutes
Tools Used
Screwdriver
Parts Used
Remove about 9 hex screws remove old motor install new one took less than 10 minutes
Did you find this story helpful?
Thanks for voting and helping fellow customers!
My Dewalt cordless drill motor was smoking
Allen - November 9, 2017
👍 2 of 2 people found this instruction helpful
Tool Type
Cordless Drill
Difficulty
Easy
Time
Less than 15 minutes
Tools Used
Screwdriver
Parts Used
1. Removed the 9 screws holding 1/2 of the drill case together.
2. Removed the Motor & Pinion Assembly (all in one piece) from the drill case.
3. Removed the two color coded wires from the motor.
4. Laid the old motor down and picked up the new motor & Pinion Assembly.
5. Attached the color coded wires on the new motor assembly.
6. Inserted the new motor into the drill making sure the gear on the motor engaged the gears on the drive unit in the drill.
7.Replaced the 1/2 of the drill cover that was removed to open the drill up for service.
8. Screwed the 9 screws back in that were removed to complete the installation,
9. Pulled the trigger and the drill was repaired Just like new.
10 It took longer the remove the 9 screws and put them back in that to replace the drill motor & Pinion Assembly.
Did you find this story helpful?
Thanks for voting and helping fellow customers!
Drill motor smoked and burned out
Gil - July 4, 2017
👍 1 of 1 people found this instruction helpful
Tool Type
Cordless Drill
Difficulty
Easy
Time
15-30 minutes
Tools Used
Screwdriver, Pliers, T10 Torx screw driver
Parts Used
1. Remove the nine T10 Torx screws on drill
2. Lift drill cover carefully to expose inside drill
3. Pull up motor and detach black and red wires from motor
4. Remove motor by pulling out of gear shaft (careful to keep metal plate in place that keep other cogs in place)
5. Install new motor by placing gear on tip of new motor into center
6. Attach red and black wires to new motor and press motor into drill slot
7. Replace drill cover and screw back together
8. Test drill
Good to go!
Did you find this story helpful?
Thanks for voting and helping fellow customers!
Motor was burnt out
James - June 23, 2017
👍 1 of 1 people found this instruction helpful
Tool Type
Cordless Drill
Difficulty
Easy
Time
15-30 minutes
Tools Used
Screwdriver, Pliers
Parts Used
I removed the screws holding the two halves of the drill together, removed the old motor and replaced it with the new one. It's now as good as new at a fraction of buying a used one.
Did you find this story helpful?
Thanks for voting and helping fellow customers!
Motor brushes broken. Would not turn.
David - March 20, 2017
👍 1 of 1 people found this instruction helpful
Tool Type
Cordless Drill
Difficulty
Easy
Time
Less than 15 minutes
Tools Used
Screwdriver, Torx bit
Parts Used
Remove nine torx screws to take apart the two halves of the case to access drill motor. Remove two electrical spade connectors on the back of the motor. Pull out the old motor. Replace with the new motor from eReplacement Parts. Reconnect wire connections, red to red, black to black. Reassemble case with nine screws. Test.
Did you find this story helpful?
Thanks for voting and helping fellow customers!
Motor wore out, heavy use
Dan - February 20, 2017
👍 1 of 1 people found this instruction helpful
Tool Type
Cordless Drill
Difficulty
Easy
Time
Less than 15 minutes
Tools Used
Screwdriver, torx
Parts Used
Split drill in half, carefully remove motor and gear assembly, remove motor, replace new motor, carefully replace in drill, line up all pieces and screw together
Did you find this story helpful?
Thanks for voting and helping fellow customers!
Cordless Drill Stopped working.
Jerry - December 21, 2016
👍 1 of 1 people found this instruction helpful
Tool Type
Cordless Drill
Difficulty
Easy
Time
15-30 minutes
Tools Used
Screwdriver, Soldering Gun
Parts Used
Took the drill housing apart by removing the screws.
Removed the motor housing, used solder gun to disconnect power wires.
Installed new motor housing soldered wires, reinstalled drill housing with the screws.
Installed battery drill runs great.
Removed the motor housing, used solder gun to disconnect power wires.
Installed new motor housing soldered wires, reinstalled drill housing with the screws.
Installed battery drill runs great.
Did you find this story helpful?
Thanks for voting and helping fellow customers!
Drive motor bad
Michael - November 4, 2016
👍 1 of 1 people found this instruction helpful
Tool Type
Cordless Drill
Difficulty
Easy
Time
15-30 minutes
Tools Used
Screwdriver
Parts Used
Remove the battery.
Remove the screws from the housing and separate them, trying to keep all of the parts in one half of the housing.
Make a wiring diagram.
Disconnect the wires from the motor.
Remove the motor from the transgression and housing.
Install the new motor.
Connect the wires.
Make sure all of the parts are where they belong.
Screw the housing together.
Install battery and test.
Did you find this story helpful?
Thanks for voting and helping fellow customers!
Load More Install Stories
OEM stands for Original Equipment Manufacturer and means the part you’re buying is sourced directly from the manufacturer who made your product. At eReplacementParts, we sell only genuine OEM parts, guaranteeing the part you’re purchasing is of better design and of higher quality than aftermarket parts.
Our product descriptions are a combination of data sourced directly from the manufacturers who made your product as well as content researched and curated by our content & customer service teams. This content is edited and reviewed internally before being made public to customers.
Our customer service team are at the ready daily to answer your part and product questions. We have a dedicated staff with decades of collective experience in helping customers just like you purchase parts to repair their products.
All our part reviews are solicited directly from other customers who have purchased this exact part. While we moderate these reviews for profanity, offensive language or personally identifiable information, these reviews are posted exactly as submitted and no alterations are made by our team.
All our customer repair instructions are solicited directly from other customers just like you who have purchased and replaced this exact part. While we moderate these reviews for profanity, offensive language or personally identifiable information, these reviews are posted exactly as submitted and no alterations are made by our team.
Based on data from past customer purchasing behaviors, these parts are most commonly purchased together along with the part you are viewing. These parts may be necessary or helpful to replace to complete your current repair.
All our installation videos are created and produced in collaboration with our in-house repair technician, Mark Sodja, who has helped millions of eReplacementParts customers over the last 13 years repair their products. Mark has years of experience in selling and repairing both commercial and residential products with a specialty in gas-powered equipment.
This data is collected from customers who submitted a repair instruction after replacing this exact part. Customers can rate how easy the repair was to complete and how long it took. We aggregate this data to provide a repair rating that allows customers to quickly determine the difficulty and time needed to perform their own repair.