
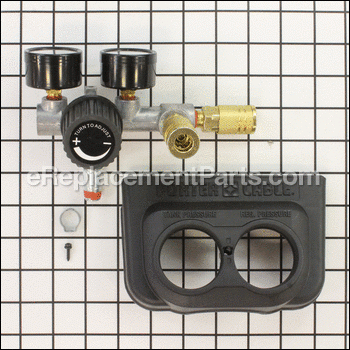
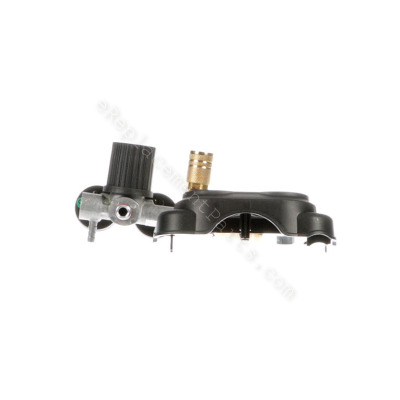


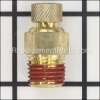
This is a genuine manufacturer supplied pressure regulator for Porter Cable Air Compressors. This part adjusts the pressure of the air coming from the tank to the desired level. Includes SS-322-CD pipe plug; A17166 gauge; Z-D27212 gauge; A16182 quick connect (2 ea); N044990 nipple; SSF-621 screw; CAC-1206-1 hose clamp. Make sure to unplug the air compressor release all the air from the tank before installing this part.
Manifold Kit 5140110-41
OEM part for: Porter Cable, DeWALT
Part Number: 5140110-41
$68.16
In Stock
Jump To:
Frequently Purchased Together ?
Compatibility
This part will fit the following 13 machines
Porter Cable
C2006 Type 0 Compressor View Diagrams & Manuals
C2002-WK Type 0 1HP 6G Compressor View Diagrams & Manuals
C6001 150 PSI 17 Gallon Oil-Free Vertical Portable Compressor View Diagrams & Manuals
C2002 Type 2 1HP 6 Gallon Compressor View Diagrams & Manuals
C2002 Type 3 1HP 6 Gallon Compressor View Diagrams & Manuals
C2002 Type 0 1 HP 6 Gallon Compressor View Diagrams & Manuals
C2002 Type 4 1 HP 6 Gallon Compressor View Diagrams & Manuals
C2002M-WK (Type 1) Compressor View Diagrams & Manuals
C2002-WK (Type 3) Finish Nailer Power Tool View Diagrams & Manuals
C2002-WK (Type 4) A 1.5hp 6g Pc Um 1stg 120 Power Tool View Diagrams & Manuals
C6001 (Type 0) 17g 150psi Compressr Power Tool View Diagrams & Manuals
DeWALT
D2002M-WK (Type 3) Dewalt Compressor View Diagrams & Manuals
D2002M-WK (Type 4) Dewalt Compressor View Diagrams & Manuals
Show More Compatible Models
This item works with the following types of products:
- Compressor Parts
This part replaces obsolete part #: N003001, 1000002881, A18038
Customer Part Reviews ?
Average Rating (out of 5):
Click to filter by ratings:
5 stars
15
4 stars
1
3 stars
1
2 stars
0
1 stars
0
< PREV
- 1
- 2
Worked great.
The new part works great. Everything I needed came in the kit. I will use you guys again.
Guest -
September 19, 2023
Verified Purchase
Fit like a glove. Thank you
Had the compressor up and running in minutes.
james -
December 3, 2022
Verified Purchase
compressor regulator and tank drain
sizing was smaller than original but that was noted in packaging - everything went together fine and fixed our compressor
Guest -
November 1, 2022
Verified Purchase
Made my compressor new again
Esaú repair
Guest -
June 21, 2022
Verified Purchase
The part was great
Also the directions was very easy yo understand
Dennis -
February 19, 2022
Verified Purchase
Great all around
Received early, packed well and fit with no problems
Thanks
Guest -
June 16, 2021
Verified Purchase
Great service.
Prompt shipment. Part installed easily and compressor is working like new.
Donald -
June 17, 2020
Verified Purchase
Compressor repair
Parts ordering was easy. Received in two days. Overall repair was very easy to accomplish
Guest -
April 28, 2020
Verified Purchase
Manifold kit replacement part
Manifold kit replacement arrived on time and I had it installed in less than an hour. My 12 year old Porter-Cable compressor is up and running again like new.
Guest -
December 10, 2019
Verified Purchase
Everything matched up.
So think I may have to send this item back. I was taking back on how accurate the item match on the listing. Very happy.
Guest -
October 15, 2019
Verified Purchase
t
t
t -
t days ago
Verified Purchase
eReplacementParts Team
t
Questions & Answers ?
Our customer Service team is at the ready daily to answer your part and product questions.

Ask our Team
We have a dedicated staff with decades of collective experience in helping customers just like you purchase parts to repair their products.
Does this fit my product?Questions & Answers for Manifold Kit
No questions have been asked yet
Customer Repair Instructions ?
All our customer repair instructions are solicited directly from other customers just like you who have purchased and replaced this exact part.
Compressor leaking air under regulator knob
George - July 9, 2016
👍 17 of 17 people found this instruction helpful
Tool Type
Compressor
Difficulty
Medium
Time
30-60 minutes
Tools Used
Screwdriver, Pliers, Wrench Set
Parts Used
1. Removed pump from tank.
2. Removed air hose connected the to manifold.
3. Unscrewed manifold from tank.
4. Unscrewed pressure relief valve from the old manifold and installed on new manifold using 5. Pipe thread compound, (not Teflon tape).
6. Installed air hose onto the new manifold. Used 5/8" hose clamp. Clamp supplied with manifold required crimping tool that I did not have.
7. Installed pump onto tank.
8. Job finished and compressor works fine.
Did you find this story helpful?
Thanks for voting and helping fellow customers!
The compressor would build pressure in the tank but the air would not come thru the manifold because of a broken plastic piece in the regulator
Arthor - September 16, 2016
👍 15 of 16 people found this instruction helpful
Tool Type
Compressor
Difficulty
Easy
Time
15-30 minutes
Tools Used
Pliers, Allen wrenches and a knife
Parts Used
1 Removed the motor off the tank
2 Unscrewed the manifold
3 Replaced with the new manifold
4 Put the motor back in place
5 Filled the tank with air adjusted the regulator
6 Worked like it was brand new
2 Unscrewed the manifold
3 Replaced with the new manifold
4 Put the motor back in place
5 Filled the tank with air adjusted the regulator
6 Worked like it was brand new
Did you find this story helpful?
Thanks for voting and helping fellow customers!
Plastic valve broken in manifold
Sean - October 16, 2016
👍 11 of 11 people found this instruction helpful
Tool Type
Compressor
Difficulty
Easy
Time
Less than 15 minutes
Tools Used
Screwdriver, Pliers, Wrench Set, Allen wrench and box cutter
Parts Used
Remove Allen screw from manifold cover and remove manifold cover
Remove set screws on motor and slide motor out of mounts and off tank
Cut rubber hose at manifold end
Unscrew old manifold by hand
Screw in new manifold by hand
Reattach robber hose and secure with clamp
Replace motor and set screws
Attach manifold cover with Allen wrench
Keep in mind that this is not the same manifold you removed. This one is smaller and does not have the plastic valve that the old one had. It is worth replacing. New manifold will not fail in the same way the old one did
Did you find this story helpful?
Thanks for voting and helping fellow customers!
The compressor regulator stopped working and so I went to Lowes and bought another compressor but the sales clerk told me that I should go online to Porter-Cable and order a replacement regulator and
Bill - July 26, 2016
👍 6 of 6 people found this instruction helpful
Tool Type
Compressor
Difficulty
Easy
Time
30-60 minutes
Tools Used
Screwdriver, Pliers, none
Parts Used
I had to remove the top assembly in order to unscrew the fitting attaching the old regulator to the air tank then I installed new regulator and connected the small hose back and then reinstalled the top motor assembly Very easy and if I had to do it again it would take no more than 15 minutes to do complete..
Did you find this story helpful?
Thanks for voting and helping fellow customers!
Broken pressure regulator
Sam - March 29, 2016
👍 4 of 4 people found this instruction helpful
Tool Type
Compressor
Difficulty
Easy
Time
15-30 minutes
Tools Used
Adjustable Wrench
Parts Used
You will need to remove the compressor/motor housing on top of the tank (the part with the handle). There are two phillips head screws on the bottom of the housing, front and rear, holding it in place. These must be removed allowing the housing to shift slightly for removal. Also, the supply hose from the compressor to the new manifold must be shortened to accommodate a different attachment location.
Did you find this story helpful?
Thanks for voting and helping fellow customers!
Air not going into the hose side.
Gregory - November 13, 2017
👍 2 of 2 people found this instruction helpful
Tool Type
Compressor
Difficulty
Easy
Time
15-30 minutes
Tools Used
Pliers, Wrench Set, Allen key
Parts Used
1. Removed the old manifold and the hose clamp.
2. Replaced it with the new manifold kit and the hose clamp.
2. Replaced it with the new manifold kit and the hose clamp.
Did you find this story helpful?
Thanks for voting and helping fellow customers!
My compressor pressure valve broke! In order to fix I needed to replace manifold. Ereplacement parts provided a cheap and easy fix!!!!!
Josh - April 12, 2016
👍 2 of 3 people found this instruction helpful
Tool Type
Compressor
Difficulty
Medium
Time
15-30 minutes
Tools Used
Screwdriver, Pliers, Adjustable Wrench
Parts Used
Strip down old existing manifold with a few house hold tools, new manifold comes with everything already attached and ready to thread in the housing. Tighten with channel locks and test run new manifold! "Bam" that easy.
Did you find this story helpful?
Thanks for voting and helping fellow customers!
Couldn't adjust air on compressor for output
Albert - February 10, 2019
Tool Type
Compressor
Difficulty
Easy
Time
15-30 minutes
Tools Used
Screwdriver, Pliers, Adjustable Wrench
Parts Used
Replaced the manifold by taking two screws out sliding the compressor off the tank undoing small hose off manifold set compressor off to the side unscrewing the manifold and pulling it back together
Did you find this story helpful?
Thanks for voting and helping fellow customers!
Compresssor leaking
Mark - January 21, 2019
Tool Type
Compressor
Difficulty
Easy
Time
15-30 minutes
Tools Used
Screwdriver, Pliers, Wrench Set
Parts Used
1. Removed screws from front and back of motor assembly
2. Slid out motor from tank
3. Disconnected hose from manifold assembly
4. Removed manifold assembly
5. Installed new manifold
6. Cut hose to fit new manifold assembly (different from original)
7. Attached hose and clamp
8. Re-attached motor to compressor with screws
2. Slid out motor from tank
3. Disconnected hose from manifold assembly
4. Removed manifold assembly
5. Installed new manifold
6. Cut hose to fit new manifold assembly (different from original)
7. Attached hose and clamp
8. Re-attached motor to compressor with screws
Did you find this story helpful?
Thanks for voting and helping fellow customers!
the pressure regulator broke had to install a new manifold with new regulqator
ROBERT - December 13, 2018
Tool Type
Compressor
Difficulty
Medium
Time
15-30 minutes
Tools Used
Screwdriver, Pliers, Adjustable Wrench, none
Parts Used
remover the housing and compressor
disconnected the air hoses
unscrewed the regulator manifold
installed the new manifold
reattached the air hoses
reinstalled the compressor and housing
completed the job
disconnected the air hoses
unscrewed the regulator manifold
installed the new manifold
reattached the air hoses
reinstalled the compressor and housing
completed the job
Did you find this story helpful?
Thanks for voting and helping fellow customers!
Load More Install Stories
OEM stands for Original Equipment Manufacturer and means the part you’re buying is sourced directly from the manufacturer who made your product. At eReplacementParts, we sell only genuine OEM parts, guaranteeing the part you’re purchasing is of better design and of higher quality than aftermarket parts.
Our product descriptions are a combination of data sourced directly from the manufacturers who made your product as well as content researched and curated by our content & customer service teams. This content is edited and reviewed internally before being made public to customers.
Our customer service team are at the ready daily to answer your part and product questions. We have a dedicated staff with decades of collective experience in helping customers just like you purchase parts to repair their products.
All our part reviews are solicited directly from other customers who have purchased this exact part. While we moderate these reviews for profanity, offensive language or personally identifiable information, these reviews are posted exactly as submitted and no alterations are made by our team.
All our customer repair instructions are solicited directly from other customers just like you who have purchased and replaced this exact part. While we moderate these reviews for profanity, offensive language or personally identifiable information, these reviews are posted exactly as submitted and no alterations are made by our team.
Based on data from past customer purchasing behaviors, these parts are most commonly purchased together along with the part you are viewing. These parts may be necessary or helpful to replace to complete your current repair.
All our installation videos are created and produced in collaboration with our in-house repair technician, Mark Sodja, who has helped millions of eReplacementParts customers over the last 13 years repair their products. Mark has years of experience in selling and repairing both commercial and residential products with a specialty in gas-powered equipment.
This data is collected from customers who submitted a repair instruction after replacing this exact part. Customers can rate how easy the repair was to complete and how long it took. We aggregate this data to provide a repair rating that allows customers to quickly determine the difficulty and time needed to perform their own repair.