
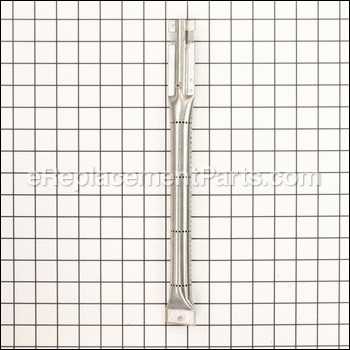
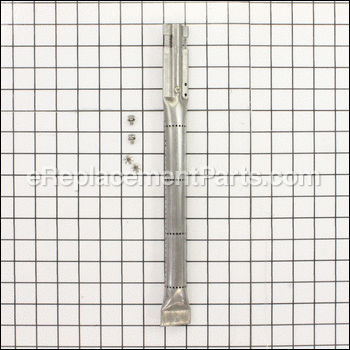

Main Tube Burner G309-1800-W2
OEM part for: Char-Broil
Part Number: G309-1800-W2
$13.69
In Stock
Jump To:
Frequently Purchased Together ?


Compatibility
This part will fit the following 9 machines
Char-Broil
463622514 Value Series Gas Grill View Diagrams & Manuals
463622512 Classic Grill View Diagrams & Manuals
463622513 Classic Grill View Diagrams & Manuals
463622515 Traditional 2 Burner Gas Grill View Diagrams & Manuals
463622713 Classic 2 Burner Gas Grill View Diagrams & Manuals
463650413 Classic Grill View Diagrams & Manuals
463650414 Char-Broil Urban 2-Burner Gas Grill View Diagrams & Manuals
466622513 Classic Grill View Diagrams & Manuals
466650414 Gas Grill Value Series View Diagrams & Manuals
Show More Compatible Models
This item works with the following types of products:
This part replaces obsolete part #: G309-1800-W1
Repair Videos ?

Articles:
|
Having trouble getting your grill to light up? A common cause of this issue is a defective ignition switch. We'll sho...
November 08, 2012
|

Customer Part Reviews ?
Average Rating (out of 5):
Click to filter by ratings:
5 stars
1
4 stars
0
3 stars
0
2 stars
0
1 stars
0
< PREV
- 1
Gas grill repair
5 minute repair. Back to working like new again.
Randy -
February 24, 2023
Verified Purchase
t
t
t -
t days ago
Verified Purchase
eReplacementParts Team
t
Questions & Answers ?
Our customer Service team is at the ready daily to answer your part and product questions.

Ask our Team
We have a dedicated staff with decades of collective experience in helping customers just like you purchase parts to repair their products.
Does this fit my product?Questions & Answers for Main Tube Burner
No questions have been asked yet
Customer Repair Instructions ?
All our customer repair instructions are solicited directly from other customers just like you who have purchased and replaced this exact part.
Carryover tube and burners had deteriorated
Paul - May 5, 2018
Tool Type
Outdoor Grill
Difficulty
Easy
Time
30-60 minutes
Tools Used
Screwdriver, Pliers
Removed the old parts
Thoroughly cleaned bottom of firebox (since it was so convenient)
Assembled and installed replacement parts
The only difficulty I ran into was that the old screws had eroded from the back end of the burners and the tabs to screw the new ones down had the remnants of the old screws, nuts, and washers kind of welded over the holes. The tabs were delicate and I was sure they would break off if I drilled them out. I ended up placing 6" channel locks on the nuts and gently massaged back and forth a few times and they came loose.
The rest was easy breezy!
Did you find this story helpful?
Thanks for voting and helping fellow customers!
Grill was just in need of parts replacement.
Walter - April 26, 2018
Tool Type
Outdoor Grill
Difficulty
Easy
Time
30-60 minutes
Tools Used
Screwdriver, Pliers, Wrench Set
Removed old burners, carryover tube, electrode and heat tents. Cleaned out the fire box. New parts were an exact fit.
Did you find this story helpful?
Thanks for voting and helping fellow customers!
Two additional screws are needed to reattach the igniter as the old ones had to be drilled out.
Randall - May 31, 2017
Tool Type
Outdoor Grill
Difficulty
Easy
Time
30-60 minutes
Tools Used
Screwdriver, Pliers, Power Drill
1. Remove old grill plates.
2. Remove heat shields.
3. Remove igniter from the burner. Had to use a drill and bit to get old screws out as they rusted together.
4. Remove two tube burners. Had to use a drill and bit to get old screws out as they rusted all together with the mounting bracket at the rear of the grill.
5. What was left of the carryover tube came out with the two tube burners. Cleaned out all the old grease and debris from grill cooking chamber.
6. Mounted two new tube burners, screws and nuts were provided for the attachment.
7. Mounted the igniter to the right tube burner, needed two additional screws for this.
8. Mounted the carryover tube to the two tube burners, screws were provided for the attachment.
9. Tested the tube burners to be sure they worked properly.
10. Placed the two heat tents over the tube burners.
11. Placed the two cooking grates into their respective spots.
Did you find this story helpful?
Thanks for voting and helping fellow customers!
OEM stands for Original Equipment Manufacturer and means the part you’re buying is sourced directly from the manufacturer who made your product. At eReplacementParts, we sell only genuine OEM parts, guaranteeing the part you’re purchasing is of better design and of higher quality than aftermarket parts.
Our product descriptions are a combination of data sourced directly from the manufacturers who made your product as well as content researched and curated by our content & customer service teams. This content is edited and reviewed internally before being made public to customers.
Our customer service team are at the ready daily to answer your part and product questions. We have a dedicated staff with decades of collective experience in helping customers just like you purchase parts to repair their products.
All our part reviews are solicited directly from other customers who have purchased this exact part. While we moderate these reviews for profanity, offensive language or personally identifiable information, these reviews are posted exactly as submitted and no alterations are made by our team.
All our customer repair instructions are solicited directly from other customers just like you who have purchased and replaced this exact part. While we moderate these reviews for profanity, offensive language or personally identifiable information, these reviews are posted exactly as submitted and no alterations are made by our team.
Based on data from past customer purchasing behaviors, these parts are most commonly purchased together along with the part you are viewing. These parts may be necessary or helpful to replace to complete your current repair.
All our installation videos are created and produced in collaboration with our in-house repair technician, Mark Sodja, who has helped millions of eReplacementParts customers over the last 13 years repair their products. Mark has years of experience in selling and repairing both commercial and residential products with a specialty in gas-powered equipment.
This data is collected from customers who submitted a repair instruction after replacing this exact part. Customers can rate how easy the repair was to complete and how long it took. We aggregate this data to provide a repair rating that allows customers to quickly determine the difficulty and time needed to perform their own repair.