


Genuine OEM replacement part, This part is sold individually.
This part is used on all of the lawn tractors shown below.
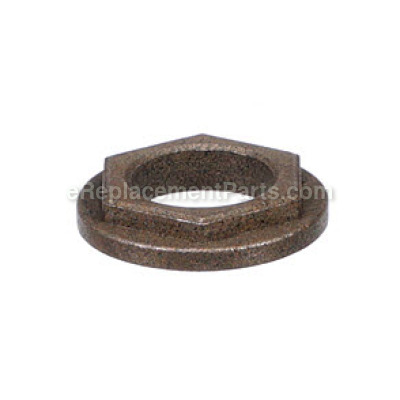
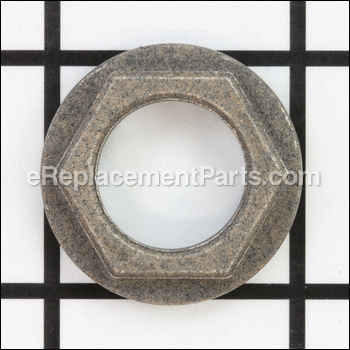
The purpose of this part is to connect the steering shaft to the frame of the lawn tractor.
Bearing-hex Flange 941-0656A
OEM part for: MTD, Ryobi, Yard Machines, Bolens, Yard Man, Troy-Bilt, Husky
Part Number: 941-0656A
$5.40
In Stock
Jump To:
Product Description ?
- Size: 5/8
- Classification: Part
- Weight: 0.01 lbs.
- Shipping: Ships Worldwide
Frequently Purchased Together ?


Compatibility
This Bearing-hex Flange will fit the following 2762 machines. Confirm this part works with your model, and view the detailed model diagrams and repair help we have to offer.
Ryobi
MTD
Yard Machines
Bolens
Yard Man
Troy-Bilt
Husky
Show More Compatible ModelsThis item works with the following types of products:
- Lawn Tractor Parts
- Lawn Mower Parts
This part replaces obsolete part #: 741-0656 (New Part), 741-0656, 7410656, 741-0656A, 941-0656, 741-0656
Customer Part Reviews ?
Average Rating (out of 5):
Click to filter by ratings:
5 stars
15
4 stars
0
3 stars
1
2 stars
0
1 stars
0
< PREV
- 1
- 2
Perfect match - easy install
New part - perfect fit and easy install
Guest -
June 13, 2023
Verified Purchase
Every part fit perfect.
Lawnmower works great again.
Guest -
August 17, 2020
Verified Purchase
Hard to find.
Fit and working as exspected.
Guest -
August 8, 2020
Verified Purchase
Great part!
Worked perfectly!
Guest -
August 1, 2020
Verified Purchase
perfect fit
part arrived just in time thank you so much
Guest -
May 5, 2020
Verified Purchase
Grass Keeps Growing
Great service - fast shipment - thanks!
Guest -
April 25, 2020
Verified Purchase
Steering repair, quality part.
Superior service on delivery, accurate order fulfillment, part installed and my ride mower is back in business!
MARK -
October 5, 2019
Verified Purchase
Fixed my mower easily
Parts came in when expected easy to order
Guest -
July 31, 2019
Verified Purchase
Great fast service
Great fast service mower is working great again
Guest -
July 25, 2019
Verified Purchase
As always, correct part, ontine, priced right, job done!
Part was correct, on time, priced right, job done!
Don -
June 17, 2019
Verified Purchase
Questions & Answers ?
Our customer Service team is at the ready daily to answer your part and product questions.

Ask our Team
We have a dedicated staff with decades of collective experience in helping customers just like you purchase parts to repair their products.
Does this fit my product?Questions & Answers for Bearing-hex Flange
No questions have been asked yet
Customer Repair Instructions ?
All our customer repair instructions are solicited directly from other customers just like you who have purchased and replaced this exact part.
When I would turn the steering wheel I could feel the gears at the bottom of the steering column skipping not allowing me to turn
Anthony - April 14, 2016
👍 27 of 29 people found this instruction helpful
Tool Type
Lawn Tractor
Difficulty
Medium
Time
30-60 minutes
Tools Used
Screwdriver, Adjustable Wrench
Parts Used
Remove fuel tank then take off nut at the bottom of the column holding on to the steering wheel while you remove the nut. Then pull up on steering column replace flange grommet and use a lot of grease and then reverse the steps and start mowing.
Did you find this story helpful?
Thanks for voting and helping fellow customers!
No steering due to stripped teeth on steering shaft gear
vern - February 28, 2016
👍 14 of 17 people found this instruction helpful
Tool Type
Lawn Tractor
Difficulty
Medium
Time
1-2 hours
Tools Used
Screwdriver, Pliers, Socket set, torx bit
Deck needs to be disconnected and lowered to get better access to bolt in bottom end of shaft . It was a torx head in my machine. Remove bolt. Removed fuel tank mounting screws and tilt tank to side . Remove steering wheel plastic trim . Remove plastic cap over top of shaft. Remove bolt holding steering wheel to shaft. Remove steering wheel. Pull shaft upwards about half way and tilt to right side of motor and slide out of plastic guide at top. The plastic guide will flex enough to let the shaft slide out. Replace the bottom hex flange bearing. It just sets in a hex cutout in the frame. Install the new shaft . Coat the gear and bottom of shaft with grease. Coat the bottom bolt threads with anti-seize compound. Coat the top spline and steering wheel bolt threads with anti-seize compound. Install bolts and steering wheel plastic covers. Reattach deck. The front of the mower needs to be raised to let the deck drop to make it easier.
Did you find this story helpful?
Thanks for voting and helping fellow customers!
Steering was not working properly, clicking sound/ feeling on steering wheel should have been 15 minutes tops.
Ruth - November 9, 2017
👍 4 of 4 people found this instruction helpful
Tool Type
Lawn Tractor
Difficulty
Easy
Time
1-2 hours
Tools Used
Screwdriver, Socket set, Vice grips and neighbor
Parts Used
1. Open engine cover, after parking with the break on.
2. Remove the mowing deck.
3. Unbolted gas tank, moved to the side, not disconnecting any lines and bracing to keep intact.
4. Visually located the steering shaft location on the engine deck and location under the deck for the end of the shaft. (Here's where you discover a flipping Phillips headed screw. Who puts a freaking non-hex screw on the area where rust, debris and dirt occurs? Forgot to mention, it was not moving, was rusted and nearly stripped out during initial try.) :(
5. Penetrating oil to screw.
6. Tapped with hammer.
7. Grabbed vise grips, and screw driver, yelled for neighbor to come and assist.
8. Neighbor able to turn screw that is secured between the blades of the vice grips, while I hold the steering wheel.
9. After screw removed, went to local store to replace it with hex bolt.
10. Returning to the tractor, lifted the steering wheel up to disengage the steering shaft from the engine mounts and located stripped Hex flange bearing. Discarded it to acceptable recycling.
11. Inserted new Hex Flange bearing, and re-seated the shaft through it. Reengaged the shaft to the proper hole through the tractor decking.
12. Neighbor held steering wheel, inserted the hex bolt on the lower side of the deck and tightened the hex bolt with socket wrench until it was snug and steering was again accurately engaged for action.
13. Re-secured gas tank, mowing deck and checked engine to ensure fuel lines not compromised.
.
Did you find this story helpful?
Thanks for voting and helping fellow customers!
Bearing Wallered out
Jeremy - May 12, 2019
👍 1 of 1 people found this instruction helpful
Tool Type
Lawn Tractor
Difficulty
Easy
Time
Less than 15 minutes
Tools Used
Screwdriver
Parts Used
Remove the screw At the bottom of the steering shaft. there is a washer and I pulled up on the steering shaft 2 remove the bearing replaced with new bearing. Then I had added 2 Fender washers for some reason the steering shaft would still come out of its place in the frame of the tractor so to keep it in place i needed to add the washer's to the bottom of it and now it works perfect.
Did you find this story helpful?
Thanks for voting and helping fellow customers!
steering gear wore out
Bill - August 16, 2018
👍 1 of 1 people found this instruction helpful
Tool Type
Lawn Tractor
Difficulty
Medium
Time
30-60 minutes
Tools Used
Screwdriver, Pliers, Socket set, Needle nose pliers
1 Dropped deck
2 Removed steering wheel
3 Removed phillips screw holding shaft
4 Pulled out shaft
5 Replaced all parts
2 Removed steering wheel
3 Removed phillips screw holding shaft
4 Pulled out shaft
5 Replaced all parts
Did you find this story helpful?
Thanks for voting and helping fellow customers!
unit wouldn't steer
GARY - August 29, 2017
👍 2 of 3 people found this instruction helpful
Tool Type
Lawn Tractor
Difficulty
Hard
Time
1-2 hours
Tools Used
Pliers, Power Drill, Socket set, Nutdriver
Found the bearing was worn out. had to pull the cowling off and gas tank to get to it from the top. The mower deck had to come off and then have to lean the unit over to get to the steering gear underneath. Also need a big breaker bar to remove the drive pulley so the belt would go on.
Did you find this story helpful?
Thanks for voting and helping fellow customers!
No steering
Kirt - September 13, 2019
Tool Type
Lawn Mower
Difficulty
Easy
Time
Less than 15 minutes
Tools Used
Wrench Set
Parts Used
Removed the nut on the steering rod removed the small gear lifted the steering wheel/ rod up remove the hex bolt shin installed new hex bolt installed washer the gear an nut less the 15 minutes the problem was fixed
Did you find this story helpful?
Thanks for voting and helping fellow customers!
Steering failed.
Jonathan - May 28, 2019
Tool Type
Lawn Tractor
Difficulty
Easy
Time
1-2 hours
Tools Used
Socket set, Wrench Set
Parts Used
Easy and direct, but somewhat time consuming. Removed nut holding pinion and removed pinion. Pulled up on steering wheel to remove steering column from lawn tractor. Removed old hex flange bearing. Inserted new hex flange bearing. Restored steering column and wheel (check steering wheel position to ensure proper orientation). Re-attached pinion and nut. Steering repaired.
Did you find this story helpful?
Thanks for voting and helping fellow customers!
Front tire was missing push cap
Eric - May 7, 2019
Tool Type
Lawn Tractor
Difficulty
Easy
Time
Less than 15 minutes
Tools Used
, Rubber hammer
Parts Used
Positioned the new push cap on end of piece that holds tire assembly and tapped with rubber hammer
Did you find this story helpful?
Thanks for voting and helping fellow customers!
\steering could not turn front wheels
Chalmer - September 24, 2018
Tool Type
Snowblower
Difficulty
Easy
Time
15-30 minutes
Tools Used
Screwdriver, Socket set
Removed gas tank
Removed steering wheel shaft
Removed old steering pinon gear
Removed old hex flange bearing
Then replaced everything in reverse
Removed steering wheel shaft
Removed old steering pinon gear
Removed old hex flange bearing
Then replaced everything in reverse
Did you find this story helpful?
Thanks for voting and helping fellow customers!
Load More Install Stories
OEM stands for Original Equipment Manufacturer and means the part you’re buying is sourced directly from the manufacturer who made your product. At eReplacementParts, we sell only genuine OEM parts, guaranteeing the part you’re purchasing is of better design and of higher quality than aftermarket parts.
Our product descriptions are a combination of data sourced directly from the manufacturers who made your product as well as content researched and curated by our content & customer service teams. This content is edited and reviewed internally before being made public to customers.
Our customer service team are at the ready daily to answer your part and product questions. We have a dedicated staff with decades of collective experience in helping customers just like you purchase parts to repair their products.
All our part reviews are solicited directly from other customers who have purchased this exact part. While we moderate these reviews for profanity, offensive language or personally identifiable information, these reviews are posted exactly as submitted and no alterations are made by our team.
All our customer repair instructions are solicited directly from other customers just like you who have purchased and replaced this exact part. While we moderate these reviews for profanity, offensive language or personally identifiable information, these reviews are posted exactly as submitted and no alterations are made by our team.
Based on data from past customer purchasing behaviors, these parts are most commonly purchased together along with the part you are viewing. These parts may be necessary or helpful to replace to complete your current repair.
All our installation videos are created and produced in collaboration with our in-house repair technician, Mark Sodja, who has helped millions of eReplacementParts customers over the last 13 years repair their products. Mark has years of experience in selling and repairing both commercial and residential products with a specialty in gas-powered equipment.
This data is collected from customers who submitted a repair instruction after replacing this exact part. Customers can rate how easy the repair was to complete and how long it took. We aggregate this data to provide a repair rating that allows customers to quickly determine the difficulty and time needed to perform their own repair.