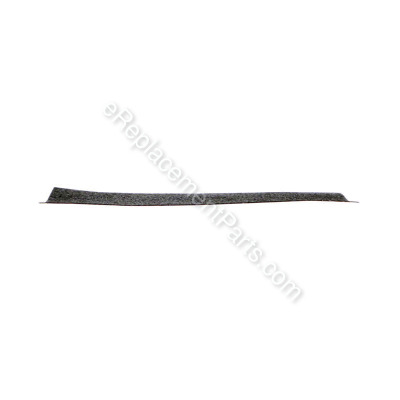
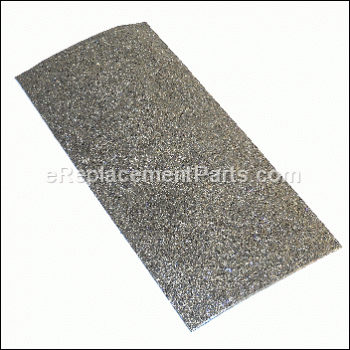
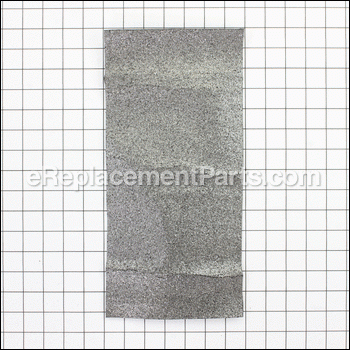


This authentic manufacturer-supplied part is specially designed for use with Jet disk and belt sanders. It is a special component that helps to provide backing. This is an identical replacement for a missing or a damaged graphite pad that was installed on a new unit. Make sure to refer to the appropriate diagrams for your model to ensure the exact location and the proper replacement procedure. Note, this high-quality component is made of durable material and is sold individually.
Graphite Pad JSG96-257
OEM part for: Jet
Part Number: JSG96-257
$75.31
In Stock
Compatibility
This item works with the following types of products:
- Sander Parts
Customer Part Reviews ?
Average Rating (out of 5):
Click to filter by ratings:
5 stars
3
4 stars
0
3 stars
0
2 stars
0
1 stars
0
< PREV
- 1
Easy to replace
I used a puddy knife to take the old one off.
Guest -
May 18, 2023
Verified Purchase
Fast and easy
The service was great. Received it when promised. Thank you
Ken
Guest -
October 9, 2021
Verified Purchase
Hard and easy
The hard part was getting the old one off. Took over half an hour of scraping, using acetone, paint thinner, and lots of cuss words. Aligned the new one, pressed down and was sanding in less than 2 minutes.
Richard -
January 13, 2020
Verified Purchase
t
t
t -
t days ago
Verified Purchase
eReplacementParts Team
t
Questions & Answers ?
Our customer Service team is at the ready daily to answer your part and product questions.

Ask our Team
We have a dedicated staff with decades of collective experience in helping customers just like you purchase parts to repair their products.
Does this fit my product?Questions & Answers for Graphite Pad
No questions have been asked yet
Customer Repair Instructions ?
All our customer repair instructions are solicited directly from other customers just like you who have purchased and replaced this exact part.
The graphite platen was worn out and had a hole worn completely through it.
David - January 17, 2017
👍 2 of 2 people found this instruction helpful
Tool Type
Sander
Difficulty
Medium
Time
1-2 hours
Tools Used
, Electric heat gun, lacquer thinner, scraper
Parts Used
Removed the sanding belt and tool rest.
Use an electric heat gun to soften the glue so that you can pull the old platen off.
Use plenty of solvent and rags to remove all of the left over glue and plastic film from the sander platen base. This was the hardest and most time consuming part.
Do NOT peel all of the plastic backer off of the new platen but just enough to get it started. Then line the platen up with the sander and using the heat gun slowly heat the glue side as you peel the plastic backing off and push the platen into place.
Just make sure that the glue is soft/sticky enough to adhere to the sander.
Did you find this story helpful?
Thanks for voting and helping fellow customers!
1. Graphite pad worn. 2. Sometimes wouldn't start right away.
Brian - December 4, 2016
👍 1 of 1 people found this instruction helpful
Tool Type
Sander
Difficulty
Medium
Time
30-60 minutes
Tools Used
Screwdriver, Pliers, Scraper, acetone
1. Remove the old/worn graphite pad with a razor blade scraper and acetone.
2. Remove Start and Run capacitors: Unplug sander. Remover disc tool rest. Raise the sander on the disc end and secure from tipping, remove the bottom cover, the caps are visible and easy to replace.
3. Install the capacitors in their original brackets and connect. One cap's wires needed to be cut. Crimp-on wire connectors worked-wire nuts could be used though.
4. Install the new graphite pad, very easy to align.
5. Reassemble, install tool rest, plug-in, install sanding belt over graphite pad, start the sander and adjust tracking.
Did you find this story helpful?
Thanks for voting and helping fellow customers!
wear
John - May 18, 2023
Tool Type
Sander
Difficulty
Easy
Time
Less than 15 minutes
Tools Used
, puddy knife
Parts Used
scraped the old one off and stuck the new one on
Did you find this story helpful?
Thanks for voting and helping fellow customers!
Graphite backing pad workout in one area.
Charles - October 1, 2020
Tool Type
Sander
Difficulty
Medium
Time
30-60 minutes
Tools Used
, Mastic solvent and putty knife.
Parts Used
Once I found the correct chemical solvent to dissolve the mastic on the back of the old graphite pad, and got it removed, it was easy to peal off the cover of the new mastic back and stick on the new pad.
Please tell us what is the correct solvent to use.
It took me five tries before I found one that worked.
Please tell us what is the correct solvent to use.
It took me five tries before I found one that worked.
Did you find this story helpful?
Thanks for voting and helping fellow customers!
old pad was worn from workers exerting more than necessary pressure against sanding belt
Kelly - May 8, 2020
Tool Type
Sander
Difficulty
Easy
Time
30-60 minutes
Tools Used
, Heat gun and putty knife to remove old pad
Parts Used
Unplugged belt sander from power source, removed belt work table/ guard, removed belt , used heat gun to loosen adhesive on old pad , used putty knife to help peel old pad off . Cleaned all remaining adhesive off with acetone . peeled protective paper off back of new pad and aligned new pad to backing . replaced belt and guard. re-energized sander . the most time consuming part of job was removing the old pad and adhesive from metal backing .
Did you find this story helpful?
Thanks for voting and helping fellow customers!
The old graphite backing was worn out and not flat
Nelson - April 18, 2016
Tool Type
Sander
Difficulty
Medium
Time
30-60 minutes
Tools Used
, Allen wrench, Rag, laquer thinner
Parts Used
1. Unplug sander, remove sanding belts and necessary guards
2. Remove old graphite backing by peeling it off
3. Clean all remaining adhesive free from the sander using acetone, this step may take a while
4. Peel the adhesive protector off of the new graphite pad and place it on the sander
2. Remove old graphite backing by peeling it off
3. Clean all remaining adhesive free from the sander using acetone, this step may take a while
4. Peel the adhesive protector off of the new graphite pad and place it on the sander
Did you find this story helpful?
Thanks for voting and helping fellow customers!
OEM stands for Original Equipment Manufacturer and means the part you’re buying is sourced directly from the manufacturer who made your product. At eReplacementParts, we sell only genuine OEM parts, guaranteeing the part you’re purchasing is of better design and of higher quality than aftermarket parts.
Our product descriptions are a combination of data sourced directly from the manufacturers who made your product as well as content researched and curated by our content & customer service teams. This content is edited and reviewed internally before being made public to customers.
Our customer service team are at the ready daily to answer your part and product questions. We have a dedicated staff with decades of collective experience in helping customers just like you purchase parts to repair their products.
All our part reviews are solicited directly from other customers who have purchased this exact part. While we moderate these reviews for profanity, offensive language or personally identifiable information, these reviews are posted exactly as submitted and no alterations are made by our team.
All our customer repair instructions are solicited directly from other customers just like you who have purchased and replaced this exact part. While we moderate these reviews for profanity, offensive language or personally identifiable information, these reviews are posted exactly as submitted and no alterations are made by our team.
Based on data from past customer purchasing behaviors, these parts are most commonly purchased together along with the part you are viewing. These parts may be necessary or helpful to replace to complete your current repair.
All our installation videos are created and produced in collaboration with our in-house repair technician, Mark Sodja, who has helped millions of eReplacementParts customers over the last 13 years repair their products. Mark has years of experience in selling and repairing both commercial and residential products with a specialty in gas-powered equipment.
This data is collected from customers who submitted a repair instruction after replacing this exact part. Customers can rate how easy the repair was to complete and how long it took. We aggregate this data to provide a repair rating that allows customers to quickly determine the difficulty and time needed to perform their own repair.