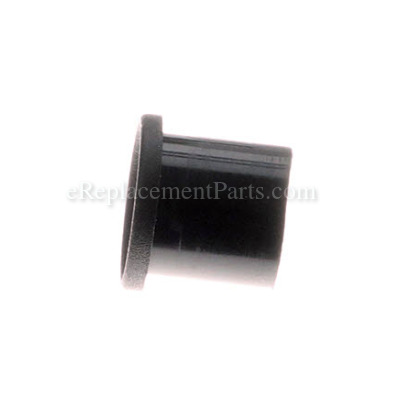
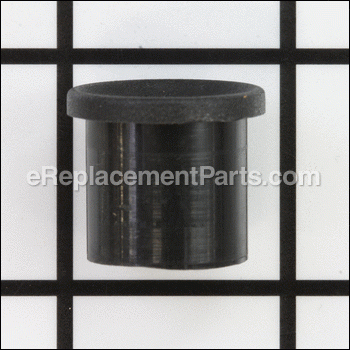


It is a genuine item that is supplied by the original equipment manufacturer for NordicTrack exercise equipment. This is an identical replacement for a missing or damaged front roller bushing that was originally installed on a new unit, please make sure to refer to the appropriate diagrams of your model for the correct location and application of this hardware. Keep in mind this high-quality item is made of durable metal and is sold individually.
Front Roller Bushing 219550
OEM part for: NordicTrack, ProForm, HealthRider, Golds Gym, Weslo
Part Number: 219550
$4.99
In Stock
Jump To:
Frequently Purchased Together ?

Compatibility
This Front Roller Bushing will fit the following 371 machines. Confirm this part works with your model, and view the detailed model diagrams and repair help we have to offer.
NordicTrack
ProForm
HealthRider
Golds Gym
Weslo
Show More Compatible ModelsThis item works with the following types of products:
- Treadmill Parts
Customer Part Reviews ?
Average Rating (out of 5):
Click to filter by ratings:
5 stars
4
4 stars
1
3 stars
0
2 stars
0
1 stars
0
< PREV
- 1
Treadmill
The part is exact fit and what I needed to get a $700 treadmill up and running again.
Guest -
November 23, 2022
Verified Purchase
worked as expected
fit perfectly
Guest -
June 18, 2022
Verified Purchase
As described and worked well.
As described and worked well.
Guest -
May 9, 2020
Verified Purchase
Work as planned
Delivery before the date
Luiz -
February 10, 2020
Verified Purchase
A good experience!!
I bought some parts that locally I couldn't get. The parts arrive very fast to the country, and despite I paid for the cheapest delivery, the part arrive in good conditions (the US part was shipped by USPS, with tracking and the local part by SEPOMEX without tracking). The only thing here to improve would be the possibility to select in the cheapest shipping option if you want tracking on the local service or not, because by default only the USPS part has tracking, and the local service not.
Thanks for the support.
iGlobal -
May 23, 2022
Verified Purchase
Questions & Answers ?
Our customer Service team is at the ready daily to answer your part and product questions.

Ask our Team
We have a dedicated staff with decades of collective experience in helping customers just like you purchase parts to repair their products.
Does this fit my product?Questions & Answers for Front Roller Bushing
No questions have been asked yet
Customer Repair Instructions ?
All our customer repair instructions are solicited directly from other customers just like you who have purchased and replaced this exact part.
felt like belt was slipping
Brad - October 13, 2021
👍 1 of 1 people found this instruction helpful
Tool Type
Treadmill
Difficulty
Medium
Time
30-60 minutes
Tools Used
Screwdriver, Pliers, Adjustable Wrench
Parts Used
removed motor cover, removed spring that was attached to the drive belt tension
control arm then removed the tension arm assembly to allow room for the belt to be removed from the motor drive. Second loosed and removed belt alignment bolt and nut on the left side of the front belt roller, pulled front belt roller and belt out of the bushing and bushing retainer. Reinstalled all in reverse order with the new bushing and also did a new drive belt at the same time. Runs as smooth as when it was new
control arm then removed the tension arm assembly to allow room for the belt to be removed from the motor drive. Second loosed and removed belt alignment bolt and nut on the left side of the front belt roller, pulled front belt roller and belt out of the bushing and bushing retainer. Reinstalled all in reverse order with the new bushing and also did a new drive belt at the same time. Runs as smooth as when it was new
Did you find this story helpful?
Thanks for voting and helping fellow customers!
Making a lot of noise while running
Wendell - December 9, 2016
👍 2 of 3 people found this instruction helpful
Tool Type
Treadmill
Difficulty
Medium
Time
1-2 hours
Tools Used
Screwdriver, Pliers, Wrench Set, Adjustable Wrench, extra light and wrench that came with treadmill
Parts Used
1. Found on You Tune that showed how to work on this treadmill as I did not know what to do or how to fix it -- but was easy to do with this direction for me
2. Took it apart to see what was wrong and then ordered parts
3. When parts arrived --- only part on it that gave me trouble was getting the spring to unhook it as I am 75 years old and short on strength use a piece of wire and made loop and put it under hook of spring and just long enough that I could put a small bar under it then using the frame as pry point I was able to unhook and rehook it this way -- spring on belt to tighten it
I put the new parts on the treadmill and started it up --- guess what
it never has run this quiet before even when it was new - hope it will stay this quiet as I can watch TV with out turning the volume up on the TV now
Did you find this story helpful?
Thanks for voting and helping fellow customers!
Bad vibration and loud noise while treadmill was running.
John - August 9, 2018
👍 1 of 2 people found this instruction helpful
Tool Type
Treadmill
Difficulty
Medium
Time
30-60 minutes
Tools Used
Screwdriver, Socket set
Parts Used
1. Turn off power.
2. Remove cover over motor assembly.
3. Loosen mounting bolt on motor.
4. Loosen both adjusting screws on treadmill belt.
5. Remove adjusting bolt on left side of front roller.
6. Lift left end of front roller and slide it to the left and out of the right side bushing.
7. Remove and replace motor belt and front bushing.
8. Reverse above steps.
My treadmill now runs quieter than it ever has.
Point of interest; my owners manual parts diagram and the diagram on your web site does not show the or list the front roller bushing.
Did you find this story helpful?
Thanks for voting and helping fellow customers!
OEM stands for Original Equipment Manufacturer and means the part you’re buying is sourced directly from the manufacturer who made your product. At eReplacementParts, we sell only genuine OEM parts, guaranteeing the part you’re purchasing is of better design and of higher quality than aftermarket parts.
Our product descriptions are a combination of data sourced directly from the manufacturers who made your product as well as content researched and curated by our content & customer service teams. This content is edited and reviewed internally before being made public to customers.
Our customer service team are at the ready daily to answer your part and product questions. We have a dedicated staff with decades of collective experience in helping customers just like you purchase parts to repair their products.
All our part reviews are solicited directly from other customers who have purchased this exact part. While we moderate these reviews for profanity, offensive language or personally identifiable information, these reviews are posted exactly as submitted and no alterations are made by our team.
All our customer repair instructions are solicited directly from other customers just like you who have purchased and replaced this exact part. While we moderate these reviews for profanity, offensive language or personally identifiable information, these reviews are posted exactly as submitted and no alterations are made by our team.
Based on data from past customer purchasing behaviors, these parts are most commonly purchased together along with the part you are viewing. These parts may be necessary or helpful to replace to complete your current repair.
All our installation videos are created and produced in collaboration with our in-house repair technician, Mark Sodja, who has helped millions of eReplacementParts customers over the last 13 years repair their products. Mark has years of experience in selling and repairing both commercial and residential products with a specialty in gas-powered equipment.
This data is collected from customers who submitted a repair instruction after replacing this exact part. Customers can rate how easy the repair was to complete and how long it took. We aggregate this data to provide a repair rating that allows customers to quickly determine the difficulty and time needed to perform their own repair.