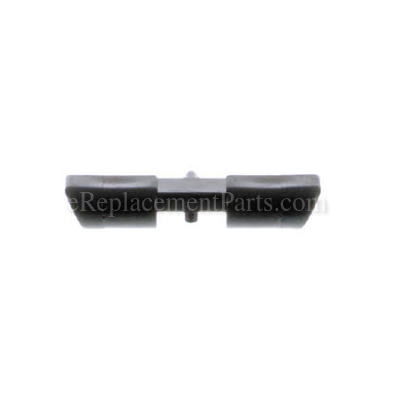
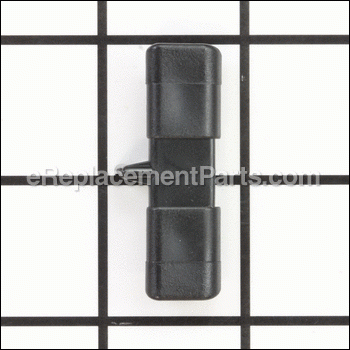


The F/R actuator is made of plastic and is sold individually. During the installation process, a screwdriver and a set of pliers might be needed to replace this part. It will require replacing if it becomes broken. This is a genuine OEM sourced part which is specially designed for use with DeWALT and Black & Decker cordless drills.
F/r Actuator 311978-01
OEM part for: DeWALT, Black and Decker
Part Number: 311978-01
$3.99
Usually ships in 7 - 12 business days
7 - 12 business days
Compatibility
This part will fit the following 162 machines
Black and Decker
CD142S Type 1 Drill View Diagrams & Manuals
CD1200S Type 1 Drill View Diagrams & Manuals
PS7240 Type 1 Drill View Diagrams & Manuals
PS3500 Type 1 Cordless Drill View Diagrams & Manuals
PS3500 Type 1A Type 1A Cordless Drill View Diagrams & Manuals
CD1200 Type 1 Cordless Drill View Diagrams & Manuals
CD1200 Type 2 Cordless Drill View Diagrams & Manuals
PS3600 Type 1 Cordless Drill View Diagrams & Manuals
PS3600K Type 1 Cordless Drill View Diagrams & Manuals
PS3600K-2 Type 1 Cordless Drill View Diagrams & Manuals
CD18SR Type 2 Cordless Drill View Diagrams & Manuals
PS3700 Type 1 Cordless Drill View Diagrams & Manuals
PS3700K-2 Type 1 Cordless Drill View Diagrams & Manuals
PS3200 Type 1 Cordless Drill View Diagrams & Manuals
PS3300 Type 1 Cordless Drill View Diagrams & Manuals
Q115 Type 1 Cordless Drill View Diagrams & Manuals
Q120 Type 2 Cordless Drill View Diagrams & Manuals
Q140 Type 1 Cordless Drill View Diagrams & Manuals
Q180 Type 1 Cordless Drill View Diagrams & Manuals
TV230 Type 1 Cordless Drill View Diagrams & Manuals
TV250 Type 1 Cordless Drill View Diagrams & Manuals
CD140G 14.4V Cordless GelMax Drill View Diagrams & Manuals
HP331 Type 2 12V Firestorm Drill View Diagrams & Manuals
HP331 Type 1 12V Firestorm Drill View Diagrams & Manuals
CD120S Type 1 12 Volt Drill View Diagrams & Manuals
CD120S Type 2 12 Volt Drill View Diagrams & Manuals
CD120S Type 3 12 Volt Drill View Diagrams & Manuals
CD140S Type 1 14.4 Volt Cordless Drill View Diagrams & Manuals
CD140S Type 3 14.4 Volt Cordless Drill View Diagrams & Manuals
CD1440 Type 1 14 Volt Drill View Diagrams & Manuals
CD1800 Type 1 18 Volt Drill View Diagrams & Manuals
CD1800 Type 2 18 Volt Drill View Diagrams & Manuals
CD1800SB Type 1 18 Volt Drill View Diagrams & Manuals
CD180S Type 1 18 Volt Drill View Diagrams & Manuals
CD180S Type 2 18 Volt Drill View Diagrams & Manuals
CD231 Type 1 9.6 Volt Firestorm Drill View Diagrams & Manuals
CD231 Type 2 9.6 Volt Firestorm Drill View Diagrams & Manuals
CD431 Type 1 12 Volt Firestorm Drill View Diagrams & Manuals
CD431 Type 2 12 Volt Firestorm Drill View Diagrams & Manuals
CD632 Type 1 14.4 Volt Firestorm Drill View Diagrams & Manuals
CD632 Type 2 14.4 Volt Firestorm Drill View Diagrams & Manuals
CD9600 Type 1 9.6 Volt Drill View Diagrams & Manuals
CD9600 Type 2 9.6 Volt Drill View Diagrams & Manuals
CD9600 Type 3 9.6 Volt Drill View Diagrams & Manuals
CD9600 Type 4 9.6 Volt Drill View Diagrams & Manuals
FS1201 Type 1 12 Volt Cordless Drill View Diagrams & Manuals
FS1320 Type 1 13.2 Volt Drill View Diagrams & Manuals
FS1442K12 Type 1 14.4 Volt Cordless Drill View Diagrams & Manuals
FS1560 Type 1 15.6 Volt Drill View Diagrams & Manuals
FS1802K12 Type 1 18.0 Volt Cordless Drill View Diagrams & Manuals
FS632 Type 1 12 Volt Firestorm Drill View Diagrams & Manuals
FS840 Type 1 8.4 Volt Drill View Diagrams & Manuals
HP131 Type 1 9.6 Volt Firestorm Drill View Diagrams & Manuals
HP131 Type 2 9.6 Volt Firestorm Drill View Diagrams & Manuals
HP231 Type 1 9.6 Volt High Performance Cordless Drill View Diagrams & Manuals
HP231 Type 2 9.6 Volt High Performance Cordless Drill View Diagrams & Manuals
HP431 Type 1 12.0 Volt High Performance Cordless Drill View Diagrams & Manuals
HP431 Type 2 12.0 Volt High Performance Cordless Drill View Diagrams & Manuals
HP532 Type 1 14.4 Volt Firestorm Drill View Diagrams & Manuals
HP532 Type 2 14.4 Volt Firestorm Drill View Diagrams & Manuals
HP932 Type 1 18 Volt Firestorm Drill View Diagrams & Manuals
HP932 Type 2 18 Volt Firestorm Drill View Diagrams & Manuals
PS2400 Type 2 24 Volt Drill View Diagrams & Manuals
PSO1800 Type 3 18 Volt OPP Drill View Diagrams & Manuals
Q129 Type 1 12 Volt Drill View Diagrams & Manuals
Q145 Type 1 14.4 Volt Firestorm Drill View Diagrams & Manuals
Q145 Type 2 14.4 Volt Firestorm Drill View Diagrams & Manuals
Q185 Type 1 18 Volt Quantum Drill View Diagrams & Manuals
CD9600B Type 1 9.6 Volt Drill / Driver View Diagrams & Manuals
CD120G Type 1 12 Volt Drill / Driver View Diagrams & Manuals
CD1402 Type 1 14 Volt Drill / Driver View Diagrams & Manuals
CD180GR Type 1 18 Volt Drill / Driver View Diagrams & Manuals
CD18GSR Type 1 18 Volt Drill / Driver View Diagrams & Manuals
FS432 Type 1 9.6 Volt Firestorm Drill View Diagrams & Manuals
PS2400K Type 2 24V Cordless Drill View Diagrams & Manuals
CD18SFRK Type 3 18V Cordless Drill View Diagrams & Manuals
CD142SK Type 1 14.4V Cordless Drill / Driver View Diagrams & Manuals
CD1200SK Type 1 12V Cordless Drill / Driver View Diagrams & Manuals
CD1200SK Type 2 12V Cordless Drill / Driver View Diagrams & Manuals
CD1200SK Type 3 12V Cordless Drill / Driver View Diagrams & Manuals
PS1200 Type 2 Cordless Drill View Diagrams & Manuals
PS1200 Type 3 Cordless Drill View Diagrams & Manuals
PS1200 Type 4 Cordless Drill View Diagrams & Manuals
PS1800K Type 6 18V Drill View Diagrams & Manuals
PS1800K Type 4 18V Drill View Diagrams & Manuals
PS1200AK (Type 3) 12V Cordless Drill Project Kit View Diagrams & Manuals
PS3200K (Type 1) 9.6V Mid Hndl. Drill View Diagrams & Manuals
PS3200K-2 (Type 1) 9.6V Mid 2 Batt Drill Kit View Diagrams & Manuals
PS3500K-2 (Type 1) 12V Cordless Drill Mid. 2 Batt. Kit View Diagrams & Manuals
PS3500K-2 (Type 1A) 12V Cordless Drill Mid. 2 Batt. Kit View Diagrams & Manuals
PS7240K (Type 1) 7.2 Volt Drill Kit View Diagrams & Manuals
Q120K (Type 2) 12V Mh Drill Kit View Diagrams & Manuals
Q129K (Type 1) 12V Drill View Diagrams & Manuals
TV230K (Type 1) 9.6V Cordless Drill/ Driver View Diagrams & Manuals
TV250K (Type 1) 12V Cordless Drill/ Driver View Diagrams & Manuals
TV250K (Type 1A) 12V Cordless Drill/ Driver View Diagrams & Manuals
FS840K (Type 1) 8.4V Drill View Diagrams & Manuals
CD1200K (Type 1) 12v Drill View Diagrams & Manuals
CD1200K (Type 2) 12v Drill View Diagrams & Manuals
CD1800K (Type 1) 18v Drill Kit View Diagrams & Manuals
CD1800K (Type 2) 18v Drill Kit View Diagrams & Manuals
CD18SRK-2 (Type 2) Drill View Diagrams & Manuals
CD18SRK-2 (Type 4) Drill View Diagrams & Manuals
CD231K (Type 1) 9.6v Firestorm Drill View Diagrams & Manuals
CD231K (Type 2) 9.6v Firestorm Drill View Diagrams & Manuals
CD431K (Type 1) 12v Firestorm Drill View Diagrams & Manuals
CD431K (Type 2) 12v Firestorm Drill View Diagrams & Manuals
CD632K (Type 1) 14.4v Firestorm Drill View Diagrams & Manuals
CD632K (Type 2) 14.4v Firestorm Drill View Diagrams & Manuals
CD9600K (Type 1) 9.6 Volt Drill Kit View Diagrams & Manuals
CD9600K (Type 3) 9.6 Volt Drill Kit View Diagrams & Manuals
CD9600K-2 (Type 2) 9.6v Drill View Diagrams & Manuals
CD9600K-2 (Type 4) 9.6v Drill View Diagrams & Manuals
HP131K-2 (Type 1) 9.6v Firestorm Drill View Diagrams & Manuals
HP131K-2 (Type 2) 9.6v Firestorm Drill View Diagrams & Manuals
HP231K-2 (Type 1) 9.6v Hi-Perf Cordless Drill View Diagrams & Manuals
HP231K-2 (Type 2) 9.6v Hi-Perf Cordless Drill View Diagrams & Manuals
HP331K-2 (Type 1) 12v Firestorm Drill View Diagrams & Manuals
HP331K-2 (Type 2) 12v Firestorm Drill View Diagrams & Manuals
HP431K-2 (Type 1) 12.0v Hi-Perf Cordless Drill View Diagrams & Manuals
HP431K-2 (Type 2) 12.0v Hi-Perf Cordless Drill View Diagrams & Manuals
HP532K-2 (Type 1) 14.4v Firestorm Drill View Diagrams & Manuals
HP532K-2 (Type 2) 14.4v Firestorm Drill View Diagrams & Manuals
HP932K-2 (Type 1) 18v Firestorm Drill View Diagrams & Manuals
HP932K-2 (Type 2) 18v Firestorm Drill View Diagrams & Manuals
PS3300K (Type 1) 9.6v Vsr Mid Handl View Diagrams & Manuals
PS3300K (Type 1A) 9.6v Vsr Mid Handl View Diagrams & Manuals
Q145K (Type 1) Quantum Pro Drill/Driver View Diagrams & Manuals
Q145K (Type 2) Quantum Pro Drill/Driver View Diagrams & Manuals
CD1200SKA (Type 1) 12v Drill View Diagrams & Manuals
CD120GK (Type 1) 12v Drill/Driver Kit View Diagrams & Manuals
CD1402K (Type 1) 14v Drill/Driver Kit View Diagrams & Manuals
CD140GK (Type 1) 14v Drill/Driver Kit View Diagrams & Manuals
CD1440K (Type 1) 14v Drill View Diagrams & Manuals
CD1440SKA (Type 1) 14.4v Drill View Diagrams & Manuals
CD1800SKA (Type 1) 18v Drill View Diagrams & Manuals
CD180GRK (Type 1) 18v Drill/Driver Kit View Diagrams & Manuals
CD180SK (Type 1) 18v Drill View Diagrams & Manuals
CD24SF-2 (Type 1) Cordless Drill View Diagrams & Manuals
CD9600-B2 (Type 1) 9.6v Drill View Diagrams & Manuals
CD9600BK (Type 1) 9.6v Drill/Driver View Diagrams & Manuals
FS1201K-2 (Type 1) 12v Cordless Drill View Diagrams & Manuals
FS1320K-2 (Type 1) 13.2v Drill/2 Battery Kit View Diagrams & Manuals
PS1800AK (Type 6) 18v Drill View Diagrams & Manuals
PS1800B (Type 7) 18v Drill View Diagrams & Manuals
PS1800DL (Type 7) 18v Drill With Laser View Diagrams & Manuals
PS3500K (Type 1) 12v Mid Handle Kit View Diagrams & Manuals
PS3700K (Type 1) 18v Drill Kit View Diagrams & Manuals
Q140K (Type 1) 14.4v Mh Drill Kit View Diagrams & Manuals
Q180K (Type 1) 18v Drill Kit View Diagrams & Manuals
Q185K (Type 1) Quantum Pro Drill/Driver View Diagrams & Manuals
CD231K-2 (Type 1) 9.6v Firestorm Drill Kit View Diagrams & Manuals
CRT129K (Type 1) 12v Camo Drill Kit View Diagrams & Manuals
FS432K-2 (Type 1) 9.6v Firestorm Drill View Diagrams & Manuals
FS632K-2 (Type 1) 12v Firestorm Drill View Diagrams & Manuals
Q115K (Type 1) 9.6v Drill Kit View Diagrams & Manuals
CD18GSRK (Type 1) 18v Drill/Driver Kit View Diagrams & Manuals
CD18SFK (Type 3) 18v Drill View Diagrams & Manuals
CD9600-BR (Type 1) Cordless Drill Power Tool View Diagrams & Manuals
PS1200K (Type 2) 12 Volt Drill Kit Power Tool View Diagrams & Manuals
PS1200K (Type 3) 12 Volt Drill Kit Power Tool View Diagrams & Manuals
PS1200K (Type 4) 12 Volt Drill Kit Power Tool View Diagrams & Manuals
Show More Compatible Models
This item works with the following types of products:
- Drill Parts
- Cordless Drill Parts
This part replaces obsolete part #: 311978-00
Questions & Answers ?
Our customer Service team is at the ready daily to answer your part and product questions.

Ask our Team
We have a dedicated staff with decades of collective experience in helping customers just like you purchase parts to repair their products.
Does this fit my product?Questions & Answers for F/r Actuator
No questions have been asked yet
Customer Repair Instructions ?
All our customer repair instructions are solicited directly from other customers just like you who have purchased and replaced this exact part.
Broken tab on actuator.
David - November 26, 2015
👍 1 of 1 people found this instruction helpful
Tool Type
Cordless Drill
Difficulty
Easy
Time
Less than 15 minutes
Tools Used
Screwdriver
Parts Used
Split case. Take a picture in how the internal parts of the drill are placed.
Install new actuator above switch.
Re-install case
Test
Install new actuator above switch.
Re-install case
Test
Did you find this story helpful?
Thanks for voting and helping fellow customers!
F/R switch did not work. Found pin broke off actuator.
MARK - March 7, 2019
Tool Type
Cordless Drill
Difficulty
Medium
Time
15-30 minutes
Tools Used
Screwdriver, Pliers
Parts Used
1) Remove all case screws and and top half of case noting the location of the one short screw
*Note - Be careful here to keep everything in place to make reassembly easier. The motor has to be in a certain position for the case to completely close.
2) Remove F/R Actuator
3) lift switch slightly on the actuator end and slide the pin from the actuator in the hole in the trigger
4) Slide actuator into hole on bottom of the case until the trigger seats making sure the trigger wires stay in place without binding on the case
5) Make sure everything is aligned properly and put top of case back in place noting the actuator has to align in the hole on the top of the case and checking that it seats closed at all points. Do NOT use the screws to force the 2 halves of the case together. It should squeeze together with your hands.
6) Reinsert and tighten down the case screws in a back and forth pattern making sure not to force anything
7) Test drill for operation with Forward and Reverse
8) If the F/R switch binds and won't go both directions, then take drill back apart and realign parts until case closes completely with just the pressure from your hands
Did you find this story helpful?
Thanks for voting and helping fellow customers!
The drill was not going into reverse
Carl - December 13, 2017
Tool Type
Cordless Drill
Difficulty
Easy
Time
15-30 minutes
Tools Used
Screwdriver, Nil
Parts Used
1. Opened up the unit
2. The switch was easy to replace, remove and reinstall new one
3. That simple
4. Carefully cover up the unit, replacing screws
2. The switch was easy to replace, remove and reinstall new one
3. That simple
4. Carefully cover up the unit, replacing screws
Did you find this story helpful?
Thanks for voting and helping fellow customers!
F/R switch actuator pin broke off
Dale - March 23, 2017
Tool Type
Cordless Drill
Difficulty
Easy
Time
Less than 15 minutes
Tools Used
Screwdriver
Parts Used
Took side cover off, 8 screws, removed old actuator, installed new actuator, put back together.
Did you find this story helpful?
Thanks for voting and helping fellow customers!
OEM stands for Original Equipment Manufacturer and means the part you’re buying is sourced directly from the manufacturer who made your product. At eReplacementParts, we sell only genuine OEM parts, guaranteeing the part you’re purchasing is of better design and of higher quality than aftermarket parts.
Our product descriptions are a combination of data sourced directly from the manufacturers who made your product as well as content researched and curated by our content & customer service teams. This content is edited and reviewed internally before being made public to customers.
Our customer service team are at the ready daily to answer your part and product questions. We have a dedicated staff with decades of collective experience in helping customers just like you purchase parts to repair their products.
All our part reviews are solicited directly from other customers who have purchased this exact part. While we moderate these reviews for profanity, offensive language or personally identifiable information, these reviews are posted exactly as submitted and no alterations are made by our team.
All our customer repair instructions are solicited directly from other customers just like you who have purchased and replaced this exact part. While we moderate these reviews for profanity, offensive language or personally identifiable information, these reviews are posted exactly as submitted and no alterations are made by our team.
Based on data from past customer purchasing behaviors, these parts are most commonly purchased together along with the part you are viewing. These parts may be necessary or helpful to replace to complete your current repair.
All our installation videos are created and produced in collaboration with our in-house repair technician, Mark Sodja, who has helped millions of eReplacementParts customers over the last 13 years repair their products. Mark has years of experience in selling and repairing both commercial and residential products with a specialty in gas-powered equipment.
This data is collected from customers who submitted a repair instruction after replacing this exact part. Customers can rate how easy the repair was to complete and how long it took. We aggregate this data to provide a repair rating that allows customers to quickly determine the difficulty and time needed to perform their own repair.