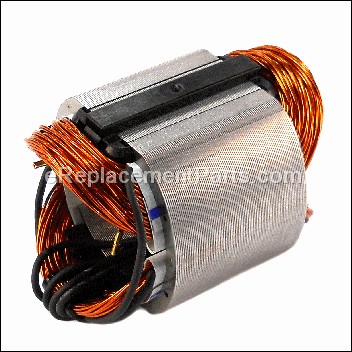

This is an authentic DeWalt replacement part, sourced from the original manufacturer for use with hammer drills. The field is a major component of the electric motor and is used to create an electromagnetic field that drives the armature. This field is available as an individual replacement part, please see model diagram for associative parts.
Field N047997SV
OEM part for: DeWALT
Part Number: N047997SV
$54.15
In Stock
Compatibility
This part will fit the following 6 machines
DeWALT
DWD210G Type 1 1/2 Drill View Diagrams & Manuals
DWD520 Type 1 1/2 Hammer Drill View Diagrams & Manuals
DWD520 Type 2 1/2 Hammer Drill View Diagrams & Manuals
DWD520K Type 1 1/2 Hammer Drill View Diagrams & Manuals
DWD520K Type 2 1/2 Hammer Drill View Diagrams & Manuals
DWD210G (Type 2) 1/2 Drill Power Tool View Diagrams & Manuals
Show More Compatible Models
This item works with the following types of products:
- Drill Parts
- Hammer Drill Parts
This part replaces obsolete part #: N030135, 653854-60 (partFwd: 653854-60 to N030135)
Repair Videos ?
Articles:
|
This article defines the basic parts of most power tools, explains how they work, and what to look for when they stop wo...
September 25, 2009
|

Questions & Answers ?
Our customer Service team is at the ready daily to answer your part and product questions.

Ask our Team
We have a dedicated staff with decades of collective experience in helping customers just like you purchase parts to repair their products.
Does this fit my product?Questions & Answers for Field
No questions have been asked yet
Customer Repair Instructions ?
All our customer repair instructions are solicited directly from other customers just like you who have purchased and replaced this exact part.
Dril motor misused and the field coil smoked
John - April 13, 2019
Tool Type
Hammer Drill
Difficulty
Medium
Time
15-30 minutes
Tools Used
, Torx set
Parts Used
1. Remove the 4 torx screws that hold the body to the transmission housing and pull the parts directly away from each other.
2. Remove the torx screws that hold the 2 halves of the handle together leaving the body in place remove the right half of the handle. Take the clamp off the power cord so you have more wire length to work with.
3. Take note of how the wires coming from the field coil and brushes are routes through the keeper posts. Take note of the color coding of the wires going to the trigger switch.
4. Pull the brushes out of their sockets by carefully bending the holding springs back. Take note of the orientation on the wire connected to the brush.
5. Pull the coil wires out of the trigger switch. You will need to press a small round object (awl or scribe) into the small hole next to the hole that the wires are seated in to release the wires.
6. Remove the 2 torx screws on the front side of the field coil. Place the housing containing the field coil back side up on a hard surface or gently clamped into a wood vise. Use a punch and hammer gently tap the field coil out through the front of its housing. it will only need the light force for a short distance before it drops out.
7. Slide the new coil into the housing in the same orientation that the old coil was removed (wires up and towards the back).
8. Using the punch and hammer gently tap the field coil back into place. Press only on the steel housing making sure to avoid any contact with the copper wires. Re-install the two torx screws that hold the coil.
9. Route the wires as noted earlier. Pay close attention to how the coil wires exit the housing. They are in close proximity to the armature. They must have NO contact with the armature and maximum possible distance from the armature.
10. Push the coil wires into the trigger switch in the same location the old one were removed. You will need no tools, just push them in. Make sure the wires are run through the standoff posts at the back of the housing.
11. Carefully push the transmission / chuck assembly back onto the body. Secure with the 4 torx screws.
12. Put the brushes back into their holders by gently bending back the springs and sliding the brushes in, orientated as they were removed, let the spring go back into place to hold the brushes in. Re-install the power cord clamp.
13. Re-install the handle making sure the trigger switch is aligned to the cover and fits properly. Make sure to have the strain relive on the power cord in place as it may have slipped down the cord. Screw the two halves of the handle together.
14. Plug the drill in and test it. Make sure there is no unusual grinding or rubbing noise.
DONE.
Did you find this story helpful?
Thanks for voting and helping fellow customers!
OEM stands for Original Equipment Manufacturer and means the part you’re buying is sourced directly from the manufacturer who made your product. At eReplacementParts, we sell only genuine OEM parts, guaranteeing the part you’re purchasing is of better design and of higher quality than aftermarket parts.
Our product descriptions are a combination of data sourced directly from the manufacturers who made your product as well as content researched and curated by our content & customer service teams. This content is edited and reviewed internally before being made public to customers.
Our customer service team are at the ready daily to answer your part and product questions. We have a dedicated staff with decades of collective experience in helping customers just like you purchase parts to repair their products.
All our part reviews are solicited directly from other customers who have purchased this exact part. While we moderate these reviews for profanity, offensive language or personally identifiable information, these reviews are posted exactly as submitted and no alterations are made by our team.
All our customer repair instructions are solicited directly from other customers just like you who have purchased and replaced this exact part. While we moderate these reviews for profanity, offensive language or personally identifiable information, these reviews are posted exactly as submitted and no alterations are made by our team.
Based on data from past customer purchasing behaviors, these parts are most commonly purchased together along with the part you are viewing. These parts may be necessary or helpful to replace to complete your current repair.
All our installation videos are created and produced in collaboration with our in-house repair technician, Mark Sodja, who has helped millions of eReplacementParts customers over the last 13 years repair their products. Mark has years of experience in selling and repairing both commercial and residential products with a specialty in gas-powered equipment.
This data is collected from customers who submitted a repair instruction after replacing this exact part. Customers can rate how easy the repair was to complete and how long it took. We aggregate this data to provide a repair rating that allows customers to quickly determine the difficulty and time needed to perform their own repair.