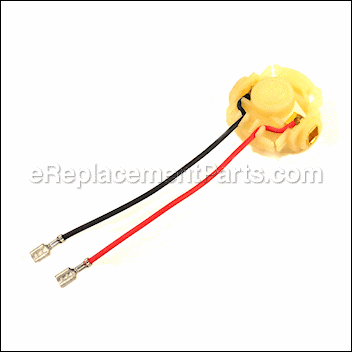

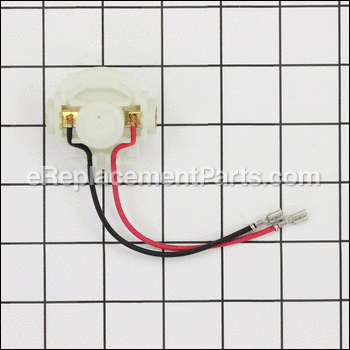
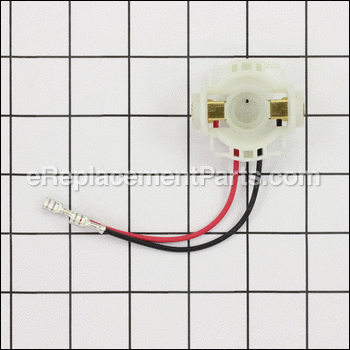

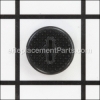
The endbell goes between the yoke unit and the housing set and is available individually. This is an authentic replacement part sourced from the original manufacturer for use with Makita grinders. It is made out of plastic and metal and will need to be replaced if it becomes broken. A screwdriver may be needed during the installation of this part.
Endbell 638448-2
OEM part for: Makita
Part Number: 638448-2
$5.79
In Stock
Jump To:
Frequently Purchased Together ?

Compatibility
This part will fit the following 45 machines
Makita
BGA452 Angle Grinder View Diagrams & Manuals
BGA452Z 18V LXT Lithium-Ion Cordless 4-1/2" Cut-Off/Angle Grinder View Diagrams & Manuals
LXDG01 18V LXT Lithium-Ion Cordless 1/4" Die Grinder View Diagrams & Manuals
LXDG01Z 18V LXT Lithium-Ion Cordless 1/4" Die Grinder View Diagrams & Manuals
LXNJ01Z 18V LXT Lithium-Ion Cordless 16 Gauge Nibbler Tool Only View Diagrams & Manuals
XAG01 18V LXT Lithium-Ion Cordless Grinder Kit View Diagrams & Manuals
XAG01Z 18V LXT Lithium-Ion 4-1/2" Cut-Off/Angle Grinder View Diagrams & Manuals
XDG01Z 8V LXT Lithium-Ion Cordless 1/4" Die Grinder View Diagrams & Manuals
BGA450Z (Type 1) Grinder View Diagrams & Manuals
BGA450Z (Type 2) Grinder View Diagrams & Manuals
BGA452F (Type 1) Grinder View Diagrams & Manuals
BGA452F (Type 2) Grinder View Diagrams & Manuals
BGA452F (Type 3) Grinder View Diagrams & Manuals
BGA452 (Type 2) Grinder View Diagrams & Manuals
BGA452 (Type 3) Grinder View Diagrams & Manuals
BGA452Z (Type 1) Grinder View Diagrams & Manuals
BGA452Z (Type 2) Grinder View Diagrams & Manuals
BGA452Z (Type 3) Grinder View Diagrams & Manuals
BJS161F (Type 1) Misc View Diagrams & Manuals
BJS161F (Type 2) Misc View Diagrams & Manuals
BJS161 (Type 1) Misc View Diagrams & Manuals
BJS161 (Type 2) Misc View Diagrams & Manuals
BJS161Z (Type 1) Misc View Diagrams & Manuals
BJS161Z (Type 2) Misc View Diagrams & Manuals
LXDG01 (Type 1) Grinder View Diagrams & Manuals
LXDG01 (Type 2) Grinder View Diagrams & Manuals
LXDG01Z1 (Type 1) Grinder View Diagrams & Manuals
LXDG01Z1 (Type 2) Grinder View Diagrams & Manuals
LXDG01Z (Type 1) Grinder View Diagrams & Manuals
LXDG01Z (Type 2) Grinder View Diagrams & Manuals
LXJP02 (Type 1) Misc View Diagrams & Manuals
LXJP02 (Type 2) Misc View Diagrams & Manuals
LXJP02Z (Type 1) Misc View Diagrams & Manuals
LXJP02Z (Type 2) Misc View Diagrams & Manuals
LXNJ01 (Type 1) Misc View Diagrams & Manuals
LXNJ01 (Type 2) Misc View Diagrams & Manuals
LXNJ01Z (Type 1) Misc View Diagrams & Manuals
LXNJ01Z (Type 2) Misc View Diagrams & Manuals
XDG01 Grinder View Diagrams & Manuals
XDG01T Grinder View Diagrams & Manuals
XDG02Z Grinder View Diagrams & Manuals
XNJ01 Misc View Diagrams & Manuals
XNJ01T Misc View Diagrams & Manuals
XNJ01Z Misc View Diagrams & Manuals
XSJ02Z Misc View Diagrams & Manuals
Show More Compatible Models
This item works with the following types of products:
- Grinder Parts
- Nibbler Parts
Repair Videos ?
Watch the Repair Video for
Endbell
Customer Part Reviews ?
Average Rating (out of 5):
Click to filter by ratings:
5 stars
1
4 stars
0
3 stars
0
2 stars
0
1 stars
0
< PREV
- 1
Old Makita Grinder
Brought a 20ish year old Makita grinder back to like new performance.
Robert -
March 14, 2023
Verified Purchase
t
t
t -
t days ago
Verified Purchase
eReplacementParts Team
t
Questions & Answers ?
Our customer Service team is at the ready daily to answer your part and product questions.

Ask our Team
We have a dedicated staff with decades of collective experience in helping customers just like you purchase parts to repair their products.
Does this fit my product?Questions & Answers for Endbell
No questions have been asked yet
Customer Repair Instructions ?
All our customer repair instructions are solicited directly from other customers just like you who have purchased and replaced this exact part.
Would not turn on
Adrian - September 27, 2018
Tool Type
Grinder
Difficulty
Easy
Time
15-30 minutes
Tools Used
Screwdriver
Took item apart, replaced brushes and some other components, put it back the way it was, very simple, too simple to explain in detail.
Did you find this story helpful?
Thanks for voting and helping fellow customers!
One of the brushes melted to the endbell and the motor stopped turning on.
Scott - April 13, 2018
Tool Type
Grinder
Difficulty
Easy
Time
Less than 15 minutes
Tools Used
Screwdriver, Pliers
Parts Used
Took grinder all the way apart. Unhooked clip on color coded wires, then removed endbell. Inserted new endbell into same slot and reconnected wires to the same locations as previous wires. Put grinder back together and installed new bushes. Bingo!
Did you find this story helpful?
Thanks for voting and helping fellow customers!
Cordless grinder needed new brushes and end bell
Dean - August 5, 2017
👍 1 of 2 people found this instruction helpful
Tool Type
Grinder
Difficulty
Easy
Time
Less than 15 minutes
Tools Used
Screwdriver
Removed the body screws and head, split the grinder, removed the end bell and replaced with the new one with new brushes, then put it back together. Then finished with a new holder cap cover
Did you find this story helpful?
Thanks for voting and helping fellow customers!
Low on power, sometimes wouldn't turn on.
Jack - January 8, 2017
Tool Type
Grinder
Difficulty
Easy
Time
Less than 15 minutes
Tools Used
Screwdriver
1. Removed the metal head. (4 screws)
2. Removed the screws holding the body together. (5 screws)
3. Removed the two dust brush covers and the two screw on brush covers.
4. Removed the two brushes.
5. Removed the brush holder with two wires. (mine was melted from the heat.)
6. Greased the gear head with a light grease. (I used superlube)
7. Reassemble in opposite order of taking it apart.
Did you find this story helpful?
Thanks for voting and helping fellow customers!
OEM stands for Original Equipment Manufacturer and means the part you’re buying is sourced directly from the manufacturer who made your product. At eReplacementParts, we sell only genuine OEM parts, guaranteeing the part you’re purchasing is of better design and of higher quality than aftermarket parts.
Our product descriptions are a combination of data sourced directly from the manufacturers who made your product as well as content researched and curated by our content & customer service teams. This content is edited and reviewed internally before being made public to customers.
Our customer service team are at the ready daily to answer your part and product questions. We have a dedicated staff with decades of collective experience in helping customers just like you purchase parts to repair their products.
All our part reviews are solicited directly from other customers who have purchased this exact part. While we moderate these reviews for profanity, offensive language or personally identifiable information, these reviews are posted exactly as submitted and no alterations are made by our team.
All our customer repair instructions are solicited directly from other customers just like you who have purchased and replaced this exact part. While we moderate these reviews for profanity, offensive language or personally identifiable information, these reviews are posted exactly as submitted and no alterations are made by our team.
Based on data from past customer purchasing behaviors, these parts are most commonly purchased together along with the part you are viewing. These parts may be necessary or helpful to replace to complete your current repair.
All our installation videos are created and produced in collaboration with our in-house repair technician, Mark Sodja, who has helped millions of eReplacementParts customers over the last 13 years repair their products. Mark has years of experience in selling and repairing both commercial and residential products with a specialty in gas-powered equipment.
This data is collected from customers who submitted a repair instruction after replacing this exact part. Customers can rate how easy the repair was to complete and how long it took. We aggregate this data to provide a repair rating that allows customers to quickly determine the difficulty and time needed to perform their own repair.