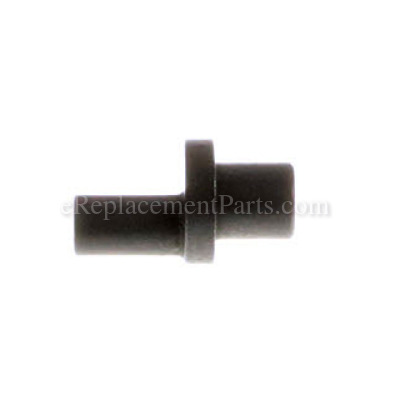
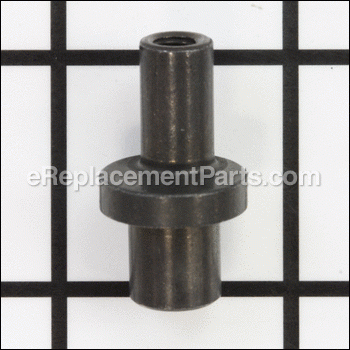


This is a genuine manufacturer-sourced component which is specially designed for use with Powermatic and Jet bandsaws. It is an identical replacement for a missing or a faulty eccentric shaft that was installed on a new unit. Please make sure to refer to the appropriate diagrams of your model for the correct location and installation of this part. Keep in mind this high-quality eccentric shaft is made of durable metal and is sold individually.
Eccentric Shaft PWBS14-240
OEM part for: Powermatic, Jet
Part Number: PWBS14-240
$6.09
Factory Backorder
Jump To:
Frequently Purchased Together ?

Compatibility
This Eccentric Shaft will fit the following 3 machines. Confirm this part works with your model, and view the detailed model diagrams and repair help we have to offer.
Powermatic
Jet
This item works with the following types of products:
- Band Saw Parts
- Saw Parts
Customer Part Reviews ?
Average Rating (out of 5):
Click to filter by ratings:
5 stars
3
4 stars
0
3 stars
0
2 stars
0
1 stars
0
< PREV
- 1
Wanted the best
My parts arrived quickly (Australia). Thank you for a great product and service.
iGlobal -
March 11, 2024
Verified Purchase
right part
Got the right part- easy ordering, fast shipping!
Guest -
June 22, 2021
Verified Purchase
Great company to work with.
They had the part I needed at a good price. Fit perfectly when I got it. Not the first time I have bought from them and wont be the last. Thanks folks!
Guest -
April 29, 2020
Verified Purchase
Questions & Answers ?
Our customer Service team is at the ready daily to answer your part and product questions.

Ask our Team
We have a dedicated staff with decades of collective experience in helping customers just like you purchase parts to repair their products.
Does this fit my product?Questions & Answers for Eccentric Shaft
No questions have been asked yet
Customer Repair Instructions ?
All our customer repair instructions are solicited directly from other customers just like you who have purchased and replaced this exact part.
Eccentric shaft snapped.
Mike - August 23, 2017
👍 2 of 2 people found this instruction helpful
Tool Type
Band Saw
Difficulty
Easy
Time
Less than 15 minutes
Tools Used
Wrench Set
Parts Used
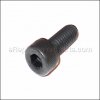
Loosened the cap screw holding it and replaced the shaft.
Did you find this story helpful?
Thanks for voting and helping fellow customers!
Broke both eccentric shafts because I did NOT use a zero clearance insert. Was shaving "toothpicks: of white hard maple to get closer to my cut line. The off cut followed the blade, riding between
Ed - April 11, 2018
👍 1 of 1 people found this instruction helpful
Tool Type
Band Saw
Difficulty
Medium
Time
30-60 minutes
Tools Used
Socket set, allen wrench, dollar bill
Parts Used
Release tension on the eccentric shafts using an allen wrench.
Remove the broken shafts from the aluminum slide.
Replace the bearings on the eccentric shafts.
Hand tighten the allen screws which attach the bearings to the shaft.
Slip a folded dollar bill between the blade and the bearing, on the right side of blade. (It helps to put some tension on the allen screw which tightens the eccentric shafts. Otherwise the eccentric shafts allow the bearings to flop around. That's disconcerting.)
Repeat above on the left side of the blade.
Tighten the allen screw which holds the eccentric shafts.
Repeat for the Bottom set of bearings.
I removed the cast iron table from the band saw. Makes this maneuver simpler.
Also I removed the plate the table is attached to so I had easier access to tighten the bottom
screws of the bearings.
Reattach plate. Then reattach table top. Stand away from the machine. Turn the machine on...cross your fingers, and hold your breath. Ahhhh success. Oh yes!! the bandsaw WAS unplugged the whole time of this retro.
I did remove the band saw blade--but that is unnecessary. Just be careful as you remove the cast iron table so you don't damage the blade.
BTW these guys at eReplacement parts are great!! Price was awesome. Delivery was great too. Wish I would have check them out a month earlier. My Powermatic dealer took a month to get me a broken part--then I broke it again ( my bad) by exerting too much tension on the allen wrench tightening the bearing to the eccentric shaft. I broke it. I did NOT want to wait for my dealer so I found these guys on line. Will certainly use them again. Hope this helps.
Be Well, Ed
Did you find this story helpful?
Thanks for voting and helping fellow customers!
At some point, the eccentric shaft on one of the bottom blade guide bearings (outboard) broke, and the blade continually wandered off track. Finally discovered the broken (missing) shaft, ordered 4 (
Dennis - October 12, 2022
Tool Type
Band Saw
Difficulty
Easy
Time
Less than 15 minutes
Tools Used
, Allen wrench
Parts Used
This was for a Powermatic PWBS-14CS bandsaw
1. Removed the old (broken end) of the eccentric shaft from the saw by loosening the socket head screw on the bandsaw (beneath the table).
2. Installed bearing (from previous purchase) onto the new shaft
3. Secured bearing onto eccentric shaft with washer (#10 SAE) and socket head screw (5mm). Tightened screw to shaft to enable next step
4. Inserted shaft to bandsaw, adjusted appropriate blade clearance by using socket screw on eccentric shaft to rotate the shaft, then tightened bottom outboard socket screw (on bandsaw).
Did you find this story helpful?
Thanks for voting and helping fellow customers!
The lower Bearing blade guide (eccentric shaft) was broken by a piece of wood.
Brett - December 4, 2020
Tool Type
Band Saw
Difficulty
Easy
Time
15-30 minutes
Tools Used
Screwdriver, Pliers, Allen wrench
Remove throat plate.
Remove blade.
Remove table mount knobs and tilt table.
Loosen bearing guide, eccentric shaft lock bolt , using Allen wrench.
Push broken shaft out of bracket from back of machine. I used a pc of wood.
Install new eccentric shaft with bearings installed and retained by Socket Head Cap Screw.
Tighten bearing guide eccentric shaft lock bolt .
Replace table and mount knobs.
Install blade and throat plate.
Adjust saw per manufacturers recommendations.
Did you find this story helpful?
Thanks for voting and helping fellow customers!
Nothing
Daniel - January 9, 2017
Tool Type
Band Saw
Difficulty
Easy
Time
Less than 15 minutes
Tools Used
, Allen (hex) wrench
Parts Used
Removed the broken part (eccentric shaft) then I removed the bearings from the broken part and installed them on the new part. Installed new part with the old bearings back into bandsaw, adjusted clearance and went back to using saw. Works like a champ.
Did you find this story helpful?
Thanks for voting and helping fellow customers!
OEM stands for Original Equipment Manufacturer and means the part you’re buying is sourced directly from the manufacturer who made your product. At eReplacementParts, we sell only genuine OEM parts, guaranteeing the part you’re purchasing is of better design and of higher quality than aftermarket parts.
Our product descriptions are a combination of data sourced directly from the manufacturers who made your product as well as content researched and curated by our content & customer service teams. This content is edited and reviewed internally before being made public to customers.
Our customer service team are at the ready daily to answer your part and product questions. We have a dedicated staff with decades of collective experience in helping customers just like you purchase parts to repair their products.
All our part reviews are solicited directly from other customers who have purchased this exact part. While we moderate these reviews for profanity, offensive language or personally identifiable information, these reviews are posted exactly as submitted and no alterations are made by our team.
All our customer repair instructions are solicited directly from other customers just like you who have purchased and replaced this exact part. While we moderate these reviews for profanity, offensive language or personally identifiable information, these reviews are posted exactly as submitted and no alterations are made by our team.
Based on data from past customer purchasing behaviors, these parts are most commonly purchased together along with the part you are viewing. These parts may be necessary or helpful to replace to complete your current repair.
All our installation videos are created and produced in collaboration with our in-house repair technician, Mark Sodja, who has helped millions of eReplacementParts customers over the last 13 years repair their products. Mark has years of experience in selling and repairing both commercial and residential products with a specialty in gas-powered equipment.
This data is collected from customers who submitted a repair instruction after replacing this exact part. Customers can rate how easy the repair was to complete and how long it took. We aggregate this data to provide a repair rating that allows customers to quickly determine the difficulty and time needed to perform their own repair.