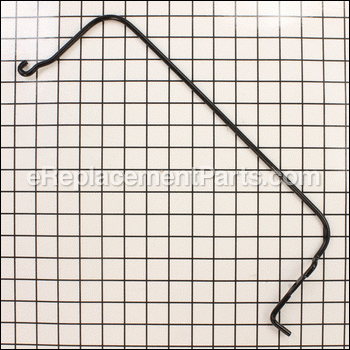

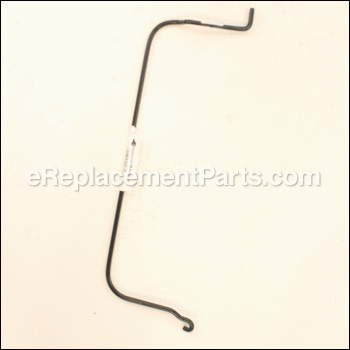
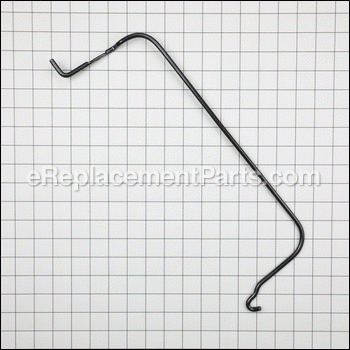

This is an authentic OEM part for use with Craftsman Lawn Mowers. The bail control bar lets you start the engine when you pull the bail control bar against the handle and stops the engine when you release it. This part is sold individually. The most common reason for replacing the bail arm is if it is damaged. There are no tools needed to replace the bail arm.
Bail 747-1161A-0637
OEM part for: MTD, Ryobi, Yard Machines, Troy-Bilt, Bolens, Yard Man, Craftsman, Cub Cadet, Husky
Part Number: 747-1161A-0637
$12.90
In Stock
Jump To:
Frequently Purchased Together ?


Compatibility
This part will fit the following 2664 machines
Ryobi
11A-546P034 Push Walk-Behind Mower View Diagrams & Manuals
11A-545D034 Push Walk-Behind Mower View Diagrams & Manuals
11A-545D734 Push Walk-Behind Mower View Diagrams & Manuals
11A-546P034 (2002) Lawn Mower View Diagrams & Manuals
11A-545D034 (2003) Lawn Mower View Diagrams & Manuals
11A-545D734 (2004) Lawn Mower View Diagrams & Manuals
MTD
11A-549W300 (2002) Push Walk-Behind Mower View Diagrams & Manuals
11A-509W300 (2002) Push Walk-Behind Mower View Diagrams & Manuals
11A-439W300 (2002) Push Walk-Behind Mower View Diagrams & Manuals
11A-418A300 (2002) Push Walk-Behind Mower View Diagrams & Manuals
11A-088A300 (2002) Push Walk-Behind Mower View Diagrams & Manuals
11A-542Q (2009) Push Walk-Behind Mower View Diagrams & Manuals
11A-542Q (2008) Push Walk-Behind Mower View Diagrams & Manuals
11A-439W300 (2003) Push Walk-Behind Mower View Diagrams & Manuals
11A-435E300 (2003) Push Walk-Behind Mower View Diagrams & Manuals
11A-422Q713 (2007) Walk-Behind Mower View Diagrams & Manuals
11A-436Q095 (2009) Walk-Behind Mower View Diagrams & Manuals
11A-588Q795 (2005) Walk-Behind Mower View Diagrams & Manuals
11A-589B795 (2006) Walk-Behind Mower View Diagrams & Manuals
12A-26MY295 (2007) Walk-Behind Mower View Diagrams & Manuals
12A-559Q795 (2006) Walk-Behind Mower View Diagrams & Manuals
12AV55DQ713 (2008) Walk-Behind Mower View Diagrams & Manuals
11A-020B006 (2009) Lawn Mower View Diagrams & Manuals
11A-08MB006 (2009) Lawn Mower View Diagrams & Manuals
11A-41MB006 (2009) Lawn Mower View Diagrams & Manuals
11A-50MB006 (2009) Lawn Mower View Diagrams & Manuals
11A-54M9006 (2009) Lawn Mower View Diagrams & Manuals
11A-54MC006 (2009) Lawn Mower View Diagrams & Manuals
11A-439W722 (2004) Lawn Mower View Diagrams & Manuals
11A-439R004 (2008) Lawn Mower View Diagrams & Manuals
11A-439S204 (2008) Lawn Mower View Diagrams & Manuals
11A-544B004 (2008) Lawn Mower View Diagrams & Manuals
11A-544K204 (2008) Lawn Mower View Diagrams & Manuals
11A-439R004 (2009) Lawn Mower View Diagrams & Manuals
11A-439S204 (2009) Lawn Mower View Diagrams & Manuals
11A-544B004 (2009) Lawn Mower View Diagrams & Manuals
11A-544K204 (2009) Lawn Mower View Diagrams & Manuals
12A-288A300 (2002) Lawn Mower View Diagrams & Manuals
12A-529B300 (2002) Lawn Mower View Diagrams & Manuals
12A-529W300 (2002) Lawn Mower View Diagrams & Manuals
12A-288A300 (2003) Lawn Mower View Diagrams & Manuals
12A-289W722 (2004) Lawn Mower View Diagrams & Manuals
12A-469W722 (2004) Lawn Mower View Diagrams & Manuals
12A-469R004 (2008) Lawn Mower View Diagrams & Manuals
12A-469S204 (2008) Lawn Mower View Diagrams & Manuals
12A-529R004 (2008) Lawn Mower View Diagrams & Manuals
12A-529S204 (2008) Lawn Mower View Diagrams & Manuals
12A-469R004 (2009) Lawn Mower View Diagrams & Manuals
12A-469S204 (2009) Lawn Mower View Diagrams & Manuals
12A-529R004 (2009) Lawn Mower View Diagrams & Manuals
12A-529S204 (2009) Lawn Mower View Diagrams & Manuals
12AV569R004 (2009) Lawn Mower View Diagrams & Manuals
12AV569S204 (2009) Lawn Mower View Diagrams & Manuals
11B-084A033 (2000) Push Walk-Behind Mower View Diagrams & Manuals
11B-509B033 (2000) Push Walk-Behind Mower View Diagrams & Manuals
11A-418C033 (2001) Push Walk-Behind Mower View Diagrams & Manuals
11B-084A033 (2001) Push Walk-Behind Mower View Diagrams & Manuals
11B-509B033 (2001) Push Walk-Behind Mower View Diagrams & Manuals
11A-549P118 (2003) Lawn Mower View Diagrams & Manuals
12B-263B033 (2000) Self-Propelled Walk-Behind Mower View Diagrams & Manuals
12A-264A033 (2001) Self-Propelled Walk-Behind Mower View Diagrams & Manuals
11A-588Q795 (2004) Pro Walk-Behind Mower View Diagrams & Manuals
12A-26MB095 (2007) Pro Walk-Behind Mower View Diagrams & Manuals
12AV55DQ713 (2007) Walk-Behind Mower View Diagrams & Manuals
11A-549W304 (2002) Push Walk-Behind Mower View Diagrams & Manuals
11A-549W372 (2002) Push Walk-Behind Mower View Diagrams & Manuals
11A-549W401 (2002) Push Walk-Behind Mower View Diagrams & Manuals
11A-549W720 (2002) Push Walk-Behind Mower View Diagrams & Manuals
11A-549W730 (2002) Push Walk-Behind Mower View Diagrams & Manuals
11A-549W301 (2002) Push Walk-Behind Mower View Diagrams & Manuals
11A-549W709 (2002) Push Walk-Behind Mower View Diagrams & Manuals
11A-549W371 (2002) Push Walk-Behind Mower View Diagrams & Manuals
11A-549W307 (2002) Push Walk-Behind Mower View Diagrams & Manuals
11A-549W513 (2002) Push Walk-Behind Mower View Diagrams & Manuals
11A-549W713 (2002) Push Walk-Behind Mower View Diagrams & Manuals
11A-549W382 (2002) Push Walk-Behind Mower View Diagrams & Manuals
11A-549W000 (2002) Push Walk-Behind Mower View Diagrams & Manuals
11A-549W121 (2002) Push Walk-Behind Mower View Diagrams & Manuals
11A-549W205 (2002) Push Walk-Behind Mower View Diagrams & Manuals
11A-549W705 (2002) Push Walk-Behind Mower View Diagrams & Manuals
11A-549W706 (2002) Push Walk-Behind Mower View Diagrams & Manuals
11A-549W026 (2002) Push Walk-Behind Mower View Diagrams & Manuals
11A-549W726 (2002) Push Walk-Behind Mower View Diagrams & Manuals
11A-549W054 (2002) Push Walk-Behind Mower View Diagrams & Manuals
11A-549W745 (2002) Push Walk-Behind Mower View Diagrams & Manuals
11A-549W754 (2002) Push Walk-Behind Mower View Diagrams & Manuals
11A-549W704 (2002) Push Walk-Behind Mower View Diagrams & Manuals
11A-549W029 (2002) Push Walk-Behind Mower View Diagrams & Manuals
11A-549W229 (2002) Push Walk-Behind Mower View Diagrams & Manuals
11A-549W134 (2002) Push Walk-Behind Mower View Diagrams & Manuals
11A-549W138 (2002) Push Walk-Behind Mower View Diagrams & Manuals
11A-549W729 (2002) Push Walk-Behind Mower View Diagrams & Manuals
11A-549W929 (2002) Push Walk-Behind Mower View Diagrams & Manuals
11A-549W129 (2002) Push Walk-Behind Mower View Diagrams & Manuals
11A-549W151 (2002) Push Walk-Behind Mower View Diagrams & Manuals
11A-549W206 (2002) Push Walk-Behind Mower View Diagrams & Manuals
11A-549W308 (2002) Push Walk-Behind Mower View Diagrams & Manuals
11A-549W033 (2002) Push Walk-Behind Mower View Diagrams & Manuals
11A-549W019 (2002) Push Walk-Behind Mower View Diagrams & Manuals
11A-549W057 (2002) Push Walk-Behind Mower View Diagrams & Manuals
11A-549W118 (2002) Push Walk-Behind Mower View Diagrams & Manuals
11A-549W131 (2002) Push Walk-Behind Mower View Diagrams & Manuals
11A-549W022 (2002) Push Walk-Behind Mower View Diagrams & Manuals
11A-549W722 (2002) Push Walk-Behind Mower View Diagrams & Manuals
11A-549W002 (2002) Push Walk-Behind Mower View Diagrams & Manuals
11A-549W715 (2002) Push Walk-Behind Mower View Diagrams & Manuals
11A-549W077 (2002) Push Walk-Behind Mower View Diagrams & Manuals
11A-549W977 (2002) Push Walk-Behind Mower View Diagrams & Manuals
11A-549W777 (2002) Push Walk-Behind Mower View Diagrams & Manuals
11A-549W724 (2002) Push Walk-Behind Mower View Diagrams & Manuals
11A-549W105 (2002) Push Walk-Behind Mower View Diagrams & Manuals
11A-549W009 (2002) Push Walk-Behind Mower View Diagrams & Manuals
11A-549W016 (2002) Push Walk-Behind Mower View Diagrams & Manuals
11A-549W145 (2002) Push Walk-Behind Mower View Diagrams & Manuals
11A-549W196 (2002) Push Walk-Behind Mower View Diagrams & Manuals
11A-549W719 (2002) Push Walk-Behind Mower View Diagrams & Manuals
11A-549W098 (2002) Push Walk-Behind Mower View Diagrams & Manuals
11A-509W304 (2002) Push Walk-Behind Mower View Diagrams & Manuals
11A-509W372 (2002) Push Walk-Behind Mower View Diagrams & Manuals
11A-509W401 (2002) Push Walk-Behind Mower View Diagrams & Manuals
11A-509W720 (2002) Push Walk-Behind Mower View Diagrams & Manuals
11A-509W730 (2002) Push Walk-Behind Mower View Diagrams & Manuals
11A-509W301 (2002) Push Walk-Behind Mower View Diagrams & Manuals
11A-509W709 (2002) Push Walk-Behind Mower View Diagrams & Manuals
11A-509W371 (2002) Push Walk-Behind Mower View Diagrams & Manuals
11A-509W307 (2002) Push Walk-Behind Mower View Diagrams & Manuals
11A-509W513 (2002) Push Walk-Behind Mower View Diagrams & Manuals
11A-509W713 (2002) Push Walk-Behind Mower View Diagrams & Manuals
11A-509W382 (2002) Push Walk-Behind Mower View Diagrams & Manuals
11A-509W000 (2002) Push Walk-Behind Mower View Diagrams & Manuals
11A-509W121 (2002) Push Walk-Behind Mower View Diagrams & Manuals
11A-509W205 (2002) Push Walk-Behind Mower View Diagrams & Manuals
11A-509W705 (2002) Push Walk-Behind Mower View Diagrams & Manuals
11A-509W706 (2002) Push Walk-Behind Mower View Diagrams & Manuals
11A-509W026 (2002) Push Walk-Behind Mower View Diagrams & Manuals
11A-509W726 (2002) Push Walk-Behind Mower View Diagrams & Manuals
11A-509W054 (2002) Push Walk-Behind Mower View Diagrams & Manuals
11A-509W745 (2002) Push Walk-Behind Mower View Diagrams & Manuals
11A-509W754 (2002) Push Walk-Behind Mower View Diagrams & Manuals
11A-509W704 (2002) Push Walk-Behind Mower View Diagrams & Manuals
11A-509W029 (2002) Push Walk-Behind Mower View Diagrams & Manuals
11A-509W229 (2002) Push Walk-Behind Mower View Diagrams & Manuals
11A-509W134 (2002) Push Walk-Behind Mower View Diagrams & Manuals
11A-509W138 (2002) Push Walk-Behind Mower View Diagrams & Manuals
11A-509W729 (2002) Push Walk-Behind Mower View Diagrams & Manuals
11A-509W929 (2002) Push Walk-Behind Mower View Diagrams & Manuals
11A-509W129 (2002) Push Walk-Behind Mower View Diagrams & Manuals
11A-509W151 (2002) Push Walk-Behind Mower View Diagrams & Manuals
11A-509W206 (2002) Push Walk-Behind Mower View Diagrams & Manuals
11A-509W308 (2002) Push Walk-Behind Mower View Diagrams & Manuals
11A-509W033 (2002) Push Walk-Behind Mower View Diagrams & Manuals
11A-509W019 (2002) Push Walk-Behind Mower View Diagrams & Manuals
11A-509W057 (2002) Push Walk-Behind Mower View Diagrams & Manuals
11A-509W118 (2002) Push Walk-Behind Mower View Diagrams & Manuals
11A-509W131 (2002) Push Walk-Behind Mower View Diagrams & Manuals
11A-509W022 (2002) Push Walk-Behind Mower View Diagrams & Manuals
11A-509W722 (2002) Push Walk-Behind Mower View Diagrams & Manuals
11A-509W002 (2002) Push Walk-Behind Mower View Diagrams & Manuals
11A-509W715 (2002) Push Walk-Behind Mower View Diagrams & Manuals
11A-509W077 (2002) Push Walk-Behind Mower View Diagrams & Manuals
11A-509W977 (2002) Push Walk-Behind Mower View Diagrams & Manuals
11A-509W777 (2002) Push Walk-Behind Mower View Diagrams & Manuals
11A-509W724 (2002) Push Walk-Behind Mower View Diagrams & Manuals
11A-509W105 (2002) Push Walk-Behind Mower View Diagrams & Manuals
11A-509W009 (2002) Push Walk-Behind Mower View Diagrams & Manuals
11A-509W016 (2002) Push Walk-Behind Mower View Diagrams & Manuals
11A-509W145 (2002) Push Walk-Behind Mower View Diagrams & Manuals
11A-509W196 (2002) Push Walk-Behind Mower View Diagrams & Manuals
11A-509W719 (2002) Push Walk-Behind Mower View Diagrams & Manuals
11A-509W098 (2002) Push Walk-Behind Mower View Diagrams & Manuals
11A-439W304 (2002) Push Walk-Behind Mower View Diagrams & Manuals
11A-439W372 (2002) Push Walk-Behind Mower View Diagrams & Manuals
11A-439W401 (2002) Push Walk-Behind Mower View Diagrams & Manuals
11A-439W720 (2002) Push Walk-Behind Mower View Diagrams & Manuals
11A-439W730 (2002) Push Walk-Behind Mower View Diagrams & Manuals
11A-439W301 (2002) Push Walk-Behind Mower View Diagrams & Manuals
11A-439W709 (2002) Push Walk-Behind Mower View Diagrams & Manuals
11A-439W371 (2002) Push Walk-Behind Mower View Diagrams & Manuals
11A-439W307 (2002) Push Walk-Behind Mower View Diagrams & Manuals
11A-439W513 (2002) Push Walk-Behind Mower View Diagrams & Manuals
11A-439W713 (2002) Push Walk-Behind Mower View Diagrams & Manuals
11A-439W382 (2002) Push Walk-Behind Mower View Diagrams & Manuals
11A-439W000 (2002) Push Walk-Behind Mower View Diagrams & Manuals
11A-439W121 (2002) Push Walk-Behind Mower View Diagrams & Manuals
11A-439W205 (2002) Push Walk-Behind Mower View Diagrams & Manuals
11A-439W705 (2002) Push Walk-Behind Mower View Diagrams & Manuals
11A-439W706 (2002) Push Walk-Behind Mower View Diagrams & Manuals
11A-439W026 (2002) Push Walk-Behind Mower View Diagrams & Manuals
11A-439W726 (2002) Push Walk-Behind Mower View Diagrams & Manuals
11A-439W054 (2002) Push Walk-Behind Mower View Diagrams & Manuals
11A-439W745 (2002) Push Walk-Behind Mower View Diagrams & Manuals
11A-439W754 (2002) Push Walk-Behind Mower View Diagrams & Manuals
11A-439W704 (2002) Push Walk-Behind Mower View Diagrams & Manuals
11A-439W029 (2002) Push Walk-Behind Mower View Diagrams & Manuals
11A-439W229 (2002) Push Walk-Behind Mower View Diagrams & Manuals
11A-439W134 (2002) Push Walk-Behind Mower View Diagrams & Manuals
11A-439W138 (2002) Push Walk-Behind Mower View Diagrams & Manuals
11A-439W729 (2002) Push Walk-Behind Mower View Diagrams & Manuals
11A-439W929 (2002) Push Walk-Behind Mower View Diagrams & Manuals
11A-439W129 (2002) Push Walk-Behind Mower View Diagrams & Manuals
11A-439W151 (2002) Push Walk-Behind Mower View Diagrams & Manuals
11A-439W206 (2002) Push Walk-Behind Mower View Diagrams & Manuals
11A-439W308 (2002) Push Walk-Behind Mower View Diagrams & Manuals
11A-439W033 (2002) Push Walk-Behind Mower View Diagrams & Manuals
11A-439W019 (2002) Push Walk-Behind Mower View Diagrams & Manuals
11A-439W057 (2002) Push Walk-Behind Mower View Diagrams & Manuals
11A-439W118 (2002) Push Walk-Behind Mower View Diagrams & Manuals
11A-439W131 (2002) Push Walk-Behind Mower View Diagrams & Manuals
11A-439W022 (2002) Push Walk-Behind Mower View Diagrams & Manuals
11A-439W002 (2002) Push Walk-Behind Mower View Diagrams & Manuals
11A-439W715 (2002) Push Walk-Behind Mower View Diagrams & Manuals
11A-439W077 (2002) Push Walk-Behind Mower View Diagrams & Manuals
11A-439W977 (2002) Push Walk-Behind Mower View Diagrams & Manuals
11A-439W777 (2002) Push Walk-Behind Mower View Diagrams & Manuals
11A-439W724 (2002) Push Walk-Behind Mower View Diagrams & Manuals
11A-439W105 (2002) Push Walk-Behind Mower View Diagrams & Manuals
11A-439W009 (2002) Push Walk-Behind Mower View Diagrams & Manuals
11A-439W016 (2002) Push Walk-Behind Mower View Diagrams & Manuals
11A-439W145 (2002) Push Walk-Behind Mower View Diagrams & Manuals
11A-439W196 (2002) Push Walk-Behind Mower View Diagrams & Manuals
11A-439W719 (2002) Push Walk-Behind Mower View Diagrams & Manuals
11A-439W098 (2002) Push Walk-Behind Mower View Diagrams & Manuals
11A-418A304 (2002) Push Walk-Behind Mower View Diagrams & Manuals
11A-418A372 (2002) Push Walk-Behind Mower View Diagrams & Manuals
11A-418A401 (2002) Push Walk-Behind Mower View Diagrams & Manuals
11A-418A720 (2002) Push Walk-Behind Mower View Diagrams & Manuals
11A-418A730 (2002) Push Walk-Behind Mower View Diagrams & Manuals
11A-418A301 (2002) Push Walk-Behind Mower View Diagrams & Manuals
11A-418A709 (2002) Push Walk-Behind Mower View Diagrams & Manuals
11A-418A371 (2002) Push Walk-Behind Mower View Diagrams & Manuals
11A-418A307 (2002) Push Walk-Behind Mower View Diagrams & Manuals
11A-418A513 (2002) Push Walk-Behind Mower View Diagrams & Manuals
11A-418A713 (2002) Push Walk-Behind Mower View Diagrams & Manuals
11A-418A382 (2002) Push Walk-Behind Mower View Diagrams & Manuals
11A-418A000 (2002) Push Walk-Behind Mower View Diagrams & Manuals
11A-418A121 (2002) Push Walk-Behind Mower View Diagrams & Manuals
11A-418A205 (2002) Push Walk-Behind Mower View Diagrams & Manuals
11A-418A705 (2002) Push Walk-Behind Mower View Diagrams & Manuals
11A-418A706 (2002) Push Walk-Behind Mower View Diagrams & Manuals
11A-418A026 (2002) Push Walk-Behind Mower View Diagrams & Manuals
11A-418A726 (2002) Push Walk-Behind Mower View Diagrams & Manuals
11A-418A054 (2002) Push Walk-Behind Mower View Diagrams & Manuals
11A-418A745 (2002) Push Walk-Behind Mower View Diagrams & Manuals
11A-418A754 (2002) Push Walk-Behind Mower View Diagrams & Manuals
11A-418A704 (2002) Push Walk-Behind Mower View Diagrams & Manuals
11A-418A029 (2002) Push Walk-Behind Mower View Diagrams & Manuals
11A-418A229 (2002) Push Walk-Behind Mower View Diagrams & Manuals
11A-418A134 (2002) Push Walk-Behind Mower View Diagrams & Manuals
11A-418A138 (2002) Push Walk-Behind Mower View Diagrams & Manuals
11A-418A729 (2002) Push Walk-Behind Mower View Diagrams & Manuals
11A-418A929 (2002) Push Walk-Behind Mower View Diagrams & Manuals
11A-418A129 (2002) Push Walk-Behind Mower View Diagrams & Manuals
11A-418A151 (2002) Push Walk-Behind Mower View Diagrams & Manuals
11A-418A206 (2002) Push Walk-Behind Mower View Diagrams & Manuals
11A-418A308 (2002) Push Walk-Behind Mower View Diagrams & Manuals
11A-418A033 (2002) Push Walk-Behind Mower View Diagrams & Manuals
11A-418A019 (2002) Push Walk-Behind Mower View Diagrams & Manuals
11A-418A057 (2002) Push Walk-Behind Mower View Diagrams & Manuals
11A-418A118 (2002) Push Walk-Behind Mower View Diagrams & Manuals
11A-418A131 (2002) Push Walk-Behind Mower View Diagrams & Manuals
11A-418A022 (2002) Push Walk-Behind Mower View Diagrams & Manuals
11A-418A722 (2002) Push Walk-Behind Mower View Diagrams & Manuals
11A-418A002 (2002) Push Walk-Behind Mower View Diagrams & Manuals
11A-418A715 (2002) Push Walk-Behind Mower View Diagrams & Manuals
11A-418A077 (2002) Push Walk-Behind Mower View Diagrams & Manuals
11A-418A977 (2002) Push Walk-Behind Mower View Diagrams & Manuals
11A-418A777 (2002) Push Walk-Behind Mower View Diagrams & Manuals
11A-418A724 (2002) Push Walk-Behind Mower View Diagrams & Manuals
11A-418A105 (2002) Push Walk-Behind Mower View Diagrams & Manuals
11A-418A009 (2002) Push Walk-Behind Mower View Diagrams & Manuals
11A-418A016 (2002) Push Walk-Behind Mower View Diagrams & Manuals
11A-418A145 (2002) Push Walk-Behind Mower View Diagrams & Manuals
11A-418A196 (2002) Push Walk-Behind Mower View Diagrams & Manuals
11A-418A719 (2002) Push Walk-Behind Mower View Diagrams & Manuals
11A-418A098 (2002) Push Walk-Behind Mower View Diagrams & Manuals
11A-088A304 (2002) Push Walk-Behind Mower View Diagrams & Manuals
11A-088A372 (2002) Push Walk-Behind Mower View Diagrams & Manuals
11A-088A401 (2002) Push Walk-Behind Mower View Diagrams & Manuals
11A-088A720 (2002) Push Walk-Behind Mower View Diagrams & Manuals
11A-088A730 (2002) Push Walk-Behind Mower View Diagrams & Manuals
11A-088A301 (2002) Push Walk-Behind Mower View Diagrams & Manuals
11A-088A709 (2002) Push Walk-Behind Mower View Diagrams & Manuals
11A-088A371 (2002) Push Walk-Behind Mower View Diagrams & Manuals
11A-088A307 (2002) Push Walk-Behind Mower View Diagrams & Manuals
11A-088A513 (2002) Push Walk-Behind Mower View Diagrams & Manuals
11A-088A713 (2002) Push Walk-Behind Mower View Diagrams & Manuals
11A-088A382 (2002) Push Walk-Behind Mower View Diagrams & Manuals
11A-088A000 (2002) Push Walk-Behind Mower View Diagrams & Manuals
11A-088A121 (2002) Push Walk-Behind Mower View Diagrams & Manuals
11A-088A205 (2002) Push Walk-Behind Mower View Diagrams & Manuals
11A-088A705 (2002) Push Walk-Behind Mower View Diagrams & Manuals
11A-088A706 (2002) Push Walk-Behind Mower View Diagrams & Manuals
11A-088A026 (2002) Push Walk-Behind Mower View Diagrams & Manuals
11A-088A726 (2002) Push Walk-Behind Mower View Diagrams & Manuals
11A-088A054 (2002) Push Walk-Behind Mower View Diagrams & Manuals
11A-088A745 (2002) Push Walk-Behind Mower View Diagrams & Manuals
11A-088A754 (2002) Push Walk-Behind Mower View Diagrams & Manuals
11A-088A704 (2002) Push Walk-Behind Mower View Diagrams & Manuals
11A-088A029 (2002) Push Walk-Behind Mower View Diagrams & Manuals
11A-088A229 (2002) Push Walk-Behind Mower View Diagrams & Manuals
11A-088A134 (2002) Push Walk-Behind Mower View Diagrams & Manuals
11A-088A138 (2002) Push Walk-Behind Mower View Diagrams & Manuals
11A-088A729 (2002) Push Walk-Behind Mower View Diagrams & Manuals
11A-088A929 (2002) Push Walk-Behind Mower View Diagrams & Manuals
11A-088A129 (2002) Push Walk-Behind Mower View Diagrams & Manuals
11A-088A151 (2002) Push Walk-Behind Mower View Diagrams & Manuals
11A-088A206 (2002) Push Walk-Behind Mower View Diagrams & Manuals
11A-088A308 (2002) Push Walk-Behind Mower View Diagrams & Manuals
11A-088A033 (2002) Push Walk-Behind Mower View Diagrams & Manuals
11A-088A019 (2002) Push Walk-Behind Mower View Diagrams & Manuals
11A-088A057 (2002) Push Walk-Behind Mower View Diagrams & Manuals
11A-088A118 (2002) Push Walk-Behind Mower View Diagrams & Manuals
11A-088A131 (2002) Push Walk-Behind Mower View Diagrams & Manuals
11A-088A022 (2002) Push Walk-Behind Mower View Diagrams & Manuals
11A-088A722 (2002) Push Walk-Behind Mower View Diagrams & Manuals
11A-088A002 (2002) Push Walk-Behind Mower View Diagrams & Manuals
11A-088A715 (2002) Push Walk-Behind Mower View Diagrams & Manuals
11A-088A077 (2002) Push Walk-Behind Mower View Diagrams & Manuals
11A-088A977 (2002) Push Walk-Behind Mower View Diagrams & Manuals
11A-088A777 (2002) Push Walk-Behind Mower View Diagrams & Manuals
11A-088A724 (2002) Push Walk-Behind Mower View Diagrams & Manuals
11A-088A105 (2002) Push Walk-Behind Mower View Diagrams & Manuals
11A-088A009 (2002) Push Walk-Behind Mower View Diagrams & Manuals
11A-088A016 (2002) Push Walk-Behind Mower View Diagrams & Manuals
11A-088A145 (2002) Push Walk-Behind Mower View Diagrams & Manuals
11A-088A196 (2002) Push Walk-Behind Mower View Diagrams & Manuals
11A-088A719 (2002) Push Walk-Behind Mower View Diagrams & Manuals
11A-088A098 (2002) Push Walk-Behind Mower View Diagrams & Manuals
11A-544B304 (2008) Lawn Mower View Diagrams & Manuals
11A-544B372 (2008) Lawn Mower View Diagrams & Manuals
11A-544B401 (2008) Lawn Mower View Diagrams & Manuals
11A-544B720 (2008) Lawn Mower View Diagrams & Manuals
11A-544B730 (2008) Lawn Mower View Diagrams & Manuals
11A-544B301 (2008) Lawn Mower View Diagrams & Manuals
11A-544B709 (2008) Lawn Mower View Diagrams & Manuals
11A-544B371 (2008) Lawn Mower View Diagrams & Manuals
11A-544B307 (2008) Lawn Mower View Diagrams & Manuals
11A-544B513 (2008) Lawn Mower View Diagrams & Manuals
11A-544B713 (2008) Lawn Mower View Diagrams & Manuals
11A-544B382 (2008) Lawn Mower View Diagrams & Manuals
11A-544B000 (2008) Lawn Mower View Diagrams & Manuals
11A-544B121 (2008) Lawn Mower View Diagrams & Manuals
11A-544B205 (2008) Lawn Mower View Diagrams & Manuals
11A-544B705 (2008) Lawn Mower View Diagrams & Manuals
11A-544B706 (2008) Lawn Mower View Diagrams & Manuals
11A-544B026 (2008) Lawn Mower View Diagrams & Manuals
11A-544B726 (2008) Lawn Mower View Diagrams & Manuals
11A-544B054 (2008) Lawn Mower View Diagrams & Manuals
11A-544B745 (2008) Lawn Mower View Diagrams & Manuals
11A-544B754 (2008) Lawn Mower View Diagrams & Manuals
11A-544B704 (2008) Lawn Mower View Diagrams & Manuals
11A-544B029 (2008) Lawn Mower View Diagrams & Manuals
11A-544B229 (2008) Lawn Mower View Diagrams & Manuals
11A-544B134 (2008) Lawn Mower View Diagrams & Manuals
11A-544B138 (2008) Lawn Mower View Diagrams & Manuals
11A-544B729 (2008) Lawn Mower View Diagrams & Manuals
11A-544B929 (2008) Lawn Mower View Diagrams & Manuals
11A-544B129 (2008) Lawn Mower View Diagrams & Manuals
11A-544B151 (2008) Lawn Mower View Diagrams & Manuals
11A-544B206 (2008) Lawn Mower View Diagrams & Manuals
11A-544B308 (2008) Lawn Mower View Diagrams & Manuals
11A-544B033 (2008) Lawn Mower View Diagrams & Manuals
11A-544B019 (2008) Lawn Mower View Diagrams & Manuals
11A-544B057 (2008) Lawn Mower View Diagrams & Manuals
11A-544B118 (2008) Lawn Mower View Diagrams & Manuals
11A-544B131 (2008) Lawn Mower View Diagrams & Manuals
11A-544B022 (2008) Lawn Mower View Diagrams & Manuals
11A-544B722 (2008) Lawn Mower View Diagrams & Manuals
11A-544B002 (2008) Lawn Mower View Diagrams & Manuals
11A-544B715 (2008) Lawn Mower View Diagrams & Manuals
11A-544B077 (2008) Lawn Mower View Diagrams & Manuals
11A-544B977 (2008) Lawn Mower View Diagrams & Manuals
11A-544B777 (2008) Lawn Mower View Diagrams & Manuals
11A-544B724 (2008) Lawn Mower View Diagrams & Manuals
11A-544B105 (2008) Lawn Mower View Diagrams & Manuals
11A-544B009 (2008) Lawn Mower View Diagrams & Manuals
11A-544B016 (2008) Lawn Mower View Diagrams & Manuals
11A-544B145 (2008) Lawn Mower View Diagrams & Manuals
11A-544B196 (2008) Lawn Mower View Diagrams & Manuals
11A-544B719 (2008) Lawn Mower View Diagrams & Manuals
11A-544B098 (2008) Lawn Mower View Diagrams & Manuals
11A-435E304 (2003) Push Walk-Behind Mower View Diagrams & Manuals
11A-435E372 (2003) Push Walk-Behind Mower View Diagrams & Manuals
11A-435E401 (2003) Push Walk-Behind Mower View Diagrams & Manuals
11A-435E720 (2003) Push Walk-Behind Mower View Diagrams & Manuals
11A-435E730 (2003) Push Walk-Behind Mower View Diagrams & Manuals
11A-435E301 (2003) Push Walk-Behind Mower View Diagrams & Manuals
11A-435E709 (2003) Push Walk-Behind Mower View Diagrams & Manuals
11A-435E371 (2003) Push Walk-Behind Mower View Diagrams & Manuals
11A-435E307 (2003) Push Walk-Behind Mower View Diagrams & Manuals
11A-435E513 (2003) Push Walk-Behind Mower View Diagrams & Manuals
11A-435E713 (2003) Push Walk-Behind Mower View Diagrams & Manuals
11A-435E382 (2003) Push Walk-Behind Mower View Diagrams & Manuals
11A-435E000 (2003) Push Walk-Behind Mower View Diagrams & Manuals
11A-435E121 (2003) Push Walk-Behind Mower View Diagrams & Manuals
11A-435E205 (2003) Push Walk-Behind Mower View Diagrams & Manuals
11A-435E705 (2003) Push Walk-Behind Mower View Diagrams & Manuals
11A-435E706 (2003) Push Walk-Behind Mower View Diagrams & Manuals
11A-435E026 (2003) Push Walk-Behind Mower View Diagrams & Manuals
11A-435E726 (2003) Push Walk-Behind Mower View Diagrams & Manuals
11A-435E054 (2003) Push Walk-Behind Mower View Diagrams & Manuals
11A-435E745 (2003) Push Walk-Behind Mower View Diagrams & Manuals
11A-435E754 (2003) Push Walk-Behind Mower View Diagrams & Manuals
11A-435E704 (2003) Push Walk-Behind Mower View Diagrams & Manuals
11A-435E029 (2003) Push Walk-Behind Mower View Diagrams & Manuals
11A-435E229 (2003) Push Walk-Behind Mower View Diagrams & Manuals
11A-435E134 (2003) Push Walk-Behind Mower View Diagrams & Manuals
11A-435E138 (2003) Push Walk-Behind Mower View Diagrams & Manuals
11A-435E729 (2003) Push Walk-Behind Mower View Diagrams & Manuals
11A-435E929 (2003) Push Walk-Behind Mower View Diagrams & Manuals
11A-435E129 (2003) Push Walk-Behind Mower View Diagrams & Manuals
11A-435E151 (2003) Push Walk-Behind Mower View Diagrams & Manuals
11A-435E206 (2003) Push Walk-Behind Mower View Diagrams & Manuals
11A-435E308 (2003) Push Walk-Behind Mower View Diagrams & Manuals
11A-435E033 (2003) Push Walk-Behind Mower View Diagrams & Manuals
11A-435E019 (2003) Push Walk-Behind Mower View Diagrams & Manuals
11A-435E057 (2003) Push Walk-Behind Mower View Diagrams & Manuals
11A-435E118 (2003) Push Walk-Behind Mower View Diagrams & Manuals
11A-435E131 (2003) Push Walk-Behind Mower View Diagrams & Manuals
11A-435E022 (2003) Push Walk-Behind Mower View Diagrams & Manuals
11A-435E722 (2003) Push Walk-Behind Mower View Diagrams & Manuals
11A-435E002 (2003) Push Walk-Behind Mower View Diagrams & Manuals
11A-435E715 (2003) Push Walk-Behind Mower View Diagrams & Manuals
11A-435E077 (2003) Push Walk-Behind Mower View Diagrams & Manuals
11A-435E977 (2003) Push Walk-Behind Mower View Diagrams & Manuals
11A-435E777 (2003) Push Walk-Behind Mower View Diagrams & Manuals
11A-435E724 (2003) Push Walk-Behind Mower View Diagrams & Manuals
11A-435E105 (2003) Push Walk-Behind Mower View Diagrams & Manuals
11A-435E009 (2003) Push Walk-Behind Mower View Diagrams & Manuals
11A-435E016 (2003) Push Walk-Behind Mower View Diagrams & Manuals
11A-435E145 (2003) Push Walk-Behind Mower View Diagrams & Manuals
11A-435E196 (2003) Push Walk-Behind Mower View Diagrams & Manuals
11A-435E719 (2003) Push Walk-Behind Mower View Diagrams & Manuals
11A-435E098 (2003) Push Walk-Behind Mower View Diagrams & Manuals
11A-422Q304 (2007) Walk-Behind Mower View Diagrams & Manuals
11A-422Q372 (2007) Walk-Behind Mower View Diagrams & Manuals
11A-422Q401 (2007) Walk-Behind Mower View Diagrams & Manuals
11A-422Q720 (2007) Walk-Behind Mower View Diagrams & Manuals
11A-422Q730 (2007) Walk-Behind Mower View Diagrams & Manuals
11A-422Q301 (2007) Walk-Behind Mower View Diagrams & Manuals
11A-422Q709 (2007) Walk-Behind Mower View Diagrams & Manuals
11A-422Q371 (2007) Walk-Behind Mower View Diagrams & Manuals
11A-422Q307 (2007) Walk-Behind Mower View Diagrams & Manuals
11A-422Q513 (2007) Walk-Behind Mower View Diagrams & Manuals
11A-422Q382 (2007) Walk-Behind Mower View Diagrams & Manuals
11A-422Q000 (2007) Walk-Behind Mower View Diagrams & Manuals
11A-422Q121 (2007) Walk-Behind Mower View Diagrams & Manuals
11A-422Q205 (2007) Walk-Behind Mower View Diagrams & Manuals
11A-422Q705 (2007) Walk-Behind Mower View Diagrams & Manuals
11A-422Q706 (2007) Walk-Behind Mower View Diagrams & Manuals
11A-422Q026 (2007) Walk-Behind Mower View Diagrams & Manuals
11A-422Q726 (2007) Walk-Behind Mower View Diagrams & Manuals
11A-422Q054 (2007) Walk-Behind Mower View Diagrams & Manuals
11A-422Q745 (2007) Walk-Behind Mower View Diagrams & Manuals
11A-422Q754 (2007) Walk-Behind Mower View Diagrams & Manuals
11A-422Q704 (2007) Walk-Behind Mower View Diagrams & Manuals
11A-422Q029 (2007) Walk-Behind Mower View Diagrams & Manuals
11A-422Q229 (2007) Walk-Behind Mower View Diagrams & Manuals
11A-422Q134 (2007) Walk-Behind Mower View Diagrams & Manuals
11A-422Q138 (2007) Walk-Behind Mower View Diagrams & Manuals
11A-422Q729 (2007) Walk-Behind Mower View Diagrams & Manuals
11A-422Q929 (2007) Walk-Behind Mower View Diagrams & Manuals
11A-422Q129 (2007) Walk-Behind Mower View Diagrams & Manuals
11A-422Q151 (2007) Walk-Behind Mower View Diagrams & Manuals
11A-422Q206 (2007) Walk-Behind Mower View Diagrams & Manuals
11A-422Q308 (2007) Walk-Behind Mower View Diagrams & Manuals
11A-422Q033 (2007) Walk-Behind Mower View Diagrams & Manuals
11A-422Q019 (2007) Walk-Behind Mower View Diagrams & Manuals
11A-422Q057 (2007) Walk-Behind Mower View Diagrams & Manuals
11A-422Q118 (2007) Walk-Behind Mower View Diagrams & Manuals
11A-422Q131 (2007) Walk-Behind Mower View Diagrams & Manuals
11A-422Q022 (2007) Walk-Behind Mower View Diagrams & Manuals
11A-422Q722 (2007) Walk-Behind Mower View Diagrams & Manuals
11A-422Q002 (2007) Walk-Behind Mower View Diagrams & Manuals
11A-422Q715 (2007) Walk-Behind Mower View Diagrams & Manuals
11A-422Q077 (2007) Walk-Behind Mower View Diagrams & Manuals
11A-422Q977 (2007) Walk-Behind Mower View Diagrams & Manuals
11A-422Q777 (2007) Walk-Behind Mower View Diagrams & Manuals
11A-422Q724 (2007) Walk-Behind Mower View Diagrams & Manuals
11A-422Q105 (2007) Walk-Behind Mower View Diagrams & Manuals
11A-422Q009 (2007) Walk-Behind Mower View Diagrams & Manuals
11A-422Q016 (2007) Walk-Behind Mower View Diagrams & Manuals
11A-422Q145 (2007) Walk-Behind Mower View Diagrams & Manuals
11A-422Q196 (2007) Walk-Behind Mower View Diagrams & Manuals
11A-422Q719 (2007) Walk-Behind Mower View Diagrams & Manuals
11A-422Q098 (2007) Walk-Behind Mower View Diagrams & Manuals
11A-436Q304 (2009) Walk-Behind Mower View Diagrams & Manuals
11A-436Q372 (2009) Walk-Behind Mower View Diagrams & Manuals
11A-436Q401 (2009) Walk-Behind Mower View Diagrams & Manuals
11A-436Q720 (2009) Walk-Behind Mower View Diagrams & Manuals
11A-436Q730 (2009) Walk-Behind Mower View Diagrams & Manuals
11A-436Q301 (2009) Walk-Behind Mower View Diagrams & Manuals
11A-436Q709 (2009) Walk-Behind Mower View Diagrams & Manuals
11A-436Q371 (2009) Walk-Behind Mower View Diagrams & Manuals
11A-436Q307 (2009) Walk-Behind Mower View Diagrams & Manuals
11A-436Q513 (2009) Walk-Behind Mower View Diagrams & Manuals
11A-436Q713 (2009) Walk-Behind Mower View Diagrams & Manuals
11A-436Q382 (2009) Walk-Behind Mower View Diagrams & Manuals
11A-436Q000 (2009) Walk-Behind Mower View Diagrams & Manuals
11A-436Q121 (2009) Walk-Behind Mower View Diagrams & Manuals
11A-436Q205 (2009) Walk-Behind Mower View Diagrams & Manuals
11A-436Q705 (2009) Walk-Behind Mower View Diagrams & Manuals
11A-436Q706 (2009) Walk-Behind Mower View Diagrams & Manuals
11A-436Q026 (2009) Walk-Behind Mower View Diagrams & Manuals
11A-436Q726 (2009) Walk-Behind Mower View Diagrams & Manuals
11A-436Q054 (2009) Walk-Behind Mower View Diagrams & Manuals
11A-436Q745 (2009) Walk-Behind Mower View Diagrams & Manuals
11A-436Q754 (2009) Walk-Behind Mower View Diagrams & Manuals
11A-436Q704 (2009) Walk-Behind Mower View Diagrams & Manuals
11A-436Q029 (2009) Walk-Behind Mower View Diagrams & Manuals
11A-436Q229 (2009) Walk-Behind Mower View Diagrams & Manuals
11A-436Q134 (2009) Walk-Behind Mower View Diagrams & Manuals
11A-436Q138 (2009) Walk-Behind Mower View Diagrams & Manuals
11A-436Q729 (2009) Walk-Behind Mower View Diagrams & Manuals
11A-436Q929 (2009) Walk-Behind Mower View Diagrams & Manuals
11A-436Q129 (2009) Walk-Behind Mower View Diagrams & Manuals
11A-436Q151 (2009) Walk-Behind Mower View Diagrams & Manuals
11A-436Q206 (2009) Walk-Behind Mower View Diagrams & Manuals
11A-436Q308 (2009) Walk-Behind Mower View Diagrams & Manuals
11A-436Q033 (2009) Walk-Behind Mower View Diagrams & Manuals
11A-436Q019 (2009) Walk-Behind Mower View Diagrams & Manuals
11A-436Q057 (2009) Walk-Behind Mower View Diagrams & Manuals
11A-436Q118 (2009) Walk-Behind Mower View Diagrams & Manuals
11A-436Q131 (2009) Walk-Behind Mower View Diagrams & Manuals
11A-436Q022 (2009) Walk-Behind Mower View Diagrams & Manuals
11A-436Q722 (2009) Walk-Behind Mower View Diagrams & Manuals
11A-436Q002 (2009) Walk-Behind Mower View Diagrams & Manuals
11A-436Q715 (2009) Walk-Behind Mower View Diagrams & Manuals
11A-436Q077 (2009) Walk-Behind Mower View Diagrams & Manuals
11A-436Q977 (2009) Walk-Behind Mower View Diagrams & Manuals
11A-436Q777 (2009) Walk-Behind Mower View Diagrams & Manuals
11A-436Q724 (2009) Walk-Behind Mower View Diagrams & Manuals
11A-436Q105 (2009) Walk-Behind Mower View Diagrams & Manuals
11A-436Q009 (2009) Walk-Behind Mower View Diagrams & Manuals
11A-436Q016 (2009) Walk-Behind Mower View Diagrams & Manuals
11A-436Q145 (2009) Walk-Behind Mower View Diagrams & Manuals
11A-436Q196 (2009) Walk-Behind Mower View Diagrams & Manuals
11A-436Q719 (2009) Walk-Behind Mower View Diagrams & Manuals
11A-436Q098 (2009) Walk-Behind Mower View Diagrams & Manuals
11A-588Q304 (2005) Walk-Behind Mower View Diagrams & Manuals
11A-588Q372 (2005) Walk-Behind Mower View Diagrams & Manuals
11A-588Q401 (2005) Walk-Behind Mower View Diagrams & Manuals
11A-588Q720 (2005) Walk-Behind Mower View Diagrams & Manuals
11A-588Q730 (2005) Walk-Behind Mower View Diagrams & Manuals
11A-588Q301 (2005) Walk-Behind Mower View Diagrams & Manuals
11A-588Q709 (2005) Walk-Behind Mower View Diagrams & Manuals
11A-588Q371 (2005) Walk-Behind Mower View Diagrams & Manuals
11A-588Q307 (2005) Walk-Behind Mower View Diagrams & Manuals
11A-588Q513 (2005) Walk-Behind Mower View Diagrams & Manuals
11A-588Q713 (2005) Walk-Behind Mower View Diagrams & Manuals
11A-588Q382 (2005) Walk-Behind Mower View Diagrams & Manuals
11A-588Q000 (2005) Walk-Behind Mower View Diagrams & Manuals
11A-588Q121 (2005) Walk-Behind Mower View Diagrams & Manuals
11A-588Q205 (2005) Walk-Behind Mower View Diagrams & Manuals
11A-588Q705 (2005) Walk-Behind Mower View Diagrams & Manuals
11A-588Q706 (2005) Walk-Behind Mower View Diagrams & Manuals
11A-588Q026 (2005) Walk-Behind Mower View Diagrams & Manuals
11A-588Q726 (2005) Walk-Behind Mower View Diagrams & Manuals
11A-588Q054 (2005) Walk-Behind Mower View Diagrams & Manuals
11A-588Q745 (2005) Walk-Behind Mower View Diagrams & Manuals
11A-588Q754 (2005) Walk-Behind Mower View Diagrams & Manuals
11A-588Q704 (2005) Walk-Behind Mower View Diagrams & Manuals
11A-588Q029 (2005) Walk-Behind Mower View Diagrams & Manuals
11A-588Q229 (2005) Walk-Behind Mower View Diagrams & Manuals
11A-588Q134 (2005) Walk-Behind Mower View Diagrams & Manuals
11A-588Q138 (2005) Walk-Behind Mower View Diagrams & Manuals
11A-588Q729 (2005) Walk-Behind Mower View Diagrams & Manuals
11A-588Q929 (2005) Walk-Behind Mower View Diagrams & Manuals
11A-588Q129 (2005) Walk-Behind Mower View Diagrams & Manuals
11A-588Q151 (2005) Walk-Behind Mower View Diagrams & Manuals
11A-588Q206 (2005) Walk-Behind Mower View Diagrams & Manuals
11A-588Q308 (2005) Walk-Behind Mower View Diagrams & Manuals
11A-588Q033 (2005) Walk-Behind Mower View Diagrams & Manuals
11A-588Q019 (2005) Walk-Behind Mower View Diagrams & Manuals
11A-588Q057 (2005) Walk-Behind Mower View Diagrams & Manuals
11A-588Q118 (2005) Walk-Behind Mower View Diagrams & Manuals
11A-588Q131 (2005) Walk-Behind Mower View Diagrams & Manuals
11A-588Q022 (2005) Walk-Behind Mower View Diagrams & Manuals
11A-588Q722 (2005) Walk-Behind Mower View Diagrams & Manuals
11A-588Q002 (2005) Walk-Behind Mower View Diagrams & Manuals
11A-588Q715 (2005) Walk-Behind Mower View Diagrams & Manuals
11A-588Q077 (2005) Walk-Behind Mower View Diagrams & Manuals
11A-588Q977 (2005) Walk-Behind Mower View Diagrams & Manuals
11A-588Q777 (2005) Walk-Behind Mower View Diagrams & Manuals
11A-588Q724 (2005) Walk-Behind Mower View Diagrams & Manuals
11A-588Q105 (2005) Walk-Behind Mower View Diagrams & Manuals
11A-588Q009 (2005) Walk-Behind Mower View Diagrams & Manuals
11A-588Q016 (2005) Walk-Behind Mower View Diagrams & Manuals
11A-588Q145 (2005) Walk-Behind Mower View Diagrams & Manuals
11A-588Q196 (2005) Walk-Behind Mower View Diagrams & Manuals
11A-588Q719 (2005) Walk-Behind Mower View Diagrams & Manuals
11A-588Q098 (2005) Walk-Behind Mower View Diagrams & Manuals
11A-589B304 (2006) Walk-Behind Mower View Diagrams & Manuals
11A-589B372 (2006) Walk-Behind Mower View Diagrams & Manuals
11A-589B401 (2006) Walk-Behind Mower View Diagrams & Manuals
11A-589B720 (2006) Walk-Behind Mower View Diagrams & Manuals
11A-589B730 (2006) Walk-Behind Mower View Diagrams & Manuals
11A-589B301 (2006) Walk-Behind Mower View Diagrams & Manuals
11A-589B709 (2006) Walk-Behind Mower View Diagrams & Manuals
11A-589B371 (2006) Walk-Behind Mower View Diagrams & Manuals
11A-589B307 (2006) Walk-Behind Mower View Diagrams & Manuals
11A-589B513 (2006) Walk-Behind Mower View Diagrams & Manuals
11A-589B713 (2006) Walk-Behind Mower View Diagrams & Manuals
11A-589B382 (2006) Walk-Behind Mower View Diagrams & Manuals
11A-589B000 (2006) Walk-Behind Mower View Diagrams & Manuals
11A-589B121 (2006) Walk-Behind Mower View Diagrams & Manuals
11A-589B205 (2006) Walk-Behind Mower View Diagrams & Manuals
11A-589B705 (2006) Walk-Behind Mower View Diagrams & Manuals
11A-589B706 (2006) Walk-Behind Mower View Diagrams & Manuals
11A-589B026 (2006) Walk-Behind Mower View Diagrams & Manuals
11A-589B726 (2006) Walk-Behind Mower View Diagrams & Manuals
11A-589B054 (2006) Walk-Behind Mower View Diagrams & Manuals
11A-589B745 (2006) Walk-Behind Mower View Diagrams & Manuals
11A-589B754 (2006) Walk-Behind Mower View Diagrams & Manuals
11A-589B704 (2006) Walk-Behind Mower View Diagrams & Manuals
11A-589B029 (2006) Walk-Behind Mower View Diagrams & Manuals
11A-589B229 (2006) Walk-Behind Mower View Diagrams & Manuals
11A-589B134 (2006) Walk-Behind Mower View Diagrams & Manuals
11A-589B138 (2006) Walk-Behind Mower View Diagrams & Manuals
11A-589B729 (2006) Walk-Behind Mower View Diagrams & Manuals
11A-589B929 (2006) Walk-Behind Mower View Diagrams & Manuals
11A-589B129 (2006) Walk-Behind Mower View Diagrams & Manuals
11A-589B151 (2006) Walk-Behind Mower View Diagrams & Manuals
11A-589B206 (2006) Walk-Behind Mower View Diagrams & Manuals
11A-589B308 (2006) Walk-Behind Mower View Diagrams & Manuals
11A-589B033 (2006) Walk-Behind Mower View Diagrams & Manuals
11A-589B019 (2006) Walk-Behind Mower View Diagrams & Manuals
11A-589B057 (2006) Walk-Behind Mower View Diagrams & Manuals
11A-589B118 (2006) Walk-Behind Mower View Diagrams & Manuals
11A-589B131 (2006) Walk-Behind Mower View Diagrams & Manuals
11A-589B022 (2006) Walk-Behind Mower View Diagrams & Manuals
11A-589B722 (2006) Walk-Behind Mower View Diagrams & Manuals
11A-589B002 (2006) Walk-Behind Mower View Diagrams & Manuals
11A-589B715 (2006) Walk-Behind Mower View Diagrams & Manuals
11A-589B077 (2006) Walk-Behind Mower View Diagrams & Manuals
11A-589B977 (2006) Walk-Behind Mower View Diagrams & Manuals
11A-589B777 (2006) Walk-Behind Mower View Diagrams & Manuals
11A-589B724 (2006) Walk-Behind Mower View Diagrams & Manuals
11A-589B105 (2006) Walk-Behind Mower View Diagrams & Manuals
11A-589B009 (2006) Walk-Behind Mower View Diagrams & Manuals
11A-589B016 (2006) Walk-Behind Mower View Diagrams & Manuals
11A-589B145 (2006) Walk-Behind Mower View Diagrams & Manuals
11A-589B196 (2006) Walk-Behind Mower View Diagrams & Manuals
11A-589B719 (2006) Walk-Behind Mower View Diagrams & Manuals
11A-589B098 (2006) Walk-Behind Mower View Diagrams & Manuals
12A-26MY304 (2007) Walk-Behind Mower View Diagrams & Manuals
12A-26MY372 (2007) Walk-Behind Mower View Diagrams & Manuals
12A-26MY401 (2007) Walk-Behind Mower View Diagrams & Manuals
12A-26MY720 (2007) Walk-Behind Mower View Diagrams & Manuals
12A-26MY730 (2007) Walk-Behind Mower View Diagrams & Manuals
12A-26MY301 (2007) Walk-Behind Mower View Diagrams & Manuals
12A-26MY709 (2007) Walk-Behind Mower View Diagrams & Manuals
12A-26MY371 (2007) Walk-Behind Mower View Diagrams & Manuals
12A-26MY307 (2007) Walk-Behind Mower View Diagrams & Manuals
12A-26MY513 (2007) Walk-Behind Mower View Diagrams & Manuals
12A-26MY713 (2007) Walk-Behind Mower View Diagrams & Manuals
12A-26MY382 (2007) Walk-Behind Mower View Diagrams & Manuals
12A-26MY000 (2007) Walk-Behind Mower View Diagrams & Manuals
12A-26MY121 (2007) Walk-Behind Mower View Diagrams & Manuals
12A-26MY205 (2007) Walk-Behind Mower View Diagrams & Manuals
12A-26MY705 (2007) Walk-Behind Mower View Diagrams & Manuals
12A-26MY706 (2007) Walk-Behind Mower View Diagrams & Manuals
12A-26MY026 (2007) Walk-Behind Mower View Diagrams & Manuals
12A-26MY726 (2007) Walk-Behind Mower View Diagrams & Manuals
12A-26MY054 (2007) Walk-Behind Mower View Diagrams & Manuals
12A-26MY745 (2007) Walk-Behind Mower View Diagrams & Manuals
12A-26MY754 (2007) Walk-Behind Mower View Diagrams & Manuals
12A-26MY704 (2007) Walk-Behind Mower View Diagrams & Manuals
12A-26MY029 (2007) Walk-Behind Mower View Diagrams & Manuals
12A-26MY229 (2007) Walk-Behind Mower View Diagrams & Manuals
12A-26MY134 (2007) Walk-Behind Mower View Diagrams & Manuals
12A-26MY138 (2007) Walk-Behind Mower View Diagrams & Manuals
12A-26MY729 (2007) Walk-Behind Mower View Diagrams & Manuals
12A-26MY929 (2007) Walk-Behind Mower View Diagrams & Manuals
12A-26MY129 (2007) Walk-Behind Mower View Diagrams & Manuals
12A-26MY151 (2007) Walk-Behind Mower View Diagrams & Manuals
12A-26MY206 (2007) Walk-Behind Mower View Diagrams & Manuals
12A-26MY308 (2007) Walk-Behind Mower View Diagrams & Manuals
12A-26MY033 (2007) Walk-Behind Mower View Diagrams & Manuals
12A-26MY019 (2007) Walk-Behind Mower View Diagrams & Manuals
12A-26MY057 (2007) Walk-Behind Mower View Diagrams & Manuals
12A-26MY118 (2007) Walk-Behind Mower View Diagrams & Manuals
12A-26MY131 (2007) Walk-Behind Mower View Diagrams & Manuals
12A-26MY022 (2007) Walk-Behind Mower View Diagrams & Manuals
12A-26MY722 (2007) Walk-Behind Mower View Diagrams & Manuals
12A-26MY002 (2007) Walk-Behind Mower View Diagrams & Manuals
12A-26MY715 (2007) Walk-Behind Mower View Diagrams & Manuals
12A-26MY077 (2007) Walk-Behind Mower View Diagrams & Manuals
12A-26MY977 (2007) Walk-Behind Mower View Diagrams & Manuals
12A-26MY777 (2007) Walk-Behind Mower View Diagrams & Manuals
12A-26MY724 (2007) Walk-Behind Mower View Diagrams & Manuals
12A-26MY105 (2007) Walk-Behind Mower View Diagrams & Manuals
12A-26MY009 (2007) Walk-Behind Mower View Diagrams & Manuals
12A-26MY016 (2007) Walk-Behind Mower View Diagrams & Manuals
12A-26MY145 (2007) Walk-Behind Mower View Diagrams & Manuals
12A-26MY196 (2007) Walk-Behind Mower View Diagrams & Manuals
12A-26MY719 (2007) Walk-Behind Mower View Diagrams & Manuals
12A-26MY098 (2007) Walk-Behind Mower View Diagrams & Manuals
12A-559Q304 (2006) Walk-Behind Mower View Diagrams & Manuals
12A-559Q372 (2006) Walk-Behind Mower View Diagrams & Manuals
12A-559Q401 (2006) Walk-Behind Mower View Diagrams & Manuals
12A-559Q720 (2006) Walk-Behind Mower View Diagrams & Manuals
12A-559Q730 (2006) Walk-Behind Mower View Diagrams & Manuals
12A-559Q301 (2006) Walk-Behind Mower View Diagrams & Manuals
12A-559Q709 (2006) Walk-Behind Mower View Diagrams & Manuals
12A-559Q371 (2006) Walk-Behind Mower View Diagrams & Manuals
12A-559Q307 (2006) Walk-Behind Mower View Diagrams & Manuals
12A-559Q513 (2006) Walk-Behind Mower View Diagrams & Manuals
12A-559Q713 (2006) Walk-Behind Mower View Diagrams & Manuals
12A-559Q382 (2006) Walk-Behind Mower View Diagrams & Manuals
12A-559Q000 (2006) Walk-Behind Mower View Diagrams & Manuals
12A-559Q121 (2006) Walk-Behind Mower View Diagrams & Manuals
12A-559Q205 (2006) Walk-Behind Mower View Diagrams & Manuals
12A-559Q705 (2006) Walk-Behind Mower View Diagrams & Manuals
12A-559Q706 (2006) Walk-Behind Mower View Diagrams & Manuals
12A-559Q026 (2006) Walk-Behind Mower View Diagrams & Manuals
12A-559Q726 (2006) Walk-Behind Mower View Diagrams & Manuals
12A-559Q054 (2006) Walk-Behind Mower View Diagrams & Manuals
12A-559Q745 (2006) Walk-Behind Mower View Diagrams & Manuals
12A-559Q754 (2006) Walk-Behind Mower View Diagrams & Manuals
12A-559Q704 (2006) Walk-Behind Mower View Diagrams & Manuals
12A-559Q029 (2006) Walk-Behind Mower View Diagrams & Manuals
12A-559Q229 (2006) Walk-Behind Mower View Diagrams & Manuals
12A-559Q134 (2006) Walk-Behind Mower View Diagrams & Manuals
12A-559Q138 (2006) Walk-Behind Mower View Diagrams & Manuals
12A-559Q729 (2006) Walk-Behind Mower View Diagrams & Manuals
12A-559Q929 (2006) Walk-Behind Mower View Diagrams & Manuals
12A-559Q129 (2006) Walk-Behind Mower View Diagrams & Manuals
12A-559Q151 (2006) Walk-Behind Mower View Diagrams & Manuals
12A-559Q206 (2006) Walk-Behind Mower View Diagrams & Manuals
12A-559Q308 (2006) Walk-Behind Mower View Diagrams & Manuals
12A-559Q033 (2006) Walk-Behind Mower View Diagrams & Manuals
12A-559Q019 (2006) Walk-Behind Mower View Diagrams & Manuals
12A-559Q057 (2006) Walk-Behind Mower View Diagrams & Manuals
12A-559Q118 (2006) Walk-Behind Mower View Diagrams & Manuals
12A-559Q131 (2006) Walk-Behind Mower View Diagrams & Manuals
12A-559Q022 (2006) Walk-Behind Mower View Diagrams & Manuals
12A-559Q722 (2006) Walk-Behind Mower View Diagrams & Manuals
12A-559Q002 (2006) Walk-Behind Mower View Diagrams & Manuals
12A-559Q715 (2006) Walk-Behind Mower View Diagrams & Manuals
12A-559Q077 (2006) Walk-Behind Mower View Diagrams & Manuals
12A-559Q977 (2006) Walk-Behind Mower View Diagrams & Manuals
12A-559Q777 (2006) Walk-Behind Mower View Diagrams & Manuals
12A-559Q724 (2006) Walk-Behind Mower View Diagrams & Manuals
12A-559Q105 (2006) Walk-Behind Mower View Diagrams & Manuals
12A-559Q009 (2006) Walk-Behind Mower View Diagrams & Manuals
12A-559Q016 (2006) Walk-Behind Mower View Diagrams & Manuals
12A-559Q145 (2006) Walk-Behind Mower View Diagrams & Manuals
12A-559Q196 (2006) Walk-Behind Mower View Diagrams & Manuals
12A-559Q719 (2006) Walk-Behind Mower View Diagrams & Manuals
12A-559Q098 (2006) Walk-Behind Mower View Diagrams & Manuals
12AV55DQ304 (2008) Walk-Behind Mower View Diagrams & Manuals
12AV55DQ372 (2008) Walk-Behind Mower View Diagrams & Manuals
12AV55DQ401 (2008) Walk-Behind Mower View Diagrams & Manuals
12AV55DQ720 (2008) Walk-Behind Mower View Diagrams & Manuals
12AV55DQ730 (2008) Walk-Behind Mower View Diagrams & Manuals
12AV55DQ301 (2008) Walk-Behind Mower View Diagrams & Manuals
12AV55DQ709 (2008) Walk-Behind Mower View Diagrams & Manuals
12AV55DQ371 (2008) Walk-Behind Mower View Diagrams & Manuals
12AV55DQ307 (2008) Walk-Behind Mower View Diagrams & Manuals
12AV55DQ513 (2008) Walk-Behind Mower View Diagrams & Manuals
12AV55DQ382 (2008) Walk-Behind Mower View Diagrams & Manuals
12AV55DQ000 (2008) Walk-Behind Mower View Diagrams & Manuals
12AV55DQ121 (2008) Walk-Behind Mower View Diagrams & Manuals
12AV55DQ205 (2008) Walk-Behind Mower View Diagrams & Manuals
12AV55DQ705 (2008) Walk-Behind Mower View Diagrams & Manuals
12AV55DQ706 (2008) Walk-Behind Mower View Diagrams & Manuals
12AV55DQ026 (2008) Walk-Behind Mower View Diagrams & Manuals
12AV55DQ726 (2008) Walk-Behind Mower View Diagrams & Manuals
12AV55DQ054 (2008) Walk-Behind Mower View Diagrams & Manuals
12AV55DQ745 (2008) Walk-Behind Mower View Diagrams & Manuals
12AV55DQ754 (2008) Walk-Behind Mower View Diagrams & Manuals
12AV55DQ704 (2008) Walk-Behind Mower View Diagrams & Manuals
12AV55DQ029 (2008) Walk-Behind Mower View Diagrams & Manuals
12AV55DQ229 (2008) Walk-Behind Mower View Diagrams & Manuals
12AV55DQ134 (2008) Walk-Behind Mower View Diagrams & Manuals
12AV55DQ138 (2008) Walk-Behind Mower View Diagrams & Manuals
12AV55DQ729 (2008) Walk-Behind Mower View Diagrams & Manuals
12AV55DQ929 (2008) Walk-Behind Mower View Diagrams & Manuals
12AV55DQ129 (2008) Walk-Behind Mower View Diagrams & Manuals
12AV55DQ151 (2008) Walk-Behind Mower View Diagrams & Manuals
12AV55DQ206 (2008) Walk-Behind Mower View Diagrams & Manuals
12AV55DQ308 (2008) Walk-Behind Mower View Diagrams & Manuals
12AV55DQ033 (2008) Walk-Behind Mower View Diagrams & Manuals
12AV55DQ019 (2008) Walk-Behind Mower View Diagrams & Manuals
12AV55DQ057 (2008) Walk-Behind Mower View Diagrams & Manuals
12AV55DQ118 (2008) Walk-Behind Mower View Diagrams & Manuals
12AV55DQ131 (2008) Walk-Behind Mower View Diagrams & Manuals
12AV55DQ022 (2008) Walk-Behind Mower View Diagrams & Manuals
12AV55DQ722 (2008) Walk-Behind Mower View Diagrams & Manuals
12AV55DQ002 (2008) Walk-Behind Mower View Diagrams & Manuals
12AV55DQ715 (2008) Walk-Behind Mower View Diagrams & Manuals
12AV55DQ077 (2008) Walk-Behind Mower View Diagrams & Manuals
12AV55DQ977 (2008) Walk-Behind Mower View Diagrams & Manuals
12AV55DQ777 (2008) Walk-Behind Mower View Diagrams & Manuals
12AV55DQ724 (2008) Walk-Behind Mower View Diagrams & Manuals
12AV55DQ105 (2008) Walk-Behind Mower View Diagrams & Manuals
12AV55DQ009 (2008) Walk-Behind Mower View Diagrams & Manuals
12AV55DQ016 (2008) Walk-Behind Mower View Diagrams & Manuals
12AV55DQ145 (2008) Walk-Behind Mower View Diagrams & Manuals
12AV55DQ196 (2008) Walk-Behind Mower View Diagrams & Manuals
12AV55DQ719 (2008) Walk-Behind Mower View Diagrams & Manuals
12AV55DQ098 (2008) Walk-Behind Mower View Diagrams & Manuals
11A-020B304 (2009) Lawn Mower View Diagrams & Manuals
11A-020B372 (2009) Lawn Mower View Diagrams & Manuals
11A-020B401 (2009) Lawn Mower View Diagrams & Manuals
11A-020B720 (2009) Lawn Mower View Diagrams & Manuals
11A-020B730 (2009) Lawn Mower View Diagrams & Manuals
11A-020B301 (2009) Lawn Mower View Diagrams & Manuals
11A-020B709 (2009) Lawn Mower View Diagrams & Manuals
11A-020B371 (2009) Lawn Mower View Diagrams & Manuals
11A-020B307 (2009) Lawn Mower View Diagrams & Manuals
11A-020B513 (2009) Lawn Mower View Diagrams & Manuals
11A-020B713 (2009) Lawn Mower View Diagrams & Manuals
11A-020B382 (2009) Lawn Mower View Diagrams & Manuals
11A-020B121 (2009) Lawn Mower View Diagrams & Manuals
11A-020B205 (2009) Lawn Mower View Diagrams & Manuals
11A-020B705 (2009) Lawn Mower View Diagrams & Manuals
11A-020B706 (2009) Lawn Mower View Diagrams & Manuals
11A-020B026 (2009) Lawn Mower View Diagrams & Manuals
11A-020B726 (2009) Lawn Mower View Diagrams & Manuals
11A-020B054 (2009) Lawn Mower View Diagrams & Manuals
11A-020B745 (2009) Lawn Mower View Diagrams & Manuals
11A-020B754 (2009) Lawn Mower View Diagrams & Manuals
11A-020B704 (2009) Lawn Mower View Diagrams & Manuals
11A-020B029 (2009) Lawn Mower View Diagrams & Manuals
11A-020B229 (2009) Lawn Mower View Diagrams & Manuals
11A-020B134 (2009) Lawn Mower View Diagrams & Manuals
11A-020B138 (2009) Lawn Mower View Diagrams & Manuals
11A-020B729 (2009) Lawn Mower View Diagrams & Manuals
11A-020B929 (2009) Lawn Mower View Diagrams & Manuals
11A-020B129 (2009) Lawn Mower View Diagrams & Manuals
11A-020B151 (2009) Lawn Mower View Diagrams & Manuals
11A-020B206 (2009) Lawn Mower View Diagrams & Manuals
11A-020B308 (2009) Lawn Mower View Diagrams & Manuals
11A-020B033 (2009) Lawn Mower View Diagrams & Manuals
11A-020B019 (2009) Lawn Mower View Diagrams & Manuals
11A-020B057 (2009) Lawn Mower View Diagrams & Manuals
11A-020B118 (2009) Lawn Mower View Diagrams & Manuals
11A-020B131 (2009) Lawn Mower View Diagrams & Manuals
11A-020B022 (2009) Lawn Mower View Diagrams & Manuals
11A-020B722 (2009) Lawn Mower View Diagrams & Manuals
11A-020B002 (2009) Lawn Mower View Diagrams & Manuals
11A-020B715 (2009) Lawn Mower View Diagrams & Manuals
11A-020B077 (2009) Lawn Mower View Diagrams & Manuals
11A-020B977 (2009) Lawn Mower View Diagrams & Manuals
11A-020B777 (2009) Lawn Mower View Diagrams & Manuals
11A-020B724 (2009) Lawn Mower View Diagrams & Manuals
11A-020B105 (2009) Lawn Mower View Diagrams & Manuals
11A-020B009 (2009) Lawn Mower View Diagrams & Manuals
11A-020B016 (2009) Lawn Mower View Diagrams & Manuals
11A-020B145 (2009) Lawn Mower View Diagrams & Manuals
11A-020B196 (2009) Lawn Mower View Diagrams & Manuals
11A-020B719 (2009) Lawn Mower View Diagrams & Manuals
11A-020B098 (2009) Lawn Mower View Diagrams & Manuals
11A-08MB304 (2009) Lawn Mower View Diagrams & Manuals
11A-08MB372 (2009) Lawn Mower View Diagrams & Manuals
11A-08MB401 (2009) Lawn Mower View Diagrams & Manuals
11A-08MB720 (2009) Lawn Mower View Diagrams & Manuals
11A-08MB730 (2009) Lawn Mower View Diagrams & Manuals
11A-08MB301 (2009) Lawn Mower View Diagrams & Manuals
11A-08MB709 (2009) Lawn Mower View Diagrams & Manuals
11A-08MB371 (2009) Lawn Mower View Diagrams & Manuals
11A-08MB307 (2009) Lawn Mower View Diagrams & Manuals
11A-08MB513 (2009) Lawn Mower View Diagrams & Manuals
11A-08MB713 (2009) Lawn Mower View Diagrams & Manuals
11A-08MB382 (2009) Lawn Mower View Diagrams & Manuals
11A-08MB000 (2009) Lawn Mower View Diagrams & Manuals
11A-08MB121 (2009) Lawn Mower View Diagrams & Manuals
11A-08MB205 (2009) Lawn Mower View Diagrams & Manuals
11A-08MB705 (2009) Lawn Mower View Diagrams & Manuals
11A-08MB706 (2009) Lawn Mower View Diagrams & Manuals
11A-08MB026 (2009) Lawn Mower View Diagrams & Manuals
11A-08MB726 (2009) Lawn Mower View Diagrams & Manuals
11A-08MB054 (2009) Lawn Mower View Diagrams & Manuals
11A-08MB745 (2009) Lawn Mower View Diagrams & Manuals
11A-08MB754 (2009) Lawn Mower View Diagrams & Manuals
11A-08MB704 (2009) Lawn Mower View Diagrams & Manuals
11A-08MB029 (2009) Lawn Mower View Diagrams & Manuals
11A-08MB229 (2009) Lawn Mower View Diagrams & Manuals
11A-08MB134 (2009) Lawn Mower View Diagrams & Manuals
11A-08MB138 (2009) Lawn Mower View Diagrams & Manuals
11A-08MB729 (2009) Lawn Mower View Diagrams & Manuals
11A-08MB929 (2009) Lawn Mower View Diagrams & Manuals
11A-08MB129 (2009) Lawn Mower View Diagrams & Manuals
11A-08MB151 (2009) Lawn Mower View Diagrams & Manuals
11A-08MB206 (2009) Lawn Mower View Diagrams & Manuals
11A-08MB308 (2009) Lawn Mower View Diagrams & Manuals
11A-08MB033 (2009) Lawn Mower View Diagrams & Manuals
11A-08MB019 (2009) Lawn Mower View Diagrams & Manuals
11A-08MB057 (2009) Lawn Mower View Diagrams & Manuals
11A-08MB118 (2009) Lawn Mower View Diagrams & Manuals
11A-08MB131 (2009) Lawn Mower View Diagrams & Manuals
11A-08MB022 (2009) Lawn Mower View Diagrams & Manuals
11A-08MB722 (2009) Lawn Mower View Diagrams & Manuals
11A-08MB002 (2009) Lawn Mower View Diagrams & Manuals
11A-08MB715 (2009) Lawn Mower View Diagrams & Manuals
11A-08MB077 (2009) Lawn Mower View Diagrams & Manuals
11A-08MB977 (2009) Lawn Mower View Diagrams & Manuals
11A-08MB777 (2009) Lawn Mower View Diagrams & Manuals
11A-08MB724 (2009) Lawn Mower View Diagrams & Manuals
11A-08MB105 (2009) Lawn Mower View Diagrams & Manuals
11A-08MB009 (2009) Lawn Mower View Diagrams & Manuals
11A-08MB016 (2009) Lawn Mower View Diagrams & Manuals
11A-08MB145 (2009) Lawn Mower View Diagrams & Manuals
11A-08MB196 (2009) Lawn Mower View Diagrams & Manuals
11A-08MB719 (2009) Lawn Mower View Diagrams & Manuals
11A-08MB098 (2009) Lawn Mower View Diagrams & Manuals
11A-41MB304 (2009) Lawn Mower View Diagrams & Manuals
11A-41MB372 (2009) Lawn Mower View Diagrams & Manuals
11A-41MB401 (2009) Lawn Mower View Diagrams & Manuals
11A-41MB720 (2009) Lawn Mower View Diagrams & Manuals
11A-41MB730 (2009) Lawn Mower View Diagrams & Manuals
11A-41MB301 (2009) Lawn Mower View Diagrams & Manuals
11A-41MB709 (2009) Lawn Mower View Diagrams & Manuals
11A-41MB371 (2009) Lawn Mower View Diagrams & Manuals
11A-41MB307 (2009) Lawn Mower View Diagrams & Manuals
11A-41MB513 (2009) Lawn Mower View Diagrams & Manuals
11A-41MB713 (2009) Lawn Mower View Diagrams & Manuals
11A-41MB382 (2009) Lawn Mower View Diagrams & Manuals
11A-41MB000 (2009) Lawn Mower View Diagrams & Manuals
11A-41MB121 (2009) Lawn Mower View Diagrams & Manuals
11A-41MB205 (2009) Lawn Mower View Diagrams & Manuals
11A-41MB705 (2009) Lawn Mower View Diagrams & Manuals
11A-41MB706 (2009) Lawn Mower View Diagrams & Manuals
11A-41MB026 (2009) Lawn Mower View Diagrams & Manuals
11A-41MB726 (2009) Lawn Mower View Diagrams & Manuals
11A-41MB054 (2009) Lawn Mower View Diagrams & Manuals
11A-41MB745 (2009) Lawn Mower View Diagrams & Manuals
11A-41MB754 (2009) Lawn Mower View Diagrams & Manuals
11A-41MB704 (2009) Lawn Mower View Diagrams & Manuals
11A-41MB029 (2009) Lawn Mower View Diagrams & Manuals
11A-41MB229 (2009) Lawn Mower View Diagrams & Manuals
11A-41MB134 (2009) Lawn Mower View Diagrams & Manuals
11A-41MB138 (2009) Lawn Mower View Diagrams & Manuals
11A-41MB729 (2009) Lawn Mower View Diagrams & Manuals
11A-41MB929 (2009) Lawn Mower View Diagrams & Manuals
11A-41MB129 (2009) Lawn Mower View Diagrams & Manuals
11A-41MB151 (2009) Lawn Mower View Diagrams & Manuals
11A-41MB206 (2009) Lawn Mower View Diagrams & Manuals
11A-41MB308 (2009) Lawn Mower View Diagrams & Manuals
11A-41MB033 (2009) Lawn Mower View Diagrams & Manuals
11A-41MB019 (2009) Lawn Mower View Diagrams & Manuals
11A-41MB057 (2009) Lawn Mower View Diagrams & Manuals
11A-41MB118 (2009) Lawn Mower View Diagrams & Manuals
11A-41MB131 (2009) Lawn Mower View Diagrams & Manuals
11A-41MB022 (2009) Lawn Mower View Diagrams & Manuals
11A-41MB722 (2009) Lawn Mower View Diagrams & Manuals
11A-41MB002 (2009) Lawn Mower View Diagrams & Manuals
11A-41MB715 (2009) Lawn Mower View Diagrams & Manuals
11A-41MB077 (2009) Lawn Mower View Diagrams & Manuals
11A-41MB977 (2009) Lawn Mower View Diagrams & Manuals
11A-41MB777 (2009) Lawn Mower View Diagrams & Manuals
11A-41MB724 (2009) Lawn Mower View Diagrams & Manuals
11A-41MB105 (2009) Lawn Mower View Diagrams & Manuals
11A-41MB009 (2009) Lawn Mower View Diagrams & Manuals
11A-41MB016 (2009) Lawn Mower View Diagrams & Manuals
11A-41MB145 (2009) Lawn Mower View Diagrams & Manuals
11A-41MB196 (2009) Lawn Mower View Diagrams & Manuals
11A-41MB719 (2009) Lawn Mower View Diagrams & Manuals
11A-41MB098 (2009) Lawn Mower View Diagrams & Manuals
11A-50MB304 (2009) Lawn Mower View Diagrams & Manuals
11A-50MB372 (2009) Lawn Mower View Diagrams & Manuals
11A-50MB401 (2009) Lawn Mower View Diagrams & Manuals
11A-50MB720 (2009) Lawn Mower View Diagrams & Manuals
11A-50MB730 (2009) Lawn Mower View Diagrams & Manuals
11A-50MB301 (2009) Lawn Mower View Diagrams & Manuals
11A-50MB709 (2009) Lawn Mower View Diagrams & Manuals
11A-50MB371 (2009) Lawn Mower View Diagrams & Manuals
11A-50MB307 (2009) Lawn Mower View Diagrams & Manuals
11A-50MB513 (2009) Lawn Mower View Diagrams & Manuals
11A-50MB713 (2009) Lawn Mower View Diagrams & Manuals
11A-50MB382 (2009) Lawn Mower View Diagrams & Manuals
11A-50MB000 (2009) Lawn Mower View Diagrams & Manuals
11A-50MB121 (2009) Lawn Mower View Diagrams & Manuals
11A-50MB205 (2009) Lawn Mower View Diagrams & Manuals
11A-50MB705 (2009) Lawn Mower View Diagrams & Manuals
11A-50MB706 (2009) Lawn Mower View Diagrams & Manuals
11A-50MB026 (2009) Lawn Mower View Diagrams & Manuals
11A-50MB726 (2009) Lawn Mower View Diagrams & Manuals
11A-50MB054 (2009) Lawn Mower View Diagrams & Manuals
11A-50MB745 (2009) Lawn Mower View Diagrams & Manuals
11A-50MB754 (2009) Lawn Mower View Diagrams & Manuals
11A-50MB704 (2009) Lawn Mower View Diagrams & Manuals
11A-50MB029 (2009) Lawn Mower View Diagrams & Manuals
11A-50MB229 (2009) Lawn Mower View Diagrams & Manuals
11A-50MB134 (2009) Lawn Mower View Diagrams & Manuals
11A-50MB138 (2009) Lawn Mower View Diagrams & Manuals
11A-50MB729 (2009) Lawn Mower View Diagrams & Manuals
11A-50MB929 (2009) Lawn Mower View Diagrams & Manuals
11A-50MB129 (2009) Lawn Mower View Diagrams & Manuals
11A-50MB151 (2009) Lawn Mower View Diagrams & Manuals
11A-50MB206 (2009) Lawn Mower View Diagrams & Manuals
11A-50MB308 (2009) Lawn Mower View Diagrams & Manuals
11A-50MB033 (2009) Lawn Mower View Diagrams & Manuals
11A-50MB019 (2009) Lawn Mower View Diagrams & Manuals
11A-50MB057 (2009) Lawn Mower View Diagrams & Manuals
11A-50MB118 (2009) Lawn Mower View Diagrams & Manuals
11A-50MB131 (2009) Lawn Mower View Diagrams & Manuals
11A-50MB022 (2009) Lawn Mower View Diagrams & Manuals
11A-50MB722 (2009) Lawn Mower View Diagrams & Manuals
11A-50MB002 (2009) Lawn Mower View Diagrams & Manuals
11A-50MB715 (2009) Lawn Mower View Diagrams & Manuals
11A-50MB077 (2009) Lawn Mower View Diagrams & Manuals
11A-50MB977 (2009) Lawn Mower View Diagrams & Manuals
11A-50MB777 (2009) Lawn Mower View Diagrams & Manuals
11A-50MB724 (2009) Lawn Mower View Diagrams & Manuals
11A-50MB105 (2009) Lawn Mower View Diagrams & Manuals
11A-50MB009 (2009) Lawn Mower View Diagrams & Manuals
11A-50MB016 (2009) Lawn Mower View Diagrams & Manuals
11A-50MB145 (2009) Lawn Mower View Diagrams & Manuals
11A-50MB196 (2009) Lawn Mower View Diagrams & Manuals
11A-50MB719 (2009) Lawn Mower View Diagrams & Manuals
11A-50MB098 (2009) Lawn Mower View Diagrams & Manuals
11A-54M9304 (2009) Lawn Mower View Diagrams & Manuals
11A-54M9372 (2009) Lawn Mower View Diagrams & Manuals
11A-54M9401 (2009) Lawn Mower View Diagrams & Manuals
11A-54M9720 (2009) Lawn Mower View Diagrams & Manuals
11A-54M9730 (2009) Lawn Mower View Diagrams & Manuals
11A-54M9301 (2009) Lawn Mower View Diagrams & Manuals
11A-54M9709 (2009) Lawn Mower View Diagrams & Manuals
11A-54M9371 (2009) Lawn Mower View Diagrams & Manuals
11A-54M9307 (2009) Lawn Mower View Diagrams & Manuals
11A-54M9513 (2009) Lawn Mower View Diagrams & Manuals
11A-54M9713 (2009) Lawn Mower View Diagrams & Manuals
11A-54M9382 (2009) Lawn Mower View Diagrams & Manuals
11A-54M9000 (2009) Lawn Mower View Diagrams & Manuals
11A-54M9121 (2009) Lawn Mower View Diagrams & Manuals
11A-54M9205 (2009) Lawn Mower View Diagrams & Manuals
11A-54M9705 (2009) Lawn Mower View Diagrams & Manuals
11A-54M9706 (2009) Lawn Mower View Diagrams & Manuals
11A-54M9026 (2009) Lawn Mower View Diagrams & Manuals
11A-54M9726 (2009) Lawn Mower View Diagrams & Manuals
11A-54M9054 (2009) Lawn Mower View Diagrams & Manuals
11A-54M9745 (2009) Lawn Mower View Diagrams & Manuals
11A-54M9754 (2009) Lawn Mower View Diagrams & Manuals
11A-54M9704 (2009) Lawn Mower View Diagrams & Manuals
11A-54M9029 (2009) Lawn Mower View Diagrams & Manuals
11A-54M9229 (2009) Lawn Mower View Diagrams & Manuals
11A-54M9134 (2009) Lawn Mower View Diagrams & Manuals
11A-54M9138 (2009) Lawn Mower View Diagrams & Manuals
11A-54M9729 (2009) Lawn Mower View Diagrams & Manuals
11A-54M9929 (2009) Lawn Mower View Diagrams & Manuals
11A-54M9129 (2009) Lawn Mower View Diagrams & Manuals
11A-54M9151 (2009) Lawn Mower View Diagrams & Manuals
11A-54M9206 (2009) Lawn Mower View Diagrams & Manuals
11A-54M9308 (2009) Lawn Mower View Diagrams & Manuals
11A-54M9033 (2009) Lawn Mower View Diagrams & Manuals
11A-54M9019 (2009) Lawn Mower View Diagrams & Manuals
11A-54M9057 (2009) Lawn Mower View Diagrams & Manuals
11A-54M9118 (2009) Lawn Mower View Diagrams & Manuals
11A-54M9131 (2009) Lawn Mower View Diagrams & Manuals
11A-54M9022 (2009) Lawn Mower View Diagrams & Manuals
11A-54M9722 (2009) Lawn Mower View Diagrams & Manuals
11A-54M9002 (2009) Lawn Mower View Diagrams & Manuals
11A-54M9715 (2009) Lawn Mower View Diagrams & Manuals
11A-54M9077 (2009) Lawn Mower View Diagrams & Manuals
11A-54M9977 (2009) Lawn Mower View Diagrams & Manuals
11A-54M9777 (2009) Lawn Mower View Diagrams & Manuals
11A-54M9724 (2009) Lawn Mower View Diagrams & Manuals
11A-54M9105 (2009) Lawn Mower View Diagrams & Manuals
11A-54M9009 (2009) Lawn Mower View Diagrams & Manuals
11A-54M9016 (2009) Lawn Mower View Diagrams & Manuals
11A-54M9145 (2009) Lawn Mower View Diagrams & Manuals
11A-54M9196 (2009) Lawn Mower View Diagrams & Manuals
11A-54M9719 (2009) Lawn Mower View Diagrams & Manuals
11A-54M9098 (2009) Lawn Mower View Diagrams & Manuals
11A-54MC304 (2009) Lawn Mower View Diagrams & Manuals
11A-54MC372 (2009) Lawn Mower View Diagrams & Manuals
11A-54MC401 (2009) Lawn Mower View Diagrams & Manuals
11A-54MC720 (2009) Lawn Mower View Diagrams & Manuals
11A-54MC730 (2009) Lawn Mower View Diagrams & Manuals
11A-54MC301 (2009) Lawn Mower View Diagrams & Manuals
11A-54MC709 (2009) Lawn Mower View Diagrams & Manuals
11A-54MC371 (2009) Lawn Mower View Diagrams & Manuals
11A-54MC307 (2009) Lawn Mower View Diagrams & Manuals
11A-54MC513 (2009) Lawn Mower View Diagrams & Manuals
11A-54MC713 (2009) Lawn Mower View Diagrams & Manuals
11A-54MC382 (2009) Lawn Mower View Diagrams & Manuals
11A-54MC000 (2009) Lawn Mower View Diagrams & Manuals
11A-54MC121 (2009) Lawn Mower View Diagrams & Manuals
11A-54MC205 (2009) Lawn Mower View Diagrams & Manuals
11A-54MC705 (2009) Lawn Mower View Diagrams & Manuals
11A-54MC706 (2009) Lawn Mower View Diagrams & Manuals
11A-54MC026 (2009) Lawn Mower View Diagrams & Manuals
11A-54MC726 (2009) Lawn Mower View Diagrams & Manuals
11A-54MC054 (2009) Lawn Mower View Diagrams & Manuals
11A-54MC745 (2009) Lawn Mower View Diagrams & Manuals
11A-54MC754 (2009) Lawn Mower View Diagrams & Manuals
11A-54MC704 (2009) Lawn Mower View Diagrams & Manuals
11A-54MC029 (2009) Lawn Mower View Diagrams & Manuals
11A-54MC229 (2009) Lawn Mower View Diagrams & Manuals
11A-54MC134 (2009) Lawn Mower View Diagrams & Manuals
11A-54MC138 (2009) Lawn Mower View Diagrams & Manuals
11A-54MC729 (2009) Lawn Mower View Diagrams & Manuals
11A-54MC929 (2009) Lawn Mower View Diagrams & Manuals
11A-54MC129 (2009) Lawn Mower View Diagrams & Manuals
11A-54MC151 (2009) Lawn Mower View Diagrams & Manuals
11A-54MC206 (2009) Lawn Mower View Diagrams & Manuals
11A-54MC308 (2009) Lawn Mower View Diagrams & Manuals
11A-54MC033 (2009) Lawn Mower View Diagrams & Manuals
11A-54MC019 (2009) Lawn Mower View Diagrams & Manuals
11A-54MC057 (2009) Lawn Mower View Diagrams & Manuals
11A-54MC118 (2009) Lawn Mower View Diagrams & Manuals
11A-54MC131 (2009) Lawn Mower View Diagrams & Manuals
11A-54MC022 (2009) Lawn Mower View Diagrams & Manuals
11A-54MC722 (2009) Lawn Mower View Diagrams & Manuals
11A-54MC002 (2009) Lawn Mower View Diagrams & Manuals
11A-54MC715 (2009) Lawn Mower View Diagrams & Manuals
11A-54MC077 (2009) Lawn Mower View Diagrams & Manuals
11A-54MC977 (2009) Lawn Mower View Diagrams & Manuals
11A-54MC777 (2009) Lawn Mower View Diagrams & Manuals
11A-54MC724 (2009) Lawn Mower View Diagrams & Manuals
11A-54MC105 (2009) Lawn Mower View Diagrams & Manuals
11A-54MC009 (2009) Lawn Mower View Diagrams & Manuals
11A-54MC016 (2009) Lawn Mower View Diagrams & Manuals
11A-54MC145 (2009) Lawn Mower View Diagrams & Manuals
11A-54MC196 (2009) Lawn Mower View Diagrams & Manuals
11A-54MC719 (2009) Lawn Mower View Diagrams & Manuals
11A-54MC098 (2009) Lawn Mower View Diagrams & Manuals
11A-439R304 (2008) Lawn Mower View Diagrams & Manuals
11A-439R372 (2008) Lawn Mower View Diagrams & Manuals
11A-439R401 (2008) Lawn Mower View Diagrams & Manuals
11A-439R720 (2008) Lawn Mower View Diagrams & Manuals
11A-439R730 (2008) Lawn Mower View Diagrams & Manuals
11A-439R301 (2008) Lawn Mower View Diagrams & Manuals
11A-439R709 (2008) Lawn Mower View Diagrams & Manuals
11A-439R371 (2008) Lawn Mower View Diagrams & Manuals
11A-439R307 (2008) Lawn Mower View Diagrams & Manuals
11A-439R513 (2008) Lawn Mower View Diagrams & Manuals
11A-439R713 (2008) Lawn Mower View Diagrams & Manuals
11A-439R382 (2008) Lawn Mower View Diagrams & Manuals
11A-439R000 (2008) Lawn Mower View Diagrams & Manuals
11A-439R121 (2008) Lawn Mower View Diagrams & Manuals
11A-439R205 (2008) Lawn Mower View Diagrams & Manuals
11A-439R705 (2008) Lawn Mower View Diagrams & Manuals
11A-439R706 (2008) Lawn Mower View Diagrams & Manuals
11A-439R026 (2008) Lawn Mower View Diagrams & Manuals
11A-439R726 (2008) Lawn Mower View Diagrams & Manuals
11A-439R054 (2008) Lawn Mower View Diagrams & Manuals
11A-439R745 (2008) Lawn Mower View Diagrams & Manuals
11A-439R754 (2008) Lawn Mower View Diagrams & Manuals
11A-439R704 (2008) Lawn Mower View Diagrams & Manuals
11A-439R029 (2008) Lawn Mower View Diagrams & Manuals
11A-439R229 (2008) Lawn Mower View Diagrams & Manuals
11A-439R134 (2008) Lawn Mower View Diagrams & Manuals
11A-439R138 (2008) Lawn Mower View Diagrams & Manuals
11A-439R729 (2008) Lawn Mower View Diagrams & Manuals
11A-439R929 (2008) Lawn Mower View Diagrams & Manuals
11A-439R129 (2008) Lawn Mower View Diagrams & Manuals
11A-439R151 (2008) Lawn Mower View Diagrams & Manuals
11A-439R206 (2008) Lawn Mower View Diagrams & Manuals
11A-439R308 (2008) Lawn Mower View Diagrams & Manuals
11A-439R033 (2008) Lawn Mower View Diagrams & Manuals
11A-439R019 (2008) Lawn Mower View Diagrams & Manuals
11A-439R057 (2008) Lawn Mower View Diagrams & Manuals
11A-439R118 (2008) Lawn Mower View Diagrams & Manuals
11A-439R131 (2008) Lawn Mower View Diagrams & Manuals
11A-439R022 (2008) Lawn Mower View Diagrams & Manuals
11A-439R722 (2008) Lawn Mower View Diagrams & Manuals
11A-439R002 (2008) Lawn Mower View Diagrams & Manuals
11A-439R715 (2008) Lawn Mower View Diagrams & Manuals
11A-439R077 (2008) Lawn Mower View Diagrams & Manuals
11A-439R977 (2008) Lawn Mower View Diagrams & Manuals
11A-439R777 (2008) Lawn Mower View Diagrams & Manuals
11A-439R724 (2008) Lawn Mower View Diagrams & Manuals
11A-439R105 (2008) Lawn Mower View Diagrams & Manuals
11A-439R009 (2008) Lawn Mower View Diagrams & Manuals
11A-439R016 (2008) Lawn Mower View Diagrams & Manuals
11A-439R145 (2008) Lawn Mower View Diagrams & Manuals
11A-439R196 (2008) Lawn Mower View Diagrams & Manuals
11A-439R719 (2008) Lawn Mower View Diagrams & Manuals
11A-439R098 (2008) Lawn Mower View Diagrams & Manuals
11A-439S304 (2008) Lawn Mower View Diagrams & Manuals
11A-439S372 (2008) Lawn Mower View Diagrams & Manuals
11A-439S401 (2008) Lawn Mower View Diagrams & Manuals
11A-439S720 (2008) Lawn Mower View Diagrams & Manuals
11A-439S730 (2008) Lawn Mower View Diagrams & Manuals
11A-439S301 (2008) Lawn Mower View Diagrams & Manuals
11A-439S709 (2008) Lawn Mower View Diagrams & Manuals
11A-439S371 (2008) Lawn Mower View Diagrams & Manuals
11A-439S307 (2008) Lawn Mower View Diagrams & Manuals
11A-439S513 (2008) Lawn Mower View Diagrams & Manuals
11A-439S713 (2008) Lawn Mower View Diagrams & Manuals
11A-439S382 (2008) Lawn Mower View Diagrams & Manuals
11A-439S000 (2008) Lawn Mower View Diagrams & Manuals
11A-439S121 (2008) Lawn Mower View Diagrams & Manuals
11A-439S205 (2008) Lawn Mower View Diagrams & Manuals
11A-439S705 (2008) Lawn Mower View Diagrams & Manuals
11A-439S706 (2008) Lawn Mower View Diagrams & Manuals
11A-439S026 (2008) Lawn Mower View Diagrams & Manuals
11A-439S726 (2008) Lawn Mower View Diagrams & Manuals
11A-439S054 (2008) Lawn Mower View Diagrams & Manuals
11A-439S745 (2008) Lawn Mower View Diagrams & Manuals
11A-439S754 (2008) Lawn Mower View Diagrams & Manuals
11A-439S704 (2008) Lawn Mower View Diagrams & Manuals
11A-439S029 (2008) Lawn Mower View Diagrams & Manuals
11A-439S229 (2008) Lawn Mower View Diagrams & Manuals
11A-439S134 (2008) Lawn Mower View Diagrams & Manuals
11A-439S138 (2008) Lawn Mower View Diagrams & Manuals
11A-439S729 (2008) Lawn Mower View Diagrams & Manuals
11A-439S929 (2008) Lawn Mower View Diagrams & Manuals
11A-439S129 (2008) Lawn Mower View Diagrams & Manuals
11A-439S151 (2008) Lawn Mower View Diagrams & Manuals
11A-439S206 (2008) Lawn Mower View Diagrams & Manuals
11A-439S308 (2008) Lawn Mower View Diagrams & Manuals
11A-439S033 (2008) Lawn Mower View Diagrams & Manuals
11A-439S019 (2008) Lawn Mower View Diagrams & Manuals
11A-439S057 (2008) Lawn Mower View Diagrams & Manuals
11A-439S118 (2008) Lawn Mower View Diagrams & Manuals
11A-439S131 (2008) Lawn Mower View Diagrams & Manuals
11A-439S022 (2008) Lawn Mower View Diagrams & Manuals
11A-439S722 (2008) Lawn Mower View Diagrams & Manuals
11A-439S002 (2008) Lawn Mower View Diagrams & Manuals
11A-439S715 (2008) Lawn Mower View Diagrams & Manuals
11A-439S077 (2008) Lawn Mower View Diagrams & Manuals
11A-439S977 (2008) Lawn Mower View Diagrams & Manuals
11A-439S777 (2008) Lawn Mower View Diagrams & Manuals
11A-439S724 (2008) Lawn Mower View Diagrams & Manuals
11A-439S105 (2008) Lawn Mower View Diagrams & Manuals
11A-439S009 (2008) Lawn Mower View Diagrams & Manuals
11A-439S016 (2008) Lawn Mower View Diagrams & Manuals
11A-439S145 (2008) Lawn Mower View Diagrams & Manuals
11A-439S196 (2008) Lawn Mower View Diagrams & Manuals
11A-439S719 (2008) Lawn Mower View Diagrams & Manuals
11A-439S098 (2008) Lawn Mower View Diagrams & Manuals
11A-544K304 (2008) Lawn Mower View Diagrams & Manuals
11A-544K372 (2008) Lawn Mower View Diagrams & Manuals
11A-544K401 (2008) Lawn Mower View Diagrams & Manuals
11A-544K720 (2008) Lawn Mower View Diagrams & Manuals
11A-544K730 (2008) Lawn Mower View Diagrams & Manuals
11A-544K301 (2008) Lawn Mower View Diagrams & Manuals
11A-544K709 (2008) Lawn Mower View Diagrams & Manuals
11A-544K371 (2008) Lawn Mower View Diagrams & Manuals
11A-544K307 (2008) Lawn Mower View Diagrams & Manuals
11A-544K513 (2008) Lawn Mower View Diagrams & Manuals
11A-544K713 (2008) Lawn Mower View Diagrams & Manuals
11A-544K382 (2008) Lawn Mower View Diagrams & Manuals
11A-544K000 (2008) Lawn Mower View Diagrams & Manuals
11A-544K121 (2008) Lawn Mower View Diagrams & Manuals
11A-544K705 (2008) Lawn Mower View Diagrams & Manuals
11A-544K706 (2008) Lawn Mower View Diagrams & Manuals
11A-544K026 (2008) Lawn Mower View Diagrams & Manuals
11A-544K726 (2008) Lawn Mower View Diagrams & Manuals
11A-544K054 (2008) Lawn Mower View Diagrams & Manuals
11A-544K745 (2008) Lawn Mower View Diagrams & Manuals
11A-544K754 (2008) Lawn Mower View Diagrams & Manuals
11A-544K704 (2008) Lawn Mower View Diagrams & Manuals
11A-544K029 (2008) Lawn Mower View Diagrams & Manuals
11A-544K229 (2008) Lawn Mower View Diagrams & Manuals
11A-544K134 (2008) Lawn Mower View Diagrams & Manuals
11A-544K138 (2008) Lawn Mower View Diagrams & Manuals
11A-544K729 (2008) Lawn Mower View Diagrams & Manuals
11A-544K929 (2008) Lawn Mower View Diagrams & Manuals
11A-544K129 (2008) Lawn Mower View Diagrams & Manuals
11A-544K151 (2008) Lawn Mower View Diagrams & Manuals
11A-544K206 (2008) Lawn Mower View Diagrams & Manuals
11A-544K308 (2008) Lawn Mower View Diagrams & Manuals
11A-544K033 (2008) Lawn Mower View Diagrams & Manuals
11A-544K019 (2008) Lawn Mower View Diagrams & Manuals
11A-544K057 (2008) Lawn Mower View Diagrams & Manuals
11A-544K118 (2008) Lawn Mower View Diagrams & Manuals
11A-544K131 (2008) Lawn Mower View Diagrams & Manuals
11A-544K022 (2008) Lawn Mower View Diagrams & Manuals
11A-544K722 (2008) Lawn Mower View Diagrams & Manuals
11A-544K002 (2008) Lawn Mower View Diagrams & Manuals
11A-544K715 (2008) Lawn Mower View Diagrams & Manuals
11A-544K077 (2008) Lawn Mower View Diagrams & Manuals
11A-544K977 (2008) Lawn Mower View Diagrams & Manuals
11A-544K777 (2008) Lawn Mower View Diagrams & Manuals
11A-544K724 (2008) Lawn Mower View Diagrams & Manuals
11A-544K105 (2008) Lawn Mower View Diagrams & Manuals
11A-544K009 (2008) Lawn Mower View Diagrams & Manuals
11A-544K016 (2008) Lawn Mower View Diagrams & Manuals
11A-544K145 (2008) Lawn Mower View Diagrams & Manuals
11A-544K196 (2008) Lawn Mower View Diagrams & Manuals
11A-544K719 (2008) Lawn Mower View Diagrams & Manuals
11A-544K098 (2008) Lawn Mower View Diagrams & Manuals
12A-288A304 (2002) Lawn Mower View Diagrams & Manuals
12A-288A372 (2002) Lawn Mower View Diagrams & Manuals
12A-288A401 (2002) Lawn Mower View Diagrams & Manuals
12A-288A720 (2002) Lawn Mower View Diagrams & Manuals
12A-288A730 (2002) Lawn Mower View Diagrams & Manuals
12A-288A301 (2002) Lawn Mower View Diagrams & Manuals
12A-288A709 (2002) Lawn Mower View Diagrams & Manuals
12A-288A371 (2002) Lawn Mower View Diagrams & Manuals
12A-288A307 (2002) Lawn Mower View Diagrams & Manuals
12A-288A513 (2002) Lawn Mower View Diagrams & Manuals
12A-288A713 (2002) Lawn Mower View Diagrams & Manuals
12A-288A382 (2002) Lawn Mower View Diagrams & Manuals
12A-288A000 (2002) Lawn Mower View Diagrams & Manuals
12A-288A121 (2002) Lawn Mower View Diagrams & Manuals
12A-288A205 (2002) Lawn Mower View Diagrams & Manuals
12A-288A705 (2002) Lawn Mower View Diagrams & Manuals
12A-288A706 (2002) Lawn Mower View Diagrams & Manuals
12A-288A026 (2002) Lawn Mower View Diagrams & Manuals
12A-288A726 (2002) Lawn Mower View Diagrams & Manuals
12A-288A054 (2002) Lawn Mower View Diagrams & Manuals
12A-288A745 (2002) Lawn Mower View Diagrams & Manuals
12A-288A754 (2002) Lawn Mower View Diagrams & Manuals
12A-288A704 (2002) Lawn Mower View Diagrams & Manuals
12A-288A029 (2002) Lawn Mower View Diagrams & Manuals
12A-288A229 (2002) Lawn Mower View Diagrams & Manuals
12A-288A134 (2002) Lawn Mower View Diagrams & Manuals
12A-288A138 (2002) Lawn Mower View Diagrams & Manuals
12A-288A729 (2002) Lawn Mower View Diagrams & Manuals
12A-288A929 (2002) Lawn Mower View Diagrams & Manuals
12A-288A129 (2002) Lawn Mower View Diagrams & Manuals
12A-288A151 (2002) Lawn Mower View Diagrams & Manuals
12A-288A206 (2002) Lawn Mower View Diagrams & Manuals
12A-288A308 (2002) Lawn Mower View Diagrams & Manuals
12A-288A033 (2002) Lawn Mower View Diagrams & Manuals
12A-288A019 (2002) Lawn Mower View Diagrams & Manuals
12A-288A057 (2002) Lawn Mower View Diagrams & Manuals
12A-288A118 (2002) Lawn Mower View Diagrams & Manuals
12A-288A131 (2002) Lawn Mower View Diagrams & Manuals
12A-288A022 (2002) Lawn Mower View Diagrams & Manuals
12A-288A722 (2002) Lawn Mower View Diagrams & Manuals
12A-288A002 (2002) Lawn Mower View Diagrams & Manuals
12A-288A715 (2002) Lawn Mower View Diagrams & Manuals
12A-288A077 (2002) Lawn Mower View Diagrams & Manuals
12A-288A977 (2002) Lawn Mower View Diagrams & Manuals
12A-288A777 (2002) Lawn Mower View Diagrams & Manuals
12A-288A724 (2002) Lawn Mower View Diagrams & Manuals
12A-288A105 (2002) Lawn Mower View Diagrams & Manuals
12A-288A009 (2002) Lawn Mower View Diagrams & Manuals
12A-288A016 (2002) Lawn Mower View Diagrams & Manuals
12A-288A145 (2002) Lawn Mower View Diagrams & Manuals
12A-288A196 (2002) Lawn Mower View Diagrams & Manuals
12A-288A719 (2002) Lawn Mower View Diagrams & Manuals
12A-288A098 (2002) Lawn Mower View Diagrams & Manuals
12A-529B304 (2002) Lawn Mower View Diagrams & Manuals
12A-529B372 (2002) Lawn Mower View Diagrams & Manuals
12A-529B401 (2002) Lawn Mower View Diagrams & Manuals
12A-529B720 (2002) Lawn Mower View Diagrams & Manuals
12A-529B730 (2002) Lawn Mower View Diagrams & Manuals
12A-529B301 (2002) Lawn Mower View Diagrams & Manuals
12A-529B709 (2002) Lawn Mower View Diagrams & Manuals
12A-529B371 (2002) Lawn Mower View Diagrams & Manuals
12A-529B307 (2002) Lawn Mower View Diagrams & Manuals
12A-529B513 (2002) Lawn Mower View Diagrams & Manuals
12A-529B713 (2002) Lawn Mower View Diagrams & Manuals
12A-529B382 (2002) Lawn Mower View Diagrams & Manuals
12A-529B000 (2002) Lawn Mower View Diagrams & Manuals
12A-529B121 (2002) Lawn Mower View Diagrams & Manuals
12A-529B205 (2002) Lawn Mower View Diagrams & Manuals
12A-529B705 (2002) Lawn Mower View Diagrams & Manuals
12A-529B706 (2002) Lawn Mower View Diagrams & Manuals
12A-529B026 (2002) Lawn Mower View Diagrams & Manuals
12A-529B726 (2002) Lawn Mower View Diagrams & Manuals
12A-529B054 (2002) Lawn Mower View Diagrams & Manuals
12A-529B745 (2002) Lawn Mower View Diagrams & Manuals
12A-529B754 (2002) Lawn Mower View Diagrams & Manuals
12A-529B704 (2002) Lawn Mower View Diagrams & Manuals
12A-529B029 (2002) Lawn Mower View Diagrams & Manuals
12A-529B229 (2002) Lawn Mower View Diagrams & Manuals
12A-529B134 (2002) Lawn Mower View Diagrams & Manuals
12A-529B138 (2002) Lawn Mower View Diagrams & Manuals
12A-529B729 (2002) Lawn Mower View Diagrams & Manuals
12A-529B929 (2002) Lawn Mower View Diagrams & Manuals
12A-529B129 (2002) Lawn Mower View Diagrams & Manuals
12A-529B151 (2002) Lawn Mower View Diagrams & Manuals
12A-529B206 (2002) Lawn Mower View Diagrams & Manuals
12A-529B308 (2002) Lawn Mower View Diagrams & Manuals
12A-529B033 (2002) Lawn Mower View Diagrams & Manuals
12A-529B019 (2002) Lawn Mower View Diagrams & Manuals
12A-529B057 (2002) Lawn Mower View Diagrams & Manuals
12A-529B118 (2002) Lawn Mower View Diagrams & Manuals
12A-529B131 (2002) Lawn Mower View Diagrams & Manuals
12A-529B022 (2002) Lawn Mower View Diagrams & Manuals
12A-529B722 (2002) Lawn Mower View Diagrams & Manuals
12A-529B002 (2002) Lawn Mower View Diagrams & Manuals
12A-529B715 (2002) Lawn Mower View Diagrams & Manuals
12A-529B077 (2002) Lawn Mower View Diagrams & Manuals
12A-529B977 (2002) Lawn Mower View Diagrams & Manuals
12A-529B777 (2002) Lawn Mower View Diagrams & Manuals
12A-529B724 (2002) Lawn Mower View Diagrams & Manuals
12A-529B105 (2002) Lawn Mower View Diagrams & Manuals
12A-529B009 (2002) Lawn Mower View Diagrams & Manuals
12A-529B016 (2002) Lawn Mower View Diagrams & Manuals
12A-529B145 (2002) Lawn Mower View Diagrams & Manuals
12A-529B196 (2002) Lawn Mower View Diagrams & Manuals
12A-529B719 (2002) Lawn Mower View Diagrams & Manuals
12A-529B098 (2002) Lawn Mower View Diagrams & Manuals
12A-529W304 (2002) Lawn Mower View Diagrams & Manuals
12A-529W372 (2002) Lawn Mower View Diagrams & Manuals
12A-529W401 (2002) Lawn Mower View Diagrams & Manuals
12A-529W720 (2002) Lawn Mower View Diagrams & Manuals
12A-529W730 (2002) Lawn Mower View Diagrams & Manuals
12A-529W301 (2002) Lawn Mower View Diagrams & Manuals
12A-529W709 (2002) Lawn Mower View Diagrams & Manuals
12A-529W371 (2002) Lawn Mower View Diagrams & Manuals
12A-529W307 (2002) Lawn Mower View Diagrams & Manuals
12A-529W513 (2002) Lawn Mower View Diagrams & Manuals
12A-529W713 (2002) Lawn Mower View Diagrams & Manuals
12A-529W382 (2002) Lawn Mower View Diagrams & Manuals
12A-529W000 (2002) Lawn Mower View Diagrams & Manuals
12A-529W121 (2002) Lawn Mower View Diagrams & Manuals
12A-529W205 (2002) Lawn Mower View Diagrams & Manuals
12A-529W705 (2002) Lawn Mower View Diagrams & Manuals
12A-529W706 (2002) Lawn Mower View Diagrams & Manuals
12A-529W026 (2002) Lawn Mower View Diagrams & Manuals
12A-529W726 (2002) Lawn Mower View Diagrams & Manuals
12A-529W054 (2002) Lawn Mower View Diagrams & Manuals
12A-529W745 (2002) Lawn Mower View Diagrams & Manuals
12A-529W754 (2002) Lawn Mower View Diagrams & Manuals
12A-529W704 (2002) Lawn Mower View Diagrams & Manuals
12A-529W029 (2002) Lawn Mower View Diagrams & Manuals
12A-529W229 (2002) Lawn Mower View Diagrams & Manuals
12A-529W134 (2002) Lawn Mower View Diagrams & Manuals
12A-529W138 (2002) Lawn Mower View Diagrams & Manuals
12A-529W729 (2002) Lawn Mower View Diagrams & Manuals
12A-529W929 (2002) Lawn Mower View Diagrams & Manuals
12A-529W129 (2002) Lawn Mower View Diagrams & Manuals
12A-529W151 (2002) Lawn Mower View Diagrams & Manuals
12A-529W206 (2002) Lawn Mower View Diagrams & Manuals
12A-529W308 (2002) Lawn Mower View Diagrams & Manuals
12A-529W033 (2002) Lawn Mower View Diagrams & Manuals
12A-529W019 (2002) Lawn Mower View Diagrams & Manuals
12A-529W057 (2002) Lawn Mower View Diagrams & Manuals
12A-529W118 (2002) Lawn Mower View Diagrams & Manuals
12A-529W131 (2002) Lawn Mower View Diagrams & Manuals
12A-529W022 (2002) Lawn Mower View Diagrams & Manuals
12A-529W722 (2002) Lawn Mower View Diagrams & Manuals
12A-529W002 (2002) Lawn Mower View Diagrams & Manuals
12A-529W715 (2002) Lawn Mower View Diagrams & Manuals
12A-529W077 (2002) Lawn Mower View Diagrams & Manuals
12A-529W977 (2002) Lawn Mower View Diagrams & Manuals
12A-529W777 (2002) Lawn Mower View Diagrams & Manuals
12A-529W724 (2002) Lawn Mower View Diagrams & Manuals
12A-529W105 (2002) Lawn Mower View Diagrams & Manuals
12A-529W009 (2002) Lawn Mower View Diagrams & Manuals
12A-529W016 (2002) Lawn Mower View Diagrams & Manuals
12A-529W145 (2002) Lawn Mower View Diagrams & Manuals
12A-529W196 (2002) Lawn Mower View Diagrams & Manuals
12A-529W719 (2002) Lawn Mower View Diagrams & Manuals
12A-529W098 (2002) Lawn Mower View Diagrams & Manuals
12A-289W304 (2004) Lawn Mower View Diagrams & Manuals
12A-289W372 (2004) Lawn Mower View Diagrams & Manuals
12A-289W401 (2004) Lawn Mower View Diagrams & Manuals
12A-289W720 (2004) Lawn Mower View Diagrams & Manuals
12A-289W730 (2004) Lawn Mower View Diagrams & Manuals
12A-289W301 (2004) Lawn Mower View Diagrams & Manuals
12A-289W709 (2004) Lawn Mower View Diagrams & Manuals
12A-289W371 (2004) Lawn Mower View Diagrams & Manuals
12A-289W307 (2004) Lawn Mower View Diagrams & Manuals
12A-289W513 (2004) Lawn Mower View Diagrams & Manuals
12A-289W713 (2004) Lawn Mower View Diagrams & Manuals
12A-289W382 (2004) Lawn Mower View Diagrams & Manuals
12A-289W000 (2004) Lawn Mower View Diagrams & Manuals
12A-289W121 (2004) Lawn Mower View Diagrams & Manuals
12A-289W205 (2004) Lawn Mower View Diagrams & Manuals
12A-289W705 (2004) Lawn Mower View Diagrams & Manuals
12A-289W706 (2004) Lawn Mower View Diagrams & Manuals
12A-289W026 (2004) Lawn Mower View Diagrams & Manuals
12A-289W726 (2004) Lawn Mower View Diagrams & Manuals
12A-289W054 (2004) Lawn Mower View Diagrams & Manuals
12A-289W745 (2004) Lawn Mower View Diagrams & Manuals
12A-289W754 (2004) Lawn Mower View Diagrams & Manuals
12A-289W704 (2004) Lawn Mower View Diagrams & Manuals
12A-289W029 (2004) Lawn Mower View Diagrams & Manuals
12A-289W229 (2004) Lawn Mower View Diagrams & Manuals
12A-289W134 (2004) Lawn Mower View Diagrams & Manuals
12A-289W138 (2004) Lawn Mower View Diagrams & Manuals
12A-289W729 (2004) Lawn Mower View Diagrams & Manuals
12A-289W929 (2004) Lawn Mower View Diagrams & Manuals
12A-289W129 (2004) Lawn Mower View Diagrams & Manuals
12A-289W151 (2004) Lawn Mower View Diagrams & Manuals
12A-289W206 (2004) Lawn Mower View Diagrams & Manuals
12A-289W308 (2004) Lawn Mower View Diagrams & Manuals
12A-289W033 (2004) Lawn Mower View Diagrams & Manuals
12A-289W019 (2004) Lawn Mower View Diagrams & Manuals
12A-289W057 (2004) Lawn Mower View Diagrams & Manuals
12A-289W118 (2004) Lawn Mower View Diagrams & Manuals
12A-289W131 (2004) Lawn Mower View Diagrams & Manuals
12A-289W022 (2004) Lawn Mower View Diagrams & Manuals
12A-289W002 (2004) Lawn Mower View Diagrams & Manuals
12A-289W715 (2004) Lawn Mower View Diagrams & Manuals
12A-289W077 (2004) Lawn Mower View Diagrams & Manuals
12A-289W977 (2004) Lawn Mower View Diagrams & Manuals
12A-289W777 (2004) Lawn Mower View Diagrams & Manuals
12A-289W724 (2004) Lawn Mower View Diagrams & Manuals
12A-289W105 (2004) Lawn Mower View Diagrams & Manuals
12A-289W009 (2004) Lawn Mower View Diagrams & Manuals
12A-289W016 (2004) Lawn Mower View Diagrams & Manuals
12A-289W145 (2004) Lawn Mower View Diagrams & Manuals
12A-289W196 (2004) Lawn Mower View Diagrams & Manuals
12A-289W719 (2004) Lawn Mower View Diagrams & Manuals
12A-289W098 (2004) Lawn Mower View Diagrams & Manuals
12A-469W304 (2004) Lawn Mower View Diagrams & Manuals
12A-469W372 (2004) Lawn Mower View Diagrams & Manuals
12A-469W401 (2004) Lawn Mower View Diagrams & Manuals
12A-469W720 (2004) Lawn Mower View Diagrams & Manuals
12A-469W730 (2004) Lawn Mower View Diagrams & Manuals
12A-469W301 (2004) Lawn Mower View Diagrams & Manuals
12A-469W709 (2004) Lawn Mower View Diagrams & Manuals
12A-469W371 (2004) Lawn Mower View Diagrams & Manuals
12A-469W307 (2004) Lawn Mower View Diagrams & Manuals
12A-469W513 (2004) Lawn Mower View Diagrams & Manuals
12A-469W713 (2004) Lawn Mower View Diagrams & Manuals
12A-469W382 (2004) Lawn Mower View Diagrams & Manuals
12A-469W000 (2004) Lawn Mower View Diagrams & Manuals
12A-469W121 (2004) Lawn Mower View Diagrams & Manuals
12A-469W205 (2004) Lawn Mower View Diagrams & Manuals
12A-469W705 (2004) Lawn Mower View Diagrams & Manuals
12A-469W706 (2004) Lawn Mower View Diagrams & Manuals
12A-469W026 (2004) Lawn Mower View Diagrams & Manuals
12A-469W726 (2004) Lawn Mower View Diagrams & Manuals
12A-469W054 (2004) Lawn Mower View Diagrams & Manuals
12A-469W745 (2004) Lawn Mower View Diagrams & Manuals
12A-469W754 (2004) Lawn Mower View Diagrams & Manuals
12A-469W704 (2004) Lawn Mower View Diagrams & Manuals
12A-469W029 (2004) Lawn Mower View Diagrams & Manuals
12A-469W229 (2004) Lawn Mower View Diagrams & Manuals
12A-469W134 (2004) Lawn Mower View Diagrams & Manuals
12A-469W138 (2004) Lawn Mower View Diagrams & Manuals
12A-469W729 (2004) Lawn Mower View Diagrams & Manuals
12A-469W929 (2004) Lawn Mower View Diagrams & Manuals
12A-469W129 (2004) Lawn Mower View Diagrams & Manuals
12A-469W151 (2004) Lawn Mower View Diagrams & Manuals
12A-469W206 (2004) Lawn Mower View Diagrams & Manuals
12A-469W308 (2004) Lawn Mower View Diagrams & Manuals
12A-469W033 (2004) Lawn Mower View Diagrams & Manuals
12A-469W019 (2004) Lawn Mower View Diagrams & Manuals
12A-469W057 (2004) Lawn Mower View Diagrams & Manuals
12A-469W118 (2004) Lawn Mower View Diagrams & Manuals
12A-469W131 (2004) Lawn Mower View Diagrams & Manuals
12A-469W022 (2004) Lawn Mower View Diagrams & Manuals
12A-469W002 (2004) Lawn Mower View Diagrams & Manuals
12A-469W715 (2004) Lawn Mower View Diagrams & Manuals
12A-469W077 (2004) Lawn Mower View Diagrams & Manuals
12A-469W977 (2004) Lawn Mower View Diagrams & Manuals
12A-469W777 (2004) Lawn Mower View Diagrams & Manuals
12A-469W724 (2004) Lawn Mower View Diagrams & Manuals
12A-469W105 (2004) Lawn Mower View Diagrams & Manuals
12A-469W009 (2004) Lawn Mower View Diagrams & Manuals
12A-469W016 (2004) Lawn Mower View Diagrams & Manuals
12A-469W145 (2004) Lawn Mower View Diagrams & Manuals
12A-469W196 (2004) Lawn Mower View Diagrams & Manuals
12A-469W719 (2004) Lawn Mower View Diagrams & Manuals
12A-469W098 (2004) Lawn Mower View Diagrams & Manuals
12A-469R304 (2008) Lawn Mower View Diagrams & Manuals
12A-469R372 (2008) Lawn Mower View Diagrams & Manuals
12A-469R401 (2008) Lawn Mower View Diagrams & Manuals
12A-469R720 (2008) Lawn Mower View Diagrams & Manuals
12A-469R730 (2008) Lawn Mower View Diagrams & Manuals
12A-469R301 (2008) Lawn Mower View Diagrams & Manuals
12A-469R709 (2008) Lawn Mower View Diagrams & Manuals
12A-469R371 (2008) Lawn Mower View Diagrams & Manuals
12A-469R307 (2008) Lawn Mower View Diagrams & Manuals
12A-469R513 (2008) Lawn Mower View Diagrams & Manuals
12A-469R713 (2008) Lawn Mower View Diagrams & Manuals
12A-469R382 (2008) Lawn Mower View Diagrams & Manuals
12A-469R000 (2008) Lawn Mower View Diagrams & Manuals
12A-469R121 (2008) Lawn Mower View Diagrams & Manuals
12A-469R205 (2008) Lawn Mower View Diagrams & Manuals
12A-469R705 (2008) Lawn Mower View Diagrams & Manuals
12A-469R706 (2008) Lawn Mower View Diagrams & Manuals
12A-469R026 (2008) Lawn Mower View Diagrams & Manuals
12A-469R726 (2008) Lawn Mower View Diagrams & Manuals
12A-469R054 (2008) Lawn Mower View Diagrams & Manuals
12A-469R745 (2008) Lawn Mower View Diagrams & Manuals
12A-469R754 (2008) Lawn Mower View Diagrams & Manuals
12A-469R704 (2008) Lawn Mower View Diagrams & Manuals
12A-469R029 (2008) Lawn Mower View Diagrams & Manuals
12A-469R229 (2008) Lawn Mower View Diagrams & Manuals
12A-469R134 (2008) Lawn Mower View Diagrams & Manuals
12A-469R138 (2008) Lawn Mower View Diagrams & Manuals
12A-469R729 (2008) Lawn Mower View Diagrams & Manuals
12A-469R929 (2008) Lawn Mower View Diagrams & Manuals
12A-469R129 (2008) Lawn Mower View Diagrams & Manuals
12A-469R151 (2008) Lawn Mower View Diagrams & Manuals
12A-469R206 (2008) Lawn Mower View Diagrams & Manuals
12A-469R308 (2008) Lawn Mower View Diagrams & Manuals
12A-469R033 (2008) Lawn Mower View Diagrams & Manuals
12A-469R019 (2008) Lawn Mower View Diagrams & Manuals
12A-469R057 (2008) Lawn Mower View Diagrams & Manuals
12A-469R118 (2008) Lawn Mower View Diagrams & Manuals
12A-469R131 (2008) Lawn Mower View Diagrams & Manuals
12A-469R022 (2008) Lawn Mower View Diagrams & Manuals
12A-469R722 (2008) Lawn Mower View Diagrams & Manuals
12A-469R002 (2008) Lawn Mower View Diagrams & Manuals
12A-469R715 (2008) Lawn Mower View Diagrams & Manuals
12A-469R077 (2008) Lawn Mower View Diagrams & Manuals
12A-469R977 (2008) Lawn Mower View Diagrams & Manuals
12A-469R777 (2008) Lawn Mower View Diagrams & Manuals
12A-469R724 (2008) Lawn Mower View Diagrams & Manuals
12A-469R105 (2008) Lawn Mower View Diagrams & Manuals
12A-469R009 (2008) Lawn Mower View Diagrams & Manuals
12A-469R016 (2008) Lawn Mower View Diagrams & Manuals
12A-469R145 (2008) Lawn Mower View Diagrams & Manuals
12A-469R196 (2008) Lawn Mower View Diagrams & Manuals
12A-469R719 (2008) Lawn Mower View Diagrams & Manuals
12A-469R098 (2008) Lawn Mower View Diagrams & Manuals
12A-469S304 (2008) Lawn Mower View Diagrams & Manuals
12A-469S372 (2008) Lawn Mower View Diagrams & Manuals
12A-469S401 (2008) Lawn Mower View Diagrams & Manuals
12A-469S720 (2008) Lawn Mower View Diagrams & Manuals
12A-469S730 (2008) Lawn Mower View Diagrams & Manuals
12A-469S301 (2008) Lawn Mower View Diagrams & Manuals
12A-469S709 (2008) Lawn Mower View Diagrams & Manuals
12A-469S371 (2008) Lawn Mower View Diagrams & Manuals
12A-469S307 (2008) Lawn Mower View Diagrams & Manuals
12A-469S513 (2008) Lawn Mower View Diagrams & Manuals
12A-469S713 (2008) Lawn Mower View Diagrams & Manuals
12A-469S382 (2008) Lawn Mower View Diagrams & Manuals
12A-469S000 (2008) Lawn Mower View Diagrams & Manuals
12A-469S121 (2008) Lawn Mower View Diagrams & Manuals
12A-469S205 (2008) Lawn Mower View Diagrams & Manuals
12A-469S705 (2008) Lawn Mower View Diagrams & Manuals
12A-469S706 (2008) Lawn Mower View Diagrams & Manuals
12A-469S026 (2008) Lawn Mower View Diagrams & Manuals
12A-469S726 (2008) Lawn Mower View Diagrams & Manuals
12A-469S054 (2008) Lawn Mower View Diagrams & Manuals
12A-469S745 (2008) Lawn Mower View Diagrams & Manuals
12A-469S754 (2008) Lawn Mower View Diagrams & Manuals
12A-469S704 (2008) Lawn Mower View Diagrams & Manuals
12A-469S029 (2008) Lawn Mower View Diagrams & Manuals
12A-469S229 (2008) Lawn Mower View Diagrams & Manuals
12A-469S134 (2008) Lawn Mower View Diagrams & Manuals
12A-469S138 (2008) Lawn Mower View Diagrams & Manuals
12A-469S729 (2008) Lawn Mower View Diagrams & Manuals
12A-469S929 (2008) Lawn Mower View Diagrams & Manuals
12A-469S129 (2008) Lawn Mower View Diagrams & Manuals
12A-469S151 (2008) Lawn Mower View Diagrams & Manuals
12A-469S206 (2008) Lawn Mower View Diagrams & Manuals
12A-469S308 (2008) Lawn Mower View Diagrams & Manuals
12A-469S033 (2008) Lawn Mower View Diagrams & Manuals
12A-469S019 (2008) Lawn Mower View Diagrams & Manuals
12A-469S057 (2008) Lawn Mower View Diagrams & Manuals
12A-469S118 (2008) Lawn Mower View Diagrams & Manuals
12A-469S131 (2008) Lawn Mower View Diagrams & Manuals
12A-469S022 (2008) Lawn Mower View Diagrams & Manuals
12A-469S722 (2008) Lawn Mower View Diagrams & Manuals
12A-469S002 (2008) Lawn Mower View Diagrams & Manuals
12A-469S715 (2008) Lawn Mower View Diagrams & Manuals
12A-469S077 (2008) Lawn Mower View Diagrams & Manuals
12A-469S977 (2008) Lawn Mower View Diagrams & Manuals
12A-469S777 (2008) Lawn Mower View Diagrams & Manuals
12A-469S724 (2008) Lawn Mower View Diagrams & Manuals
12A-469S105 (2008) Lawn Mower View Diagrams & Manuals
12A-469S009 (2008) Lawn Mower View Diagrams & Manuals
12A-469S016 (2008) Lawn Mower View Diagrams & Manuals
12A-469S145 (2008) Lawn Mower View Diagrams & Manuals
12A-469S196 (2008) Lawn Mower View Diagrams & Manuals
12A-469S719 (2008) Lawn Mower View Diagrams & Manuals
12A-469S098 (2008) Lawn Mower View Diagrams & Manuals
12A-529R304 (2008) Lawn Mower View Diagrams & Manuals
12A-529R372 (2008) Lawn Mower View Diagrams & Manuals
12A-529R401 (2008) Lawn Mower View Diagrams & Manuals
12A-529R720 (2008) Lawn Mower View Diagrams & Manuals
12A-529R730 (2008) Lawn Mower View Diagrams & Manuals
12A-529R301 (2008) Lawn Mower View Diagrams & Manuals
12A-529R709 (2008) Lawn Mower View Diagrams & Manuals
12A-529R371 (2008) Lawn Mower View Diagrams & Manuals
12A-529R307 (2008) Lawn Mower View Diagrams & Manuals
12A-529R513 (2008) Lawn Mower View Diagrams & Manuals
12A-529R713 (2008) Lawn Mower View Diagrams & Manuals
12A-529R382 (2008) Lawn Mower View Diagrams & Manuals
12A-529R000 (2008) Lawn Mower View Diagrams & Manuals
12A-529R121 (2008) Lawn Mower View Diagrams & Manuals
12A-529R205 (2008) Lawn Mower View Diagrams & Manuals
12A-529R705 (2008) Lawn Mower View Diagrams & Manuals
12A-529R706 (2008) Lawn Mower View Diagrams & Manuals
12A-529R026 (2008) Lawn Mower View Diagrams & Manuals
12A-529R726 (2008) Lawn Mower View Diagrams & Manuals
12A-529R054 (2008) Lawn Mower View Diagrams & Manuals
12A-529R745 (2008) Lawn Mower View Diagrams & Manuals
12A-529R754 (2008) Lawn Mower View Diagrams & Manuals
12A-529R704 (2008) Lawn Mower View Diagrams & Manuals
12A-529R029 (2008) Lawn Mower View Diagrams & Manuals
12A-529R229 (2008) Lawn Mower View Diagrams & Manuals
12A-529R134 (2008) Lawn Mower View Diagrams & Manuals
12A-529R138 (2008) Lawn Mower View Diagrams & Manuals
12A-529R729 (2008) Lawn Mower View Diagrams & Manuals
12A-529R929 (2008) Lawn Mower View Diagrams & Manuals
12A-529R129 (2008) Lawn Mower View Diagrams & Manuals
12A-529R151 (2008) Lawn Mower View Diagrams & Manuals
12A-529R206 (2008) Lawn Mower View Diagrams & Manuals
12A-529R308 (2008) Lawn Mower View Diagrams & Manuals
12A-529R033 (2008) Lawn Mower View Diagrams & Manuals
12A-529R019 (2008) Lawn Mower View Diagrams & Manuals
12A-529R057 (2008) Lawn Mower View Diagrams & Manuals
12A-529R118 (2008) Lawn Mower View Diagrams & Manuals
12A-529R131 (2008) Lawn Mower View Diagrams & Manuals
12A-529R022 (2008) Lawn Mower View Diagrams & Manuals
12A-529R722 (2008) Lawn Mower View Diagrams & Manuals
12A-529R002 (2008) Lawn Mower View Diagrams & Manuals
12A-529R715 (2008) Lawn Mower View Diagrams & Manuals
12A-529R077 (2008) Lawn Mower View Diagrams & Manuals
12A-529R977 (2008) Lawn Mower View Diagrams & Manuals
12A-529R777 (2008) Lawn Mower View Diagrams & Manuals
12A-529R724 (2008) Lawn Mower View Diagrams & Manuals
12A-529R105 (2008) Lawn Mower View Diagrams & Manuals
12A-529R009 (2008) Lawn Mower View Diagrams & Manuals
12A-529R016 (2008) Lawn Mower View Diagrams & Manuals
12A-529R145 (2008) Lawn Mower View Diagrams & Manuals
12A-529R196 (2008) Lawn Mower View Diagrams & Manuals
12A-529R719 (2008) Lawn Mower View Diagrams & Manuals
12A-529R098 (2008) Lawn Mower View Diagrams & Manuals
12A-529S304 (2008) Lawn Mower View Diagrams & Manuals
12A-529S372 (2008) Lawn Mower View Diagrams & Manuals
12A-529S401 (2008) Lawn Mower View Diagrams & Manuals
12A-529S720 (2008) Lawn Mower View Diagrams & Manuals
12A-529S730 (2008) Lawn Mower View Diagrams & Manuals
12A-529S301 (2008) Lawn Mower View Diagrams & Manuals
12A-529S709 (2008) Lawn Mower View Diagrams & Manuals
12A-529S371 (2008) Lawn Mower View Diagrams & Manuals
12A-529S307 (2008) Lawn Mower View Diagrams & Manuals
12A-529S513 (2008) Lawn Mower View Diagrams & Manuals
12A-529S713 (2008) Lawn Mower View Diagrams & Manuals
12A-529S382 (2008) Lawn Mower View Diagrams & Manuals
12A-529S000 (2008) Lawn Mower View Diagrams & Manuals
12A-529S121 (2008) Lawn Mower View Diagrams & Manuals
12A-529S205 (2008) Lawn Mower View Diagrams & Manuals
12A-529S705 (2008) Lawn Mower View Diagrams & Manuals
12A-529S706 (2008) Lawn Mower View Diagrams & Manuals
12A-529S026 (2008) Lawn Mower View Diagrams & Manuals
12A-529S726 (2008) Lawn Mower View Diagrams & Manuals
12A-529S054 (2008) Lawn Mower View Diagrams & Manuals
12A-529S745 (2008) Lawn Mower View Diagrams & Manuals
12A-529S754 (2008) Lawn Mower View Diagrams & Manuals
12A-529S704 (2008) Lawn Mower View Diagrams & Manuals
12A-529S029 (2008) Lawn Mower View Diagrams & Manuals
12A-529S229 (2008) Lawn Mower View Diagrams & Manuals
12A-529S134 (2008) Lawn Mower View Diagrams & Manuals
12A-529S138 (2008) Lawn Mower View Diagrams & Manuals
12A-529S729 (2008) Lawn Mower View Diagrams & Manuals
12A-529S929 (2008) Lawn Mower View Diagrams & Manuals
12A-529S129 (2008) Lawn Mower View Diagrams & Manuals
12A-529S151 (2008) Lawn Mower View Diagrams & Manuals
12A-529S206 (2008) Lawn Mower View Diagrams & Manuals
12A-529S308 (2008) Lawn Mower View Diagrams & Manuals
12A-529S033 (2008) Lawn Mower View Diagrams & Manuals
12A-529S019 (2008) Lawn Mower View Diagrams & Manuals
12A-529S057 (2008) Lawn Mower View Diagrams & Manuals
12A-529S118 (2008) Lawn Mower View Diagrams & Manuals
12A-529S131 (2008) Lawn Mower View Diagrams & Manuals
12A-529S022 (2008) Lawn Mower View Diagrams & Manuals
12A-529S722 (2008) Lawn Mower View Diagrams & Manuals
12A-529S002 (2008) Lawn Mower View Diagrams & Manuals
12A-529S715 (2008) Lawn Mower View Diagrams & Manuals
12A-529S077 (2008) Lawn Mower View Diagrams & Manuals
12A-529S977 (2008) Lawn Mower View Diagrams & Manuals
12A-529S777 (2008) Lawn Mower View Diagrams & Manuals
12A-529S724 (2008) Lawn Mower View Diagrams & Manuals
12A-529S105 (2008) Lawn Mower View Diagrams & Manuals
12A-529S009 (2008) Lawn Mower View Diagrams & Manuals
12A-529S016 (2008) Lawn Mower View Diagrams & Manuals
12A-529S145 (2008) Lawn Mower View Diagrams & Manuals
12A-529S196 (2008) Lawn Mower View Diagrams & Manuals
12A-529S719 (2008) Lawn Mower View Diagrams & Manuals
12A-529S098 (2008) Lawn Mower View Diagrams & Manuals
11A-02JV006 (2011) Push Lawn Mower View Diagrams & Manuals
11A-074E065 (2010) Push Lawn Mower View Diagrams & Manuals
11A-074R265 (2010) Push Lawn Mower View Diagrams & Manuals
11A-414A065 (2010) Push Lawn Mower View Diagrams & Manuals
11A-414S265 (2010) Push Lawn Mower View Diagrams & Manuals
11A-020B029 (2010) Push Lawn Mower View Diagrams & Manuals
11A-020B029 (2011) Push Lawn Mower View Diagrams & Manuals
11A-020G020 (2010) Push Lawn Mower View Diagrams & Manuals
11A-020H220 (2010) Push Lawn Mower View Diagrams & Manuals
11A-084D000 (2010) Push Lawn Mower View Diagrams & Manuals
11A-084E000 (2010) Push Lawn Mower View Diagrams & Manuals
11A-084E029 (2010) Push Lawn Mower View Diagrams & Manuals
11A-084R220 (2010) Push Lawn Mower View Diagrams & Manuals
11A-084R229 (2010) Push Lawn Mower View Diagrams & Manuals
11A-414A020 (2010) Push Lawn Mower View Diagrams & Manuals
11A-414E000 (2010) Push Lawn Mower View Diagrams & Manuals
11A-414E029 (2010) Push Lawn Mower View Diagrams & Manuals
11A-414R229 (2010) Push Lawn Mower View Diagrams & Manuals
11A-414S220 (2010) Push Lawn Mower View Diagrams & Manuals
11A-504E000 (2010) Push Lawn Mower View Diagrams & Manuals
11A-504E020 (2010) Push Lawn Mower View Diagrams & Manuals
11A-504R200 (2010) Push Lawn Mower View Diagrams & Manuals
11A-504R220 (2010) Push Lawn Mower View Diagrams & Manuals
11A-544A000 (2010) Push Lawn Mower View Diagrams & Manuals
11A-544A020 (2010) Push Lawn Mower View Diagrams & Manuals
11A-544S220 (2010) Push Lawn Mower View Diagrams & Manuals
12A-264A000 (2010) Push Lawn Mower View Diagrams & Manuals
12A-464T020 (2010) Self Propelled Lawn Mower View Diagrams & Manuals
12A-464Z220 (2010) Self Propelled Lawn Mower View Diagrams & Manuals
12A-46K6020 (2010) Self Propelled Lawn Mower View Diagrams & Manuals
31A-32AD706 (2010) Two-Stage Compact Snowblower View Diagrams & Manuals
31A-32AD706 (2011) Two-Stage Compact Snowblower View Diagrams & Manuals
11A-020K006 (2012) 20" Push Mower View Diagrams & Manuals
11A-020L206 (2012) 20" Push Mower View Diagrams & Manuals
31A-32AD706 (2009) Two-Stage Compact Snowblower View Diagrams & Manuals
31A-3BAD729 (2005) Snow Thrower View Diagrams & Manuals
11A429R729 (2006) Lawn Mower View Diagrams & Manuals
11a414l129 Lawn Mower View Diagrams & Manuals
12a-445e755 (2004) Walk-Behind Lawn Mower View Diagrams & Manuals
11a-082a352 (2002) Lawn Mower View Diagrams & Manuals
11A-020B752 (2004) Lawn Mower View Diagrams & Manuals
11A-020B752 (2005) Lawn Mower View Diagrams & Manuals
12A-527G030 2007 Lawn Mower View Diagrams & Manuals
11A-54MB029 (2008) Lawn Mower View Diagrams & Manuals
31A-3CAD729 (2006) Snow Thrower View Diagrams & Manuals
31A-3CAD729 (2007) Snowthrower View Diagrams & Manuals
12A-453E700 (2004) Lawn Mower View Diagrams & Manuals
12A-453E700 (2005) Lawn Mower View Diagrams & Manuals
11A-02JX700 Push Mower 2012 View Diagrams & Manuals
11A-020L706 (2013) Lawn Mower View Diagrams & Manuals
11A-02BT706 Lawn Mower View Diagrams & Manuals
11A-02JX706 (2013) Lawn Mower View Diagrams & Manuals
11A-02SB706 Edger View Diagrams & Manuals
11A-08JC006 (2010) Lawn Mower View Diagrams & Manuals
11A-08M9006 (2009) Lawn Mower View Diagrams & Manuals
11A-41M9006 (2009) Lawn Mower View Diagrams & Manuals
11A-42K6095 (2010) Lawn Mower View Diagrams & Manuals
11A-436A004 (2010) Lawn Mower View Diagrams & Manuals
11A-50JC006 (2010) Lawn Mower View Diagrams & Manuals
11A-50M9006 (2009) Lawn Mower View Diagrams & Manuals
11A-544F004 (2010) Lawn Mower View Diagrams & Manuals
11A-58K6095 (2010) Lawn Mower View Diagrams & Manuals
12A-26JC006 (2010) Lawn Mower View Diagrams & Manuals
12AV566A004 (2010) Lawn Mower View Diagrams & Manuals
12AV56K3095 (2010) Lawn Mower View Diagrams & Manuals
12AV56K5095 (2009) Lawn Mower View Diagrams & Manuals
11A-546B729 (2006) Lawn Mower View Diagrams & Manuals
11A-038A729 22" Rotary Mower 2006 View Diagrams & Manuals
11A-439G129 (2001) Lawn Mower View Diagrams & Manuals
11A-439G129 (2002) Lawn Mower View Diagrams & Manuals
11A-038A729 (2006) Lawn Mower View Diagrams & Manuals
31A-32AD706 (2013) Two Stage Compact Snow Thrower View Diagrams & Manuals
31A-32AD706 (2014) Two Stage Compact Snow Thrower View Diagrams & Manuals
31A-32AD706 (2012) Two Stage Compact Snow Thrower View Diagrams & Manuals
11A-503E755 22" Rotary Mower View Diagrams & Manuals
12AE469D029 Self Propelled Lawn Mower View Diagrams & Manuals
12A-449R729 21" Rotary Mower View Diagrams & Manuals
11B-508C022 (2000) Lawn Mower View Diagrams & Manuals
11A-414A022 (2001) Lawn Mower View Diagrams & Manuals
11A-504A022 (2001) Lawn Mower View Diagrams & Manuals
11B-508C022 (2001) Lawn Mower View Diagrams & Manuals
11A-414D022 (2002) Lawn Mower View Diagrams & Manuals
11A-504D022 (2002) Lawn Mower View Diagrams & Manuals
12B-260A022 (2000) Lawn Mower View Diagrams & Manuals
12A-268C022 (2001) Lawn Mower View Diagrams & Manuals
11B-084A205 (2000) Lawn Mower View Diagrams & Manuals
11B-509B205 (2000) Lawn Mower View Diagrams & Manuals
11B-084A205 (2001) Lawn Mower View Diagrams & Manuals
11B-414A205 (2001) Lawn Mower View Diagrams & Manuals
11B-509B205 (2001) Lawn Mower View Diagrams & Manuals
11A-084D205 (2002) Lawn Mower View Diagrams & Manuals
11B-414A205 (2002) Lawn Mower View Diagrams & Manuals
11B-508C205 (2002) Lawn Mower View Diagrams & Manuals
11B-509B205 (2002) Lawn Mower View Diagrams & Manuals
11A-083B205 (2003) Lawn Mower View Diagrams & Manuals
11A-413C205 (2003) Lawn Mower View Diagrams & Manuals
11A-503E205 (2003) Lawn Mower View Diagrams & Manuals
11B-022B205 (2003) Lawn Mower View Diagrams & Manuals
11B-508C205 (2003) Lawn Mower View Diagrams & Manuals
11B-509B205 (2003) Lawn Mower View Diagrams & Manuals
11A-084E705 (2004) Lawn Mower View Diagrams & Manuals
11A-509R705 (2004) Lawn Mower View Diagrams & Manuals
11A-084E705 (2005) Lawn Mower View Diagrams & Manuals
11A-509R705 (2005) Lawn Mower View Diagrams & Manuals
12A-284A205 (2000) Lawn Mower View Diagrams & Manuals
12A-289B205 (2000) Lawn Mower View Diagrams & Manuals
12B-529B205 (2000) Lawn Mower View Diagrams & Manuals
12A-283C205 (2003) Lawn Mower View Diagrams & Manuals
11A-084A009 (2000) Lawn Mower View Diagrams & Manuals
11A-508C009 (2000) Lawn Mower View Diagrams & Manuals
11B-503F009 (2000) Lawn Mower View Diagrams & Manuals
11Z-084A009 (2000) Lawn Mower View Diagrams & Manuals
12A-264A009 (2000) Lawn Mower View Diagrams & Manuals
12A-525G009 (2000) Lawn Mower View Diagrams & Manuals
11A-084A016 (2001) Lawn Mower View Diagrams & Manuals
11A-084A016 (2002) Lawn Mower View Diagrams & Manuals
11A-083A196 (2000) Lawn Mower View Diagrams & Manuals
11A-505G196 (2000) Lawn Mower View Diagrams & Manuals
11A-504A098 (2000) Lawn Mower View Diagrams & Manuals
11A-509B098 (2000) Lawn Mower View Diagrams & Manuals
11A-084A098 (2001) Lawn Mower View Diagrams & Manuals
11A-504A098 (2001) Lawn Mower View Diagrams & Manuals
11A-509B098 (2001) Lawn Mower View Diagrams & Manuals
11A-084D098 (2002) Lawn Mower View Diagrams & Manuals
11A-504D098 (2002) Lawn Mower View Diagrams & Manuals
12A-264A098 (2000) Lawn Mower View Diagrams & Manuals
12A-264A098 (2001) Lawn Mower View Diagrams & Manuals
12A-264D098 (2002) Lawn Mower View Diagrams & Manuals
11A-084C163 (2003) Push Walk Behind Mower View Diagrams & Manuals
11A-416H763 (2003) Push Walk Behind Mower View Diagrams & Manuals
11A-436T763 (2003) Push Walk Behind Mower View Diagrams & Manuals
11A-506L163 (2003) Push Walk Behind Mower View Diagrams & Manuals
11A-544L163 (2003) Push Walk Behind Mower View Diagrams & Manuals
11A-546I763 (2003) Push Walk Behind Mower View Diagrams & Manuals
11A-084E765 (2004) Push Walk Behind Mower View Diagrams & Manuals
11A-504E765 (2004) Push Walk Behind Mower View Diagrams & Manuals
11A-584E765 (2004) Push Walk Behind Mower View Diagrams & Manuals
11A-074D765 (2005) Push Walk Behind Mower View Diagrams & Manuals
11A-414E765 (2005) Push Walk Behind Mower View Diagrams & Manuals
11A-584E765 (2005) Push Walk Behind Mower View Diagrams & Manuals
11A-074D765 (2006) Push Walk Behind Mower View Diagrams & Manuals
11A-414E765 (2006) Push Walk Behind Mower View Diagrams & Manuals
11A-418A765 (2006) Push Walk Behind Mower View Diagrams & Manuals
11A-074F265 (2007) Push Walk Behind Mower View Diagrams & Manuals
11A-414J265 (2007) Push Walk Behind Mower View Diagrams & Manuals
11A-414J265 (2008) Push Walk Behind Mower View Diagrams & Manuals
11A-020B065 (2009) Push Walk Behind Mower View Diagrams & Manuals
11A-020L765 (2013) Push Walk Behind Mower View Diagrams & Manuals
11A-020W765 (2014) Push Walk Behind Mower View Diagrams & Manuals
12A-264L163 (2003) Self Propelled Walk Behind Mower View Diagrams & Manuals
12A-526L163 (2003) Self Propelled Walk Behind Mower View Diagrams & Manuals
12A-264E765 (2004) Self Propelled Walk Behind Mower View Diagrams & Manuals
12A-264E765 (2005) Self Propelled Walk Behind Mower View Diagrams & Manuals
11A-020B597 (2008) Lawn Mower View Diagrams & Manuals
11A-109Q597 (2008) Lawn Mower View Diagrams & Manuals
11A-549Q597 (2008) Lawn Mower View Diagrams & Manuals
11A-020B597 (2009) Lawn Mower View Diagrams & Manuals
11A-109Q597 (2009) Lawn Mower View Diagrams & Manuals
11A-439Q597 (2009) Lawn Mower View Diagrams & Manuals
11A-504A597 (2009) Lawn Mower View Diagrams & Manuals
11A-549Q597 (2009) Lawn Mower View Diagrams & Manuals
11A-020B897 (2010) Lawn Mower View Diagrams & Manuals
11A-109Q897 (2010) Lawn Mower View Diagrams & Manuals
11A-504A897 (2010) Lawn Mower View Diagrams & Manuals
11A-549Q897 (2010) Lawn Mower View Diagrams & Manuals
11A-020B897 (2011) Lawn Mower View Diagrams & Manuals
12AV569Q597 (2008) Lawn Mower View Diagrams & Manuals
12AV569Q597 (2009) Lawn Mower View Diagrams & Manuals
12AV569Q897 (2010) Lawn Mower View Diagrams & Manuals
11A-088A099 (247.38510)(2010) Lawn Mower View Diagrams & Manuals
11A-088B299 (247.37136)(2010) Lawn Mower View Diagrams & Manuals
11A-418C099 (247.38814)(2010) Lawn Mower View Diagrams & Manuals
11A-418D299 (247.37173)(2010) Lawn Mower View Diagrams & Manuals
11A-508A099 (247.38518)(2010) Lawn Mower View Diagrams & Manuals
11A-508L099 (247.38528)(2010) Lawn Mower View Diagrams & Manuals
CC46ES (12AE46JA010) (2010) 12AE46JA Self Propelled Walk Behind Mower View Diagrams & Manuals
31AS380D099 (247.887000)(2004) Snowblower View Diagrams & Manuals
31AS3AAD799 (247.887001)(2005) Snowblower View Diagrams & Manuals
31AS3CAD799 (247.885550)(2007) Snowblower View Diagrams & Manuals
31AM32AD799 (247.88755)(2008) Snowblower View Diagrams & Manuals
CC94M (12A-94M7010) (2010) 12A-94M7 Self Propelled Walk Behind Mower View Diagrams & Manuals
CC98M (12A-98M7010, 12A-98MZ210) (2010) 12A-98M Self Propelled Walk Behind Mower View Diagrams & Manuals
CC46ES (12AE46JA010) (2011) 12AE46JA Self Propelled Walk Behind Mower View Diagrams & Manuals
CC46ES (12AE46JA009, 12AE46JA010) (2012) 12AE46JA Self Propelled Walk Behind Mower View Diagrams & Manuals
11A-544C059 (2008) Lawn Mower View Diagrams & Manuals
11A-544C059 (2009) Lawn Mower View Diagrams & Manuals
11A-544A059 (2010) Lawn Mower View Diagrams & Manuals
12AV569R059 (2008) Lawn Mower View Diagrams & Manuals
12AG769L059 (2009) Lawn Mower View Diagrams & Manuals
12AV569R059 (2009) Lawn Mower View Diagrams & Manuals
12AG469D059 (2010) Lawn Mower View Diagrams & Manuals
12AV566A059 (2010) Lawn Mower View Diagrams & Manuals
11A-542Q724 (2008) Lawn Mower View Diagrams & Manuals
11A-542Q724 (2009) Lawn Mower View Diagrams & Manuals
11A-542Q724 (2010) Lawn Mower View Diagrams & Manuals
RM2200 (31A-32AD783)(2015) Snowblower View Diagrams & Manuals
RM2200 (31A-32AD783)(2016) Snowblower View Diagrams & Manuals
RM2200 (31AS3AAD783)(2017) Snowblower View Diagrams & Manuals
11A-105D790 (2005) Lawn Mower View Diagrams & Manuals
11A-435D790 (2005) Lawn Mower View Diagrams & Manuals
11A-505D790 (2005) Lawn Mower View Diagrams & Manuals
12A-285D790 (2005) Lawn Mower View Diagrams & Manuals
12A-465E790 (2005) Lawn Mower View Diagrams & Manuals
12A-565E790 (2005) Lawn Mower View Diagrams & Manuals
11A-105A790 (W-105)(2006) Lawn Mower View Diagrams & Manuals
11A-505A790 (W-505)(2006) Lawn Mower View Diagrams & Manuals
11A-54MB790 (W-54MB)(2006) Lawn Mower View Diagrams & Manuals
11A-54MC790 (W-54MC)(2006) Lawn Mower View Diagrams & Manuals
12A-285D790 (W-285)(2006) Lawn Mower View Diagrams & Manuals
12A-56MC790 (W-56MC)(2006) Lawn Mower View Diagrams & Manuals
12AV83MC790 (W-83MC)(2006) Lawn Mower View Diagrams & Manuals
11A-104B090 (11A-104B090 W104B)(2007) Lawn Mower View Diagrams & Manuals
11A-104K290 (2007) Lawn Mower View Diagrams & Manuals
11A-439R090 (11A-439R090 W-439R)(2007) Lawn Mower View Diagrams & Manuals
11A-439S290 (2007) Lawn Mower View Diagrams & Manuals
11A-504B090 (11A-504B090 W-504B)(2007) Lawn Mower View Diagrams & Manuals
11A-504K290 (2007) Lawn Mower View Diagrams & Manuals
12A-469R090 (12A-469R090 W-469R)(2007) Lawn Mower View Diagrams & Manuals
12A-469S290 (2007) Lawn Mower View Diagrams & Manuals
12A-529R090 (12A-529R090 W-529R)(2007) Lawn Mower View Diagrams & Manuals
12A-529S290 (2007) Lawn Mower View Diagrams & Manuals
12AV569R090 (12AV569R090 W-569R)(2007) Lawn Mower View Diagrams & Manuals
12AV569S290 (2007) Lawn Mower View Diagrams & Manuals
12AV839R090 (12AV839R090 W839R)(2007) Lawn Mower View Diagrams & Manuals
12AV839S290 (2007) Lawn Mower View Diagrams & Manuals
11A-54K1090 (11A-54K1090 W-54K)(2008) Lawn Mower View Diagrams & Manuals
12A-52K1090 (12A-52K1090 W-52K)(2008) Lawn Mower View Diagrams & Manuals
11A-082A000 (2000) Push Walk Behind Mower View Diagrams & Manuals
11A-509A352 (2002) Push Walk Behind Mower View Diagrams & Manuals
11A-519C401 (2000) Push Walk Behind Mower View Diagrams & Manuals
11A-435D401 (2003) Push Walk Behind Mower View Diagrams & Manuals
11A-109P701 (2004) Push Walk Behind Mower View Diagrams & Manuals
11A-435D701 (2004) Push Walk Behind Mower View Diagrams & Manuals
11A-549P713 (2004) Push Walk Behind Mower View Diagrams & Manuals
11A-589P701 (2004) Push Walk Behind Mower View Diagrams & Manuals
11A-428Q713 (2005) Push Walk Behind Mower View Diagrams & Manuals
11A-435D701 (2005) Push Walk Behind Mower View Diagrams & Manuals
11A-589R755 (2005) Push Walk Behind Mower View Diagrams & Manuals
11A-435A701 (2006) Push Walk Behind Mower View Diagrams & Manuals
11A-439Q755 (2006) Push Walk Behind Mower View Diagrams & Manuals
11A-588C755 (2006) Push Walk Behind Mower View Diagrams & Manuals
11A-54MB055 (2007) Push Walk Behind Mower View Diagrams & Manuals
11A-54MY255 (2007) Push Walk Behind Mower View Diagrams & Manuals
11B-439Q755 (2007) Push Walk Behind Mower View Diagrams & Manuals
11A-549Q755 (2008) Push Walk Behind Mower View Diagrams & Manuals
12A-529N062 (2001) Self Propelled Walk Behind Mower View Diagrams & Manuals
12A-263E701 (2004) Self Propelled Walk Behind Mower View Diagrams & Manuals
12A-445D701 (2004) Self Propelled Walk Behind Mower View Diagrams & Manuals
12A-469P701 (2004) Self Propelled Walk Behind Mower View Diagrams & Manuals
12A-565I701 (2004) Self Propelled Walk Behind Mower View Diagrams & Manuals
12A-567A796 (2004) Self Propelled Walk Behind Mower View Diagrams & Manuals
12A-569P701 (2004) Self Propelled Walk Behind Mower View Diagrams & Manuals
12AE465F701 (2004) Self Propelled Walk Behind Mower View Diagrams & Manuals
12A-263E701 (2005) Self Propelled Walk Behind Mower View Diagrams & Manuals
12A-268N755 (2005) Self Propelled Walk Behind Mower View Diagrams & Manuals
12A-445C701 (2005) Self Propelled Walk Behind Mower View Diagrams & Manuals
12A-449C755 (2005) Self Propelled Walk Behind Mower View Diagrams & Manuals
12A-556Q713 (2005) Self Propelled Walk Behind Mower View Diagrams & Manuals
12A-568Q701 (2005) Self Propelled Walk Behind Mower View Diagrams & Manuals
12A-568Q755 (2005) Self Propelled Walk Behind Mower View Diagrams & Manuals
12AE445G701 (2005) Self Propelled Walk Behind Mower View Diagrams & Manuals
12AV829C755 (2005) Self Propelled Walk Behind Mower View Diagrams & Manuals
12A-263D701 (2006) Self Propelled Walk Behind Mower View Diagrams & Manuals
12A-26MB455 (2006) Self Propelled Walk Behind Mower View Diagrams & Manuals
12A-26MB755 (2006) Self Propelled Walk Behind Mower View Diagrams & Manuals
12A-26MC755 (2006) Self Propelled Walk Behind Mower View Diagrams & Manuals
12A-445C701 (2006) Self Propelled Walk Behind Mower View Diagrams & Manuals
12A-449C755 (2006) Self Propelled Walk Behind Mower View Diagrams & Manuals
12A-569Q701 (2006) Self Propelled Walk Behind Mower View Diagrams & Manuals
12A-569Q755 (2006) Self Propelled Walk Behind Mower View Diagrams & Manuals
12AE445G701 (2006) Self Propelled Walk Behind Mower View Diagrams & Manuals
12AE469D755 (2006) Self Propelled Walk Behind Mower View Diagrams & Manuals
12AV829C755 (2006) Self Propelled Walk Behind Mower View Diagrams & Manuals
12A-265C001 (2007) Self Propelled Walk Behind Mower View Diagrams & Manuals
12A-26MB055 (2007) Self Propelled Walk Behind Mower View Diagrams & Manuals
12A-26MY255 (2007) Self Propelled Walk Behind Mower View Diagrams & Manuals
12A-445C001 (2007) Self Propelled Walk Behind Mower View Diagrams & Manuals
12A-44MC055 (2007) Self Propelled Walk Behind Mower View Diagrams & Manuals
12A-44MZ255 (2007) Self Propelled Walk Behind Mower View Diagrams & Manuals
12AE445R001 (2007) Self Propelled Walk Behind Mower View Diagrams & Manuals
12B-569Q755 (2007) Self Propelled Walk Behind Mower View Diagrams & Manuals
12BV829Q755 (2007) Self Propelled Walk Behind Mower View Diagrams & Manuals
12A-446M001 (2008) Self Propelled Walk Behind Mower View Diagrams & Manuals
12AE46JA001 (2008) Self Propelled Walk Behind Mower View Diagrams & Manuals
12AE46M3001 (2008) Self Propelled Walk Behind Mower View Diagrams & Manuals
12AV566M055 (2008) Self Propelled Walk Behind Mower View Diagrams & Manuals
12AV566N255 (2008) Self Propelled Walk Behind Mower View Diagrams & Manuals
12A-446M001 (2009) Self Propelled Walk Behind Mower View Diagrams & Manuals
Yard Machines
11A-020B000 (2009) Push Walk-Behind Mower View Diagrams & Manuals
12A-529B000 (2002) Self-Propelled Walk-Behind Mower View Diagrams & Manuals
11A-02JV000 (2011) Push Lawn Mower View Diagrams & Manuals
11A-020B000 (2010) Push Lawn Mower View Diagrams & Manuals
11A-020B000 (2011) Push Lawn Mower View Diagrams & Manuals
31A-32AD700 (2010) Walk Behind Snowblower View Diagrams & Manuals
31A-32AD700 (2011) Walk Behind Snowblower View Diagrams & Manuals
31A-32AD752 (2010) Walk Behind Snowblower View Diagrams & Manuals
31A-32AD752 (2011) Walk Behind Snowblower View Diagrams & Manuals
12A-446M729 Lawn Mower View Diagrams & Manuals
11A-544E029 Lawn Mower View Diagrams & Manuals
11B-544C062 (2002) 21" Rear & Side Discharge Mulching Mower View Diagrams & Manuals
11A-414E729 (2004) Walk Behind Mower View Diagrams & Manuals
11A-414E729 (2005) Walk Behind Mower View Diagrams & Manuals
11A-414E729 (2006) Walk Behind Mower View Diagrams & Manuals
11A-020W700 (2014) Lawn Mower View Diagrams & Manuals
11A-02JX700 (2014) Lawn Mower View Diagrams & Manuals
11A-02JX700 (2012) Lawn Mower View Diagrams & Manuals
11A-02SB700 (2014) Lawn Mower View Diagrams & Manuals
31A-32AD752 (2009) Two Stage Compact Snow Thrower View Diagrams & Manuals
31A-32AD752 (2012) Two Stage Compact Snow Thrower View Diagrams & Manuals
31A-32AD752 (2013) Two Stage Compact Snow Thrower View Diagrams & Manuals
31A-32AD752 (2014) Two Stage Compact Snow Thrower View Diagrams & Manuals
31A-32AD752 (2008) Two Stage Compact Snow Thrower View Diagrams & Manuals
11A-082A026 (2001) Lawn Mower View Diagrams & Manuals
11A-084A009 (2001) Lawn Mower View Diagrams & Manuals
11A-084D129 (2001) Lawn Mower View Diagrams & Manuals
11A-086F132 (2001) Lawn Mower View Diagrams & Manuals
11A-089Q720 (2001) Lawn Mower View Diagrams & Manuals
11A-089Q729 (2001) Lawn Mower View Diagrams & Manuals
11A-089Q762 (2001) Lawn Mower View Diagrams & Manuals
11A-089S700 (2001) Lawn Mower View Diagrams & Manuals
11A-414A009 (2001) Lawn Mower View Diagrams & Manuals
11A-414A088 (2001) Lawn Mower View Diagrams & Manuals
11A-414A120 (2001) Lawn Mower View Diagrams & Manuals
11A-414D129 (2001) Lawn Mower View Diagrams & Manuals
11A-419Q720 (2001) Lawn Mower View Diagrams & Manuals
11A-419Q729 (2001) Lawn Mower View Diagrams & Manuals
11A-424B352 (2001) Lawn Mower View Diagrams & Manuals
11A-426F132 (2001) Lawn Mower View Diagrams & Manuals
11A-428C000 (2001) Lawn Mower View Diagrams & Manuals
11A-429Q762 (2001) Lawn Mower View Diagrams & Manuals
11A-429S700 (2001) Lawn Mower View Diagrams & Manuals
11A-439S700 (2001) Lawn Mower View Diagrams & Manuals
11A-503F129 (2001) Lawn Mower View Diagrams & Manuals
11A-504A009 (2001) Lawn Mower View Diagrams & Manuals
11A-504A120 (2001) Lawn Mower View Diagrams & Manuals
11A-504N141 (2001) Lawn Mower View Diagrams & Manuals
11A-505C026 (2001) Lawn Mower View Diagrams & Manuals
11A-508C009 (2001) Lawn Mower View Diagrams & Manuals
11A-508C132 (2001) Lawn Mower View Diagrams & Manuals
11A-509A352 (2001) Lawn Mower View Diagrams & Manuals
11A-509S700 (2001) Lawn Mower View Diagrams & Manuals
11B-081B352 (2001) Lawn Mower View Diagrams & Manuals
11B-082A000 (2001) Lawn Mower View Diagrams & Manuals
11B-084A000 (2001) Lawn Mower View Diagrams & Manuals
11B-084C062 (2001) Lawn Mower View Diagrams & Manuals
11B-429B088 (2001) Lawn Mower View Diagrams & Manuals
11B-504A000 (2001) Lawn Mower View Diagrams & Manuals
11B-508C205 (2001) Lawn Mower View Diagrams & Manuals
11B-508N141 (2001) Lawn Mower View Diagrams & Manuals
11B-509N062 (2001) Lawn Mower View Diagrams & Manuals
11Z-082A120 (2001) Lawn Mower View Diagrams & Manuals
11Z-084C062 (2001) Lawn Mower View Diagrams & Manuals
11A-082A120 (2002) Lawn Mower View Diagrams & Manuals
11A-084D129 (2002) Lawn Mower View Diagrams & Manuals
11A-086F132 (2002) Lawn Mower View Diagrams & Manuals
11A-086Q729 (2002) Lawn Mower View Diagrams & Manuals
11A-089K700 (2002) Lawn Mower View Diagrams & Manuals
11A-089Q720 (2002) Lawn Mower View Diagrams & Manuals
11A-089Q729 (2002) Lawn Mower View Diagrams & Manuals
11A-089R762 (2002) Lawn Mower View Diagrams & Manuals
11A-413A000 (2002) Lawn Mower View Diagrams & Manuals
11A-414B352 (2002) Lawn Mower View Diagrams & Manuals
11A-414D000 (2002) Lawn Mower View Diagrams & Manuals
11A-414D120 (2002) Lawn Mower View Diagrams & Manuals
11A-414D129 (2002) Lawn Mower View Diagrams & Manuals
11A-416Q729 (2002) Lawn Mower View Diagrams & Manuals
11A-416S762 (2002) Lawn Mower View Diagrams & Manuals
11A-418C000 (2002) Lawn Mower View Diagrams & Manuals
11A-419Q720 (2002) Lawn Mower View Diagrams & Manuals
11A-424B352 (2002) Lawn Mower View Diagrams & Manuals
11A-426F132 (2002) Lawn Mower View Diagrams & Manuals
11A-428C000 (2002) Lawn Mower View Diagrams & Manuals
11A-429S700 (2002) Lawn Mower View Diagrams & Manuals
11A-436K700 (2002) Lawn Mower View Diagrams & Manuals
11A-438F352 (2002) Lawn Mower View Diagrams & Manuals
11A-504D120 (2002) Lawn Mower View Diagrams & Manuals
11A-505C026 (2002) Lawn Mower View Diagrams & Manuals
11A-506K700 (2002) Lawn Mower View Diagrams & Manuals
11A-506L062 (2002) Lawn Mower View Diagrams & Manuals
11A-508C000 (2002) Lawn Mower View Diagrams & Manuals
11A-508C132 (2002) Lawn Mower View Diagrams & Manuals
11A-545C000 (2002) Lawn Mower View Diagrams & Manuals
11A-546J118 (2002) Lawn Mower View Diagrams & Manuals
11A-546U729 (2002) Lawn Mower View Diagrams & Manuals
11A-549G129 (2002) Lawn Mower View Diagrams & Manuals
11B-081B352 (2002) Lawn Mower View Diagrams & Manuals
11B-082A000 (2002) Lawn Mower View Diagrams & Manuals
11B-084C062 (2002) Lawn Mower View Diagrams & Manuals
11B-504A000 (2002) Lawn Mower View Diagrams & Manuals
11B-504B352 (2002) Lawn Mower View Diagrams & Manuals
11C-084C062 (2002) Lawn Mower View Diagrams & Manuals
11A-020B352 (2003) Lawn Mower View Diagrams & Manuals
11A-021C000 (2003) Lawn Mower View Diagrams & Manuals
11A-081D000 (2003) Lawn Mower View Diagrams & Manuals
11A-083F141 (2003) Lawn Mower View Diagrams & Manuals
11A-084D352 (2003) Lawn Mower View Diagrams & Manuals
11A-084E352 (2003) Lawn Mower View Diagrams & Manuals
11A-084L132 (2003) Lawn Mower View Diagrams & Manuals
11A-086H729 (2003) Lawn Mower View Diagrams & Manuals
11A-411D000 (2003) Lawn Mower View Diagrams & Manuals
11A-413F141 (2003) Lawn Mower View Diagrams & Manuals
11A-414F352 (2003) Lawn Mower View Diagrams & Manuals
11A-414L000 (2003) Lawn Mower View Diagrams & Manuals
11A-416H729 (2003) Lawn Mower View Diagrams & Manuals
11A-418C000 (2003) Lawn Mower View Diagrams & Manuals
11A-434C000 (2003) Lawn Mower View Diagrams & Manuals
11A-436J729 (2003) Lawn Mower View Diagrams & Manuals
11A-501D000 (2003) Lawn Mower View Diagrams & Manuals
11A-504D000 (2003) Lawn Mower View Diagrams & Manuals
11A-504F352 (2003) Lawn Mower View Diagrams & Manuals
11A-508C000 (2003) Lawn Mower View Diagrams & Manuals
11A-508C132 (2003) Lawn Mower View Diagrams & Manuals
11A-546U729 (2003) Lawn Mower View Diagrams & Manuals
11B-082A000 (2003) Lawn Mower View Diagrams & Manuals
11A-020B700 (2004) Lawn Mower View Diagrams & Manuals
11A-021C700 (2004) Lawn Mower View Diagrams & Manuals
11A-021G000 (2004) Lawn Mower View Diagrams & Manuals
11A-022B700 (2004) Lawn Mower View Diagrams & Manuals
11A-031B700 (2004) Lawn Mower View Diagrams & Manuals
11A-032A752 (2004) Lawn Mower View Diagrams & Manuals
11A-083F700 (2004) Lawn Mower View Diagrams & Manuals
11A-084E729 (2004) Lawn Mower View Diagrams & Manuals
11A-418B752 (2004) Lawn Mower View Diagrams & Manuals
11A-435D755 (2004) Lawn Mower View Diagrams & Manuals
11A-439G729 (2004) Lawn Mower View Diagrams & Manuals
11A-503F700 (2004) Lawn Mower View Diagrams & Manuals
11A-508B752 (2004) Lawn Mower View Diagrams & Manuals
11A-543C700 (2004) Lawn Mower View Diagrams & Manuals
11A-544E700 (2004) Lawn Mower View Diagrams & Manuals
11A-549G729 (2004) Lawn Mower View Diagrams & Manuals
11B-084E700 (2004) Lawn Mower View Diagrams & Manuals
11B-084E752 (2004) Lawn Mower View Diagrams & Manuals
11A-020B700 (2005) Lawn Mower View Diagrams & Manuals
11A-021C700 (2005) Lawn Mower View Diagrams & Manuals
11A-021G800 (2005) Lawn Mower View Diagrams & Manuals
11A-031B700 (2005) Lawn Mower View Diagrams & Manuals
11A-032A752 (2005) Lawn Mower View Diagrams & Manuals
11A-074E729 (2005) Lawn Mower View Diagrams & Manuals
11A-083F800 (2005) Lawn Mower View Diagrams & Manuals
11A-084E729 (2005) Lawn Mower View Diagrams & Manuals
11A-084E752 (2005) Lawn Mower View Diagrams & Manuals
11A-413F800 (2005) Lawn Mower View Diagrams & Manuals
11A-414A752 (2005) Lawn Mower View Diagrams & Manuals
11A-503F800 (2005) Lawn Mower View Diagrams & Manuals
11A-504A752 (2005) Lawn Mower View Diagrams & Manuals
11A-543C700 (2005) Lawn Mower View Diagrams & Manuals
11A-549R729 (2005) Lawn Mower View Diagrams & Manuals
11A-021C700 (2006) Lawn Mower View Diagrams & Manuals
11A-021G800 (2006) Lawn Mower View Diagrams & Manuals
11A-031B700 (2006) Lawn Mower View Diagrams & Manuals
11A-034E729 (2006) Lawn Mower View Diagrams & Manuals
11A-073A800 (2006) Lawn Mower View Diagrams & Manuals
11A-083A800 (2006) Lawn Mower View Diagrams & Manuals
11A-413A800 (2006) Lawn Mower View Diagrams & Manuals
11A-429R729 (2006) Lawn Mower View Diagrams & Manuals
11A-503A800 (2006) Lawn Mower View Diagrams & Manuals
11A-543B700 (2006) Lawn Mower View Diagrams & Manuals
11A-021G000 (2007) Lawn Mower View Diagrams & Manuals
11A-033F000 (2007) Lawn Mower View Diagrams & Manuals
11A-034E000 (2007) Lawn Mower View Diagrams & Manuals
11A-034F200 (2007) Lawn Mower View Diagrams & Manuals
11A-083F000 (2007) Lawn Mower View Diagrams & Manuals
11A-084C000 (2007) Lawn Mower View Diagrams & Manuals
11A-084F229 (2007) Lawn Mower View Diagrams & Manuals
11A-084G200 (2007) Lawn Mower View Diagrams & Manuals
11A-414C000 (2007) Lawn Mower View Diagrams & Manuals
11A-414F229 (2007) Lawn Mower View Diagrams & Manuals
11A-414G200 (2007) Lawn Mower View Diagrams & Manuals
11A-503F000 (2007) Lawn Mower View Diagrams & Manuals
11A-504C000 (2007) Lawn Mower View Diagrams & Manuals
11A-504G200 (2007) Lawn Mower View Diagrams & Manuals
11A-546B029 (2007) Lawn Mower View Diagrams & Manuals
11A-546H229 (2007) Lawn Mower View Diagrams & Manuals
11A-02MG000 (2008) Lawn Mower View Diagrams & Manuals
11A-02MG029 (2008) Lawn Mower View Diagrams & Manuals
11A-034E000 (2008) Lawn Mower View Diagrams & Manuals
11A-034R200 (2008) Lawn Mower View Diagrams & Manuals
11A-085B229 (2008) Lawn Mower View Diagrams & Manuals
11A-08M5229 (2008) Lawn Mower View Diagrams & Manuals
11A-08MA029 (2008) Lawn Mower View Diagrams & Manuals
11A-414C000 (2008) Lawn Mower View Diagrams & Manuals
11A-414G200 (2008) Lawn Mower View Diagrams & Manuals
11A-419Q229 (2008) Lawn Mower View Diagrams & Manuals
11A-504C000 (2008) Lawn Mower View Diagrams & Manuals
11A-504G200 (2008) Lawn Mower View Diagrams & Manuals
11A-50M9000 (2008) Lawn Mower View Diagrams & Manuals
11A-549Q229 (2008) Lawn Mower View Diagrams & Manuals
11A-54MY229 (2008) Lawn Mower View Diagrams & Manuals
11A-020C200 (2009) Lawn Mower View Diagrams & Manuals
11A-02MG000 (2009) Lawn Mower View Diagrams & Manuals
11A-030E000 (2009) Lawn Mower View Diagrams & Manuals
11A-030F200 (2009) Lawn Mower View Diagrams & Manuals
11A-414C000 (2009) Lawn Mower View Diagrams & Manuals
11A-414G200 (2009) Lawn Mower View Diagrams & Manuals
11A-504C000 (2009) Lawn Mower View Diagrams & Manuals
11A-504G200 (2009) Lawn Mower View Diagrams & Manuals
11A-504J000 (2009) Lawn Mower View Diagrams & Manuals
11A-544C000 (2009) Lawn Mower View Diagrams & Manuals
11A-544G200 (2009) Lawn Mower View Diagrams & Manuals
11A-544R229 (2009) Lawn Mower View Diagrams & Manuals
11A-546M029 (2009) Lawn Mower View Diagrams & Manuals
11A-546N229 (2009) Lawn Mower View Diagrams & Manuals
11A-084E020 (2010) Lawn Mower View Diagrams & Manuals
11A-020I700 (2012) Lawn Mower View Diagrams & Manuals
11A-020K029 (2012) Lawn Mower View Diagrams & Manuals
11A-020L229 (2012) Lawn Mower View Diagrams & Manuals
11A-020L700 (2013) Lawn Mower View Diagrams & Manuals
11A-020L700 (2016) Lawn Mower View Diagrams & Manuals
11A-02BT729 (2017) Lawn Mower View Diagrams & Manuals
11B-02SB700 (2017) Lawn Mower View Diagrams & Manuals
11A-02BT729 (2018) Lawn Mower View Diagrams & Manuals
12A-263B352 (2001) Lawn Mower View Diagrams & Manuals
12A-264A009 (2001) Lawn Mower View Diagrams & Manuals
12A-264A132 (2001) Lawn Mower View Diagrams & Manuals
12A-269S700 (2001) Lawn Mower View Diagrams & Manuals
12A-288C000 (2001) Lawn Mower View Diagrams & Manuals
12A-528C009 (2001) Lawn Mower View Diagrams & Manuals
12A-528N141 (2001) Lawn Mower View Diagrams & Manuals
12B-264A000 (2001) Lawn Mower View Diagrams & Manuals
12B-264C062 (2001) Lawn Mower View Diagrams & Manuals
12B-268C141 (2001) Lawn Mower View Diagrams & Manuals
12A-264D000 (2002) Lawn Mower View Diagrams & Manuals
12A-264D132 (2002) Lawn Mower View Diagrams & Manuals
12A-265K026 (2002) Lawn Mower View Diagrams & Manuals
12A-268B352 (2002) Lawn Mower View Diagrams & Manuals
12A-288C000 (2002) Lawn Mower View Diagrams & Manuals
12A-526L062 (2002) Lawn Mower View Diagrams & Manuals
12B-264C062 (2002) Lawn Mower View Diagrams & Manuals
12A-264C000 (2003) Lawn Mower View Diagrams & Manuals
12A-264D000 (2003) Lawn Mower View Diagrams & Manuals
12A-265K026 (2003) Lawn Mower View Diagrams & Manuals
12A-268B352 (2003) Lawn Mower View Diagrams & Manuals
12A-288C000 (2003) Lawn Mower View Diagrams & Manuals
12A-263E726 (2004) Lawn Mower View Diagrams & Manuals
12A-263E755 (2004) Lawn Mower View Diagrams & Manuals
12A-565I755 (2004) Lawn Mower View Diagrams & Manuals
12A-263E726 (2005) Lawn Mower View Diagrams & Manuals
12A-263F800 (2005) Lawn Mower View Diagrams & Manuals
12A-263F800 (2006) Lawn Mower View Diagrams & Manuals
12A-446B729 (2006) Lawn Mower View Diagrams & Manuals
12A-264C000 (2007) Lawn Mower View Diagrams & Manuals
12A-264G200 (2007) Lawn Mower View Diagrams & Manuals
12AE469A229 (2007) Lawn Mower View Diagrams & Manuals
12A-264C000 (2008) Lawn Mower View Diagrams & Manuals
12A-264G200 (2008) Lawn Mower View Diagrams & Manuals
12A-264C000 (2009) Lawn Mower View Diagrams & Manuals
12A-264G200 (2009) Lawn Mower View Diagrams & Manuals
12A-527H000 (2009) Lawn Mower View Diagrams & Manuals
31A-380D000 (2004) Snowblower View Diagrams & Manuals
31A-380D062 (2004) Snowblower View Diagrams & Manuals
31A-3AAD700 (2005) Snowblower View Diagrams & Manuals
31A-3AAD700 (2005-2) Snowblower View Diagrams & Manuals
31A-3BAD700 (2005) Snowblower View Diagrams & Manuals
31A-3BAD700 (2005-2) Snowblower View Diagrams & Manuals
31A-3BAD752 (2005) Snowblower View Diagrams & Manuals
31A-3BAD752 (2005-2) Snowblower View Diagrams & Manuals
31A-3BAD762 (2005) Snowblower View Diagrams & Manuals
31A-3BAD762 (2005-2) Snowblower View Diagrams & Manuals
31A-3CAD700 (2006) Snowblower View Diagrams & Manuals
31A-3CAD752 (2006) Snowblower View Diagrams & Manuals
31A-3CAD762 (2006) Snowblower View Diagrams & Manuals
31A-3CAD700 (2007) Snowblower View Diagrams & Manuals
31A-3CAD752 (2007) Snowblower View Diagrams & Manuals
31A-3CAD762 (2007) Snowblower View Diagrams & Manuals
31A-32AD729 (2008) Snowblower View Diagrams & Manuals
31A-32AD762 (2008) Snowblower View Diagrams & Manuals
31A-32AD762 (2009) Snowblower View Diagrams & Manuals
31A-3AAD752 (2016) Snowblower View Diagrams & Manuals
11A-020B000 (2003) Push Walk-Behind Mower View Diagrams & Manuals
11A-020B000 (2012) Push Walk-Behind Mower View Diagrams & Manuals
11A-020W700 (2016) Push Walk-Behind Mower View Diagrams & Manuals
11A-020W700 (2017) Push Walk-Behind Mower View Diagrams & Manuals
11A-020W700 (2018) Push Walk-Behind Mower View Diagrams & Manuals
11A-02BT729 (2019) Push Walk-Behind Mower View Diagrams & Manuals
11A-02BT729 (2020) Push Walk-Behind Mower View Diagrams & Manuals
11A-02BT729 (2021) Push Walk-Behind Mower View Diagrams & Manuals
11A-02JV000 (2012) Push Walk-Behind Mower View Diagrams & Manuals
11A-02M2700 (2020) Push Walk-Behind Mower View Diagrams & Manuals
11A-02MY700 (2021) Push Walk-Behind Mower View Diagrams & Manuals
11A-02SB700 (2015) Push Walk-Behind Mower View Diagrams & Manuals
11A-02SB700 (2016) Push Walk-Behind Mower View Diagrams & Manuals
11A-02SB700 (2017) Push Walk-Behind Mower View Diagrams & Manuals
11A-02SB700 (2018) Push Walk-Behind Mower View Diagrams & Manuals
11A-084E029 (2007) Push Walk-Behind Mower View Diagrams & Manuals
11A-084E029 (2009) Push Walk-Behind Mower View Diagrams & Manuals
11A-08MB000 (2008) Push Walk-Behind Mower View Diagrams & Manuals
11A-414E029 (2007) Push Walk-Behind Mower View Diagrams & Manuals
11A-41MB029 (2008) Push Walk-Behind Mower View Diagrams & Manuals
11A-41MY229 (2008) Push Walk-Behind Mower View Diagrams & Manuals
11A-50MB000 (2008) Push Walk-Behind Mower View Diagrams & Manuals
11A-544E029 (2009) Push Walk-Behind Mower View Diagrams & Manuals
12A-446M729 (2004) Self-Propelled Walk-Behind Mower View Diagrams & Manuals
12A-529B000 (2000) Self-Propelled Walk-Behind Mower View Diagrams & Manuals
12A-529B000 (2003) Self-Propelled Walk-Behind Mower View Diagrams & Manuals
31A-32AD700 (2008) Snow Thrower View Diagrams & Manuals
31A-32AD700 (2009) Snow Thrower View Diagrams & Manuals
31A-32AD700 (2012) Snow Thrower View Diagrams & Manuals
31A-32AD700 (2013) Snow Thrower View Diagrams & Manuals
31A-32AD700 (2015) Snow Thrower View Diagrams & Manuals
31A-32AD752 (2015) Snow Thrower View Diagrams & Manuals
Troy-Bilt
11A-436M066 (2008) Lawn Mower View Diagrams & Manuals
11A-436M066 (2009) Lawn Mower View Diagrams & Manuals
11A-436N063 (2002) Lawn Mower View Diagrams & Manuals
11A-436N063 (2003) Lawn Mower View Diagrams & Manuals
11A-436N211 (2008) Lawn Mower View Diagrams & Manuals
11A-436N211 (2009) Lawn Mower View Diagrams & Manuals
11A-436N266 (2008) Lawn Mower View Diagrams & Manuals
11A-436N266 (2009) Lawn Mower View Diagrams & Manuals
11A-436T063 (2003) Lawn Mower View Diagrams & Manuals
11A-439R766 (2005) Lawn Mower View Diagrams & Manuals
11A-542Q711 (2006) Lawn Mower View Diagrams & Manuals
11A-542Q711 (2007) Lawn Mower View Diagrams & Manuals
11A-542Q711 (2008) Lawn Mower View Diagrams & Manuals
11A-542Q711 (2009) Lawn Mower View Diagrams & Manuals
11A-542Q766 (2007) Lawn Mower View Diagrams & Manuals
11A-426A011 (2007) Lawn Mower View Diagrams & Manuals
11A-426A066 (2007) Lawn Mower View Diagrams & Manuals
11A-542Q766 (2008) Lawn Mower View Diagrams & Manuals
11A-426A711 (2006) Lawn Mower View Diagrams & Manuals
11A-426C211 (2007) Lawn Mower View Diagrams & Manuals
11A-542Q766 (2009) Lawn Mower View Diagrams & Manuals
11A-426C266 (2007) Lawn Mower View Diagrams & Manuals
11A-429R766 (2006) Lawn Mower View Diagrams & Manuals
11A-546A711 (2004) Lawn Mower View Diagrams & Manuals
11A-436A711 (2005) Lawn Mower View Diagrams & Manuals
11A-546A766 (2004) Lawn Mower View Diagrams & Manuals
11A-436A711 (2004) Lawn Mower View Diagrams & Manuals
11A-546N711 (2005) Lawn Mower View Diagrams & Manuals
11A-436A766 (2004) Lawn Mower View Diagrams & Manuals
11A-549C766 (2005) Lawn Mower View Diagrams & Manuals
11A-436M011 (2008) Lawn Mower View Diagrams & Manuals
11A-436M011 (2009) Lawn Mower View Diagrams & Manuals
11A-549Q766 (2006) Lawn Mower View Diagrams & Manuals
12A-264U011 (2009) Lawn Mower View Diagrams & Manuals
12A-264V211 (2009) Lawn Mower View Diagrams & Manuals
12A-266A766 (2004) Lawn Mower View Diagrams & Manuals
12A-446A011 (2007) Lawn Mower View Diagrams & Manuals
12A-446A066 (2007) Lawn Mower View Diagrams & Manuals
12A-446A711 (2006) Lawn Mower View Diagrams & Manuals
12A-446C211 (2007) Lawn Mower View Diagrams & Manuals
12A-446C266 (2007) Lawn Mower View Diagrams & Manuals
12A-449R766 (2006) Lawn Mower View Diagrams & Manuals
12A-466A711 (2005) Lawn Mower View Diagrams & Manuals
12A-466A711 (2004) Lawn Mower View Diagrams & Manuals
12A-466A766 (2004) Lawn Mower View Diagrams & Manuals
12A-466M011 (2008) Lawn Mower View Diagrams & Manuals
12A-466M011 (2009) Lawn Mower View Diagrams & Manuals
12A-466M066 (2008) Lawn Mower View Diagrams & Manuals
12A-466M066 (2009) Lawn Mower View Diagrams & Manuals
12A-466N211 (2008) Lawn Mower View Diagrams & Manuals
12A-466N211 (2009) Lawn Mower View Diagrams & Manuals
12A-466N266 (2008) Lawn Mower View Diagrams & Manuals
12A-466N266 (2009) Lawn Mower View Diagrams & Manuals
12A-469R766 (2005) Lawn Mower View Diagrams & Manuals
12AE449A211 (2007) Lawn Mower View Diagrams & Manuals
12AE449A266 (2007) Lawn Mower View Diagrams & Manuals
12A-562Q711 (2009) Lawn Mower View Diagrams & Manuals
12AE449D011 (2007) Lawn Mower View Diagrams & Manuals
12A-566N711 (2004) Lawn Mower View Diagrams & Manuals
12AE449D011 (2008) Lawn Mower View Diagrams & Manuals
12AE449D066 (2007) Lawn Mower View Diagrams & Manuals
12A-566N766 (2004) Lawn Mower View Diagrams & Manuals
12AE449D066 (2008) Lawn Mower View Diagrams & Manuals
12AE449E211 (2008) Lawn Mower View Diagrams & Manuals
12AE449E266 (2008) Lawn Mower View Diagrams & Manuals
12AG836E011 (2007) Lawn Mower View Diagrams & Manuals
12AG836E066 (2007) Lawn Mower View Diagrams & Manuals
12AG836E711 (2006) Lawn Mower View Diagrams & Manuals
12AG836E766 (2006) Lawn Mower View Diagrams & Manuals
12AG836G211 (2007) Lawn Mower View Diagrams & Manuals
12AG836G266 (2007) Lawn Mower View Diagrams & Manuals
12AG839E711 (2005) Lawn Mower View Diagrams & Manuals
12AG839E766 (2005) Lawn Mower View Diagrams & Manuals
12AV556O711 (2006) Lawn Mower View Diagrams & Manuals
12AV565N011 (2007) Lawn Mower View Diagrams & Manuals
12AV565Q711 (2006) Lawn Mower View Diagrams & Manuals
12AV838Q766 (2006) Lawn Mower View Diagrams & Manuals
12AV565Q711 (2007) Lawn Mower View Diagrams & Manuals
12AV839N711 (2005) Lawn Mower View Diagrams & Manuals
12AV565Q766 (2007) Lawn Mower View Diagrams & Manuals
12AV839N766 (2005) Lawn Mower View Diagrams & Manuals
12AV566F211 (2007) Lawn Mower View Diagrams & Manuals
12AV566F266 (2007) Lawn Mower View Diagrams & Manuals
12AV566M011 (2008) Lawn Mower View Diagrams & Manuals
12AV566M066 (2008) Lawn Mower View Diagrams & Manuals
12AV566N011 (2007) Lawn Mower View Diagrams & Manuals
12AV566N066 (2007) Lawn Mower View Diagrams & Manuals
12AV566N211 (2008) Lawn Mower View Diagrams & Manuals
12AV566N266 (2008) Lawn Mower View Diagrams & Manuals
12AV566N711 (2005) Lawn Mower View Diagrams & Manuals
12AV569N766 (2005) Lawn Mower View Diagrams & Manuals
12AV569Q711 (2006) Lawn Mower View Diagrams & Manuals
12AV569Q766 (2006) Lawn Mower View Diagrams & Manuals
12AV834Q711 (2006) Lawn Mower View Diagrams & Manuals
12AV834Q766 (2006) Lawn Mower View Diagrams & Manuals
12AV835Q711 (2007) Lawn Mower View Diagrams & Manuals
12AV835Q766 (2007) Lawn Mower View Diagrams & Manuals
31AS3BB2766 (2005) Storm CS 5.5HP 24" Self-Propelled View Diagrams & Manuals
11A-54K3066 (2010) Push Walk-Behind Mower View Diagrams & Manuals
12BV565Q711 (2007) Self Propelled Walk Behind Mower View Diagrams & Manuals
12BV835Q711 (2007) Self-Propelled Walk-Behind Mower View Diagrams & Manuals
Bolens
11A-020B065 (2009) Push Walk-Behind Mower View Diagrams & Manuals
11A-074E065 (2009) Push Walk-Behind Mower View Diagrams & Manuals
11A-074R265 (2009) Push Walk-Behind Mower View Diagrams & Manuals
11A-414A065 (2009) Push Walk-Behind Mower View Diagrams & Manuals
11A-414S265 (2009) Push Walk-Behind Mower View Diagrams & Manuals
11A-414S265 (2008) Push Walk-Behind Mower View Diagrams & Manuals
11A-414J265 (2008) Push Walk-Behind Mower View Diagrams & Manuals
11A-414A065 (2008) Push Walk-Behind Mower View Diagrams & Manuals
11A-074R265 (2008) Push Walk-Behind Mower View Diagrams & Manuals
11A-414J265 (2007) Push Walk-Behind Mower View Diagrams & Manuals
11A-414A065 (2007) Push Walk-Behind Mower View Diagrams & Manuals
11A-074F265 (2007) Push Walk-Behind Mower View Diagrams & Manuals
11A-074E065 (2007) Push Walk-Behind Mower View Diagrams & Manuals
11A-418A765 (2006) Push Walk-Behind Mower View Diagrams & Manuals
11A-414E765 (2006) Push Walk-Behind Mower View Diagrams & Manuals
11A-074D765 (2006) Push Walk-Behind Mower View Diagrams & Manuals
11A-074D765 (2005) Push Walk-Behind Mower View Diagrams & Manuals
11A-414E765 (2005) Push Walk-Behind Mower View Diagrams & Manuals
11A-584E765 (2005) Push Walk-Behind Mower View Diagrams & Manuals
12A-264L163 (2003) Self-Propelled Walk-Behind Mower View Diagrams & Manuals
11A-084E765 (2004) Push Walk-Behind Mower View Diagrams & Manuals
11A-504E765 (2004) Push Walk-Behind Mower View Diagrams & Manuals
11A-584E765 (2004) Push Walk-Behind Mower View Diagrams & Manuals
11A-084C163 (2003) Push Walk-Behind Mower View Diagrams & Manuals
11A-416H763 (2003) Push Walk-Behind Mower View Diagrams & Manuals
12A-526L163 (2003) Self-Propelled Walk-Behind Mower View Diagrams & Manuals
11A-436T763 (2003) Push Walk-Behind Mower View Diagrams & Manuals
11A-506L163 (2003) Push Walk-Behind Mower View Diagrams & Manuals
11A-544L163 (2003) Push Walk-Behind Mower View Diagrams & Manuals
11A-546I763 (2003) Push Walk-Behind Mower View Diagrams & Manuals
12A-264E765 (2005) Self-Propelled Walk-Behind Mower View Diagrams & Manuals
12A-264E765 (2004) Self-Propelled Walk-Behind Mower View Diagrams & Manuals
11A-020L765 (2013) Lawn Mower View Diagrams & Manuals
11A-020W765 (2014) Lawn Mower View Diagrams & Manuals
11A-020M765 (2013) Lawn Mower View Diagrams & Manuals
11B-414E765 (2005) Lawn Mower View Diagrams & Manuals
11B-414L765 (2005) Lawn Mower View Diagrams & Manuals
31A-32AD765 (2014) Snowblower View Diagrams & Manuals
31A-32AD765 (2015) Snowblower View Diagrams & Manuals
31A-3AAD765 (2016) Snowblower View Diagrams & Manuals
31A-3AAD765 (2017) Snowblower View Diagrams & Manuals
Yard Man
11A-549Q755 (2008) Lawn Mower View Diagrams & Manuals
11A-589P701 (2004) Lawn Mower View Diagrams & Manuals
11A-54MB055 (2007) Lawn Mower View Diagrams & Manuals
11A-435D401 (2003) Lawn Mower View Diagrams & Manuals
11A-54MY255 (2007) Lawn Mower View Diagrams & Manuals
11B-439Q755 (2007) Lawn Mower View Diagrams & Manuals
11A-435A701 (2006) Lawn Mower View Diagrams & Manuals
11A-439R401 (2003) Lawn Mower View Diagrams & Manuals
11A-439Q755 (2006) Lawn Mower View Diagrams & Manuals
11A-588C755 (2006) Lawn Mower View Diagrams & Manuals
11A-428Q713 (2005) Lawn Mower View Diagrams & Manuals
11A-435D701 (2005) Lawn Mower View Diagrams & Manuals
11A-589R755 (2005) Lawn Mower View Diagrams & Manuals
11A-109P701 (2004) Lawn Mower View Diagrams & Manuals
11A-435D701 (2004) Lawn Mower View Diagrams & Manuals
11A-549P713 (2004) Lawn Mower View Diagrams & Manuals
11A-519C401 (2000) Lawn Mower View Diagrams & Manuals
12A-44MZ255 (2007) Lawn Mower View Diagrams & Manuals
12AE445R001 (2007) Lawn Mower View Diagrams & Manuals
12B-569Q755 (2007) Lawn Mower View Diagrams & Manuals
12BV829Q755 (2007) Lawn Mower View Diagrams & Manuals
12A-263D701 (2006) Lawn Mower View Diagrams & Manuals
12A-26MB455 (2006) Lawn Mower View Diagrams & Manuals
12A-26MB755 (2006) Lawn Mower View Diagrams & Manuals
12A-26MC755 (2006) Lawn Mower View Diagrams & Manuals
12A-445C701 (2006) Lawn Mower View Diagrams & Manuals
12AE46JA001 (2008) Lawn Mower View Diagrams & Manuals
12A-449C755 (2006) Lawn Mower View Diagrams & Manuals
12A-569Q701 (2006) Lawn Mower View Diagrams & Manuals
12AE46M3001 (2008) Lawn Mower View Diagrams & Manuals
12AV566M055 (2008) Lawn Mower View Diagrams & Manuals
12A-569Q755 (2006) Lawn Mower View Diagrams & Manuals
12AV566N255 (2008) Lawn Mower View Diagrams & Manuals
12A-265C001 (2007) Lawn Mower View Diagrams & Manuals
12AE445G701 (2006) Lawn Mower View Diagrams & Manuals
12A-26MB055 (2007) Lawn Mower View Diagrams & Manuals
12AE469D755 (2006) Lawn Mower View Diagrams & Manuals
12A-26MY255 (2007) Lawn Mower View Diagrams & Manuals
12AV829C755 (2006) Lawn Mower View Diagrams & Manuals
12A-445C001 (2007) Lawn Mower View Diagrams & Manuals
12A-263E701 (2005) Lawn Mower View Diagrams & Manuals
12A-268N755 (2005) Lawn Mower View Diagrams & Manuals
12A-445C701 (2005) Lawn Mower View Diagrams & Manuals
12A-449C755 (2005) Lawn Mower View Diagrams & Manuals
12A-44MC055 (2007) Lawn Mower View Diagrams & Manuals
12A-556Q713 (2005) Lawn Mower View Diagrams & Manuals
12A-568Q701 (2005) Lawn Mower View Diagrams & Manuals
12A-568Q755 (2005) Lawn Mower View Diagrams & Manuals
12AE465F701 (2004) Lawn Mower View Diagrams & Manuals
12AE445G701 (2005) Lawn Mower View Diagrams & Manuals
12AV829C755 (2005) Lawn Mower View Diagrams & Manuals
12A-263E701 (2004) Lawn Mower View Diagrams & Manuals
12A-445D701 (2004) Lawn Mower View Diagrams & Manuals
12A-469P701 (2004) Lawn Mower View Diagrams & Manuals
12A-565I701 (2004) Lawn Mower View Diagrams & Manuals
12A-567A796 (2004) Lawn Mower View Diagrams & Manuals
12A-569P701 (2004) Lawn Mower View Diagrams & Manuals
12A-529N062 (2001) Lawn Mower View Diagrams & Manuals
12A-446M001 (2008) Lawn Mower View Diagrams & Manuals
12A-446M001 (2009) Lawn Mower View Diagrams & Manuals
11A-439P701 Series 430 Mulching Lawn Mower View Diagrams & Manuals
11A-082A000 (2000) Walk Behind Lawn Mower View Diagrams & Manuals
11A-509A352 (2002) Self-Propelled Lawn Mower View Diagrams & Manuals
11A-435D755 21" Rear And Side Discharge Mulching Lawn Mower View Diagrams & Manuals
11A-546B029 21" Hi-Wheel Mower View Diagrams & Manuals
11A-41M9001 (2010) Lawn Mower View Diagrams & Manuals
11A-549Q001 (2010) Lawn Mower View Diagrams & Manuals
11A-54K3001 (2010) Lawn Mower View Diagrams & Manuals
11A-54M7001 (2010) Lawn Mower View Diagrams & Manuals
12A-26MB001 (2008) Lawn Mower View Diagrams & Manuals
12A-26M7001 (2009) Lawn Mower View Diagrams & Manuals
12A-569Q001 (2010) Lawn Mower View Diagrams & Manuals
11A-41K3001 (2010) Push Walk-Behind Mower View Diagrams & Manuals
12A-26MB055 (2008) Self-Propelled Walk-Behind Mower View Diagrams & Manuals
12A-26MY255 (2008) Self-Propelled Walk-Behind Mower View Diagrams & Manuals
12AE46JA001 (2009) Self-Propelled Walk-Behind Mower View Diagrams & Manuals
12AE46JA001 (2010) Self-Propelled Walk-Behind Mower View Diagrams & Manuals
Craftsman
247885550 Snowblower View Diagrams & Manuals
247887550 22" Snowblower View Diagrams & Manuals
247887001 Snowblower View Diagrams & Manuals
247376830 Self-Propelled Mower View Diagrams & Manuals
247887000 Snowblower View Diagrams & Manuals
24737136 Lawn Mower View Diagrams & Manuals
24737173 Lawn Mower View Diagrams & Manuals
24738510 Lawn Mower View Diagrams & Manuals
24738518 Lawn Mower View Diagrams & Manuals
24738528 Lawn Mower View Diagrams & Manuals
24738814 Lawn Mower View Diagrams & Manuals
247393710 Lawn Mower View Diagrams & Manuals
247393720 Lawn Mower View Diagrams & Manuals
247393730 Lawn Mower View Diagrams & Manuals
247393740 Lawn Mower View Diagrams & Manuals
247393750 Lawn Mower View Diagrams & Manuals
247393760 Lawn Mower View Diagrams & Manuals
247393770 Lawn Mower View Diagrams & Manuals
247393780 Lawn Mower View Diagrams & Manuals
247393790 Lawn Mower View Diagrams & Manuals
247393800 Lawn Mower View Diagrams & Manuals
12A-469Q799 Walk Behind Lawnmower, Gas^ View Diagrams & Manuals
247393700 Lawn Mower View Diagrams & Manuals
Cub Cadet
CC10M (11A-10MB010) (2009) 11A-10MB Push Walk Behind Mower View Diagrams & Manuals
CC46M (12AV46M7009, 12AV46M7010) (2009) 12AV46M Self Propelled Walk Behind Mower View Diagrams & Manuals
CC46MZ (12AV46MZ209) (2009) 12AV46MZ Self Propelled Walk Behind Mower View Diagrams & Manuals
CC94M (12A-94MC010) (2009) 12A-94MC Self Propelled Walk Behind Mower View Diagrams & Manuals
CC98M (12A-98M7010, 12A-98M7009) (2009) 12A-98M7 Self Propelled Walk Behind Mower View Diagrams & Manuals
CC94M (12A-94M7010) (2010) 12A-94M7 Self Propelled Walk Behind Mower View Diagrams & Manuals
CC46ES (12AE46JA009, 12AE46JA010) (2011) 12AE46JA Self Propelled Walk Behind Mower View Diagrams & Manuals
CC46ES (12AE46K8209) (2011) 12AE46K8 Self Propelled Walk Behind Mower View Diagrams & Manuals
CC46ES (12AE46JA009, 12AE46JA010) (2012) 12AE46JA Self Propelled Walk Behind Mower View Diagrams & Manuals
CC46ES (12AE46JZ710) (2012) 12AE46JZ Self Propelled Walk Behind Mower View Diagrams & Manuals
CC46ES (12AE46K8209) (2012) 12AE46K8 Self Propelled Walk Behind Mower View Diagrams & Manuals
CC46ES (12AE46JA009, 12AE46JA010) (2013) 12AE46JA Self Propelled Walk Behind Mower View Diagrams & Manuals
CC46ES (12AE46K8209) (2013) 12AE46K8 Self Propelled Walk Behind Mower View Diagrams & Manuals
Husky
11B-503A131 (2000) Lawn Mower View Diagrams & Manuals
11B-507B131 (2000) Lawn Mower View Diagrams & Manuals
11C-082A131 (2000) Lawn Mower View Diagrams & Manuals
11Z-082A131 (2000) Lawn Mower View Diagrams & Manuals
11A-504A131 (2001) Lawn Mower View Diagrams & Manuals
11A-509P131 (2001) Lawn Mower View Diagrams & Manuals
11C-082A131 (2001) Lawn Mower View Diagrams & Manuals
11A-504D131 (2002) Lawn Mower View Diagrams & Manuals
11A-506P131 (2002) Lawn Mower View Diagrams & Manuals
11C-082A131 (2002) Lawn Mower View Diagrams & Manuals
11A-052A731 (2004) Lawn Mower View Diagrams & Manuals
11A-508O731 (2004) Lawn Mower View Diagrams & Manuals
11A-549R731 (2004) Lawn Mower View Diagrams & Manuals
11A-054D731 (2005) Lawn Mower View Diagrams & Manuals
11A-508N731 (2005) Lawn Mower View Diagrams & Manuals
11A-549R730 (2005) Lawn Mower View Diagrams & Manuals
11A-034D731 (2006) Lawn Mower View Diagrams & Manuals
11A-084D731 (2006) Lawn Mower View Diagrams & Manuals
11A-508H731 (2006) Lawn Mower View Diagrams & Manuals
11A-549R731 (2006) Lawn Mower View Diagrams & Manuals
11A-084E031 (2007) Lawn Mower View Diagrams & Manuals
11A-084F231 (2007) Lawn Mower View Diagrams & Manuals
11A-504A031 (2007) Lawn Mower View Diagrams & Manuals
11A-504J231 (2007) Lawn Mower View Diagrams & Manuals
11A-549R031 (2007) Lawn Mower View Diagrams & Manuals
11A-549S231 (2007) Lawn Mower View Diagrams & Manuals
11A-08MB031 (2008) Lawn Mower View Diagrams & Manuals
11A-50MB031 (2008) Lawn Mower View Diagrams & Manuals
11A-544A031 (2009) Lawn Mower View Diagrams & Manuals
11A-544S231 (2009) Lawn Mower View Diagrams & Manuals
11A-08JC031 (2010) Lawn Mower View Diagrams & Manuals
11A-54K6031 (2010) Lawn Mower View Diagrams & Manuals
11A-54M7031 (2010) Lawn Mower View Diagrams & Manuals
11A-54MZ231 (2010) Lawn Mower View Diagrams & Manuals
11B-084E031 (2010) Lawn Mower View Diagrams & Manuals
12A-529K131 (2000) Lawn Mower View Diagrams & Manuals
12B-263A131 (2000) Lawn Mower View Diagrams & Manuals
12B-529B131 (2000) Lawn Mower View Diagrams & Manuals
12A-268C131 (2001) Lawn Mower View Diagrams & Manuals
12A-268C131 (2002) Lawn Mower View Diagrams & Manuals
12A-524A731 (2004) Lawn Mower View Diagrams & Manuals
12A-528F731 (2004) Lawn Mower View Diagrams & Manuals
12A-569K731 (2004) Lawn Mower View Diagrams & Manuals
12A-569R731 (2004) Lawn Mower View Diagrams & Manuals
12A-528N731 (2005) Lawn Mower View Diagrams & Manuals
12A-569K730 (2005) Lawn Mower View Diagrams & Manuals
12A-527H230 (2007) Lawn Mower View Diagrams & Manuals
12AE467E030 (2007) Lawn Mower View Diagrams & Manuals
12AE467J230 (2007) Lawn Mower View Diagrams & Manuals
12A-46M9031 (2009) Lawn Mower View Diagrams & Manuals
12A-46MC031 (2009) Lawn Mower View Diagrams & Manuals
12A-46MZ031 (2009) Lawn Mower View Diagrams & Manuals
12A-46MZ231 (2009) Lawn Mower View Diagrams & Manuals
12A-26JC031 (2010) Lawn Mower View Diagrams & Manuals
12A-26MZ231 (2010) Lawn Mower View Diagrams & Manuals
31A-380D131 (2004) Snowblower View Diagrams & Manuals
Show More Compatible Models
This item works with the following types of products:
- Lawn Mower Parts
- Snowblower Parts
- Edger Parts
This part replaces obsolete part #: 747-1161, 747-1161A
Repair Videos ?
Watch the Repair Video for
Bail

Customer Part Reviews ?
Average Rating (out of 5):
Click to filter by ratings:
5 stars
16
4 stars
1
3 stars
0
2 stars
0
1 stars
1
< PREV
- 1
- 2
Mower handle
It was the right part and fit perfectly. Took seconds to install.
Guest -
August 25, 2023
Verified Purchase
Right Part, easy repair.
Easy to find, easy to order, easy to replace 👍
Guest -
June 26, 2023
Verified Purchase
Easy fix - part fix perfect
The part arrived quickly, the price was reasonable. Will do business with ereplacement again.
Guest -
September 16, 2021
Verified Purchase
Handle
The part was perfect match, had no problem installing it, thank you !
Guest -
August 28, 2021
Verified Purchase
Exactly what I ordered
Perfect fit. Nice to know I can get a part not readily available and I don't have to be concerned if it will be correct. It will.
Guest -
August 10, 2020
Verified Purchase
Easy repair
The control handel fit perfectly and was a quick easy fix.
Guest -
July 27, 2020
Verified Purchase
Control handle review
Fast shipping! I actually just used the new control handle today, it was a gamble that paid off, there was only 2 yard machines mowers listed and I did not have any info on my mower, so I took a chance judging by the image, it's not an exact fit, it comes up just a little short but works fine, I purchased this control handle because the original one crumbled and broke in half, for a couple cuts I was using a control handle from a weed eater brand lawn mower, it worked but it was a longer control handle and it created major pain in my hands, I am so glad I took a chance on this replacement part! Thanks!
Guest -
July 6, 2020
Verified Purchase
Good
Exactly as I expected
Guest -
June 30, 2020
Verified Purchase
The right parts at the right price
Everything came as described, fit correctly, and was a great price.
Guest -
June 25, 2020
Verified Purchase
Very easy to repair.
No problem with the part. I'm glad I found your establishment. I know I will be using it again. Thank you.
Guest -
June 17, 2020
Verified Purchase
t
t
t -
t days ago
Verified Purchase
eReplacementParts Team
t
Questions & Answers ?
Our customer Service team is at the ready daily to answer your part and product questions.

Ask our Team
We have a dedicated staff with decades of collective experience in helping customers just like you purchase parts to repair their products.
Does this fit my product?Questions & Answers for Bail
No questions have been asked yet
Customer Repair Instructions ?
All our customer repair instructions are solicited directly from other customers just like you who have purchased and replaced this exact part.
Control handle was broken
Charles - May 14, 2017
👍 7 of 7 people found this instruction helpful
Tool Type
Lawn Mower
Difficulty
Easy
Time
Less than 15 minutes
Tools Used
Parts Used
Remove the control cable from the broken handle
Install the new control handle and the control cable
Install the new control handle and the control cable
Did you find this story helpful?
Thanks for voting and helping fellow customers!
The control bar had snapped in half due to age.
Robert - June 7, 2017
👍 8 of 10 people found this instruction helpful
Tool Type
Lawn Mower
Difficulty
Easy
Time
Less than 15 minutes
Tools Used
, no tools were needed
Parts Used
Inserted the posts on each side into the holes in the handle and then attached the cable.
Did you find this story helpful?
Thanks for voting and helping fellow customers!
Broken handle and bad cable
Terry - August 2, 2016
👍 5 of 5 people found this instruction helpful
Tool Type
Lawn Mower
Difficulty
Easy
Time
Less than 15 minutes
Tools Used
Parts Used
1. Removed handle and snapped new one in it place
2. Popped cable in as needed
Very easy to do, no tools required!
2. Popped cable in as needed
Very easy to do, no tools required!
Did you find this story helpful?
Thanks for voting and helping fellow customers!
Control cable snapped from rust. I tried to use a quick fix but then the control handle also broke from being rusted.
Francine - May 5, 2017
👍 2 of 2 people found this instruction helpful
Tool Type
Lawn Mower
Difficulty
Easy
Time
Less than 15 minutes
Tools Used
Screwdriver, None
Parts Used
1. Removed old cable with housing and old control handle.
2. Pop off red shield from old control handle and attach to new control handle
3. Put new handle on mower (no tools required)
4. For cable, simply place pin at the engine first then wrap cable around using same placement and attach pin onto control handle (no tools)
5 Midway on cable snap pin to handle to secure cable (removed previously screwed in housing from handle)
Did you find this story helpful?
Thanks for voting and helping fellow customers!
Blade brake release cable broke
Phill - April 15, 2017
👍 2 of 2 people found this instruction helpful
Tool Type
Lawn Mower
Difficulty
Easy
Time
15-30 minutes
Tools Used
Screwdriver, Socket set
Parts Used
Removed and replaced brake cable and release handle.
Did you find this story helpful?
Thanks for voting and helping fellow customers!
Needed a new control handle
Jason - October 2, 2016
👍 3 of 4 people found this instruction helpful
Tool Type
Lawn Mower
Difficulty
Easy
Time
Less than 15 minutes
Tools Used
Parts Used
Remove the control cable from the handle. Remove the control handle from the upper arm. Install the right side of the new control handle first, then insert the right side and attach the control cable.
Did you find this story helpful?
Thanks for voting and helping fellow customers!
Blade control was broken and cable totally stretched. Replaced parts they were an exact fit
scott - June 18, 2016
👍 2 of 2 people found this instruction helpful
Tool Type
Lawn Mower
Difficulty
Easy
Time
15-30 minutes
Tools Used
Pliers
Parts Used
Remove blade control handle replace with new. Remove cable from handle at engine end squeeze tabs together to remove. Then install the new ends.
Did you find this story helpful?
Thanks for voting and helping fellow customers!
Control handle bent
Richard - June 13, 2016
👍 2 of 2 people found this instruction helpful
Tool Type
Lawn Mower
Difficulty
Easy
Time
Less than 15 minutes
Tools Used
Parts Used
Remove the control cable, then press inward on the control handle to release it. Install the new control handle and then the control cable. Done.
Did you find this story helpful?
Thanks for voting and helping fellow customers!
The auto shut off control cable froze over the winter, when trying to loosing it the pull control handle broke.
Jos - June 13, 2016
👍 2 of 2 people found this instruction helpful
Tool Type
Lawn Mower
Difficulty
Easy
Time
Less than 15 minutes
Tools Used
, none needed
Parts Used
Removed the bad cable and control handle. Unclipped the plastic molding from the control handle. Clipped the plastic molding on the new handle. Hooked in the new ones on to the lawn mower. No tools needed time about 5 minutes.
Did you find this story helpful?
Thanks for voting and helping fellow customers!
Lawn mower control handle broke
Patrick - September 7, 2016
👍 1 of 1 people found this instruction helpful
Tool Type
Edger
Difficulty
Easy
Time
Less than 15 minutes
Tools Used
, Rubber mallet
Parts Used
1. Attach handle cover with mallet
2. Insert control handle into existing hole mounts.
2. Insert control handle into existing hole mounts.
Did you find this story helpful?
Thanks for voting and helping fellow customers!
Load More Install Stories
OEM stands for Original Equipment Manufacturer and means the part you’re buying is sourced directly from the manufacturer who made your product. At eReplacementParts, we sell only genuine OEM parts, guaranteeing the part you’re purchasing is of better design and of higher quality than aftermarket parts.
Our product descriptions are a combination of data sourced directly from the manufacturers who made your product as well as content researched and curated by our content & customer service teams. This content is edited and reviewed internally before being made public to customers.
Our customer service team are at the ready daily to answer your part and product questions. We have a dedicated staff with decades of collective experience in helping customers just like you purchase parts to repair their products.
All our part reviews are solicited directly from other customers who have purchased this exact part. While we moderate these reviews for profanity, offensive language or personally identifiable information, these reviews are posted exactly as submitted and no alterations are made by our team.
All our customer repair instructions are solicited directly from other customers just like you who have purchased and replaced this exact part. While we moderate these reviews for profanity, offensive language or personally identifiable information, these reviews are posted exactly as submitted and no alterations are made by our team.
Based on data from past customer purchasing behaviors, these parts are most commonly purchased together along with the part you are viewing. These parts may be necessary or helpful to replace to complete your current repair.
All our installation videos are created and produced in collaboration with our in-house repair technician, Mark Sodja, who has helped millions of eReplacementParts customers over the last 13 years repair their products. Mark has years of experience in selling and repairing both commercial and residential products with a specialty in gas-powered equipment.
This data is collected from customers who submitted a repair instruction after replacing this exact part. Customers can rate how easy the repair was to complete and how long it took. We aggregate this data to provide a repair rating that allows customers to quickly determine the difficulty and time needed to perform their own repair.