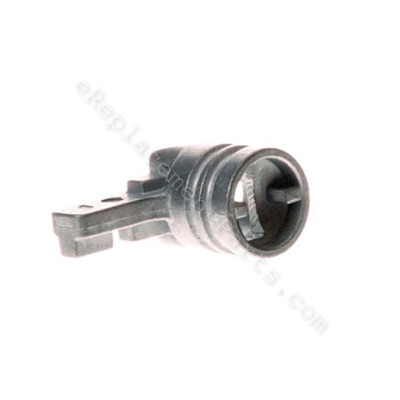
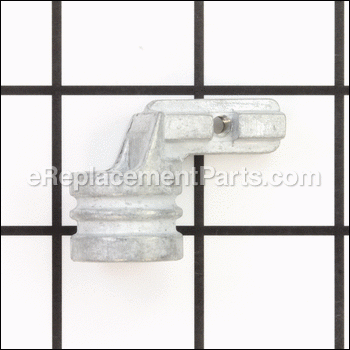


This is a genuine replacement part from original manufacturer. This part is commonly used in DeWALT and Black & Decker jig saws. Bearings reduce friction and control shaft movement/direction. This metal part is located inside the bearing carrier, which is dismantled using a screwdriver. This part will need an o-ring to connect to bearing.
Control Bearing 583425-00
OEM part for: DeWALT, Black and Decker
Part Number: 583425-00
$5.19
In Stock
Jump To:
Frequently Purchased Together ?
Compatibility
This part will fit the following 12 machines
Black and Decker
JS700 Type 1 Jigsaw View Diagrams & Manuals
JS700LK Type 1 Jig Saw View Diagrams & Manuals
JS700BL Type 1 Jig Saw / Laser Combo View Diagrams & Manuals
JS700K Type 1 Jigsaw View Diagrams & Manuals
FS5500JS Jigsaw View Diagrams & Manuals
JS700K-B3LZ (Type 1) 660w Vs Jig Saw W/Kit Box View Diagrams & Manuals
FS5500JS (Type 1) Jigsaw Power Tool View Diagrams & Manuals
JS700K-AR (Type 1) Gen 3 Scumbuster W/Access Power Tool View Diagrams & Manuals
JS700K-B2 (Type 1) Gen 3 Scumbuster W/Access Power Tool View Diagrams & Manuals
JS700K-B2C (Type 1) Gen 3 Scumbuster W/Access Power Tool View Diagrams & Manuals
JS700K-B3 (Type 1) Gen 3 Scumbuster W/Access Power Tool View Diagrams & Manuals
JS700K-BR (Type 1) Gen 3 Scumbuster W/Access Power Tool View Diagrams & Manuals
Show More Compatible Models
This item works with the following types of products:
- Jig saw Parts
- Saw Parts
Customer Part Reviews ?
Average Rating (out of 5):
Click to filter by ratings:
5 stars
10
4 stars
1
3 stars
0
2 stars
0
1 stars
0
< PREV
- 1
- 2
Good to know
Not my first time getting parts with this company, very fast service and always the right parts. Even has section to show how to replace part's.
Guest -
August 17, 2022
Verified Purchase
Fit right and works like it should so far.
It didn't look exactly like the original but fits and works like it should. Haven"t got to use the saw much yet but it cut a few test cuts ok.
Leroy -
January 18, 2022
Verified Purchase
Have used company for years A++ everytime
I have a home woodworking shop where I make toys to sell for Christmas and I restore a lot of antiques in the spring. This requires a lot of tools and when they break, I come here. The diagrams really help find the right part quickly so can order it and get back to work.
Guest -
November 19, 2021
Verified Purchase
THANKS e-Replace, got our Black & Decker running like new
Easy peasy fix! Dont wait to give E-replace a first shot getting your tools repaired for pennies on the dollar! Once you hit the brick wall with OEM customer service, go straight to e-replace and save time and money.
Brion -
May 22, 2021
Verified Purchase
No issues
The 360 view made me confident I bought the right part. Arrived, installed, jigsaw repaired.
iGlobal -
September 24, 2020
Verified Purchase
Exactly the part I needed.
Arrived in a reasonable amount of time. Easy to find the part I needed on their website.
Guest -
September 18, 2020
Verified Purchase
easy to order
Easy to order and find the correct part.
Guest -
May 13, 2020
Verified Purchase
worked as expected
easy to fix , glad I called E Replacement for the part,was very satisfied..
Edward -
November 12, 2019
Verified Purchase
Control bearing
Was glad you carried the part I needed for my jig saw. Good price and prompt delivery, was also nice to have tracking info. Part fit perfectly and jigsaw is good as new.
Guest -
September 23, 2019
Verified Purchase
jig saw part
Excellent service. Part came in early and fit perfectly. Thanks for taking care of my need.
Guest -
September 10, 2019
Verified Purchase
t
t
t -
t days ago
Verified Purchase
eReplacementParts Team
t
Questions & Answers ?
Our customer Service team is at the ready daily to answer your part and product questions.

Ask our Team
We have a dedicated staff with decades of collective experience in helping customers just like you purchase parts to repair their products.
Does this fit my product?Questions & Answers for Control Bearing
No questions have been asked yet
Customer Repair Instructions ?
All our customer repair instructions are solicited directly from other customers just like you who have purchased and replaced this exact part.
The control bearing attaches to the blade support , the attachment piece broke
Will - April 30, 2016
👍 6 of 7 people found this instruction helpful
Tool Type
Jig saw
Difficulty
Medium
Time
15-30 minutes
Tools Used
Screwdriver, Pliers, allen wrenches
Parts Used
Remove all trim fascia ,screws that hold the halves of the saw together. Carefully separate the saw case apart .Locate the bearing carrier, remove allen bolts , remove bearing carrier, remove bolts that hold blade clamp on . Raise end of shaft and slide broken control bearing off shaft , remove rubber "o" ring and slide it on new control bearing , replace blade clamp ,all bolts , slide case back together , replace screws , replace fascia . Now the hard part , the blade support has a very small retaining clip that has to be removed in order to attach blade support to control bearing . After clip is removed ,back bolt out , line up holes in blade support and control bearing put bolt in and carefully replace retaining clip .
Did you find this story helpful?
Thanks for voting and helping fellow customers!
Control bearing broke where the safety guide attaches.
Jerelyn - July 29, 2016
👍 5 of 6 people found this instruction helpful
Tool Type
Jig saw
Difficulty
Medium
Time
15-30 minutes
Tools Used
Screwdriver, Pliers, Allen wrench
Parts Used
1. Removed all screws from the outer casing.
2. Removed the shaft with control bearing.
3. Removed the broken control bearing.
4. Installed new bearing.
5. Reassembled in reverse order.
2. Removed the shaft with control bearing.
3. Removed the broken control bearing.
4. Installed new bearing.
5. Reassembled in reverse order.
Did you find this story helpful?
Thanks for voting and helping fellow customers!
Jig saw blade holder came apart.
Anthony - August 18, 2022
Tool Type
Jig saw
Difficulty
Hard
Time
More than 2 hours
Tools Used
Screwdriver, Brain
Parts Used
Ordered correct parts after I took saw apart to see what was needed, had to order another part after I installed bearing, then seen the blade holder also had broken. But all parts came correctly. Reason for time was because of taking it apart then ordering parts, so yes longer than 2 hour's. But actual times was 1 or two hours.
Did you find this story helpful?
Thanks for voting and helping fellow customers!
Had to take all screws our of handle to get to the part
Mark - June 2, 2021
Tool Type
Jig saw
Difficulty
Easy
Time
15-30 minutes
Tools Used
Screwdriver
Parts Used
Repeat the same way it come apart
Did you find this story helpful?
Thanks for voting and helping fellow customers!
Bearing housing broke
Brion - May 25, 2021
Tool Type
Jig saw
Difficulty
Easy
Time
15-30 minutes
Tools Used
Screwdriver, Pliers
Parts Used
Ensure saw is not plugged in. Lock saber saw rotating head into the straight cut position. Remove the metal guide plate taking not how the 4 part fit together. Remove all necessary screws that hold the 2 halve of the clamshell together (they are all the same). Gently seperate the 2 halves with the screw side up (the side were the screws arw visable. Wiggle control bearing housing loose from drive motor, clamshell and oscillating cam drive mechanisim. Take note of the position of the motor shaft and cams for easy replacement later. Remove 4 small screw that hold bearing-housing halves together. Slide shaft out, remove old damaged bearing, but retain o-ring to reuse on new bear (take note of the position of the o-ring placement). Slide new bearing with reused o-ring into housing, replace the other halve of the bear cap (housing). Tighten screw with a drop of lock tight. Wiggle entire housing assembly back ito place. Ensure there is no binding of moving parts. Line up other half of clamshell housing and carefully align screws threads to avoid cross threading plastic clam shell together the entire operation will take about 20 minutes for a pro DIYer.
Did you find this story helpful?
Thanks for voting and helping fellow customers!
control bearing broke
David - August 9, 2020
Tool Type
Jig saw
Difficulty
Medium
Time
15-30 minutes
Tools Used
Screwdriver
Parts Used
replaced
Did you find this story helpful?
Thanks for voting and helping fellow customers!
broken gear
Danny - January 14, 2019
Tool Type
Jig saw
Difficulty
Medium
Time
1-2 hours
Tools Used
Screwdriver
replaced gear
Did you find this story helpful?
Thanks for voting and helping fellow customers!
Guide bearing support arm broke off
William - June 4, 2018
Tool Type
Jig saw
Difficulty
Easy
Time
Less than 15 minutes
Tools Used
Power Drill, Allen wrench
Parts Used
1. Remove housing with power screwdriver
2. Remove main bearing assy with drive shaft
3. Remove bearing retainer cap top and bottom
4. Remove lower blade holder , two allen hd screws
5. Replace lower control bearing , slide on
6 Re assy lower blade holder two allen hd screws
7. Reinstall main bearing assy
8. Test for alignment rotate drive gear with finger
9. Reinstall main housing , phillips hd screws
Done
Did you find this story helpful?
Thanks for voting and helping fellow customers!
The blade guard with blade roller beoke at the attachment screw and came off.
Andrew - May 29, 2018
Tool Type
Jig saw
Difficulty
Easy
Time
Less than 15 minutes
Tools Used
Screwdriver, Pliers
Parts Used
1.Use the exploded view from your web site as a guide.
2. Removed screws holding the two halves of the housing together.
3. Removed the c shaped trim ring holding housing together.
4. Disassembled blade shaft screws and removed damaged parts.
5. Reassembled in reverse order.
6. Repair was flawless and took about 10 minutes.
2. Removed screws holding the two halves of the housing together.
3. Removed the c shaped trim ring holding housing together.
4. Disassembled blade shaft screws and removed damaged parts.
5. Reassembled in reverse order.
6. Repair was flawless and took about 10 minutes.
Did you find this story helpful?
Thanks for voting and helping fellow customers!
Bad control bearing
George - May 20, 2018
Tool Type
Jig saw
Difficulty
Medium
Time
30-60 minutes
Tools Used
Screwdriver, Pliers, Hammer and punch
Parts Used
Removed one side of jigsaw housing. Removed shuttle from jigsaw. Removed attachment from shuttle. Removed control bearing. Made I replaced control bearing in the proper orientation. Assembled and tested installation with power off. After reinstalling cover onto saw,I made sure that all was put back in the proper order. TIP. I took pictures with my iPhone in different steps to ensuring proper installation was correct". Hope this helps.
Did you find this story helpful?
Thanks for voting and helping fellow customers!
Load More Install Stories
OEM stands for Original Equipment Manufacturer and means the part you’re buying is sourced directly from the manufacturer who made your product. At eReplacementParts, we sell only genuine OEM parts, guaranteeing the part you’re purchasing is of better design and of higher quality than aftermarket parts.
Our product descriptions are a combination of data sourced directly from the manufacturers who made your product as well as content researched and curated by our content & customer service teams. This content is edited and reviewed internally before being made public to customers.
Our customer service team are at the ready daily to answer your part and product questions. We have a dedicated staff with decades of collective experience in helping customers just like you purchase parts to repair their products.
All our part reviews are solicited directly from other customers who have purchased this exact part. While we moderate these reviews for profanity, offensive language or personally identifiable information, these reviews are posted exactly as submitted and no alterations are made by our team.
All our customer repair instructions are solicited directly from other customers just like you who have purchased and replaced this exact part. While we moderate these reviews for profanity, offensive language or personally identifiable information, these reviews are posted exactly as submitted and no alterations are made by our team.
Based on data from past customer purchasing behaviors, these parts are most commonly purchased together along with the part you are viewing. These parts may be necessary or helpful to replace to complete your current repair.
All our installation videos are created and produced in collaboration with our in-house repair technician, Mark Sodja, who has helped millions of eReplacementParts customers over the last 13 years repair their products. Mark has years of experience in selling and repairing both commercial and residential products with a specialty in gas-powered equipment.
This data is collected from customers who submitted a repair instruction after replacing this exact part. Customers can rate how easy the repair was to complete and how long it took. We aggregate this data to provide a repair rating that allows customers to quickly determine the difficulty and time needed to perform their own repair.