
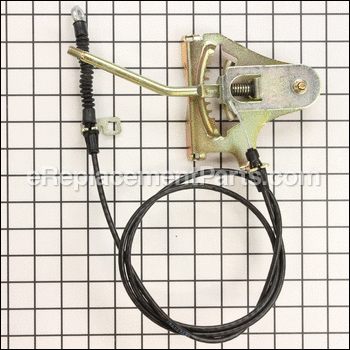
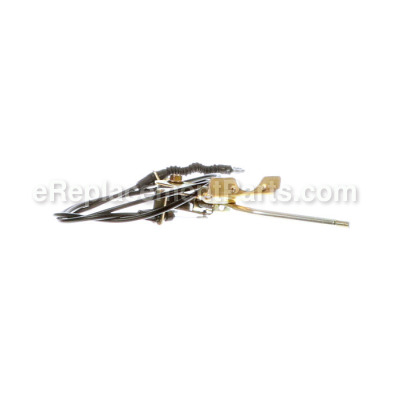


The deflector control assembly attaches to the frame. This part is made of metal and plastic and is available individually. This is an authentic Husqvarna and Poulan replacement part that is sourced from the original manufacturer for use with snowblowers. You may need a socket set and a nutdriver when replacing this part. It may become broken or stretched and will need to be replaced.
Control Assembly, Deflector 587030801
OEM part for: Husqvarna, Craftsman, Poulan, Jonsered
Part Number: 587030801
$82.19
In Stock
Compatibility
This part will fit the following 336 machines
Husqvarna
ST 9027 (HU9027STB) (954223074) (2003-08) Snowblower View Diagrams & Manuals
10527 SB LS (96193002800) (2008-09) Snowblower View Diagrams & Manuals
10527 SBE (96193000900) (2006-05) Snowblower View Diagrams & Manuals
10527 SBE (96193000901) (2006-05) Snowblower View Diagrams & Manuals
10527 SBE (961930016-04) (2007-11) Snowblower View Diagrams & Manuals
10527 SBE (961930016-05) (2007-12) Snowblower View Diagrams & Manuals
10527 SBE (96193001600) (2006-08) Snowblower View Diagrams & Manuals
10527 SBE (96193001602) (2006-08) Snowblower View Diagrams & Manuals
10527 SBE (96193001603) (2007-08) Snowblower View Diagrams & Manuals
10527 SBE (96193001606) (2008-01) Snowblower View Diagrams & Manuals
10527 STE Snowblower View Diagrams & Manuals
10530 SBE (96193000400) (2006-05) Snowblower View Diagrams & Manuals
10530 SBE (96193000401) (2006-05) Snowblower View Diagrams & Manuals
10530 SBE (96193002000) (2006-08) Snowblower View Diagrams & Manuals
10530 SBE (96195000100) (2006-06) Snowblower View Diagrams & Manuals
10530 SBE (96195000101) (2006-06) Snowblower View Diagrams & Manuals
10530 SBE (96195000102) (2006-07) Snowblower View Diagrams & Manuals
10530 SBE (96195000103) (2006-08) Snowblower View Diagrams & Manuals
10530 SBEB (96193001300) (2006-06) Snowblower View Diagrams & Manuals
1130 SB LS (96193002900) (2008-08) Snowblower View Diagrams & Manuals
1130 SB XLS (96193003000) (2008-09) Snowblower View Diagrams & Manuals
1130 SBE (96193001700) (2006-08) Snowblower View Diagrams & Manuals
1130 SBE (96193001701) (2008-01) Snowblower View Diagrams & Manuals
1130 SBE OV (96193002400) (2008-01) Snowblower View Diagrams & Manuals
1130 SBEOV (96193002100) (2006-09) Snowblower View Diagrams & Manuals
1130 SBEXP (96193000600) (2006-05) Snowblower View Diagrams & Manuals
1130 SBEXP (96193001800) (2006-10) Snowblower View Diagrams & Manuals
1130 SBEXP (96193001801) (2008-01) Snowblower View Diagrams & Manuals
1130 SBEXP (96195000200) (2006-06) Snowblower View Diagrams & Manuals
1130 SBEXP (96195000201) (2006-10) Snowblower View Diagrams & Manuals
1330 SBE OV (96193002300) (2008-01) Snowblower View Diagrams & Manuals
1330 SBE XP (96193001901) (2007-11) Snowblower View Diagrams & Manuals
1330 SBEXP (96193001900) (2006-08) Snowblower View Diagrams & Manuals
8527 SBE (927SBE) (96193000300) (2006-05) Snowblower View Diagrams & Manuals
8527 SBEB (96193001100) (2005-12) Snowblower View Diagrams & Manuals
9027 ST (HU9027STA) (954223074) (2002-09) Snowblower View Diagrams & Manuals
9027 STE XP (2004-07) Snowblower View Diagrams & Manuals
924 SB XLS (96193003200) (2008-08) Snowblower View Diagrams & Manuals
927 SBEXP (96193000500) (2006-05) Snowblower View Diagrams & Manuals
9527 SBEB (96193001200) (2005-12) Snowblower View Diagrams & Manuals
HL 1027 STE B (954633545) (2004-09) Snowblower View Diagrams & Manuals
HU 1130 ST C (954223081) (2004-07) Snowblower View Diagrams & Manuals
HU 9027 ST C (954223077) (2004-07) Snowblower View Diagrams & Manuals
ST 1130 (HU1130STB) (954223081) (2003-08) Snowblower View Diagrams & Manuals
1827EXLT (96193007700) (2011-08) Snowblower / Throwers View Diagrams & Manuals
1830EXL (96193007600) (2011-06) Snowblower / Throwers View Diagrams & Manuals
1830EXLT (96193007800) (2011-07) Snowblower / Throwers View Diagrams & Manuals
1830HV (96193005400) (2010-05) Snowblower / Throwers View Diagrams & Manuals
1830HV (96193005401) (2010-08) Snowblower / Throwers View Diagrams & Manuals
1830HV (96193007300) (2011-06) Snowblower / Throwers View Diagrams & Manuals
1830HV (96193007301) (2011-07) Snowblower / Throwers View Diagrams & Manuals
1830HV (96193008100) (2011-07) Snowblower / Throwers View Diagrams & Manuals
11524E (96193006600) (2010-08) Snowblower / Throwers View Diagrams & Manuals
11524E (96193007400) (2011-07) Snowblower / Throwers View Diagrams & Manuals
11524E (96193007401) (2011-07) Snowblower / Throwers View Diagrams & Manuals
11524E (96193008200) (2011-08) Snowblower / Throwers View Diagrams & Manuals
12527HV (96193005300) (2010-06) Snowblower / Throwers View Diagrams & Manuals
12527HV (96193005301) (2010-07) Snowblower / Throwers View Diagrams & Manuals
12527HV (96193007100) (2011-06) Snowblower / Throwers View Diagrams & Manuals
12527HV (96193007101) (2011-07) Snowblower / Throwers View Diagrams & Manuals
12527HV (96193008000) (2011-07) Snowblower / Throwers View Diagrams & Manuals
14527E (96193006700) (2010-05) Snowblower / Throwers View Diagrams & Manuals
14527E (96193007501) (2011-07) Snowblower / Throwers View Diagrams & Manuals
14527E (96193008300) (2011-08) Snowblower / Throwers View Diagrams & Manuals
145270 (96193007500) (2011-06) Snowblower / Throwers View Diagrams & Manuals
924HV (96193005200)(2010-04) Snowblower View Diagrams & Manuals
924HV (96193007000)(2011-06) Snowblower View Diagrams & Manuals
924HV (96193007001)(2012-05) Snowblower View Diagrams & Manuals
924HV (96193007002)(2012-06) Snowblower View Diagrams & Manuals
924HV (96193007003)(2012-07) Snowblower View Diagrams & Manuals
924HV (96193007004)(2012-08) Snowblower View Diagrams & Manuals
924HV (96193007900)(2011-07) Snowblower View Diagrams & Manuals
1650EXL (96193008700)(2012-07) Snowblower View Diagrams & Manuals
1650EXL (96193008701)(2012-08) Snowblower View Diagrams & Manuals
1650EXL (96193008702)(2012-08) Snowblower View Diagrams & Manuals
1650EXLT (96193008901)(2012-10) Snowblower View Diagrams & Manuals
1830EXLT (96193007801)(2012-07) Snowblower View Diagrams & Manuals
1830EXLT (96193007802)(2012-06) Snowblower View Diagrams & Manuals
1830HV (96193007303)(2012-06) Snowblower View Diagrams & Manuals
1830HV (96193007305)(2012-08) Snowblower View Diagrams & Manuals
11524E (96193007403)(2012-06) Snowblower View Diagrams & Manuals
11524E (96193007404)(2012-08) Snowblower View Diagrams & Manuals
12527HV (96193007102)(2012-07) Snowblower View Diagrams & Manuals
12527HV (96193007103)(2012-06) Snowblower View Diagrams & Manuals
12527HV (96193007104)(2012-06) Snowblower View Diagrams & Manuals
12527HV (96193007105)(2012-08) Snowblower View Diagrams & Manuals
12530HV (96193007200)(2011-07) Snowblower View Diagrams & Manuals
12530HV (96193007201)(2012-06) Snowblower View Diagrams & Manuals
12530HV (96193007203)(2012-08) Snowblower View Diagrams & Manuals
14527E (96193007503)(2012-06) Snowblower View Diagrams & Manuals
14527E (96193007504)(2012-08) Snowblower View Diagrams & Manuals
16527EXLT (96193008500)(2011-08) Snowblower View Diagrams & Manuals
ST 268EP (96191003802)(2011-05) Snowblower View Diagrams & Manuals
ST 268EP (96191003803)(2011-07) Snowblower View Diagrams & Manuals
ST 268EP (96191003804)(2012-07) Snowblower View Diagrams & Manuals
ST 268EP (96191003805)(2012-06) Snowblower View Diagrams & Manuals
ST 276EP (96191003902)(2011-05) Snowblower View Diagrams & Manuals
ST 276EP (96191003903)(2011-07) Snowblower View Diagrams & Manuals
ST 276EP (96191003904)(2012-06) Snowblower View Diagrams & Manuals
ST 276EP (96191003905)(2012-05) Snowblower View Diagrams & Manuals
ST230E (96195001600)(2012-06) Snowblower View Diagrams & Manuals
ST230E (96195001601)(2012-08) Snowblower View Diagrams & Manuals
ST230E (96195001602)(2012-08) Snowblower View Diagrams & Manuals
15530SB-LS (96193003803) Snowblower View Diagrams & Manuals
1130SBEXP (96193001803) Snow Blower View Diagrams & Manuals
1830SB (2010-04) 1830SB, 96193005700 (2010-04) View Diagrams & Manuals
96194000901 (2009-08) 96194000901 (2009-08) View Diagrams & Manuals
96194000901 (2010-06) 96194000901 (2010-06) View Diagrams & Manuals
PP208EPS24 (2009-08) PP208EPS24, 96198002701 (2009-08) View Diagrams & Manuals
PP291E27 (2010-05) PP291E27, 96198003600 (2010-05) View Diagrams & Manuals
PP265E27 (2009-08) PP265E27, 96198002800 (2009-08) View Diagrams & Manuals
PP208EPS24 (2010-07) PP208EPS24, 96198002701 (2010-07) View Diagrams & Manuals
PP291E30 (2010-03) PP291E30, 96198003001 (2010-03) View Diagrams & Manuals
PP291E27 (2010-07) PP291E27, 96198003601 (2010-07) View Diagrams & Manuals
PP414EPS30 (2010-04) PP414EPS30, 96198003101 (2010-04) View Diagrams & Manuals
PP291EPS27 (2010-04) PP291EPS27, 96198002901 (2010-04) View Diagrams & Manuals
PP1150E27 (2009-07) PP1150E27, 96198003301 (2009-07) View Diagrams & Manuals
PP1330ES (2009-08) PP1330ES, 96192003200 (2009-08) View Diagrams & Manuals
PP1150E27 (2010-06) PP1150E27, 96198003302 (2010-06) View Diagrams & Manuals
PR827ES (2009-07) PR827ES, 96192003001 (2009-07) View Diagrams & Manuals
PR1030ES (2009-06) PR1030ES, 96192003100 (2009-06) View Diagrams & Manuals
PR827ES (2010-06) PR827ES, 96192004300 (2010-06) View Diagrams & Manuals
St (2012-08) St 2111E - 96191004106 (2012-08) View Diagrams & Manuals
PSB270 (2010-06) PSB270 - 96191004400 (2010-06) View Diagrams & Manuals
2111E (2012-08) St - 96191004106 View Diagrams & Manuals
961940009 (2009-08) Snow Blower View Diagrams & Manuals
PP927ESA (2002) Snow Blower View Diagrams & Manuals
PP927ESC (2004) Snow Blower View Diagrams & Manuals
XT11530ES (96192003501) (2009-10) Snow Blower View Diagrams & Manuals
XT11530ES (96192003502) (2010-06) Snow Blower View Diagrams & Manuals
16530 EXL (96193008400) (2011-07) Snow Blower View Diagrams & Manuals
16530 EXL (96193006901) (2010-06) Snow Blower View Diagrams & Manuals
EU9027STE (96191000304) (2007-01) Snow Blower View Diagrams & Manuals
EU9027STE (96191000302) (2007-01) Snow Blower View Diagrams & Manuals
EU9027STE (96191000301) (2012-11) Snow Blower View Diagrams & Manuals
16530 EXLT (96193008600) (2011-08) Snow Blower View Diagrams & Manuals
16530 SBXLS (2009-08) (96193004102 ) Snow Blower View Diagrams & Manuals
16530 SBXLS (2009-08) 96193004101 Snow Blower View Diagrams & Manuals
16530 XLS (96193006201) (2010-10) Snow Blower View Diagrams & Manuals
16530 XLS (96193006200) (2010-06) Snow Blower View Diagrams & Manuals
1130 SBLSB (96193003800) (2008-11) Snow Blower View Diagrams & Manuals
1130 SBXLSB (2008-12) 96193004000 Snow Blower View Diagrams & Manuals
1130 ST (HU1130STB, 954223081) (2004-03) Snow Blower View Diagrams & Manuals
1130 ST (HU1130STA, 954223081) (2002-09) Snow Blower View Diagrams & Manuals
1130 STE (EU1130STEA, 954170237) (2004-09) Snow Blower View Diagrams & Manuals
1130 STE (EI1130STE, 96191000404, 961910004) (2007-01) Snow Blower View Diagrams & Manuals
1130 STE (96191001905) (2008-08) Snow Blower View Diagrams & Manuals
1130 STE (96191001904) (2008-09) Snow Blower View Diagrams & Manuals
1130 STE (96191001903) (2007-10) Snow Blower View Diagrams & Manuals
1130 STE (96191001902, 961910019) (2007-10) Snow Blower View Diagrams & Manuals
1130 STE (96191001901, 961910019) (2007-10) Snow Blower View Diagrams & Manuals
1130 STE (96191001900, 961910019) (2007-07) Snow Blower View Diagrams & Manuals
1130 STE (96191000404, 961910004) (2007-01) Snow Blower View Diagrams & Manuals
1130 STE (96191000402, 961910004) (2007-01) Snow Blower View Diagrams & Manuals
1130 STE (96191000401, 961910004) (2007-01) Snow Blower View Diagrams & Manuals
1130 STE (96191000400, 961910004) (2005-10) Snow Blower View Diagrams & Manuals
1130 STE (96091001906) (2008-11) Snow Blower View Diagrams & Manuals
ST 261E (96191003011) (2014-08) Snow Blower View Diagrams & Manuals
ST 261E (96191003010) (2014-08) Snow Blower View Diagrams & Manuals
ST 261E (96191003009) (2014-07) Snow Blower View Diagrams & Manuals
ST 261E (96191003008) (2013-09) Snow Blower View Diagrams & Manuals
ST 261E (96191003007) (2013-07) Snow Blower View Diagrams & Manuals
ST 261E (96191003006) (2013-06) Snow Blower View Diagrams & Manuals
ST 261E (96191003005) (2012-09) Snow Blower View Diagrams & Manuals
ST 261E (96191003004) (2012-07) Snow Blower View Diagrams & Manuals
ST 261E (96191003003) (2012-06) Snow Blower View Diagrams & Manuals
ST 261E (96191003002) (2011-05) Snow Blower View Diagrams & Manuals
ST 261E (96191003001) (2009-08) Snow Blower View Diagrams & Manuals
ST 261E (2009-09) 96191003000 Snow Blower View Diagrams & Manuals
1130 STEXP (HU1130STC, 954223081) (2004-07) Snow Blower View Diagrams & Manuals
ST 268EPT (96191005005) (2013-07) Snow Blower View Diagrams & Manuals
ST 268EPT (96191005004) (2013-07) Snow Blower View Diagrams & Manuals
ST 268EPT (96191005003) (2012-09) Snow Blower View Diagrams & Manuals
ST 268EPT (96191005002) (2012-07) Snow Blower View Diagrams & Manuals
ST 268EPT (96191005001) (2012-10) Snow Blower View Diagrams & Manuals
ST 268EPT (96191005000) (2011-08) Snow Blower View Diagrams & Manuals
11524 LS (96193005800) (2010-08) Snow Blower View Diagrams & Manuals
ST 276EPT (96191005104) (2013-09) Snow Blower View Diagrams & Manuals
ST 276EPT (96191005103) (2013-07) Snow Blower View Diagrams & Manuals
ST 276EPT (96191005102) (2012-08) Snow Blower View Diagrams & Manuals
ST 276EPT (96191005101) (2012-07) Snow Blower View Diagrams & Manuals
ST 276EPT (96191005100) (2011-08) Snow Blower View Diagrams & Manuals
ST 324P (96193009103) (2016-04) Snow Blower View Diagrams & Manuals
ST 324P (96193009102) (2015-07) Snow Blower View Diagrams & Manuals
ST 324P (96191008202) (2016-04) Snow Blower View Diagrams & Manuals
ST 324P (96191008201) (2015-07) Snow Blower View Diagrams & Manuals
ST 324P (96191008200) (2014-06) Snow Blower View Diagrams & Manuals
12527 SB (2010-07) 96193005600 Snow Blower View Diagrams & Manuals
ST 327P (96193009204) (2017-05) Snow Blower View Diagrams & Manuals
ST 327P (96193009203) (2016-04) Snow Blower View Diagrams & Manuals
ST 327P (96193009202) (2015-06) Snow Blower View Diagrams & Manuals
ST 327P (96193009201) (2014-05) Snow Blower View Diagrams & Manuals
ST 327P (96191008303) (2017-05) Snow Blower View Diagrams & Manuals
ST 327P (96191008302) (2016-04) Snow Blower View Diagrams & Manuals
ST 327P (96191008301) (2015-07) Snow Blower View Diagrams & Manuals
ST 327P (96191008300) (2014-06) Snow Blower View Diagrams & Manuals
12527 (96195001800) (2013-06) Hvx Snow Blower View Diagrams & Manuals
8024 STE (EU8024STEA, 954170235) (2004-09) Snow Blower View Diagrams & Manuals
8024 STE (EU8024STE, 96191000202, 961910002) (2007-01) Snow Blower View Diagrams & Manuals
8024 STE (EU8024STE, 96191000201, 961910002) (2007-01) Snow Blower View Diagrams & Manuals
8024 STE (96191001707) (2009-01) Snow Blower View Diagrams & Manuals
8024 STE (96191001706) (2008-08) Snow Blower View Diagrams & Manuals
8024 STE (96191001705) (2008-08) Snow Blower View Diagrams & Manuals
8024 STE (96191001704) (2008-08) Snow Blower View Diagrams & Manuals
8024 STE (96191001703) (2008-11) Snow Blower View Diagrams & Manuals
8024 STE (96191001701, 961910017) (2007-10) Snow Blower View Diagrams & Manuals
8024 STE (96191001700, 961910017) (2007-07) Snow Blower View Diagrams & Manuals
8024 STE (96191000201, 961910002) (2007-01) Snow Blower View Diagrams & Manuals
8024 STE (96191000200, 961910002) (2005-10) Snow Blower View Diagrams & Manuals
ST 327T (96193009303) (2016-04) Snow Blower View Diagrams & Manuals
ST 327T (96193009302) (2015-06) Snow Blower View Diagrams & Manuals
ST 327T (96193009301) (2014-06) Snow Blower View Diagrams & Manuals
ST 327T (96191008402) (2016-04) Snow Blower View Diagrams & Manuals
ST 327T (96191008401) (2015-06) Snow Blower View Diagrams & Manuals
ST 327T (96191008400) (2014-05) Snow Blower View Diagrams & Manuals
ST 330P (96193009404) (2017-05) Snow Blower View Diagrams & Manuals
ST 330P (96193009403) (2016-03) Snow Blower View Diagrams & Manuals
ST 330P (96193009402) (2015-06) Snow Blower View Diagrams & Manuals
ST 330P (96193009401) (2014-05) Snow Blower View Diagrams & Manuals
ST 330P (96191008503) (2017-05) Snow Blower View Diagrams & Manuals
ST 330P (96191008502) (2016-04) Snow Blower View Diagrams & Manuals
ST 330P (96191008501) (2015-15) Snow Blower View Diagrams & Manuals
ST 330P (96191008500) (2014-05) Snow Blower View Diagrams & Manuals
1330 SB (96193004200) (2008-11) Snow Blower View Diagrams & Manuals
ST 330T (96193009503) (2016-04) Snow Blower View Diagrams & Manuals
ST 330T (96193009502) (2015-09) Snow Blower View Diagrams & Manuals
ST 330T (96193009501) (2014-06) Snow Blower View Diagrams & Manuals
ST 330T (96191008602) (2016-04) Snow Blower View Diagrams & Manuals
ST 330T (96191008601) (2015-06) Snow Blower View Diagrams & Manuals
ST 330T (96191008600) (2014-06) Snow Blower View Diagrams & Manuals
1330 SBXLSB (96193004100) (2009-02) Snow Blower View Diagrams & Manuals
13524 SBXLS (2009-08) 96193004800 Snow Blower View Diagrams & Manuals
9027 STE (HU9027STC, 954223077) (2004-07) Xp Snow Blower View Diagrams & Manuals
9027 STE (EU9027STEA, 954170236) (2004-09) Snow Blower View Diagrams & Manuals
9027 STE (96191001805) (2009-01) Snow Blower View Diagrams & Manuals
9027 STE (96191001804) (2008-08) Snow Blower View Diagrams & Manuals
9027 STE (96191001803) (2008-02) Snow Blower View Diagrams & Manuals
9027 STE (96191001802, 961910018) (2007-10) Snow Blower View Diagrams & Manuals
9027 STE (96191001801, 961910018) (2007-10) Snow Blower View Diagrams & Manuals
9027 STE (96191001800) (2007-07) Snow Blower View Diagrams & Manuals
9027 STE (96191000300, 961910003) (2005-10) Snow Blower View Diagrams & Manuals
14527 LS (96193005901) (2010-09) Snow Blower View Diagrams & Manuals
14527 LS (96193005900) (2010-06) Snow Blower View Diagrams & Manuals
14527 SBLS (2009-08) 96193004900 Snow Blower View Diagrams & Manuals
14527 XLS (2010-08) 96193006101 Snow Blower View Diagrams & Manuals
15530 SBXLS (2009-09) 96193004001 Snow Blower View Diagrams & Manuals
924HVX (96195001700) (2013-06) Snow Blower View Diagrams & Manuals
16530 E (96193006800) (2010-05) Snow Blower View Diagrams & Manuals
14527 SBLS (2009-08) (96193004901) Snow Blower View Diagrams & Manuals
8024 STE (96191001702, 961910017) (2007-10) Snow Blower View Diagrams & Manuals
14527 XLS (96193006102) (2010-09) Snow Blower View Diagrams & Manuals
16530 SBXLS (2009-08) (96193004102 ) Snow Blower View Diagrams & Manuals
14527 SBLS (2009-08) (96193004901) Snow Blower View Diagrams & Manuals
15530 SBLS (96193003802)(2009-07) Snow Thrower View Diagrams & Manuals
927 SBE (961930003-00)(2006-05) 27 Inch Snow Blower View Diagrams & Manuals
Craftsman
944528117 Snowblower View Diagrams & Manuals
917253581 Snowblower View Diagrams & Manuals
917253572 Snowblower View Diagrams & Manuals
917881063 Snowblower View Diagrams & Manuals
917881065 Snowblower View Diagrams & Manuals
917253570 Snowblower View Diagrams & Manuals
917253580 Snowblower View Diagrams & Manuals
917253560 Snowblower View Diagrams & Manuals
917885522 Snowblower View Diagrams & Manuals
917881064 Snowblower View Diagrams & Manuals
91788777 Snowblower View Diagrams & Manuals
917254881 Snowblower View Diagrams & Manuals
917253561 Snowblower View Diagrams & Manuals
917254880 Snowblower View Diagrams & Manuals
917253571 Snowblower View Diagrams & Manuals
Poulan
PP265E27 (428550) Snowblower View Diagrams & Manuals
PP291E30 (435555) Snowblower View Diagrams & Manuals
PP291EPS27 (435548) Snowblower View Diagrams & Manuals
PP414EPS30 Snowblower View Diagrams & Manuals
PP1150E27 (429264) Snowblower View Diagrams & Manuals
PP1150E27 (436842) Snowblower View Diagrams & Manuals
PP1150E30 Snowblower View Diagrams & Manuals
PR827ES (428502) Snowblower View Diagrams & Manuals
PR827ES (436134) Snowblower View Diagrams & Manuals
PR1030ES Snowblower View Diagrams & Manuals
PR1330ES Snowblower View Diagrams & Manuals
PP1850ES (96198005502)(2012-08) Snowblower View Diagrams & Manuals
PR14527ES (96198004702)(2012-06) Snowblower View Diagrams & Manuals
PR14527ES (96198004704)(2012-08) Snowblower View Diagrams & Manuals
PR18530ES (96198004902)(2012-07) Snowblower View Diagrams & Manuals
PR18530ES (96198004904)(2012-08) Snowblower View Diagrams & Manuals
PR624ES (96198004604)(2012-08) Snowblower View Diagrams & Manuals
PR8P27ES (96192004603)(2012-06) Snowblower View Diagrams & Manuals
PR8P27ES (96192004605)(2012-08) Snowblower View Diagrams & Manuals
PP927ESC Snowblower View Diagrams & Manuals
961970004 Snowblower View Diagrams & Manuals
PP800EPS24 Snow Blowers View Diagrams & Manuals
PP1130ES (96192000700) Snowblower View Diagrams & Manuals
961940007 Snowblower View Diagrams & Manuals
PP8527ES Snow Thrower View Diagrams & Manuals
PP930ES (96192000600) Snow Thrower View Diagrams & Manuals
961940009 Snow Thrower View Diagrams & Manuals
PP927ESA Snow Thrower View Diagrams & Manuals
PR10527ESA Snowblower View Diagrams & Manuals
PP11530ES (96192001901) Snow Thrower View Diagrams & Manuals
Jonsered
J627 - 96192006400 (2013-9) Snow Blower View Diagrams & Manuals
J627ES - 96192006500 (2013-09) Snow Blower View Diagrams & Manuals
J630ES - 96192006600 (2013-9) Snow Blower View Diagrams & Manuals
ST 2109 E - 96191001300 (2007-01) Snow Blower View Diagrams & Manuals
ST 2109 E - 96191001301 (2007-01) Snow Blower View Diagrams & Manuals
ST 2109 E - 96191001303 (2007-01) Snow Blower View Diagrams & Manuals
ST 2109 E - 96191002100 (2007-10) Snow Blower View Diagrams & Manuals
ST 2109 E - 96191002101 (2007-10) Snow Blower View Diagrams & Manuals
ST 2109 E - 96191002102 (2007-10) Snow Blower View Diagrams & Manuals
ST 2109 E - 96191002103 (2007-10) Snow Blower View Diagrams & Manuals
ST 2109 E - 96191002104 (2008-08) Snow Blower View Diagrams & Manuals
ST 2109 E - 96191002105 (2008-08) Snow Blower View Diagrams & Manuals
ST 2109 E - 96191002106 (2008-10) Snow Blower View Diagrams & Manuals
ST 2109 E - 96191002107 (2009-08) Snow Blower View Diagrams & Manuals
ST 2109 E - 96191004000 (2010-06) Snow Blower View Diagrams & Manuals
ST 2109 E - 96191004001 (2010-08) Snow Blower View Diagrams & Manuals
ST 2109 E - 96191004002 (2011-05) Snow Blower View Diagrams & Manuals
ST 2109 E - 96191004003 (2011-07) Snow Blower View Diagrams & Manuals
ST 2109 E - 96191004005 (2012-06) Snow Blower View Diagrams & Manuals
ST 2111 E (2009-08) Snow Blower View Diagrams & Manuals
ST 2111 E (2010-06) Snow Blower View Diagrams & Manuals
ST 2111 E (2010-08) Snow Blower View Diagrams & Manuals
ST 2111 E - 96191001400 (2007-01) Snow Blower View Diagrams & Manuals
ST 2111 E - 96191001402 (2007-01) Snow Blower View Diagrams & Manuals
ST 2111 E - 96191002200 (2007-07) Snow Blower View Diagrams & Manuals
ST 2111 E - 96191002201 (2007-10) Snow Blower View Diagrams & Manuals
ST 2111 E - 96191002202 (2007-10) Snow Blower View Diagrams & Manuals
ST 2111 E - 96191002203 (2008-02) Snow Blower View Diagrams & Manuals
ST 2111 E - 96191002204 (2008-09) Snow Blower View Diagrams & Manuals
ST 2111 E - 96191002205 (2008-08) Snow Blower View Diagrams & Manuals
ST 2111 E - 96191004104 (2012-10) Snow Blower View Diagrams & Manuals
ST 2111 E - 96191004105 (2012-05) Snow Blower View Diagrams & Manuals
ST 2111 E - 96191004106 (2012-08) Snow Blower View Diagrams & Manuals
ST 2111 E - 96191004107 (2013-04) Snow Blower View Diagrams & Manuals
ST 2111 E - 96191004108 (2013-07) Snow Blower View Diagrams & Manuals
ST 2111 E - 96191004109 (2013-07) Snow Blower View Diagrams & Manuals
Show More Compatible Models
This item works with the following types of products:
- Snowblower Parts
This part replaces obsolete part #: 532420679, 420679, 5871331-01, 5321786-74, 532178474, 585271701, 178674, 420673, 532420673, 532198475, 532178674
Customer Part Reviews ?
Average Rating (out of 5):
Click to filter by ratings:
5 stars
1
4 stars
1
3 stars
0
2 stars
0
1 stars
0
< PREV
- 1
Cable control
Very easy 30 min
Guest -
December 29, 2020
Verified Purchase
Perfect Fit
The Control Assemble, Deflector cable was a perfect replacement. The one problem was that the screw holes that hold the shift level to the snowblower control panel were not tapped. The solution was to use the screws as taps. I tapped prior to assembly and then used the exact same screws to attach the lever assembly. Everything else was perfect including the attachment bracket to the chute.
Guest -
May 20, 2019
Verified Purchase
t
t
t -
t days ago
Verified Purchase
eReplacementParts Team
t
Questions & Answers ?
Our customer Service team is at the ready daily to answer your part and product questions.

Ask our Team
We have a dedicated staff with decades of collective experience in helping customers just like you purchase parts to repair their products.
Does this fit my product?Questions & Answers for Control Assembly, Deflector
Hi, how you guys and ladies doing? Hoping Well and Safe. My question is do you sell chute cable only for Husqvarna 10527SBE, Model # 96193001606? May I ask what is part number for that cable. Thank You and be Healthy
Mang
for model number 96193001606
asked on 2022-02-11
Hello Mang, Thank you for writing. Very sorry the Cable is not sold on its own, it is only sold as an assembly with the Lever, Part Number:532428272. If you need help placing an order, customer service is open 7 days a week. Please feel free to give us a call. We look forward to hearing from you!
eReplacementParts Team February 11, 2022
Customer Repair Instructions ?
All our customer repair instructions are solicited directly from other customers just like you who have purchased and replaced this exact part.
The cable that controls the upper chute reflected was damaged by the left wheel tire
George - August 16, 2016
👍 7 of 7 people found this instruction helpful
Tool Type
Snowblower
Difficulty
Medium
Time
30-60 minutes
Tools Used
Socket set, Nutdriver
Parts Used
1. Removed all of the rubber cushions on the rods that control the snow chute.
2. Removed the plastic cover of the control assemblies mounted near the machine handles.
3. Remove the control assembly of the damaged cable and remove the end of the cable attached to the top movable section of the snow chute.
4. Install new snow chute cable control assembly near the snow machine handles and mount the other end of the snow chute cable on the upper section of the snow chute.
5. Using plastic ties, loosely, but securely, secure the chute control cable in such a way that the cable will not be damaged by the drive wheels of the snow blower.
6. Replace the plastic cover on the control assemblies and the rubber cushions on the control rods.
Did you find this story helpful?
Thanks for voting and helping fellow customers!
The cable got lose, touched the muffler, and melted
Bradley - January 4, 2017
👍 2 of 2 people found this instruction helpful
Tool Type
Snowblower
Difficulty
Medium
Time
30-60 minutes
Tools Used
Socket set, Plastic ties
Parts Used
1. Remove the clutch levers so that I could get at the bolts holding the control panel onto the frame. (One bolt on each handlebar)
2. Remove the control panel sp that I could get at the bolts holding the control assembly onto the frame. (4 bolts)
3. Remove the old control assembly "handle end", and replace with the new one. (2 bolts, which self-taps into the new control assembly).
4. Thread the control cable to the direction chute.
5. Remove the old control assembly's "chute end", and replace with the new one. (2 bolts)
6. Use ties to tie down the cable so that neither touches the muffler nor the tires.
The hardest part was that the bolts holding the control assembly "handle end" self-tap, so it requires getting the bolt aligned and turning it with enough torque and downward pressure to make it self-tap. (The control assembly simply has holes in it metal, and the holes are not threaded).
Did you find this story helpful?
Thanks for voting and helping fellow customers!
Broken deflector cable
BRYAN - December 30, 2018
👍 1 of 1 people found this instruction helpful
Tool Type
Snowblower
Difficulty
Easy
Time
15-30 minutes
Tools Used
Screwdriver, Socket set, Adjustable Wrench
Parts Used
Removed upper contorl panel and cable, easy fix
Did you find this story helpful?
Thanks for voting and helping fellow customers!
Deflector cable broke
paul - December 3, 2018
👍 1 of 1 people found this instruction helpful
Tool Type
Snowblower
Difficulty
Easy
Time
15-30 minutes
Tools Used
Socket set
Parts Used
Removed old one and replaced
Did you find this story helpful?
Thanks for voting and helping fellow customers!
Cable had broken
David - January 5, 2019
Tool Type
Snowblower
Difficulty
Easy
Time
15-30 minutes
Tools Used
Socket set
Parts Used
Unscrew knobs to control rods
Remove instruction cover six screws
remove brakes two screws
Remove lever that controls the height of snow to be thrown two screws
Remove two nuts at the chute use a 1/2 inch on one 7/16 on the other cut three zip ties off then R
Remove the chute direction lever
Install new assembly the same way old one was taken out Put the 1/2 inch nut on along with the 7/16 tighten
Install lever through the opening using the original screws
Reinstall direction cover plate with the same screws then brakes with same screws
Reinstall knobs on correct lever
The screws all had in this case a 5/16 head
Have everything in order and it takes around a half hour
Did you find this story helpful?
Thanks for voting and helping fellow customers!
Deflector cable siezed up.
Gerald - January 24, 2018
Tool Type
Snowblower
Difficulty
Easy
Time
15-30 minutes
Tools Used
Socket set, Wrench Set
Parts Used
Unbolted the old cable assembly and bolted the new one in. Done!
Did you find this story helpful?
Thanks for voting and helping fellow customers!
Control cable needed replacing
Anthony - April 16, 2017
Tool Type
Snowblower
Difficulty
Easy
Time
Less than 15 minutes
Tools Used
Socket set, Nutdriver, use tie straps on cable
Parts Used
Took notes on how the old cable was installed , then removed it and installed the new cable.
Did you find this story helpful?
Thanks for voting and helping fellow customers!
OEM stands for Original Equipment Manufacturer and means the part you’re buying is sourced directly from the manufacturer who made your product. At eReplacementParts, we sell only genuine OEM parts, guaranteeing the part you’re purchasing is of better design and of higher quality than aftermarket parts.
Our product descriptions are a combination of data sourced directly from the manufacturers who made your product as well as content researched and curated by our content & customer service teams. This content is edited and reviewed internally before being made public to customers.
Our customer service team are at the ready daily to answer your part and product questions. We have a dedicated staff with decades of collective experience in helping customers just like you purchase parts to repair their products.
All our part reviews are solicited directly from other customers who have purchased this exact part. While we moderate these reviews for profanity, offensive language or personally identifiable information, these reviews are posted exactly as submitted and no alterations are made by our team.
All our customer repair instructions are solicited directly from other customers just like you who have purchased and replaced this exact part. While we moderate these reviews for profanity, offensive language or personally identifiable information, these reviews are posted exactly as submitted and no alterations are made by our team.
Based on data from past customer purchasing behaviors, these parts are most commonly purchased together along with the part you are viewing. These parts may be necessary or helpful to replace to complete your current repair.
All our installation videos are created and produced in collaboration with our in-house repair technician, Mark Sodja, who has helped millions of eReplacementParts customers over the last 13 years repair their products. Mark has years of experience in selling and repairing both commercial and residential products with a specialty in gas-powered equipment.
This data is collected from customers who submitted a repair instruction after replacing this exact part. Customers can rate how easy the repair was to complete and how long it took. We aggregate this data to provide a repair rating that allows customers to quickly determine the difficulty and time needed to perform their own repair.