
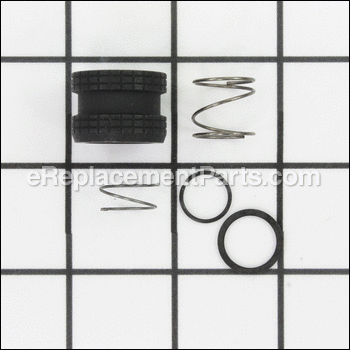
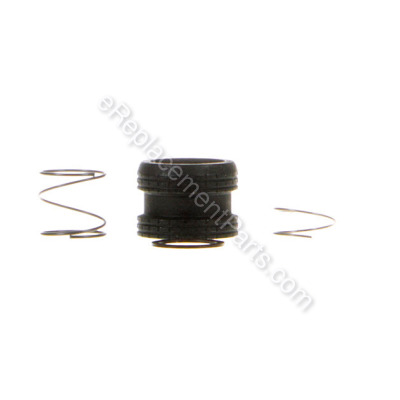


This is a genuine OEM replacement part used with the PCCK640LB (Type 1) 20V Impact Driver. The Porter Cable collar assembly is composed of metal and plastic items. This part secures the rubber sleeve to the motor & gearbox. The collar assembly is sold individually. A screwdriver and a pick set are helpful in the repair.
Collar Assembly N922985
OEM part for: Porter Cable
Part Number: N922985
$7.28
In Stock
Compatibility
This part will fit the following 3 machines
Porter Cable
PCCK640LB (Type 1) 20V Impact Driver View Diagrams & Manuals
PCC640 (Type 1) 20v Impact Driver View Diagrams & Manuals
PCC640B (Type 1) 20v Impact Drivr Bar View Diagrams & Manuals
This item works with the following types of products:
- Impact Driver Parts
This part replaces obsolete part #: 90591110
Customer Part Reviews ?
Average Rating (out of 5):
Click to filter by ratings:
5 stars
10
4 stars
2
3 stars
1
2 stars
0
1 stars
0
< PREV
- 1
- 2
Easy fix, works like new
Works perfect now
Guest -
August 24, 2023
Verified Purchase
Easy to repair. Parts were cheap. It's like having a brand new impact gun.
The parts came quickly. The parts were cheap. It's like having a brand new impact gun I couldn't be happier I'm so glad I didn't have to throw it out and buy a new one.
Scott -
November 15, 2021
Verified Purchase
Easy repair
Fast shipping , and had the repair done in about 10 minutes.Thanks
Guest -
November 1, 2021
Verified Purchase
Quick shipping. Good fit.
Suitable, quality part for a very reasonable price. Very satisfied.
Guest -
May 29, 2020
Verified Purchase
Parts fit perfect and repair was easy.
The parts arrived on time and everything was there. Repair was easy and parts fit perfectly. My impact drill works like new.
Thanks for your service. R.M.
Earl -
April 14, 2020
Verified Purchase
Work well
Impact driver is working and making money again
Guest -
February 3, 2020
Verified Purchase
Not the same but better!
I replaced my collar because of a broken spring, I was originally going to just replace the spring but the grip on the collar spoke to me. After using it over an 8 hour shift I'll say it's holding bits perfectly and changeouts with the new collar are much easier as it can no longer slip out of my fingers. Excellent product.
Guest -
September 18, 2019
Verified Purchase
Fit my ridgid
Fixed the problem of the chuck doesn’t hold bits anymore. Internal spring for the ball bearing snaps. Good product, quick shipping.
Guest -
August 26, 2019
Verified Purchase
Collar assembly
It would be nice if there was a picture showing the assembly. The parts need to be put in order or you may have to do it twice.
Guest -
May 24, 2019
Verified Purchase
Exactly as advertised
All the parts were sealed and fit perfectly. Fast shipping, great price, and worked like a charm.
Steve -
May 9, 2019
Verified Purchase
t
t
t -
t days ago
Verified Purchase
eReplacementParts Team
t
Questions & Answers ?
Our customer Service team is at the ready daily to answer your part and product questions.

Ask our Team
We have a dedicated staff with decades of collective experience in helping customers just like you purchase parts to repair their products.
Does this fit my product?Questions & Answers for Collar Assembly
What fixs the chuck on an impact driver to keep it holding the bit in it. Right now if you turn it downward the shaft with the drill tip will fall out the impact
Shawn
for model number Pcc640
asked on 2022-12-22
Hi Shawn,
Thank you for your question. Based on our research, you will need the bit retaining collar. The part number listed under your model number for the collar assembly is N922985. If you need help placing an order for it, customer service is open 7 days a week and anyone will be happy to assist you. Please feel free to give us a call. We look forward to hearing from you!
eReplacementParts Team December 22, 2022
Customer Repair Instructions ?
All our customer repair instructions are solicited directly from other customers just like you who have purchased and replaced this exact part.
The collar came apart on my impact driver.....it was way overdue. Probably screwed a thousand boards
Josh - July 2, 2017
👍 8 of 11 people found this instruction helpful
Tool Type
Cordless Drill
Difficulty
Easy
Time
Less than 15 minutes
Tools Used
, Pick
Parts Used
Pretty simple, just removed the retainer clip and replaced all the parts. The springs made it a little difficult, but not bad.
Did you find this story helpful?
Thanks for voting and helping fellow customers!
Bit retaining collar did not retain the bit
Robert - February 8, 2018
👍 4 of 5 people found this instruction helpful
Tool Type
Cordless Drill
Difficulty
Medium
Time
30-60 minutes
Tools Used
Screwdriver, x3
Parts Used
1. Removed all the collar assembly parts not problem, had a broken spring.
2. Reassembled all the parts no problems.
3. The collar assembly retain ring was very difficult to spread and install
4. Finally got it installed and the spring and ball bearing were upside down and to do it all over again.
5. Went faster the second time.
6. I had to use three very small screw drivers.
Did you find this story helpful?
Thanks for voting and helping fellow customers!
The factory Chuck collar finally came apart
Chaz - December 13, 2017
👍 5 of 8 people found this instruction helpful
Tool Type
Cordless Drill
Difficulty
Medium
Time
15-30 minutes
Tools Used
, Pick
Parts Used
Removed small c-clip and removed sliding collar, removed spring that hold locking ball in place and installed new spring and locking ball. Installed sliding collar then big spring and washer and had to fight the new c-clip back on while holding spring compressed. Works like new now
Did you find this story helpful?
Thanks for voting and helping fellow customers!
Did not hold bits
roy - June 17, 2017
👍 3 of 4 people found this instruction helpful
Tool Type
Cordless Drill
Difficulty
Medium
Time
Less than 15 minutes
Tools Used
Screwdriver, pick set
Parts Used
You need a 3rd hand. Be careful with picks. They hurt.keeping all together for last snap ring is the hardest part..it can be done
Did you find this story helpful?
Thanks for voting and helping fellow customers!
Impact gun would not hold bits securely anymore
george - November 1, 2018
👍 1 of 1 people found this instruction helpful
Tool Type
Impact Driver
Difficulty
Easy
Time
15-30 minutes
Tools Used
Screwdriver, Fine tool/pick set
Parts Used
1 Remove retaining clip from collar with pick tools
2 Hold assembly together after clip is
3 Slowly remove spring, collar, inner spring,
and ball bearing.
4 Replace with new parts from kit starting with bearing.
5 Install spring with built in retaining clip next, this holds ball bearing in place, and will hold tension against collar.
bearing goes on top of spring, so that spring/ clip is on the side closer to the drill, while bearing is closer to the opening for bits.
6 Install new collar next, followed by remaining
7 Using a flat head screw driver, I held the new retaining clip in place while using pick tool to spread it enough to get it back in place on the shaft and holding the assembly together. You're done.
Did you find this story helpful?
Thanks for voting and helping fellow customers!
Impact driver would not hold the bit in so I lost several bits.
Alfred - September 9, 2017
👍 2 of 3 people found this instruction helpful
Tool Type
Cordless Drill
Difficulty
Medium
Time
15-30 minutes
Tools Used
Screwdriver
Parts Used
I removed the snap ring which held the quick connect on the drill. I found the spring broken which holds the little ball in place. I replaced the spring with the new parts and it works great. The only difficult part of this repair was getting the snap ring back one because it is so small. Thanks for the kit to repair my impact driver.
Did you find this story helpful?
Thanks for voting and helping fellow customers!
Broke spring
Thomas - October 15, 2021
Tool Type
Impact Driver
Difficulty
Easy
Time
Less than 15 minutes
Tools Used
Screwdriver
Parts Used
Removed c clip removed the springs replaced springs then c clip
Did you find this story helpful?
Thanks for voting and helping fellow customers!
The collar stopped hold/locking bits in place
Beatrice - January 4, 2019
Tool Type
Impact Driver
Difficulty
Medium
Time
15-30 minutes
Tools Used
Pliers, Had to use my knife to hold spring down
Parts Used
I took old collar off and replaced it with a new one. The most time consuming part we're getting the spring in place and the snapring in.
Did you find this story helpful?
Thanks for voting and helping fellow customers!
A spring was broken inside.
Steve - December 11, 2018
Tool Type
Impact Driver
Difficulty
Easy
Time
Less than 15 minutes
Tools Used
, Handle with a sort of hook at the end.
Parts Used
Removed the snap ring at the tip.
Removed the following parts: washer, large spring, cowling or cover, the broken smaller spring and ball bearing.
Replaced broken spring with new one.
Reinserted ball bearing in front of the hook in the spring, replaced cover, large spring and washer.
Pressed the washer downward and placed the snap ring at the tip.
I needed a small handled tool that has a hook at the end to pull the snap ring and work it into the groove it sits in.
Really easy fix. Can be done in five minutes or less.
Did you find this story helpful?
Thanks for voting and helping fellow customers!
Would not hold a bit
Frank - December 5, 2018
Tool Type
Impact Driver
Difficulty
Easy
Time
Less than 15 minutes
Tools Used
Screwdriver, Pick
Parts Used
Disassemble & replaced spring
Did you find this story helpful?
Thanks for voting and helping fellow customers!
OEM stands for Original Equipment Manufacturer and means the part you’re buying is sourced directly from the manufacturer who made your product. At eReplacementParts, we sell only genuine OEM parts, guaranteeing the part you’re purchasing is of better design and of higher quality than aftermarket parts.
Our product descriptions are a combination of data sourced directly from the manufacturers who made your product as well as content researched and curated by our content & customer service teams. This content is edited and reviewed internally before being made public to customers.
Our customer service team are at the ready daily to answer your part and product questions. We have a dedicated staff with decades of collective experience in helping customers just like you purchase parts to repair their products.
All our part reviews are solicited directly from other customers who have purchased this exact part. While we moderate these reviews for profanity, offensive language or personally identifiable information, these reviews are posted exactly as submitted and no alterations are made by our team.
All our customer repair instructions are solicited directly from other customers just like you who have purchased and replaced this exact part. While we moderate these reviews for profanity, offensive language or personally identifiable information, these reviews are posted exactly as submitted and no alterations are made by our team.
Based on data from past customer purchasing behaviors, these parts are most commonly purchased together along with the part you are viewing. These parts may be necessary or helpful to replace to complete your current repair.
All our installation videos are created and produced in collaboration with our in-house repair technician, Mark Sodja, who has helped millions of eReplacementParts customers over the last 13 years repair their products. Mark has years of experience in selling and repairing both commercial and residential products with a specialty in gas-powered equipment.
This data is collected from customers who submitted a repair instruction after replacing this exact part. Customers can rate how easy the repair was to complete and how long it took. We aggregate this data to provide a repair rating that allows customers to quickly determine the difficulty and time needed to perform their own repair.