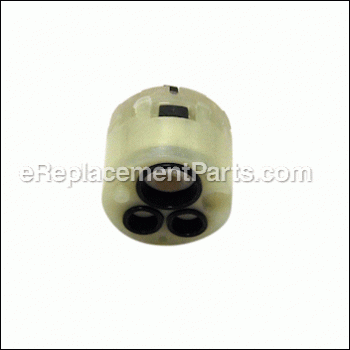

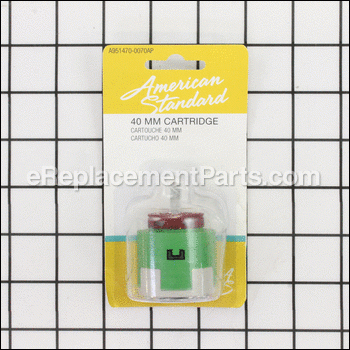

This is an original manufacturer-approved replacement part which is specially designed for use with American Standard faucets. Its purpose is to filter out contaminants from the water. Over time it will wear out and may get clogged eventually requiring a replacement to ensure the best results. Refer to the owner\\\'s manual and the appropriate diagram for your model to ensure the correct installation of the new cartridge. Keep in mind it is sold as an individual component. Note, the cartridge is secured by three screws which are sold separately.
Cartridge A951470-0070A
OEM part for: American Standard
Part Number: A951470-0070A
$29.93
Usually ships in 7 - 12 business days
7 - 12 business days
Jump To:
Frequently Purchased Together ?

Compatibility
This part will fit the following 24 machines
American Standard
4005F Fairbury Kitchen Faucet View Diagrams & Manuals
4005MBF Fairbury Single Control Pulldown Kitchen Faucet View Diagrams & Manuals
4005SSF Fairbury Kitchen Faucet View Diagrams & Manuals
4101.000P Arch Metal Escutcheon Plate View Diagrams & Manuals
4101.100 Arch Single Control Kitchen Pull-Out Faucet View Diagrams & Manuals
4101.301 Arch Metal Escutcheon Plate View Diagrams & Manuals
4101.350 Arch Kitchen Faucet W/ Pull-Out Spray View Diagrams & Manuals
4101.351 Arch Pull-Out Kitchen Faucet W/ Deck Plate & Soap View Diagrams & Manuals
4114.001 Lakeland Kitchen Faucet View Diagrams & Manuals
4175.200.F15 Colony Single Control Kitchen Faucet View Diagrams & Manuals
4175.200 Colony Single Control Kitchen Faucet View Diagrams & Manuals
4175.201 Colony Single Control Kitchen Faucet View Diagrams & Manuals
4175.201.F15 Colony Kitchen Faucet W/ Separate Spray View Diagrams & Manuals
4175.203.F15 Colony Kitchen Faucet W/ Spray View Diagrams & Manuals
4175.203 Colony Kitchen Faucet W/ Spray View Diagrams & Manuals
4175.300.F15 Colony Kitchen Faucet W/ Spray View Diagrams & Manuals
4175.300 Colony Kitchen Faucet W/ Spray View Diagrams & Manuals
4175.500.F15 Colony Soft Single Control Kitchen Faucet View Diagrams & Manuals
4175.500 Colony Soft Single Control Kitchen Faucet View Diagrams & Manuals
4175.501.F15 Colony Soft Kitchen Faucet W/ Separate Spray View Diagrams & Manuals
4175.501 Colony Soft Kitchen Faucet W/ Separate Spray View Diagrams & Manuals
4175.503.F15 Colony Soft Kitchen Faucet W/ Separate Spray View Diagrams & Manuals
4175.503 Colony Soft Kitchen Faucet W/ Separate Spray View Diagrams & Manuals
9092.301 Olvera Kitchen Faucet View Diagrams & Manuals
Show More Compatible Models
This item works with the following types of products:
- Faucet Parts
This part replaces obsolete part #: AA9514700070AP, AA9514700070A
Customer Part Reviews ?
Average Rating (out of 5):
Click to filter by ratings:
5 stars
2
4 stars
0
3 stars
0
2 stars
0
1 stars
0
< PREV
- 1
Great part
Arrived on time Faucet working perfect!!!!!!!
john -
March 6, 2023
Verified Purchase
Extremely Pleased
easy to change and has been installed and the faucet will be hooked back up tomorrow and I am sure all will be well as before, just a shame the store it was bought from still sells the faucet but no replacement parts so we will continue to buy from your company. have a spare and will continue to shop here. Quick delivery and very pleased with the service, Thank You
Guest -
December 20, 2020
Verified Purchase
t
t
t -
t days ago
Verified Purchase
eReplacementParts Team
t
Questions & Answers ?
Our customer Service team is at the ready daily to answer your part and product questions.

Ask our Team
We have a dedicated staff with decades of collective experience in helping customers just like you purchase parts to repair their products.
Does this fit my product?Questions & Answers for Cartridge
No questions have been asked yet
Customer Repair Instructions ?
All our customer repair instructions are solicited directly from other customers just like you who have purchased and replaced this exact part.
It leaked.
John - March 29, 2017
👍 2 of 3 people found this instruction helpful
Tool Type
Faucet
Difficulty
Medium
Time
1-2 hours
Tools Used
Pliers, Allen Wrench
The difficult parts were simply in finding out how the parts were connected to the faucet base. There is a set screw that attaches the handle to the faucet which was a PITA to find. It is under a button which was not a problem, but unscrewing it and discovering that the handle pulls out is obvious once you know how. Then there is a cowling that has to come off. Discovering that it screws on and is removed with a pair of channel locks is another PITA and easy once you know how. Then three screws come out and the cartridge comes out. Reverse the process to get it working again. A scraped knuckle, some scratches on the cowling, and some bad words did the trick. No worries.
Did you find this story helpful?
Thanks for voting and helping fellow customers!
Leaked around spout base and cartridge was hard to turn on.
Robert - July 1, 2023
Tool Type
Faucet
Difficulty
Medium
Time
More than 2 hours
Tools Used
Screwdriver, Pliers, Allen wrench
Parts Used
1. Turn off water
2 Loosen single handle allen set screw with 3/32 allen wrench.
3. Remove single handle from cartridge (The hardest part of the job). You would think the handle would just slip off the cartridge stem, but NO, it's held on by a plastic or nylon spacer that is pressed into the handle and must be pried off with the handle using something that won't scratch up the chrome on the faucet. Took almost an hour to figure that out! After that every thing went smoothly
4. There are no instructions with the repair parts. One thing that's important is to use a food grade silicon grease on the cartridge seals and the spout O-rings or they will fail prematurely.
Did you find this story helpful?
Thanks for voting and helping fellow customers!
Faucet leaking under the sink.
John - November 17, 2022
Tool Type
Faucet
Difficulty
Easy
Time
30-60 minutes
Tools Used
Screwdriver, Allen wrench
Parts Used
I read the repair instructions on this website; removed the plastic plug on the faucet handle to expose the set screw with a 2.5 mm Allen wrench.
Unscrewed the cover and then removed the cartridge
(3 screws). I soaked the handle and cover in vinegar to remove mineral deposits and cleaned the faucet manifold where the cartridge mounts. Installed the new cartridge, gently tightened the 3 screws until it fit snugly. Faucet is like new, an easy repair!
Thanks!
Did you find this story helpful?
Thanks for voting and helping fellow customers!
Leaking cartridge
Thomas - January 22, 2021
Tool Type
Faucet
Difficulty
Easy
Time
30-60 minutes
Tools Used
, Allen wrench set standard/metric
Parts Used
1. Shut off hot and cold water going to the faucet. 2. Remove the little plug on the faucet, the set screw will likely be inside the opening. 3. Be sure to use the correct size Allen wrench, rounding off the screw opening, not a good idea. Remove the screw and faucet handle can be removed fairly easy. 4. Remove faucet collar, that covers the cartridge. This can be a challenge, use rubber gloves/mitts, rubber dollies for removing jar lids. Channel locks, not a good choice, chip and damage the collar. 5. Remove the cartridge, three screws. Replace cartridge, be sure to place in correct position, should be a little position tab that seats cartridge in correct position. Make sure that all gaskets/ washers are in proper position. Tighten screws a little at a time, proper seating for the cartridge. 6. Replace all parts in reverse order.
Did you find this story helpful?
Thanks for voting and helping fellow customers!
OEM stands for Original Equipment Manufacturer and means the part you’re buying is sourced directly from the manufacturer who made your product. At eReplacementParts, we sell only genuine OEM parts, guaranteeing the part you’re purchasing is of better design and of higher quality than aftermarket parts.
Our product descriptions are a combination of data sourced directly from the manufacturers who made your product as well as content researched and curated by our content & customer service teams. This content is edited and reviewed internally before being made public to customers.
Our customer service team are at the ready daily to answer your part and product questions. We have a dedicated staff with decades of collective experience in helping customers just like you purchase parts to repair their products.
All our part reviews are solicited directly from other customers who have purchased this exact part. While we moderate these reviews for profanity, offensive language or personally identifiable information, these reviews are posted exactly as submitted and no alterations are made by our team.
All our customer repair instructions are solicited directly from other customers just like you who have purchased and replaced this exact part. While we moderate these reviews for profanity, offensive language or personally identifiable information, these reviews are posted exactly as submitted and no alterations are made by our team.
Based on data from past customer purchasing behaviors, these parts are most commonly purchased together along with the part you are viewing. These parts may be necessary or helpful to replace to complete your current repair.
All our installation videos are created and produced in collaboration with our in-house repair technician, Mark Sodja, who has helped millions of eReplacementParts customers over the last 13 years repair their products. Mark has years of experience in selling and repairing both commercial and residential products with a specialty in gas-powered equipment.
This data is collected from customers who submitted a repair instruction after replacing this exact part. Customers can rate how easy the repair was to complete and how long it took. We aggregate this data to provide a repair rating that allows customers to quickly determine the difficulty and time needed to perform their own repair.