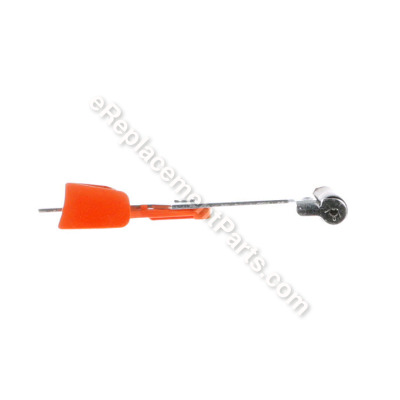


This is a genuine Black and Decker part that has been OEM sourced to ensure quality. The carrier assembly is intended to be used with belt sanders. The carrier attaches to the cover plate and the mounting plate. This item is used as the front roller to allow the belt to rotate. This part also includes the lever used to move the carrier to tighten and loosen the belt when changing sanding belts. This assembly is priced as a single item.
Carrier Assembly 589384-00N
OEM part for: DeWALT, Black and Decker
Part Number: 589384-00N
$13.97
In Stock
Compatibility
This Carrier Assembly will fit the following 12 machines. Confirm this part works with your model, and view the detailed model diagrams and repair help we have to offer.
Black and Decker
DeWALT
Show More Compatible ModelsThis item works with the following types of products:
- Sander Parts
This part replaces obsolete part #: 589384-00
Customer Part Reviews ?
Average Rating (out of 5):
Click to filter by ratings:
5 stars
9
4 stars
0
3 stars
0
2 stars
0
1 stars
0
< PREV
- 1
Ordered part
The right part for my chain saw and came in good timing.
Guest -
August 26, 2023
Verified Purchase
added years of service to an old belt sander
The part fits and works like new, identical replacement
Paul -
February 10, 2023
Verified Purchase
Exact part.
I cannot find myself throwing away tools that are repairable and am thankful EReplacment Parts is there to provide the necessary parts.
Part prices are reasonable and shipping is acceptable.
Thanks.
Guest -
May 11, 2022
Verified Purchase
Great part. Easy to instal
The part was new in great condition and was easy to replace.
iGlobal -
March 22, 2022
Verified Purchase
as described
fast shipping, cheaper than from the manufacturer, solved the problem
Guest -
February 8, 2021
Verified Purchase
Black and Decker belt sander
The carrier assembly fit perfect. Sander like new. Shipping was quick-Thanks
Guest -
August 13, 2020
Verified Purchase
Belt sander tension unit repair
The part arrived within a week, the directions on the website were clear on how to remove the three screws and slide out the belt assembly. The spring was the most challenging part since it had to be compressed as the part slid in. Once it was together, it worked fine. It's too bad they have still use a cheap plastic tab. Otherwise, erplacement parts was great.
Mark -
September 12, 2019
Verified Purchase
Worked as expected
Excelent
Guest -
August 16, 2019
Verified Purchase
Quick found part I needed and shipped same day
Cyst service was great found the part I needed quickly
Guest -
June 27, 2019
Verified Purchase
Questions & Answers ?
Our customer Service team is at the ready daily to answer your part and product questions.

Ask our Team
We have a dedicated staff with decades of collective experience in helping customers just like you purchase parts to repair their products.
Does this fit my product?Questions & Answers for Carrier Assembly
No questions have been asked yet
Customer Repair Instructions ?
All our customer repair instructions are solicited directly from other customers just like you who have purchased and replaced this exact part.
The front roller on the carrier assembly was squeaking,and the roller which is a bearing also shelled out.
Christopher - September 10, 2016
👍 3 of 3 people found this instruction helpful
Tool Type
Sander
Difficulty
Easy
Time
Less than 15 minutes
Tools Used
Screwdriver
Parts Used
1. Using a torx screwdriver,unscrew the 3 screws that hold the main roller ,carrier assembly housing and bottom plate.
2.Unscrew the belt adjustment knob ,so it is no longer holding the carrier .
3.Gently pull apart the full roller assembly from the main unit body,Be careful not to break the screw holders that fit in the assembly on the main unit .
4. The main drive shaft on the main unit and the drive roller gears are visible ,clean and lube the main shaft and bearing.
5. With a flat blade screwdriver ,place between the carrier assembly housing and the drive roller assembly and pry them apart gently,not to break any plastic parts, slide,the carrier assembly housing of the bottom plate .
6.Press the assembly and compress the spring to remove the assembly from the housing.
7.Insert new carrier assembly and spring back in plastic housing.
8.Reattach carrier assembly housing to drive roller assembly,sliding it back in place on the bottom plate.
9.Clean and lube the drive roller gears .
10.When re attaching the roller assembly , to main unit,remember to replace the adjustment knob spring and screw parts back together, your done.
Did you find this story helpful?
Thanks for voting and helping fellow customers!
Handle broke and unable to release carrier to add/remove sand paper
BILL - October 13, 2016
👍 3 of 4 people found this instruction helpful
Tool Type
Sander
Difficulty
Easy
Time
15-30 minutes
Tools Used
Screwdriver
Parts Used
Removed screws slid carrier from base. The most time was spent compressing the spring, I just put it in vise and used 2 zip ties . Then just reassembled it
Did you find this story helpful?
Thanks for voting and helping fellow customers!
Plastic latch used to change belt broke
Thomas - July 2, 2016
👍 2 of 2 people found this instruction helpful
Tool Type
Sander
Difficulty
Medium
Time
15-30 minutes
Tools Used
Screwdriver, Power Drill, Socket set, Adjustable Wrench, Vice
Parts Used
Sander was disassembled down to the carrier assembly, so replaced part and reassembled, no other adjustments. Hardest part was compressing spring on carrier to install. Had to place carrier in a vice to hold (wear safety glasses!) then compressed with adjustable wrench.
Did you find this story helpful?
Thanks for voting and helping fellow customers!
Assembly pin was broke
Jason - July 16, 2021
Tool Type
Sander
Difficulty
Easy
Time
15-30 minutes
Tools Used
Screwdriver, Torx or flat head
Replaced carrier assembly
Did you find this story helpful?
Thanks for voting and helping fellow customers!
Roller on the carrier assembly was frozen.
James - July 10, 2019
Tool Type
Sander
Difficulty
Medium
Time
30-60 minutes
Tools Used
Screwdriver, torx driver
Parts Used
1. disassembled sander - you need a 3" torx driver
2. smashed the spring in a vice and held it smashed with 2 strong zip ties.
3. placed spring over the tounge of new carrier assembly
4. installed carried assembly
5. cut zip ties to release spring
6. reassembled sander
I can't imagine how you would ever get it back together without some method of smashing the spring while you reassembled it.
Did you find this story helpful?
Thanks for voting and helping fellow customers!
OEM stands for Original Equipment Manufacturer and means the part you’re buying is sourced directly from the manufacturer who made your product. At eReplacementParts, we sell only genuine OEM parts, guaranteeing the part you’re purchasing is of better design and of higher quality than aftermarket parts.
Our product descriptions are a combination of data sourced directly from the manufacturers who made your product as well as content researched and curated by our content & customer service teams. This content is edited and reviewed internally before being made public to customers.
Our customer service team are at the ready daily to answer your part and product questions. We have a dedicated staff with decades of collective experience in helping customers just like you purchase parts to repair their products.
All our part reviews are solicited directly from other customers who have purchased this exact part. While we moderate these reviews for profanity, offensive language or personally identifiable information, these reviews are posted exactly as submitted and no alterations are made by our team.
All our customer repair instructions are solicited directly from other customers just like you who have purchased and replaced this exact part. While we moderate these reviews for profanity, offensive language or personally identifiable information, these reviews are posted exactly as submitted and no alterations are made by our team.
Based on data from past customer purchasing behaviors, these parts are most commonly purchased together along with the part you are viewing. These parts may be necessary or helpful to replace to complete your current repair.
All our installation videos are created and produced in collaboration with our in-house repair technician, Mark Sodja, who has helped millions of eReplacementParts customers over the last 13 years repair their products. Mark has years of experience in selling and repairing both commercial and residential products with a specialty in gas-powered equipment.
This data is collected from customers who submitted a repair instruction after replacing this exact part. Customers can rate how easy the repair was to complete and how long it took. We aggregate this data to provide a repair rating that allows customers to quickly determine the difficulty and time needed to perform their own repair.