Carburetor:w/primer:tec 753-04296 - OEM Troy-Bilt - eReplacementParts.com
eReplacementParts.com
877-346-4814
MTD Parts
Repair Parts Home
  
Lawn Equipment Parts
  
MTD Parts
  753-04296 Carburetor:w/primer:tec

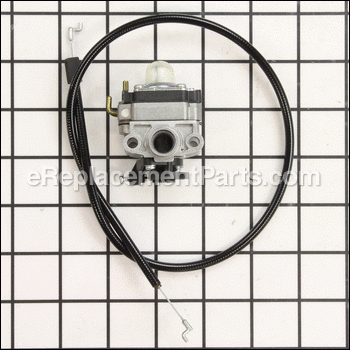
Carburetor:w/​primer:tec 753-04296

OEM part for: Troy-Bilt, MTD, Cub Cadet

Part Number: 753-04296


Install
Videos!
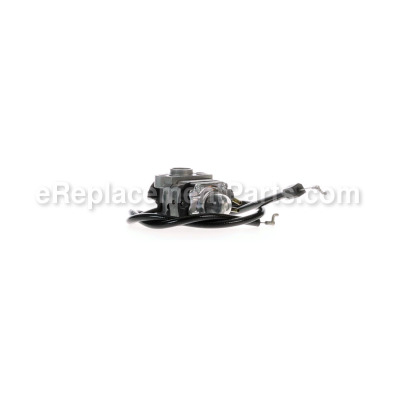
Carburetor:w/primer:tec - 753-04296:Troy-Bilt 360 View
Carburetor:w/primer:tec - 753-04296:Troy-BiltCarburetor:w/primer:tec - 753-04296:Troy-BiltCarburetor:w/primer:tec - 753-04296:Troy-Bilt 360 View
In Stock
Ships within 1 business day
Medium 15-30 minutes (13 rated repairs)?
OEM: Original Equipment Manufacturer ?
Troy-BiltMTDCub Cadet
Does this d-block d-md-none fit my product?

Product Description ?

This is an authentic OEM sourced replacement part designed for use with gas powered tillers/trimmer and edgers. It mixes air and gas before the fuel mix goes to the engine. This kit includes a metal body carburetor, a rubber primer bulb and a throttle cable. Please note gaskets are sold separately.

If the engine won't start and the tank is full of fresh fuel, test the carburetor by removing the air filter and pouring about a teaspoon of fuel into the carburetor. Pull the starter rope. If the engine starts and then quickly dies, the carburetor is likely the problem.

Tools needed for repair: Screwdriver.

• Remove the rear cover
• Disconnect throttle cable
• Remove the old carburetor
• Install the new carburetor
• Connect throttle cable
• Re-assemble and test the unit

  • Classification: Part
  • Weight: 0.25 lbs.
  • Shipping: Ships Worldwide

Frequently Purchased Together ?

Compatibility

This part will fit the following 22 machines

MTD

MP425 (41AD425C095) String Trimmer View Diagrams & Manuals
MP426CS (41AD426G995) String Trimmer View Diagrams & Manuals
MP475 (41AD475C095) String Trimmer View Diagrams & Manuals

Troy-Bilt

21AT144R766 (2004) Tiller/Edger View Diagrams & Manuals
21AT144R766 (2005) Tiller/Edger View Diagrams & Manuals
21AT144R966 (2005) Tiller/Edger View Diagrams & Manuals
TB26TB (41ADT2BC066) Gas Trimmer View Diagrams & Manuals
TB26TB (41ADT2BC966) Gas Trimmer View Diagrams & Manuals
TB475SS (41ADT47C711) Gas Trimmer View Diagrams & Manuals
TB475SS (41ADT47C766) Gas Trimmer View Diagrams & Manuals
TB475SS (41ADT47C966) Gas Trimmer View Diagrams & Manuals
TB475SS (41BDT47C063) Gas Trimmer View Diagrams & Manuals
TB490BC (41ADT49C711) Gas Trimmer View Diagrams & Manuals
TB490BC (41ADT49C966) Gas Trimmer View Diagrams & Manuals
TB490BC (41BDT49C063) Gas Trimmer View Diagrams & Manuals
TB490BC (41BDT49C966) Gas Trimmer View Diagrams & Manuals
TB425CS (41ADT42C063) Gas Trimmer View Diagrams & Manuals
TB425CS (41ADT42C711) Gas Trimmer View Diagrams & Manuals
TB425CS (41ADT42C766) Gas Trimmer View Diagrams & Manuals
TB425CS (41ADT42C966) Gas Trimmer View Diagrams & Manuals

Cub Cadet

CC4075 (41ADC47C712) Gas String Trimmer View Diagrams & Manuals
CC4090 (41ADC49C712) (2005) Gas String Trimmer View Diagrams & Manuals
Show More Compatible Models
Don't see yours? Try searching our site for :

This item works with the following types of products:

  • Trimmer Parts
  • Edger Parts

This part replaces obsolete part #: 753-04745

Repair Videos ?

Articles:
Replacing primer bulbs in small engines is one of the most common types of tool repairs, and this article explains profe...
June 25, 2010

Customer Part Reviews ?

4.8
Average Rating (out of 5):
4 Reviews
Click to filter by ratings:
5 stars
3
4 stars
1
3 stars
0
2 stars
0
1 stars
0
  • Highest Rating
  • Most Recent
< PREV
  • 1
NEXT >
  • Easy Repair
    Cultivator carb was gummed up from ethanol based gas, ordered replacement carb, 15 min to install, tool's back working great!
    Anonymous - July 22, 2021 Verified Purchase
    Repair Parts For Tiller
    Received parts in a timely manner. Parts were as advertised. Parts fit perfectly. Tiller now runs great. Would buy from this seller again.
    Guest - April 14, 2021 Verified Purchase
    ALL IS GOOD EASY FIX TRIMMER HAS NOT RAN THAT WELL IN A LONG TIME
    THE PARTS I RECEIVED WORKED PERFECTLY AS ALWAYS EVERYTHING I HAVE PURCHASED FROM eREPLACEMENT PARTS HAS BEEN SPOT ON THANK YOU
    Guest - August 4, 2020 Verified Purchase
    Worked as advertised.
    Very pleased with the service I received from you guys. Delivery went smoothly and timely. Everything worked as advertised. Will use your site again. Thanks
    Guest - October 13, 2020 Verified Purchase
    t
    t
    t - t days ago Verified Purchase
    eReplacementParts Team
    t

    Questions & Answers ?

    Our customer Service team is at the ready daily to answer your part and product questions.

    photo of team member
    Ask our Team

    We have a dedicated staff with decades of collective experience in helping customers just like you purchase parts to repair their products.

    Does this fit my product?

    Questions & Answers for Carburetor:w/​primer:tec


    What are the preset mixture specs on this carb? How many quarter, half or whole turns out on Hi and Lo mixture screws?
    Richard for model number 753-04296 asked on 2023-05-12
    HI Richard, Thank you for the question. Here at instructions on setting up a carburetor. 1. Loosen the large set screw on top of the air filter with a flathead screwdriver and remove the air filter from the carburetor. 2. Locate the idle adjustment screw on the side of the carburetor. Gently turn the screw clockwise with a screwdriver until the valve touches the seat. Then, back the screw off counterclockwise one-and-a-half turns. 3. Look on the opposite side of the carburetor, for the high-speed adjustment screw -- if your carburetor has one. Gently turn the screw clockwise until the valve touches the seat, then back this screw off one-and-a-half turns as well. 4. Check to see if your engine has a large bowl on the bottom side of the carburetor that houses the float. If so, it will have a single screw on the bottom of the bowl. Turn the screw clockwise until it stops turning, then back it off for one-and-a-half turns. 5. Replace the air filter on top of the carburetor and secure it by tightening the screw in the centre of the air filter. 6. Start the engine and let it half-throttle for about five minutes to warm up. Then, slowly turn the idle adjustment screw -- which you adjusted in Step 3 -- clockwise until the engine begins to slow. Note the position of the screw and then begin turning the screw counterclockwise. The engine will normalize, then eventually will begin to slow once again. Note the position where it begins to slow a second time and rotate the screw clockwise to a point halfway between the two positions where the engine began to slow. You have now fine-tuned the idle adjustment. 7. Increase the throttle to full speed. Repeat the adjustments you made on the idle screw on the high-speed screw -- on the opposite side of the carburetor from the idle screw. 8. Test the engine under varying workloads. If the engine runs roughly under any conditions, adjust the idle or high-speed screw to fine-tune the adjustments. I hope this helps and good luck with your repair.
    eReplacementParts Team May 12, 2023

    Customer Repair Instructions ?

    All our customer repair instructions are solicited directly from other customers just like you who have purchased and replaced this exact part.

    Medium 15-30 minutes (13 rated repairs)?

    Fuel problems

    Steven - May 26, 2016
    👍 4 of 5 people found this instruction helpful
    Tool Type

    Cultivator

    Difficulty

    Easy

    Time

    Less than 15 minutes

    Tools Used

    Screwdriver

    Removed the complete air cleaner assembly , then removed two screws. Took the fuel lines and throttle off of the defective carb, then put on the new carb on, then screwed in the screws. Put the fuel lines and throttle on the new carb. Then put the air cleaner back on.
    Did you find this story helpful?
    Thanks for voting and helping fellow customers!

    Old primer bulb worn out. Wasn't able to get just the bulb.

    Ronald - June 20, 2017
    👍 2 of 2 people found this instruction helpful
    Tool Type

    Trimmer

    Difficulty

    Expert

    Time

    15-30 minutes

    Tools Used

    Screwdriver

    Removed old carburetor, cleaned engine, put new carburetor and primer bulb on. Trimmer started right up.
    Did you find this story helpful?
    Thanks for voting and helping fellow customers!

    No start. No fuel in primer bowl.

    Brandon - September 4, 2016
    👍 2 of 3 people found this instruction helpful
    Tool Type

    Trimmer

    Difficulty

    Medium

    Time

    15-30 minutes

    Tools Used

    Screwdriver, Socket set

    1. I did some diagnostics
    2. Checked for good compression using compression guage.
    3. Checked for spark had strong spark
    4. Inspected fuel lines for being hard or brittle all checked out ok
    5. Primer wasn't working lead me to believe diaphragm wasn't any good.
    6. Bought new carb didn't find it cost effective for a rebuild
    7. Removed fuel lines from carb and remove tank
    8. Removed air cleaner cover and removed both bolts using a flathead screwdriver
    9. Removed all bolts for the trigger handle
    10. Take cable and carb off as one piece.
    11. Put new cable on and put throttle handle back together
    12. Hooked cable up to carb and reinstalled the carb
    13. Put fuel lines and tank back on
    14. Prime carb until a steady stream would go through both line with each push
    15. Set choke and pull until it starts took 2 pulls for me.
    Now my Troy-Bilt weed eater starts 1-2 pull every time. FYI deff buy the non-ethanol fuel to run through it and the carbs will last much longer. Ethanol fuel is what ruined this carb from the previous owner.
    Did you find this story helpful?
    Thanks for voting and helping fellow customers!

    Carb flooded and would not start

    JAMES - August 3, 2023
    Tool Type

    Cultivator

    Difficulty

    Easy

    Time

    30-60 minutes

    Tools Used

    Screwdriver, Socket set, Wrench Set

    Removed the old carb and installed the new one. It came with a cable but it was too short to fit my machine. so I used the old one. Primed new carb and fired up on third pull.
    Did you find this story helpful?
    Thanks for voting and helping fellow customers!

    Carburetor was leaking engine wouldn't run

    Willie - May 13, 2020
    Tool Type

    Cultivator

    Difficulty

    Easy

    Time

    15-30 minutes

    Tools Used

    Socket set

    Removed old carb replaced with new one and new air filter.
    Did you find this story helpful?
    Thanks for voting and helping fellow customers!

    Carburetor needed to be replaced

    Peter - May 2, 2020
    Tool Type

    Cultivator

    Difficulty

    Medium

    Time

    30-60 minutes

    Tools Used

    Screwdriver, Pliers, Socket set, Adjustable Wrench

    1. Disconnected the spark-plug.
    2. Drained the gas tank.
    3. disconnected the gas lines from the carburetor.
    4. Removed the air-filter cover and element.
    5. Loosened the two screws the carb is mounted to the engine.
    6. Removed old carb and replaced with new one.
    7. Reversed the process to reinstall the screws, etc.
    8. Connected the spark-plug and filled with gas.
    9. Pulled the cord and it started right up.
    Did you find this story helpful?
    Thanks for voting and helping fellow customers!

    New carb install

    Daniel - May 28, 2019
    Tool Type

    Trimmer

    Difficulty

    Easy

    Time

    Less than 15 minutes

    Tools Used

    Screwdriver, Pliers

    Removed old carb and installed new. After initial prime engine started on second pull.
    Did you find this story helpful?
    Thanks for voting and helping fellow customers!

    Trimmer would not run unless I put gas in the carb.

    Larry - April 23, 2018
    Tool Type

    Trimmer

    Difficulty

    Easy

    Time

    30-60 minutes

    Tools Used

    Power Drill, Nutdriver

    Fixed it with a new carb. Simple repair.
    Did you find this story helpful?
    Thanks for voting and helping fellow customers!

    Carb malfunctioning.

    Greg - June 3, 2017
    Tool Type

    Trimmer

    Difficulty

    Easy

    Time

    Less than 15 minutes

    Tools Used

    Nutdriver

    Removed the old carb and installed the new carb with the existing fasteners. Started right up and runs perfectly.
    Did you find this story helpful?
    Thanks for voting and helping fellow customers!

    Carburetor was damaged

    Bill - May 29, 2017
    Tool Type

    Trimmer

    Difficulty

    Easy

    Time

    Less than 15 minutes

    Tools Used

    Screwdriver

    1. Removed Air Filter
    2. Removed fuel and return lines
    3. Disconnected Breather? line
    4. Removed throttle cable
    5. Removed and replaced Carburetor
    6. Re-installed items 2 - 4
    7. Cleaned and installed Air Filter
    8. Fueled String Trimmer
    9. Two Pulls and it started and ran just fine.
    Did you find this story helpful?
    Thanks for voting and helping fellow customers!

    OEM stands for Original Equipment Manufacturer and means the part you’re buying is sourced directly from the manufacturer who made your product. At eReplacementParts, we sell only genuine OEM parts, guaranteeing the part you’re purchasing is of better design and of higher quality than aftermarket parts.

    Our product descriptions are a combination of data sourced directly from the manufacturers who made your product as well as content researched and curated by our content & customer service teams. This content is edited and reviewed internally before being made public to customers.

    Our customer service team are at the ready daily to answer your part and product questions. We have a dedicated staff with decades of collective experience in helping customers just like you purchase parts to repair their products.

    All our part reviews are solicited directly from other customers who have purchased this exact part. While we moderate these reviews for profanity, offensive language or personally identifiable information, these reviews are posted exactly as submitted and no alterations are made by our team.

    All our customer repair instructions are solicited directly from other customers just like you who have purchased and replaced this exact part. While we moderate these reviews for profanity, offensive language or personally identifiable information, these reviews are posted exactly as submitted and no alterations are made by our team.

    Based on data from past customer purchasing behaviors, these parts are most commonly purchased together along with the part you are viewing. These parts may be necessary or helpful to replace to complete your current repair.

    All our installation videos are created and produced in collaboration with our in-house repair technician, Mark Sodja, who has helped millions of eReplacementParts customers over the last 13 years repair their products. Mark has years of experience in selling and repairing both commercial and residential products with a specialty in gas-powered equipment.

    This data is collected from customers who submitted a repair instruction after replacing this exact part. Customers can rate how easy the repair was to complete and how long it took. We aggregate this data to provide a repair rating that allows customers to quickly determine the difficulty and time needed to perform their own repair.

    eReplacementParts.com
    7174 South 400 West
    Suite 5
    Midvale, UT 84047
    visa mastercard discover american express PayPal