eReplacementParts.com
877-346-4814
DeWALT Parts
Repair Parts Home
  
Power Tool Parts
  
DeWALT Parts
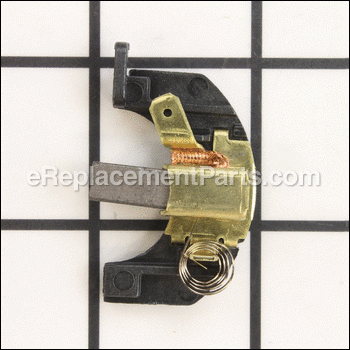
  N157123 Carbon Brush With Holder

Carbon Brush With Holder N157123

OEM part for: DeWALT

Part Number: N157123


Install
Videos!
Grid squares measure 1x1 inch
In Stock
Ships within 1 business day
Easy 15-30 minutes (12 rated repairs)?
OEM: Original Equipment Manufacturer ?
DeWALT

Product Description ?

Genuine Dewalt replacement part, this item is sold individually.
This part contains the Brush Holder,Brush Spring and Brush.
It is used on all of the tools listed below.
It is always best to replace both brushes, even if only one is worn.

Worn brushes frequently are the cause behind a motor running poorly.
Replacing brushes can fix a motor that’s operating intermittently.
New brushes can restore a motor’s electric braking.

Carbon brushes are one of the most commonly replaced power tool parts. This is because carbon brushes are wear items, meaning that through friction and use they will gradually wear away until they need replacing. Worn brushes are a common causes of intermittent motor function, reduced electric braking and reduced motor power. A worn-out brush will often be worn down near to the wire lead and can be cracked, pitted, or burned. When replacing carbon brushes, be sure to inspect your armature for burns, cracks, or other damage which can indicate larger motor problems.

  • Classification: Part
  • Weight: 0.01 lbs.
  • Shipping: Ships Worldwide

Frequently Purchased Together ?

Compatibility

This Carbon Brush With Holder will fit the following 87 machines. Confirm this part works with your model, and view the detailed model diagrams and repair help we have to offer.

Don't see yours? Try searching our site for :

This item works with the following types of products:

  • Drill Parts
  • Hammer Drill Parts
  • Impact Driver Parts
  • Impact Wrench Parts

This part replaces obsolete part #: N031376, 640550-00

Customer Part Reviews ?

4.6
Average Rating (out of 5):
5 Reviews
Click to filter by ratings:
5 stars
3
4 stars
2
3 stars
0
2 stars
0
1 stars
0
  • Highest Rating
  • Most Recent
< PREV
  • 1
NEXT >
  • Parts to save my old drill
    The brush assembly for my drill was an exact replacement for the original set. Plug and play with no special modifications needed. We will do business again.
    Guest - September 21, 2020 Verified Purchase
    Functional
    Arrived quickly, fit, worked properly. What more can you ask?
    Guest - May 17, 2019 Verified Purchase
    Worked out great
    The parts were exactly what I needed, arrived promptly, the repair is done and my drill driver works great. Thank you.
    Guest - May 8, 2019 Verified Purchase
    DEWALT 18V BRUSHES.
    The new brushes were an exact fit, no problems.
    Guest - July 7, 2023 Verified Purchase
    carbon brish
    ez to replace, ex ordering
    chris - April 23, 2019 Verified Purchase

    Questions & Answers ?

    Our customer Service team is at the ready daily to answer your part and product questions.

    photo of team member
    Ask our Team

    We have a dedicated staff with decades of collective experience in helping customers just like you purchase parts to repair their products.

    Does this fit my product?

    Questions & Answers for Carbon Brush With Holder


    No questions have been asked yet

    Customer Repair Instructions ?

    All our customer repair instructions are solicited directly from other customers just like you who have purchased and replaced this exact part.

    Easy 15-30 minutes (12 rated repairs)?

    Brushes worn out .

    KENNETH - December 27, 2016
    👍 3 of 3 people found this instruction helpful
    Tool Type

    Impact Driver

    Difficulty

    Easy

    Time

    Less than 15 minutes

    Tools Used

    Screwdriver

    Remove the screws from the housings
    Disconnect the brush leads
    Remove the brush assemblies
    Install the new brushes
    Connect the brush leads
    Make sure all of the parts are in their correct place
    Screw the housings together
    Did you find this story helpful?
    Thanks for voting and helping fellow customers!

    Brushes were worn, cleaned grime from inside drill

    Carl - May 22, 2017
    👍 1 of 1 people found this instruction helpful
    Tool Type

    Cordless Drill

    Difficulty

    Medium

    Time

    15-30 minutes

    Tools Used

    Nutdriver, torx driver

    Opened drill, removed first brush assy, lifted armature/clutch from body of drill, (NOTE: take care not to separate clutch from armature, as I did...take pictures to make re-assembly easier, which I neglected to do!. It's very easy to separate the clutch, and time consuming to properly refit, as I unfortunately discovered!
    Remove 2nd brush assembly, clean inside of drill, repack transmission gears, (I used lithium grease), replace 1st new brush assembly, replace armature/clutch assembly, replace new 2nd brush assembly, re-attach both halves of drill body. Done...now, to start over, disassemble drill and remove clutch from armature, rotate it 180 degrees to proper orientation, and re-assemble drill. Now the forward/reverse switch works like it should. ;-)
    Did you find this story helpful?
    Thanks for voting and helping fellow customers!

    Brushes was worn out

    Marvin - July 29, 2016
    👍 1 of 1 people found this instruction helpful
    Tool Type

    Impact Driver

    Difficulty

    Medium

    Time

    15-30 minutes

    Tools Used

    Screwdriver

    Opened up the case with the screwdriver and pulled out the old brushes. Disconnected the wires and secured the new brushes in place. Reconnected the wires and put the case back on.
    Did you find this story helpful?
    Thanks for voting and helping fellow customers!

    needed new brushes

    Mike - September 13, 2021
    Tool Type

    Cordless Drill

    Difficulty

    Easy

    Time

    15-30 minutes

    Tools Used

    Screwdriver

    removed torx screws and unplugged old brushes and replaced. very easy
    Did you find this story helpful?
    Thanks for voting and helping fellow customers!

    Poor power output, ran slow, excessive sparking, and hot smell

    David - June 7, 2021
    Tool Type

    Cordless Drill

    Difficulty

    Easy

    Time

    Less than 15 minutes

    Tools Used

    , Torx driver

    0. Laid drill on left side
    1. Removed several Torx screws from cover side of drill
    2. Removed two Torx screws from motor shaft clamp
    3. pulled out right hand brush and bracket, removed wire connector.
    4. Gently eased motor and transmission units out as one assembly
    5. Pulled out left hand brush and bracket, removed wire connector.
    6. Connected and inserted left replacement brush assembly
    7. cleaned copper contact surfaced with pencil eraser
    7. Replaced motor/transmission assembly, careful to align notches
    8. Connected and inserted right replacement brush assembly
    9. tucked brush wires back into groove
    10. replaced cover and reinstalled Torx screws
    Did you find this story helpful?
    Thanks for voting and helping fellow customers!

    brushes worn

    Ralph - April 29, 2021
    Tool Type

    Cordless Drill

    Difficulty

    Medium

    Time

    15-30 minutes

    Tools Used

    Screwdriver, torque driver

    took drill apart
    removed motor and clutch
    removed brushes and holder
    installed new brushes and holder
    installed motor and clutch carefully
    make sure drill housing fits with a audible click
    secured torque screws

    Did you find this story helpful?
    Thanks for voting and helping fellow customers!

    drill quit

    Wanda - May 26, 2020
    Tool Type

    Hammer Drill

    Difficulty

    Easy

    Time

    15-30 minutes

    Tools Used

    Power Drill

    replaced brushes
    Did you find this story helpful?
    Thanks for voting and helping fellow customers!

    Brushs arching badly on commutator..brushes were worn down and springs had lost their tension

    Dale - November 7, 2019
    Tool Type

    Cordless Drill

    Difficulty

    Easy

    Time

    Less than 15 minutes

    Tools Used

    Pliers, torx

    Simply remove the Torx screws and separate the 2 halves of the drill. Then unplug electrical connection from each brush and then remove the brush holders from the drill with needle nose pliers. Place new brushes in the drill and reconnect the electrical wires.. Then join the 2 halves of the drill back together and reinstall and tighten the Torx screws.

    Note: Be careful when ordering your parts to place close attention to the shape of the brush holder, as the 2 brushes are different. in the Dewalt drill, and possibly many other brands..

    The 2 things I like about replacement parts is the accuracy of the pictures of the parts on their site, and also their prices.
    Did you find this story helpful?
    Thanks for voting and helping fellow customers!

    Running poorly

    Kevin - June 21, 2018
    Tool Type

    Hammer Drill

    Difficulty

    Easy

    Time

    Less than 15 minutes

    Tools Used

    Screwdriver, Pliers

    1. Removed screws 2. Removed wire with pliers, 3. Removed 1 brush 4. Removed 2 screws and bearing retainer clip 5. Removed other brush 6. Used emery cloth to clean armature for better brush contact. 7. Complete reverse. 8. Installed battery 9. Pulled trigger to test all functions. 10. Runs like New!
    Did you find this story helpful?
    Thanks for voting and helping fellow customers!

    Drill motor brushes needed to be replaced

    David - May 31, 2018
    Tool Type

    Cordless Drill

    Difficulty

    Easy

    Time

    Less than 15 minutes

    Tools Used

    Screwdriver, Pliers

    0. Remove battery from drill
    1. Removed screws holding drill housing together
    2. Opened drill clamshell housing
    3. Removed screws holding motor in place and removed motor to get access to both halves of old brush assembly
    4. Disconnected and removed old brush assembly using needle nose pliers
    5. Installed and connected bottom brush assembly
    6. Reinstalled motor, attached second (top) brush assembly and reinstalled motor hold down clamp and screws
    7. Closed clamshell housing and reinserted screws making sure trigger and forward/ reverse toggle switch were properly aligned and operational before reinstalling screws.

    Tested it out
    Did you find this story helpful?
    Thanks for voting and helping fellow customers!

    OEM stands for Original Equipment Manufacturer and means the part you’re buying is sourced directly from the manufacturer who made your product. At eReplacementParts, we sell only genuine OEM parts, guaranteeing the part you’re purchasing is of better design and of higher quality than aftermarket parts.

    Our product descriptions are a combination of data sourced directly from the manufacturers who made your product as well as content researched and curated by our content & customer service teams. This content is edited and reviewed internally before being made public to customers.

    Our customer service team are at the ready daily to answer your part and product questions. We have a dedicated staff with decades of collective experience in helping customers just like you purchase parts to repair their products.

    All our part reviews are solicited directly from other customers who have purchased this exact part. While we moderate these reviews for profanity, offensive language or personally identifiable information, these reviews are posted exactly as submitted and no alterations are made by our team.

    All our customer repair instructions are solicited directly from other customers just like you who have purchased and replaced this exact part. While we moderate these reviews for profanity, offensive language or personally identifiable information, these reviews are posted exactly as submitted and no alterations are made by our team.

    Based on data from past customer purchasing behaviors, these parts are most commonly purchased together along with the part you are viewing. These parts may be necessary or helpful to replace to complete your current repair.

    All our installation videos are created and produced in collaboration with our in-house repair technician, Mark Sodja, who has helped millions of eReplacementParts customers over the last 13 years repair their products. Mark has years of experience in selling and repairing both commercial and residential products with a specialty in gas-powered equipment.

    This data is collected from customers who submitted a repair instruction after replacing this exact part. Customers can rate how easy the repair was to complete and how long it took. We aggregate this data to provide a repair rating that allows customers to quickly determine the difficulty and time needed to perform their own repair.

    eReplacementParts.com
    7174 South 400 West
    Suite 5
    Midvale, UT 84047
    visa mastercard discover american express PayPal