eReplacementParts.com
877-346-4814
Metabo HPT (Hitachi) Parts

Carbon Brush Set 999073

OEM part for: Metabo HPT (Hitachi)

Part Number: 999073


Install
Videos!
Carbon Brush Set - 999073:Metabo HPT (Hitachi) 360 View
Carbon Brush Set - 999073:Metabo HPT (Hitachi)Carbon Brush Set - 999073:Metabo HPT (Hitachi)Carbon Brush Set - 999073:Metabo HPT (Hitachi) 360 View
In Stock
Ships within 1 business day
Easy 15-30 minutes (11 rated repairs)?
OEM: Original Equipment Manufacturer ?
Metabo HPT (Hitachi)
Does this d-block d-md-none fit my product?

Product Description ?

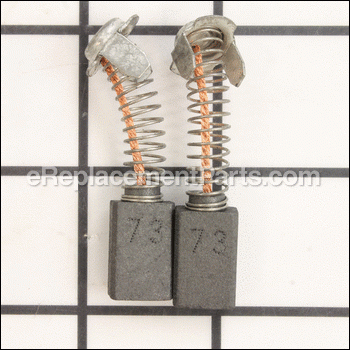
Set of 2 Carbon Brushes with wire leads and brush springs attached. The set contains genuine Hitachi replacement parts.
This brush set will fit the Hitachi tools listed at the bottom of the page.
• Worn brushes frequently are the cause behind a motor running poorly.
• Replacing brushes can fix a motor that’s operating intermittently.
• New brushes can restore a motor’s electric braking.


Carbon brushes are one of the most commonly replaced power tool parts. This is because carbon brushes are wear items, meaning that through friction and use they will gradually wear away until they need replacing. Worn brushes are a common causes of intermittent motor function, reduced electric braking and reduced motor power. A worn-out brush will often be worn down near to the wire lead and can be cracked, pitted, or burned. When replacing carbon brushes, be sure to inspect your armature for burns, cracks, or other damage which can indicate larger motor problems.

This Brush will pop out a pin when the Brush wears to a certain length.
It is advised to keep an extra set of these brushes on hand at all times

  • Classification: Part
  • Weight: 0.03 lbs.
  • Shipping: Ships Worldwide

Frequently Purchased Together ?

Compatibility

This part will fit the following 45 machines

Metabo HPT (Hitachi)

H45FRV 3/4" Hex Demolition Hammer View Diagrams & Manuals
H45MRY SDS Max Low Vibration Demolition Hammer View Diagrams & Manuals
D13 1/2" 6.2 Amp Reversible Drill View Diagrams & Manuals
DH38YE 1-1/2" Rotary Hammer, 2-Mode, Spline Shank View Diagrams & Manuals
DH40FR 1-9/16" Spline Shank Rotary Hammer View Diagrams & Manuals
DH40MRY 1-9/16" SDS Max UVP Rotary Hammer View Diagrams & Manuals
DH30PC2 1-3/16" SDS+ Rotary Hammer View Diagrams & Manuals
DH40FA Hammer Drill View Diagrams & Manuals
H45MR SDS Max Shank Demolition Hammer View Diagrams & Manuals
DH40MR 1-9/16" SDS Max Rotary Hammer View Diagrams & Manuals
DH30PC 1-3/16" VSR SDS-Plus Rotary Hammer View Diagrams & Manuals
CR12V Reciprocating Saw View Diagrams & Manuals
D13Y 1/2" Right Angle Drill 6.2A View Diagrams & Manuals
D13YA 1/2" Angle Drill View Diagrams & Manuals
DH30PB SDS+ 1-3/16" 2 Rotary Hammer VSR View Diagrams & Manuals
DH38YA SPLINE 1/2" Rotary Hammer View Diagrams & Manuals
DH38YF SPLINE 1/2" Rotary Hammer View Diagrams & Manuals
DH40FB SPLINE 1-9/16" Rotary Hammer View Diagrams & Manuals
DH40MA SDS MAX 1-9/16" Rotary Hammer View Diagrams & Manuals
DH40MB SDS MAX 1-9/16" Rotary Hammer View Diagrams & Manuals
DH40RMY SDS MAX 1-9/16" Rotary Hammer View Diagrams & Manuals
DMR13 1/2" Drill, "D" Handle View Diagrams & Manuals
H45MA SDS MAX Demolition Hammer View Diagrams & Manuals
H45SA Demolition Hammer View Diagrams & Manuals
H45SB2 3/4" HEX 21/32" Round Demolition Hammer 8AMP View Diagrams & Manuals
SP18T Sander Polisher View Diagrams & Manuals
VRY38 Rotary Hammer View Diagrams & Manuals
VTP-16A Hammer Drill View Diagrams & Manuals
DH40MCM 1-9/16 Inch Sds Max Rotary Hammer With Case View Diagrams & Manuals
D13M 1/2-Inch Spade Handle Drill, 550 Rpm, 6.2 Amp View Diagrams & Manuals
H41 Hammer Drill View Diagrams & Manuals
H45SR Hammer Drill View Diagrams & Manuals
DH28Y Hammer Drill View Diagrams & Manuals
DH38YB1 Hammer Drill View Diagrams & Manuals
DH38YD Hammer Drill View Diagrams & Manuals
DH40MC Rotary Hammer View Diagrams & Manuals
DH40YB Hammer Drill View Diagrams & Manuals
DMR13 Type-1 Drill Press View Diagrams & Manuals
DMR13 Type-2 Drill Press View Diagrams & Manuals
DMT-16 Drill Press View Diagrams & Manuals
G15SA Grinder View Diagrams & Manuals
PH40F Hammer Drill View Diagrams & Manuals
Show More Compatible Models
Don't see yours? Try searching our site for :

This item works with the following types of products:

  • Demolition Hammer Parts
  • Drill Parts
  • Rotary Hammer Parts
  • Hammer Drill Parts
  • Reciprocating Saw Parts
  • Saw Parts
  • Polisher Parts
  • Sander Parts

This part replaces obsolete part #: 981-612Z

Customer Part Reviews ?

5
Average Rating (out of 5):
1 Review
Click to filter by ratings:
5 stars
1
4 stars
0
3 stars
0
2 stars
0
1 stars
0
  • Highest Rating
  • Most Recent
< PREV
  • 1
NEXT >
  • Great part, worked great!
    The part was exactly what I needed.
    Peter - May 15, 2020 Verified Purchase
    t
    t
    t - t days ago Verified Purchase
    eReplacementParts Team
    t

    Questions & Answers ?

    Our customer Service team is at the ready daily to answer your part and product questions.

    photo of team member
    Ask our Team

    We have a dedicated staff with decades of collective experience in helping customers just like you purchase parts to repair their products.

    Does this fit my product?

    Questions & Answers for Carbon Brush Set


    No questions have been asked yet

    Customer Repair Instructions ?

    All our customer repair instructions are solicited directly from other customers just like you who have purchased and replaced this exact part.

    Easy 15-30 minutes (11 rated repairs)?

    Brushes were worn out.

    Stephen - June 10, 2017
    👍 2 of 2 people found this instruction helpful
    Tool Type

    Rotary Hammer

    Difficulty

    Easy

    Time

    Less than 15 minutes

    Tools Used

    Screwdriver, Pliers

    Removed the covers from brushes and removed the brushes with needle nose pliers. Installed the new brushes and replaced the covers. Works like a brand new machine.
    Did you find this story helpful?
    Thanks for voting and helping fellow customers!

    One of the brushes overheated causing the drill motor to stop running

    Scott - June 25, 2016
    👍 1 of 1 people found this instruction helpful
    Tool Type

    Rotary Hammer

    Difficulty

    Easy

    Time

    Less than 15 minutes

    Tools Used

    Screwdriver, Knife

    1. Removed the old brushes (had to trim the green drill body with a knife to be able to remove
    the metal brush covers.)
    2. Installed the new brushes after inspecting the brush holders (brush holders were ok)
    3. Reinstalled the metal brush covers, one phillips screw each.
    4. Tested drill,worked perfectly
    Did you find this story helpful?
    Thanks for voting and helping fellow customers!

    Replace brushes

    Lester - September 29, 2022
    Tool Type

    Rotary Hammer

    Difficulty

    Easy

    Time

    Less than 15 minutes

    Tools Used

    Screwdriver

    Removed old brushes
    Installed new brushes
    Did you find this story helpful?
    Thanks for voting and helping fellow customers!

    iy stoped workimg

    Eric - February 18, 2021
    Tool Type

    Hammer Drill

    Difficulty

    Easy

    Time

    15-30 minutes

    Tools Used

    Screwdriver

    remove brush covers and replace covers. one of the old brushes had worn to the point that the electrode was pearsing thru the old brush.
    Did you find this story helpful?
    Thanks for voting and helping fellow customers!

    The hammer drill would not hammer

    William - April 3, 2020
    Tool Type

    Hammer Drill

    Difficulty

    Hard

    Time

    1-2 hours

    Tools Used

    Screwdriver, Pliers, Socket set, Wrench Set, Nutdriver, Adjustable Wrench

    After installing the new parts the hammer drill still did not hammer.
    I called a technician who advised me that excess grease would stop the hammer function. I removed the excess grease and Walla! It hammers now!
    Did you find this story helpful?
    Thanks for voting and helping fellow customers!

    The Demolition Hammer was very slow in the pounding action.

    Ken - August 27, 2019
    Tool Type

    Demolition Hammer

    Difficulty

    Easy

    Time

    15-30 minutes

    Tools Used

    Screwdriver, Pliers, Socket set, Hex Allen Wrenchs

    I took the demolition hammer completely apart to check for damaged wires and also to clean the inside of demolition hammer from dust and to check the bearings.
    Did you find this story helpful?
    Thanks for voting and helping fellow customers!

    Would not hammer

    Robert - March 16, 2018
    Tool Type

    Demolition Hammer

    Difficulty

    Medium

    Time

    1-2 hours

    Tools Used

    Screwdriver, Pliers, Nutdriver, Lock ring pliers, snap ring pliers

    Watched U tube videos. Guy in Europe repairs tools and makes great videos. Got parts breakdown drawing from Mfr website. Broke down tools, found broke parts, ordered all needed from eReplacementParts and put tools back together according to video. Tools broke due to user not following recommended maintenance of grease every 6-months.
    Note: lock ring pliers are not the same as snap ring, and really help with this tool.
    Did you find this story helpful?
    Thanks for voting and helping fellow customers!

    Stopped working. Rotor was worn, brushes shot, brush holders shot.

    paul - January 31, 2018
    Tool Type

    Hammer Drill

    Difficulty

    Medium

    Time

    1-2 hours

    Tools Used

    Screwdriver, Wrench Set, Nutdriver, Bearing puller, brass drifts, lathe

    Took Hitachi hammer motor and switch assembly apart. Determined parts needed. Removed the bearings. Spun the rotor in the lathe to recondition the brush contact area. Installed the new bearings and installed the rotor in the new motor housing. Installed the new brushes and reassembled. Also, installed the new cord. Parts also included the new motor housing and the bearings. Much cheaper than a new hammer and works excellent. Parts delivered quickly.
    Did you find this story helpful?
    Thanks for voting and helping fellow customers!

    Needed cord and brushes

    James - August 6, 2017
    Tool Type

    Demolition Hammer

    Difficulty

    Easy

    Time

    15-30 minutes

    Tools Used

    Screwdriver, Pliers, Allen wrench

    Remove the screws from the back handle
    Removed the cord clamp
    Remove the old cord wires from the switch
    Slid the cord protector on the new cord
    Connected the new cord wires to the switch
    Screwed on the cord clamp
    Screwed on the back handle
    Removed the brush caps
    Removed the old brushes
    Installed the new brushes
    Installed the brush caps
    Did you find this story helpful?
    Thanks for voting and helping fellow customers!

    Worn brushes

    bart - September 26, 2016
    Tool Type

    Hammer Drill

    Difficulty

    Easy

    Time

    15-30 minutes

    Tools Used

    Screwdriver

    Used a screwdriver to remove the brush caps. Then I removed the used and worn brushes and discarded them. I then installed the new brushes into the brush holders, then screwed the brush caps back on.
    Did you find this story helpful?
    Thanks for voting and helping fellow customers!

    OEM stands for Original Equipment Manufacturer and means the part you’re buying is sourced directly from the manufacturer who made your product. At eReplacementParts, we sell only genuine OEM parts, guaranteeing the part you’re purchasing is of better design and of higher quality than aftermarket parts.

    Our product descriptions are a combination of data sourced directly from the manufacturers who made your product as well as content researched and curated by our content & customer service teams. This content is edited and reviewed internally before being made public to customers.

    Our customer service team are at the ready daily to answer your part and product questions. We have a dedicated staff with decades of collective experience in helping customers just like you purchase parts to repair their products.

    All our part reviews are solicited directly from other customers who have purchased this exact part. While we moderate these reviews for profanity, offensive language or personally identifiable information, these reviews are posted exactly as submitted and no alterations are made by our team.

    All our customer repair instructions are solicited directly from other customers just like you who have purchased and replaced this exact part. While we moderate these reviews for profanity, offensive language or personally identifiable information, these reviews are posted exactly as submitted and no alterations are made by our team.

    Based on data from past customer purchasing behaviors, these parts are most commonly purchased together along with the part you are viewing. These parts may be necessary or helpful to replace to complete your current repair.

    All our installation videos are created and produced in collaboration with our in-house repair technician, Mark Sodja, who has helped millions of eReplacementParts customers over the last 13 years repair their products. Mark has years of experience in selling and repairing both commercial and residential products with a specialty in gas-powered equipment.

    This data is collected from customers who submitted a repair instruction after replacing this exact part. Customers can rate how easy the repair was to complete and how long it took. We aggregate this data to provide a repair rating that allows customers to quickly determine the difficulty and time needed to perform their own repair.

    eReplacementParts.com
    7174 South 400 West
    Suite 5
    Midvale, UT 84047
    visa mastercard discover american express PayPal