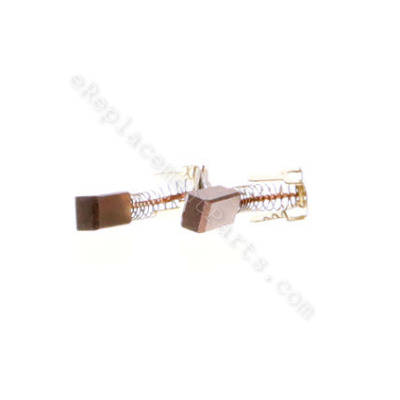
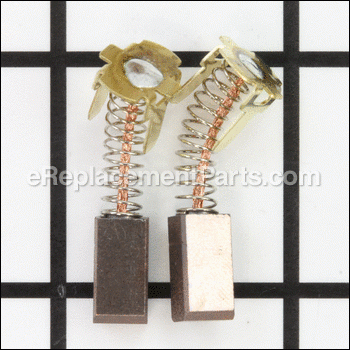


This is an Authentic Manufacturer Sourced replacement part designed for Hitachi Power Tools. This item is made out of Carbon and Metal. This item includes Two (2) Carbon Brushes with Two (2) Lead Wires and Two (2) Springs attached. Please note Brush Holders are Sold Separately.
Carbon motor brushes are one of the most commonly replaced power tool components. Because carbon brushes are wear items, meaning that through friction and use they will gradually wear away, they will eventually require replacement.
You would need a Screwdriver and Pliers to complete this job.
Carbon Brush Set 999054
OEM part for: Metabo HPT (Hitachi)
Part Number: 999054
$8.28
In Stock
Product Description ?
- Classification: Part
- Weight: 0.01 lbs.
- Shipping: Ships Worldwide
Compatibility
This part will fit the following 67 machines
Metabo HPT (Hitachi)
DS18DL 18V 3.0Ah Lithium Ion Driver Drill View Diagrams & Manuals
DS18DMR(PS) 18V 2.0Ah Cordless 1/2" Driver Drill View Diagrams & Manuals
DS14DL 14.4 Volt Lithium Ion Cordless Driver Drill View Diagrams & Manuals
WH10DL 10.8 Volt Lithium Ion Micro Impact Driver View Diagrams & Manuals
G18DL 4-1/2" 18V 3.0Ah Lithium Ion Disc Grinder View Diagrams & Manuals
WH18DL 18V 3.0Ah Lithium Ion Impact Driver View Diagrams & Manuals
WH14DL 14.4 Volt Lithium Ion Cordless Impact Driver View Diagrams & Manuals
WR14DL 14.4-Volt Lithium Ion Cordless Impact Wrench View Diagrams & Manuals
WH12DMR 12V Cordless Impact Driver View Diagrams & Manuals
WR12DMR 12V Cordless Impact Wrench View Diagrams & Manuals
WH9DMR 9.6V Cordless Impact Driver View Diagrams & Manuals
WR9DMR 9.6V Cordless Impact Wrench View Diagrams & Manuals
WR18DL 18V 3.0Ah Lithium Ion Impact Wrench View Diagrams & Manuals
DV18DL 18V 3.0Ah Lithium Ion Cordless Hammer Drill View Diagrams & Manuals
DV14DL 14.4-Volt Lithium Ion Cordless Hammer Drill View Diagrams & Manuals
WR9DM2 9.6V 3/8" Impact Wrench View Diagrams & Manuals
WR18DMR 18V Cordless Impact Wrench View Diagrams & Manuals
WR14DMR 14.4V Cordless Impact Wrench View Diagrams & Manuals
WR14DMB 14.4V 1/2" Impact Wrench View Diagrams & Manuals
WR12DM2 12V 1/2" Impact Wrench View Diagrams & Manuals
WH9DM2 9.6V 1/4" Hex Impact Driver View Diagrams & Manuals
WH18DMR 18V Cordless Impact Driver View Diagrams & Manuals
WH14DMR 14.4V Cordless Impact Driver View Diagrams & Manuals
WH14DMB 14.4V 1/4" Hex Impact Driver View Diagrams & Manuals
WH12DM2 12V 1.4 Hex Impact Driver View Diagrams & Manuals
DV18DMR 18-Volt 1/2" Cordless Hammer Drill View Diagrams & Manuals
DV14DMR 14-Volt 1/2" Cordless Hammer Drill View Diagrams & Manuals
DS14DMR 14.4V Cordless 1/2" Driver Drill View Diagrams & Manuals
WH14DM 14.4V 1/4" Hex Impact Driver View Diagrams & Manuals
WR14DM 14.4V 1/2" Impact Wrench View Diagrams & Manuals
DS18DMR 18V 3.0Ah Cordless 1/2" Driver Drill View Diagrams & Manuals
WR18DM2 18V 3/8" Impact Wrench View Diagrams & Manuals
WH12DH 1/4 IN. Hex, 12v Impact Drill View Diagrams & Manuals
WH12DM 1/4 IN. Hex, 12v Impact Drill View Diagrams & Manuals
WH8DH 1/4 In. Hex, 9.6v Impact Drill Driver View Diagrams & Manuals
WH9DM 1/4 In. Hex, 9.6v Impact Drill Driver View Diagrams & Manuals
WR12DH 1/2", 12v Impact Wrench View Diagrams & Manuals
WR12DM 1/2", 12v Impact Wrench View Diagrams & Manuals
WR8DH 3/8", 9.6v Impact Wrench View Diagrams & Manuals
WR8DHS Impact Wrench View Diagrams & Manuals
WR9DM 3/8", 9.6v Impact Wrench View Diagrams & Manuals
DS18DSAL Cordless Driver Drill View Diagrams & Manuals
DS18DSDL Cordless Driver Drill View Diagrams & Manuals
DV18DSDL Cordless Impact Driver Drill View Diagrams & Manuals
G18DSLP4 Cordless Disc Grinder View Diagrams & Manuals
WH18DSDL Cordless Impact Driver View Diagrams & Manuals
WR18DSDL Cordless Impact Wrench View Diagrams & Manuals
G18DMR Grinder View Diagrams & Manuals
G18DSL Grinder View Diagrams & Manuals
CE18DSLQ4M 18v Cordless Li-Ion Shear (Bare Tool) View Diagrams & Manuals
CN18DSLQ4M 18v Cordless Li-Ion Nibbler (Bare Tool) View Diagrams & Manuals
DN18DSLQ4M 18v Cordless Li-Ion 3/8 Inch Angle Drill (Bare Tool) View Diagrams & Manuals
CE18DSL Shear / Nibbler View Diagrams & Manuals
CE18DSLP4 Shear / Nibbler View Diagrams & Manuals
CN18DSL Shear / Nibbler View Diagrams & Manuals
CN18DSLP4 Shear / Nibbler View Diagrams & Manuals
DS14DSL Impact Wrench View Diagrams & Manuals
DS18DSDLP4 Drill Press View Diagrams & Manuals
DV14DSL Impact Wrench View Diagrams & Manuals
DV18DLP4 Hammer Drill View Diagrams & Manuals
DV18DSL Impact Wrench View Diagrams & Manuals
WH10DLP4 Impact Wrench View Diagrams & Manuals
WH12DMRE2 Impact Wrench View Diagrams & Manuals
WH14DLE2 Impact Wrench View Diagrams & Manuals
WH18DL(E2) Impact Wrench View Diagrams & Manuals
WR14DL(E2) Impact Wrench View Diagrams & Manuals
WR18DL(E2) Impact Wrench View Diagrams & Manuals
Show More Compatible Models
This item works with the following types of products:
- Drill Parts
- Cordless Drill Parts
- Impact Driver Parts
- Grinder Parts
- Impact Wrench Parts
- Hammer Drill Parts
Customer Part Reviews ?
Average Rating (out of 5):
Click to filter by ratings:
5 stars
9
4 stars
0
3 stars
0
2 stars
0
1 stars
0
< PREV
- 1
Easy repair
Oem brushes easy install back in business
Jeffrey -
July 11, 2023
Verified Purchase
Parts fit..drill works now, thanks
Great service
Guest -
June 28, 2022
Verified Purchase
They worked
I would like to thank eReplacement parts for there quick service. We don't through away tools when they don't work. We fix em. Thanks again. Patrick.
Pat -
April 16, 2022
Verified Purchase
Worked as expected
Fit as it should driver works great
Guest -
January 18, 2022
Verified Purchase
Great replacement part
These. Brushes saved me from buying a new drill fit my 18 volt Hatchi perfect
Guest -
November 21, 2019
Verified Purchase
Easy repair
Installed the new brushes and drill/driver runs like new again.
Guest -
September 2, 2019
Verified Purchase
Makita brush set
Excellent response and product parts
Dennis -
August 1, 2019
Verified Purchase
Just what the doctor ordered
Works perfectly and very easy to install. :)
Guest -
July 13, 2019
Verified Purchase
perfect fit
every part i have gotten from you guys have been spot on. great company!
george -
June 19, 2019
Verified Purchase
t
t
t -
t days ago
Verified Purchase
eReplacementParts Team
t
Questions & Answers ?
Our customer Service team is at the ready daily to answer your part and product questions.

Ask our Team
We have a dedicated staff with decades of collective experience in helping customers just like you purchase parts to repair their products.
Does this fit my product?Questions & Answers for Carbon Brush Set
No questions have been asked yet
Customer Repair Instructions ?
All our customer repair instructions are solicited directly from other customers just like you who have purchased and replaced this exact part.
Brushes were sparking when tool running
William - December 24, 2015
👍 2 of 2 people found this instruction helpful
Tool Type
Cordless Drill
Difficulty
Easy
Time
Less than 15 minutes
Tools Used
Screwdriver, tweezers, needle nose pliers, sharp scribe
Parts Used
1. Remove brush holder cap with screwdriver
2. Remove brush assembly ( I used tweezers to do this)...if sticking use something like a scribe or other sharp pointed object to dislodge the brush assy from the tool
3. Note orientation of brush assy in tool....be prepared to insert new part exactly as the old one was removed.
4. Replace brush assy with new one, taking care to insert exactly as the old one.
5. Re-install brush cap with screwdriver to a snug fit....do not over tighten!
6. After installing both new brushes.......run tool under no load for 3-4 minutes to allow new brushes to wear into the commutator surface. Observed sparks at this time is normal and is the result of the brush seating itself on the commutator.
NOTE....DO NOT TRY TO CLEAN COMMUTATOR AS DAMAGE TO IT WILL OCCUR UNLESS THE ENTIRE DRILL IS DISASSEMBLED PRIOR TO ATTEMPTING TO CLEAN COMMUTATOR!
If you are not comfortable disassembling the entire drill, do not attempt cleaning the commutator by undercutting the segments....bits will get inside or between the rotor and stater and short out the drill!
Did you find this story helpful?
Thanks for voting and helping fellow customers!
Drill did not always start when the trigger was pulled.
Philip - November 26, 2015
👍 1 of 1 people found this instruction helpful
Tool Type
Cordless Drill
Difficulty
Easy
Time
Less than 15 minutes
Tools Used
Screwdriver
Parts Used
Real easy. Unscrewed the covers on the back of my Makita drill. Pulled out the brushes with a pair of needle nose pliers and stuck the new brushes into the slot the old ones came out of. Re-screwed the caps back on and presto! it worked great!!! Took less than 3 minutes to fix. Dr Phil.
Did you find this story helpful?
Thanks for voting and helping fellow customers!
Bad Brushes
Joe - September 14, 2022
Tool Type
Cordless Drill
Difficulty
Easy
Time
15-30 minutes
Tools Used
Screwdriver, Pliers, Socket set, Wrench Set
Parts Used
repairing the brush holder
Did you find this story helpful?
Thanks for voting and helping fellow customers!
Worn out brushes and one of the Brush Caps had gone missing
Andrew - February 9, 2022
Tool Type
Cordless Drill
Difficulty
Easy
Time
Less than 15 minutes
Tools Used
Screwdriver
Parts Used
I pressed in the brush set with a flat blade screw driver. The Brush Cap was easy installed using the same screw driver.
This web site is awesome !
This web site is awesome !
Did you find this story helpful?
Thanks for voting and helping fellow customers!
broken housing
James - May 28, 2019
Tool Type
Cordless Drill
Difficulty
Easy
Time
15-30 minutes
Tools Used
Screwdriver
Parts Used
1. Opened the broken housing by removing the screws and removing one side of the housing from the components.
2. Matched the new housing with the one still containing the drill components.
3.Swapped the drill components from the old housing into the new housing to ensure proper placement.
4. Replaced the brush set while the housing was open
5. Put the opposite side housing onto the new housing containing the drill components and screwed the two housing sides together.
6. Tested the drill
Did you find this story helpful?
Thanks for voting and helping fellow customers!
Brushes wore out.
Michael - April 4, 2019
Tool Type
Hammer Drill
Difficulty
Easy
Time
Less than 15 minutes
Tools Used
Power Drill
Parts Used
Unscrewed the caps and pulled the old brushes out. Slid the new brushes in and screwed the caps back on.
Did you find this story helpful?
Thanks for voting and helping fellow customers!
The brushes were worn down.
Steve - May 17, 2017
Tool Type
Cordless Drill
Difficulty
Easy
Time
Less than 15 minutes
Tools Used
Screwdriver
Parts Used
Took the caps, removed the old brushes, put in the new brushes and put the caps back on.
Did you find this story helpful?
Thanks for voting and helping fellow customers!
Bearing was making noise.
Stuart - May 16, 2017
Tool Type
Impact Wrench
Difficulty
Medium
Time
30-60 minutes
Tools Used
Screwdriver
1. Removed the screws and split it in half.
2. Took the motor out and pulled the bearing out.
3. Reassembled in reverse order.
2. Took the motor out and pulled the bearing out.
3. Reassembled in reverse order.
Did you find this story helpful?
Thanks for voting and helping fellow customers!
The drill ran poorly
Steven - January 21, 2016
👍 1 of 2 people found this instruction helpful
Tool Type
Cordless Drill
Difficulty
Easy
Time
15-30 minutes
Tools Used
Screwdriver, Metal pike was used but it wasn\\\'t necessary.
Parts Used
Disassembled the case, removed the motor and brush holder at the same time. Installed the brushes and reversed the procedure.
Did you find this story helpful?
Thanks for voting and helping fellow customers!
OEM stands for Original Equipment Manufacturer and means the part you’re buying is sourced directly from the manufacturer who made your product. At eReplacementParts, we sell only genuine OEM parts, guaranteeing the part you’re purchasing is of better design and of higher quality than aftermarket parts.
Our product descriptions are a combination of data sourced directly from the manufacturers who made your product as well as content researched and curated by our content & customer service teams. This content is edited and reviewed internally before being made public to customers.
Our customer service team are at the ready daily to answer your part and product questions. We have a dedicated staff with decades of collective experience in helping customers just like you purchase parts to repair their products.
All our part reviews are solicited directly from other customers who have purchased this exact part. While we moderate these reviews for profanity, offensive language or personally identifiable information, these reviews are posted exactly as submitted and no alterations are made by our team.
All our customer repair instructions are solicited directly from other customers just like you who have purchased and replaced this exact part. While we moderate these reviews for profanity, offensive language or personally identifiable information, these reviews are posted exactly as submitted and no alterations are made by our team.
Based on data from past customer purchasing behaviors, these parts are most commonly purchased together along with the part you are viewing. These parts may be necessary or helpful to replace to complete your current repair.
All our installation videos are created and produced in collaboration with our in-house repair technician, Mark Sodja, who has helped millions of eReplacementParts customers over the last 13 years repair their products. Mark has years of experience in selling and repairing both commercial and residential products with a specialty in gas-powered equipment.
This data is collected from customers who submitted a repair instruction after replacing this exact part. Customers can rate how easy the repair was to complete and how long it took. We aggregate this data to provide a repair rating that allows customers to quickly determine the difficulty and time needed to perform their own repair.