
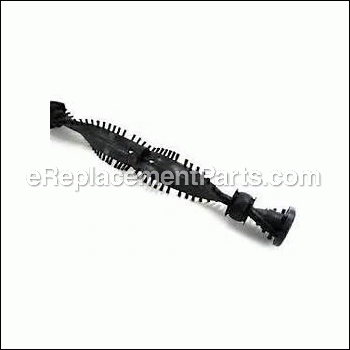
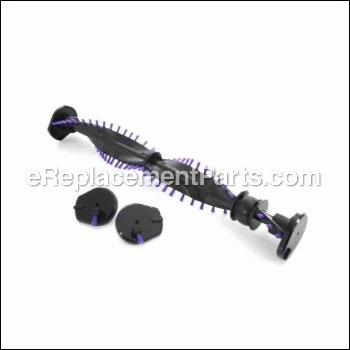
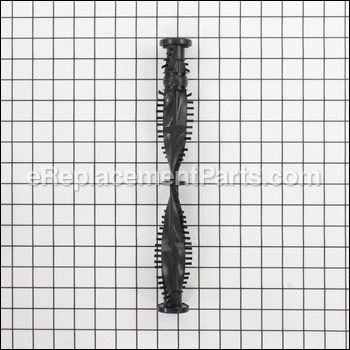
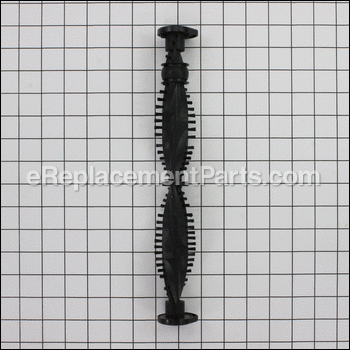
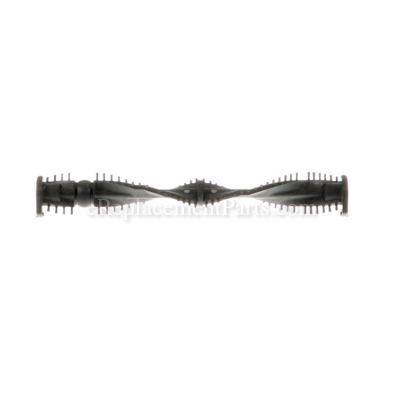


This is an authentic OEM sourced part which is specifically designed for use with a Dyson upright vacuum. The brushbar rotates and picks up material from the floor, over time the bristles will wear out eventually requiring replacement. Keep in mind this part is made of high-quality plastic material and is sold as an individual replacement part.
Brushbar Assy DY-92023401
OEM part for: Dyson
Part Number: DY-92023401
$30.46
In Stock
Jump To:
Frequently Purchased Together ?
Compatibility
This part will fit the following 53 machines
Dyson
DC07 Upright Vacuum View Diagrams & Manuals
DC33 Upright Vacuum View Diagrams & Manuals
DC14 Upright Vacuum View Diagrams & Manuals
DC14 (10444-01) Animal Vacuum View Diagrams & Manuals
DC07 (10503-01) All Floors Vacuum View Diagrams & Manuals
DC14 (14467-01) All-Floors Cyclone Upright Vacuum View Diagrams & Manuals
DC33 (212645-01) Origin Upright Vacuum View Diagrams & Manuals
DC14 (10443-01) All Floors Vacuum View Diagrams & Manuals
DC14 (10688-01) Full Kit Vacuum View Diagrams & Manuals
DC07 (10541-01) Animal Vacuum View Diagrams & Manuals
DC14 (10869-01) Total Clean Vacuum View Diagrams & Manuals
DC07 (16801-01) Upright Vacuum (Pink) View Diagrams & Manuals
DC14 (08841-01) Animal Vacuum View Diagrams & Manuals
DC07 (05945-01) All Floors Vacuum View Diagrams & Manuals
DC14 (08843-01) Full Access Vacuum View Diagrams & Manuals
DC14 (12973-01) Hsn Exclusive Vacuum View Diagrams & Manuals
DC07 (06999-01) Club Exclusive Vacuum View Diagrams & Manuals
DC14 (09712-01) All Floors Vacuum View Diagrams & Manuals
DC14 (18511-01) Plus Vacuum View Diagrams & Manuals
DC07 (14264-01) Target Exclusive Vacuum View Diagrams & Manuals
DC14 (18951-01) Upright Vacuum View Diagrams & Manuals
DC14 (11376-01) Drive Vacuum View Diagrams & Manuals
DC14 (08844-01) Complete Vacuum View Diagrams & Manuals
DC33 (19625-01) Multi Floor Vacuum View Diagrams & Manuals
DC14 (09879-01) Full Kit Vacuum View Diagrams & Manuals
DC14 (14468-01) Online Retailers Exclusive Vacuum View Diagrams & Manuals
DC07 (10823-01) Original For Walmart Vacuum View Diagrams & Manuals
DC07 (12421-01) Hsn Exclusive Vacuum View Diagrams & Manuals
DC33 (20333-01) Multi Floor Exclusive Vacuum View Diagrams & Manuals
DC14 (08842-01) Full Gear Vacuum View Diagrams & Manuals
DC07 (05946-01) Low Reach Vacuum View Diagrams & Manuals
DC14 (13715-01) Hsn Exclusive Vacuum View Diagrams & Manuals
DC14 (09902-01) Total Clean Vacuum View Diagrams & Manuals
DC07 (05947-01) Animal Vacuum View Diagrams & Manuals
DC07 (06622-01) Independent Exclusive Vacuum View Diagrams & Manuals
DC07 (14934-01) Target Exclusive Vacuum View Diagrams & Manuals
DC33 (22073-01) Multi Floor Exclusive Vacuum View Diagrams & Manuals
DC14 (08840-01) Low Reach Vacuum View Diagrams & Manuals
DC14 (16269-01) Hsn Exclusive Vacuum View Diagrams & Manuals
DC33 (22074-01) Multi Floor Exclusive Vacuum View Diagrams & Manuals
DC14 (19058-01) All Floors Exclusive Vacuum View Diagrams & Manuals
DC33 (21967-01) Multi Floor Vacuum View Diagrams & Manuals
DC33 (23952-01) Total Clean Vacuum View Diagrams & Manuals
DC33 (205062-01) Multi Floor Vacuum View Diagrams & Manuals
DC33 (20906-01) Exclusive Vacuum View Diagrams & Manuals
DC33 (23831-01) Multi Floor Plus Vacuum View Diagrams & Manuals
DC33 (20118-01) Multi Floor Vacuum View Diagrams & Manuals
DC07 (11453-01) Target Exclusive Vacuum View Diagrams & Manuals
DC14 (12098-01) Complete Vacuum View Diagrams & Manuals
DC07 (16303-01) Exclusive Vacuum View Diagrams & Manuals
DC14 (17160-01) Complete Vacuum View Diagrams & Manuals
DC33 (24137-01) Multi Floor Exclusive Vacuum View Diagrams & Manuals
DC33 (63646-01) Multi Floor Vacuum View Diagrams & Manuals
Show More Compatible Models
This item works with the following types of products:
- Vacuum Parts
This part replaces obsolete part #: 904174-01, DY-90417401, 920234-01
Customer Part Reviews ?
Average Rating (out of 5):
Click to filter by ratings:
5 stars
2
4 stars
0
3 stars
0
2 stars
0
1 stars
0
< PREV
- 1
The right part
I always get the right parts, I'm a frequent buyer of this company and have their web address bookmarked
Guest -
November 4, 2020
Verified Purchase
Easy repair
Was able to restore the cleaning performance of the vac with the new brush
Thomas -
May 29, 2019
Verified Purchase
t
t
t -
t days ago
Verified Purchase
eReplacementParts Team
t
Questions & Answers ?
Our customer Service team is at the ready daily to answer your part and product questions.

Ask our Team
We have a dedicated staff with decades of collective experience in helping customers just like you purchase parts to repair their products.
Does this fit my product?Questions & Answers for Brushbar Assy
No questions have been asked yet
Customer Repair Instructions ?
All our customer repair instructions are solicited directly from other customers just like you who have purchased and replaced this exact part.
Vacuum didn't pick up well. Brushbar was a little worn
Bruce - June 2, 2016
👍 4 of 5 people found this instruction helpful
Tool Type
Vacuum
Difficulty
Medium
Time
30-60 minutes
Tools Used
Screwdriver, Pliers
It took more time to figure out how to disassemble the vacuum than to repair and reassemble it. I used the handles of a pair of pliers to stretch the belt enough to install the brush bar. It works as well as a new one now. Apparently, the clutch belt stretches out over time ( this one is about 7 years old) and causes the brush bar not to work well.
Did you find this story helpful?
Thanks for voting and helping fellow customers!
Beater bar brushes worn down
Celia - May 20, 2018
👍 2 of 2 people found this instruction helpful
Tool Type
Vacuum
Difficulty
Medium
Time
30-60 minutes
Tools Used
, Quarter and butter knife
Parts Used
Removed bottom cover
Ended up going on YouTube to get instructions
Replaced bar and put cover back on
Ended up going on YouTube to get instructions
Replaced bar and put cover back on
Did you find this story helpful?
Thanks for voting and helping fellow customers!
Brush bar bearings were packed with hair & crud & seized
Ron - May 7, 2017
👍 1 of 1 people found this instruction helpful
Tool Type
Vacuum
Difficulty
Medium
Time
Less than 15 minutes
Tools Used
Screwdriver, Nutdriver, Torx bits
Parts Used
1-Remove sole plate with coin
2-Remove old brush bar-belt is hard to stretch.
3-Stretch belt with screwdriver & slip new brush bar into belt.
4-Seat brush bar into place & replace soleplate
2-Remove old brush bar-belt is hard to stretch.
3-Stretch belt with screwdriver & slip new brush bar into belt.
4-Seat brush bar into place & replace soleplate
Did you find this story helpful?
Thanks for voting and helping fellow customers!
Beater lost bristles had to replace
Barbara - February 20, 2016
👍 1 of 1 people found this instruction helpful
Tool Type
Vacuum
Difficulty
Easy
Time
15-30 minutes
Tools Used
Screwdriver
Parts Used
Remove sole plate, removed the belt and old beater. Installed the new beater and belt, then replaced sole plate. Vacuum works great.
Did you find this story helpful?
Thanks for voting and helping fellow customers!
Beater bars a little worn
Joseph - May 17, 2022
Tool Type
Vacuum
Difficulty
Easy
Time
15-30 minutes
Tools Used
Screwdriver, A very big and additional medium sized as well
Parts Used
Replaced “beater bar” on Dyson 33 vacuum
1 remove canister and main filter and leave filter assembly open (it has a hinge) 180 degrees. This makes it a neatly flat surface so you can turn the whole thing upside down and rest it on a counter or table work surface with upright portion hanging down.
Use coin or large screwdriver to turn three large fasteners a quarter turn so you can remove plate on bottom of machine. It pops up easily and then you easily hit carefully work it off.
The next to hardest part is the removing the beater bar. Pull both ends straight up. It’s hard because you really need to stretch the rubber belt with the screwdrivers.
Then do everything in reverse and make sure belt is not twisted. Putting in the new bar is hardest part but not that hard. It’s difficult because of the belt that needs to be stretched. It’s easy to replace the belt too, but takes a while and you will need torx screwdriver.
I recommend replacing both filters and cleaning canister. There is a single elongated oval about 3/4 inch push in catch that holds the top part to the bottom part of the canister
Did you find this story helpful?
Thanks for voting and helping fellow customers!
Bristles were worn
Susan - February 10, 2019
Tool Type
Vacuum
Difficulty
Easy
Time
Less than 15 minutes
Tools Used
Screwdriver
Parts Used
Stretched the pulley slide the new brush assembly into the pulley and into the vacuum
Did you find this story helpful?
Thanks for voting and helping fellow customers!
Brushbar assembly was cracked.
Gregory - July 10, 2017
Tool Type
Vacuum
Difficulty
Easy
Time
Less than 15 minutes
Tools Used
Screwdriver
Parts Used
Used a screwdriver, gently pulled out the belt and slipped the bar assembly underneath and into the place. Take time not to cut the belt. Screwed to finish the plate into the place.
Did you find this story helpful?
Thanks for voting and helping fellow customers!
OEM stands for Original Equipment Manufacturer and means the part you’re buying is sourced directly from the manufacturer who made your product. At eReplacementParts, we sell only genuine OEM parts, guaranteeing the part you’re purchasing is of better design and of higher quality than aftermarket parts.
Our product descriptions are a combination of data sourced directly from the manufacturers who made your product as well as content researched and curated by our content & customer service teams. This content is edited and reviewed internally before being made public to customers.
Our customer service team are at the ready daily to answer your part and product questions. We have a dedicated staff with decades of collective experience in helping customers just like you purchase parts to repair their products.
All our part reviews are solicited directly from other customers who have purchased this exact part. While we moderate these reviews for profanity, offensive language or personally identifiable information, these reviews are posted exactly as submitted and no alterations are made by our team.
All our customer repair instructions are solicited directly from other customers just like you who have purchased and replaced this exact part. While we moderate these reviews for profanity, offensive language or personally identifiable information, these reviews are posted exactly as submitted and no alterations are made by our team.
Based on data from past customer purchasing behaviors, these parts are most commonly purchased together along with the part you are viewing. These parts may be necessary or helpful to replace to complete your current repair.
All our installation videos are created and produced in collaboration with our in-house repair technician, Mark Sodja, who has helped millions of eReplacementParts customers over the last 13 years repair their products. Mark has years of experience in selling and repairing both commercial and residential products with a specialty in gas-powered equipment.
This data is collected from customers who submitted a repair instruction after replacing this exact part. Customers can rate how easy the repair was to complete and how long it took. We aggregate this data to provide a repair rating that allows customers to quickly determine the difficulty and time needed to perform their own repair.