


This replacement brush set is sourced directly from original equipment manufacturer and it is designed for use with angle grinders. Over time brushes will gradually wear down and will require replacement. It is advised to replace both brushes at the same type.
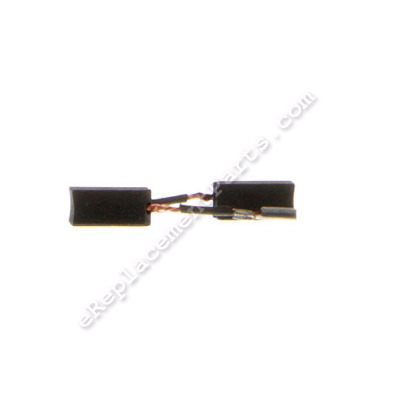
This assembly includes two (2) carbon brushes with lead wires attached. Please note brush boxes are sold separately.
You would need a screwdriver to complete this job.
• Make sure the unit is unplugged
• Remove screws from the housing
• Separate housing to gain access to the brushes
• Remove old brushes and secure the new ones in place
• Re-assemble and test the tool
Brush 5140099-01
OEM part for: Porter Cable, Bostitch, Black and Decker, Stanley
Part Number: 5140099-01
$13.70
In Stock
Jump To:
Product Description ?
- Classification: Part
- Weight: 0.01 lbs.
- Shipping: Ships Worldwide
Frequently Purchased Together ?

Compatibility
This part will fit the following 7 machines
Porter Cable
PC60TAG Type 1 6.0 AMP Angle Grinder View Diagrams & Manuals
PC60TCTAG Type 1 6 AMP Angle Grinder/Cut-Off Tool View Diagrams & Manuals
PC60TPAG Type 1 6.0 AMP Angle Grinder View Diagrams & Manuals
Bostitch
BTE820K (Type 1) 7 Amp 4-1/2" Angle Grinder Kit View Diagrams & Manuals
Black and Decker
STEL816-B3 (Type 1) 750w Small Angle Grinder View Diagrams & Manuals
Stanley
FME820 (Type 1) 4-1/2 Grinder View Diagrams & Manuals
STEL816-B3 (Type 1) 750w Small Angle Grinder View Diagrams & Manuals
Show More Compatible Models
This item works with the following types of products:
- Grinder Parts
Questions & Answers ?
Our customer Service team is at the ready daily to answer your part and product questions.

Ask our Team
We have a dedicated staff with decades of collective experience in helping customers just like you purchase parts to repair their products.
Does this fit my product?Questions & Answers for Brush
No questions have been asked yet
Customer Repair Instructions ?
All our customer repair instructions are solicited directly from other customers just like you who have purchased and replaced this exact part.
worn brushes
RON - September 27, 2023
Tool Type
Grinder
Difficulty
Easy
Time
15-30 minutes
Tools Used
Screwdriver, Pliers
Parts Used
following your instructions made it very easy to replace brushes.
Thank you!
Thank you!
Did you find this story helpful?
Thanks for voting and helping fellow customers!
Broken brush box and replacement brush needed
Shawn - August 14, 2022
Tool Type
Grinder
Difficulty
Easy
Time
15-30 minutes
Tools Used
Screwdriver, Needle nose pliers
Parts Used
1: Removed lower housing cover by removing the screw on the end of the grinder by the power cord.
2: Removed the screw holding the brush box to the frame. Keep the screw for a later step.
NOTE: **Screws are sold separate and not included with a new brush box**
3: Use needle nose pliers to firmly grip the 2 wires and detach them from the brush box
4: Remove and keep the spring from the brush box (reuse it on the new brush box in a later step)
NOTE: **The spring is sold separate and not included with a new brush box**
5: Attach the wire going to the motor to the middle brush box connector
6: Attach the wire for your new brush to the end connector on the brush box and slide your brush into the box
7: Attach the brush box in place of the one you removed with the screw you saved in step 2. Wires on the left and spring will be on the right
8: Insert the spring you saved from step 4 with the pointed end on the top and spin the spring counter-clockwise till it catches on the tab at the top of the brush box now giving you tension. Continue turning the bottom flat end of the spring counter-clockwise back around and rest it on the end of your brush holding it in the brush box.
NOTE: Repeat these steps on the other side to replace the box and/or brush. You want to replace both brushes at the same time. Its not required to replace the boxes unless they are damaged. Once you finish with the brush and/or brush boxes proceed to the final step 9
9) Slide the lower cover back over the housing being careful not to crimp the power cord sliding through it. Now attach it firmly with the screw you saved from step 1 on the end of the unit by the power cord. You completed the repair.
Did you find this story helpful?
Thanks for voting and helping fellow customers!
bad brushes
dan - July 10, 2022
Tool Type
Grinder
Difficulty
Easy
Time
15-30 minutes
Tools Used
Screwdriver
Parts Used
replaced them
Did you find this story helpful?
Thanks for voting and helping fellow customers!
Worn brushes.
ROBERT - April 3, 2018
👍 1 of 2 people found this instruction helpful
Tool Type
Grinder
Difficulty
Easy
Time
15-30 minutes
Tools Used
Screwdriver, Pliers
Parts Used
Removed the old brushes and replaced them with the new ones.
Did you find this story helpful?
Thanks for voting and helping fellow customers!
OEM stands for Original Equipment Manufacturer and means the part you’re buying is sourced directly from the manufacturer who made your product. At eReplacementParts, we sell only genuine OEM parts, guaranteeing the part you’re purchasing is of better design and of higher quality than aftermarket parts.
Our product descriptions are a combination of data sourced directly from the manufacturers who made your product as well as content researched and curated by our content & customer service teams. This content is edited and reviewed internally before being made public to customers.
Our customer service team are at the ready daily to answer your part and product questions. We have a dedicated staff with decades of collective experience in helping customers just like you purchase parts to repair their products.
All our part reviews are solicited directly from other customers who have purchased this exact part. While we moderate these reviews for profanity, offensive language or personally identifiable information, these reviews are posted exactly as submitted and no alterations are made by our team.
All our customer repair instructions are solicited directly from other customers just like you who have purchased and replaced this exact part. While we moderate these reviews for profanity, offensive language or personally identifiable information, these reviews are posted exactly as submitted and no alterations are made by our team.
Based on data from past customer purchasing behaviors, these parts are most commonly purchased together along with the part you are viewing. These parts may be necessary or helpful to replace to complete your current repair.
All our installation videos are created and produced in collaboration with our in-house repair technician, Mark Sodja, who has helped millions of eReplacementParts customers over the last 13 years repair their products. Mark has years of experience in selling and repairing both commercial and residential products with a specialty in gas-powered equipment.
This data is collected from customers who submitted a repair instruction after replacing this exact part. Customers can rate how easy the repair was to complete and how long it took. We aggregate this data to provide a repair rating that allows customers to quickly determine the difficulty and time needed to perform their own repair.