


This is a genuine Ariens replacement part, it is sold individually.
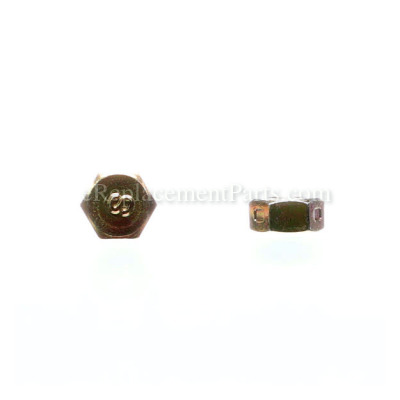
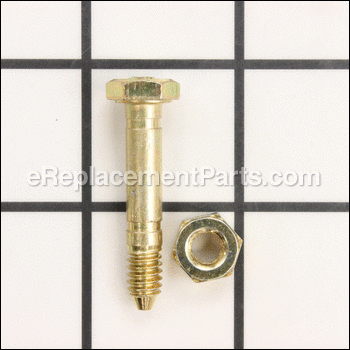
The purpose of the 53200500 Shear Bolt is to protect your snowblower.
If the auger gets jammed or clogged, the Shear Bolt is designed to snap at a certain point of pressure, so it will not damage any other part of the unit
Shear Bolt With Nut 53200500
OEM part for: Ariens
Part Number: 53200500
$3.99
In Stock
Product Description ?
- Classification: Part
- Weight: 0.01 lbs.
- Shipping: Ships Worldwide
Compatibility
This Shear Bolt With Nut will fit the following 299 machines. Confirm this part works with your model, and view the detailed model diagrams and repair help we have to offer.
Ariens
Show More Compatible ModelsThis item works with the following types of products:
- Snowblower Parts
- Blower Parts
- Lawn Tractor Parts
- Engine Parts
Customer Part Reviews ?
Average Rating (out of 5):
Click to filter by ratings:
5 stars
3
4 stars
0
3 stars
0
2 stars
0
1 stars
0
< PREV
- 1
Excellent seller and fast delivery
Correct parts and accurate description
Thank you
Guest -
February 16, 2021
Verified Purchase
happy with part
easy to order good price fast shipping good fit thanks
Guest -
January 20, 2021
Verified Purchase
Two stage snowbower auger shear bolt – arrived just in time
This shear bolt fit perfectly in the Ariens 2 stage snowblower shaft. Ariens could’ve done a better job showing the shear bolt shaft locations for the two augers.
It just so happens that both locations are on the same spot on main drive shaft. I was just lucky that one auger bolt was not sheared so it give me a clue as to where the second location on the main shaft was.
Guest -
February 4, 2020
Verified Purchase
Questions & Answers ?
Our customer Service team is at the ready daily to answer your part and product questions.

Ask our Team
We have a dedicated staff with decades of collective experience in helping customers just like you purchase parts to repair their products.
Does this fit my product?Questions & Answers for Shear Bolt With Nut
No questions have been asked yet
Customer Repair Instructions ?
All our customer repair instructions are solicited directly from other customers just like you who have purchased and replaced this exact part.
Rock caught in auger blades broke one shear bolt.
Thomas - December 29, 2016
👍 4 of 5 people found this instruction helpful
Tool Type
Snowblower
Difficulty
Medium
Time
15-30 minutes
Tools Used
Socket set, Adjustable Wrench, Hammer and punch (nail set)
Parts Used
Tilted snow blower back on handles. Turned blades by hand, looking for hole for new bolt.
Couldn't find hole for a few minutes because of grease on axle and old bolt remained in hole.
When I was sure I had the hole I used a hammer and punch to remove the shaft of the broken bolt.
I slipped new bolt in the hole in axle but had difficulty turning nut on bolt. I used a wrench to hold the nut while torquing the head of bolt with a socket wrench, making sure I hadn't cross-threaded. I stopped turning when nut and bolt head were snug against the axle. Snow blower running fine after the repair. Of course, catch of another rock will be the acid test.
Did you find this story helpful?
Thanks for voting and helping fellow customers!
Shear pin broke.
Robert - April 8, 2018
👍 2 of 2 people found this instruction helpful
Tool Type
Snowblower
Difficulty
Easy
Time
Less than 15 minutes
Tools Used
Socket set, Wrench Set, Center punch
Parts Used
1. Used a center punch to remove the shaft of the old shear pin.
2. Lined the drive and the auger shafts up and installed the new shear pin.
3. Tightened the pin.
2. Lined the drive and the auger shafts up and installed the new shear pin.
3. Tightened the pin.
Did you find this story helpful?
Thanks for voting and helping fellow customers!
Broken shear bolt
Martin - April 7, 2017
👍 1 of 1 people found this instruction helpful
Tool Type
Snowblower
Difficulty
Easy
Time
Less than 15 minutes
Tools Used
Wrench Set, Nutdriver, Nail
Parts Used
1. Pressed out remainder of broken shear bolt with a nail
2. Carefully aligned holes in rake and rake driveshaft
3. Slipped new shear bolt through aligned holes
4. Placed nut on protruding threaded end of shear bolt finger tight
5. Held nut with closed end wrench
6. Tightened bolt head with nut driver
7. Done! Total time <5 minutes
2. Carefully aligned holes in rake and rake driveshaft
3. Slipped new shear bolt through aligned holes
4. Placed nut on protruding threaded end of shear bolt finger tight
5. Held nut with closed end wrench
6. Tightened bolt head with nut driver
7. Done! Total time <5 minutes
Did you find this story helpful?
Thanks for voting and helping fellow customers!
Left auger shaft shear pin broke.
Alan - February 11, 2021
Tool Type
Snowblower
Difficulty
Easy
Time
Less than 15 minutes
Tools Used
Adjustable Wrench, Punch
Parts Used
Using a punch I drove out the remaining shear pin material.
Aligning auger shaft hole with power shaft I slipped new bolt thru and tightened nut.
Very simple repair. I bought an extra sher pin just in case the other auger shear breaks in future snow removal work.
Aligning auger shaft hole with power shaft I slipped new bolt thru and tightened nut.
Very simple repair. I bought an extra sher pin just in case the other auger shear breaks in future snow removal work.
Did you find this story helpful?
Thanks for voting and helping fellow customers!
Snowblower shear bolt broke
Len - February 1, 2021
Tool Type
Snowblower
Difficulty
Easy
Time
Less than 15 minutes
Tools Used
Socket set, Wrench Set
Parts Used
1. Removed remaining pieces of old shear pin.
2. Inserted and secured new shear pin.
2. Inserted and secured new shear pin.
Did you find this story helpful?
Thanks for voting and helping fellow customers!
Shear bolt broke at the end of last winter
Thomas - November 29, 2020
Tool Type
Snowblower
Difficulty
Easy
Time
Less than 15 minutes
Tools Used
Socket set
Parts Used
1. Lined holes up on shaft to allow shear pin to pass completely through shaft.
2. Put shear pin through shaft
3. Put nut on threaded end of shear pin.
4. Tighten nut on shear pin with wrench.
5. Wait for next snow storm and fire it up.
6. Sit and enjoy a cup of coffee looking at my cleared driveway from inside the house.
2. Put shear pin through shaft
3. Put nut on threaded end of shear pin.
4. Tighten nut on shear pin with wrench.
5. Wait for next snow storm and fire it up.
6. Sit and enjoy a cup of coffee looking at my cleared driveway from inside the house.
Did you find this story helpful?
Thanks for voting and helping fellow customers!
Shear pin snapped
James - November 16, 2019
Tool Type
Snowblower
Difficulty
Easy
Time
Less than 15 minutes
Tools Used
Adjustable Wrench
Parts Used
Pushed out old pin... put in new pin....EASY!
Did you find this story helpful?
Thanks for voting and helping fellow customers!
Shear bolt broke
Kelly - February 21, 2019
Tool Type
Snowblower
Difficulty
Easy
Time
Less than 15 minutes
Tools Used
Socket set, Hammer
Parts Used
Aligned propeller bolt hole to the shaft bolt hole, tapped shear bolt through, fastened nut onto bolt.
Did you find this story helpful?
Thanks for voting and helping fellow customers!
shear bolt sheared
Steve - February 17, 2019
Tool Type
Snowblower
Difficulty
Easy
Time
15-30 minutes
Tools Used
Screwdriver, Socket set
Parts Used
replaced shear bolt
Did you find this story helpful?
Thanks for voting and helping fellow customers!
snow blower auger shear bolt broke.
Steven - February 11, 2019
Tool Type
Snowblower
Difficulty
Easy
Time
Less than 15 minutes
Tools Used
Wrench Set, drift pin
Parts Used
. Verified that the machine was off. I located broken piece of old shear bolt that was still in the auger and pushed it out with a drift pin. installed new shear bolt using two wrenches to tighten the self-locking nut on the shear bolt.
Did you find this story helpful?
Thanks for voting and helping fellow customers!
Load More Install Stories
OEM stands for Original Equipment Manufacturer and means the part you’re buying is sourced directly from the manufacturer who made your product. At eReplacementParts, we sell only genuine OEM parts, guaranteeing the part you’re purchasing is of better design and of higher quality than aftermarket parts.
Our product descriptions are a combination of data sourced directly from the manufacturers who made your product as well as content researched and curated by our content & customer service teams. This content is edited and reviewed internally before being made public to customers.
Our customer service team are at the ready daily to answer your part and product questions. We have a dedicated staff with decades of collective experience in helping customers just like you purchase parts to repair their products.
All our part reviews are solicited directly from other customers who have purchased this exact part. While we moderate these reviews for profanity, offensive language or personally identifiable information, these reviews are posted exactly as submitted and no alterations are made by our team.
All our customer repair instructions are solicited directly from other customers just like you who have purchased and replaced this exact part. While we moderate these reviews for profanity, offensive language or personally identifiable information, these reviews are posted exactly as submitted and no alterations are made by our team.
Based on data from past customer purchasing behaviors, these parts are most commonly purchased together along with the part you are viewing. These parts may be necessary or helpful to replace to complete your current repair.
All our installation videos are created and produced in collaboration with our in-house repair technician, Mark Sodja, who has helped millions of eReplacementParts customers over the last 13 years repair their products. Mark has years of experience in selling and repairing both commercial and residential products with a specialty in gas-powered equipment.
This data is collected from customers who submitted a repair instruction after replacing this exact part. Customers can rate how easy the repair was to complete and how long it took. We aggregate this data to provide a repair rating that allows customers to quickly determine the difficulty and time needed to perform their own repair.