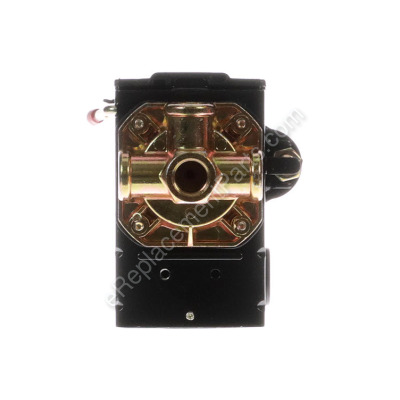
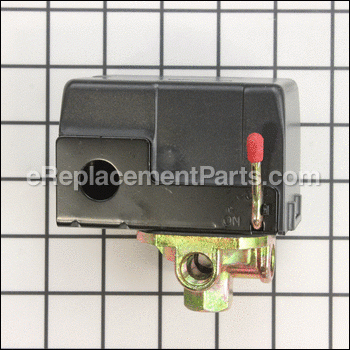


This is a manufacturer approved replacement part designed to work with Makita air compressors. The pressure switch tells your compressor when to stop and when to start. There are multiple reasons a pressure switch could be leaking air. If it is leaking air the pressure switch should be replaced for a compressor to operate properly and safely.
Pressure Switch 412024-E
OEM part for: Makita
Part Number: 412024-E
$79.92
In Stock
Jump To:
Frequently Purchased Together ?


Compatibility
This part will fit the following 4 machines
Makita
MAC5200 Air Compressor View Diagrams & Manuals
MAC700 Air Compressor View Diagrams & Manuals
MAC2400 2.5HP 1720RPM Air Compressor View Diagrams & Manuals
MAC700K1 Compressor View Diagrams & Manuals
This item works with the following types of products:
- Compressor Parts
This part replaces obsolete part #: 412025-E
Customer Part Reviews ?
Average Rating (out of 5):
Click to filter by ratings:
5 stars
8
4 stars
1
3 stars
0
2 stars
1
1 stars
0
< PREV
- 1
Exact part
Exact replacement and works excellent!
Guest -
August 21, 2023
Verified Purchase
Exact replacement parts make repairs easy and effective.
Fit perfectly
Jeff -
February 9, 2023
Verified Purchase
Exact OEM replacement.
A bit pricey but it was exactly the same and worked perfectly. Thank you!
Guest -
January 19, 2022
Verified Purchase
akita
fits and works fast shipping
Guest -
May 29, 2020
Verified Purchase
Great customer service.
Hi, I have been with eReplacementparts for many a year now, have always been satisfied with the company's side of the transactions. We had a little problem with the last one, the on/off switch did not work, I brought it to the company's attention and you jumped in and corrected the problem immediately. From a customers stand point hooray. Thanks.
Leon -
March 12, 2020
Verified Purchase
Makita Pressure Switch/Unloader for MAC700
My compressor was tripping the breaker intermittently. Traced problem to the pressure switch not unloading consistently. Replacement solved problem and the factory preset 100-130 PSI operating range setting on the switch was accurate! Replaced tool pressure regulator also as it was 9 years old and was drifting in pressure that messed up nail gun penetration consistency.
Robert -
December 26, 2019
Verified Purchase
Love doing business with ERP!
Easy to find parts diagrams, identify correct part, and order. Fast shipping, very happy with eReplacementParts.
Eric -
July 2, 2019
Verified Purchase
Cut off switch was exactly what I ordered fits perfectly works perfectly thank you.
Part was in perfect condition arrive on time great customer service.
Guest -
May 22, 2019
Verified Purchase
unexpected ease!
A good example of a pleasant surprise. I have been suffering a leaky Makita compressor pressure switch for several years, which basically meant the unit would run very frequently whenever it was needed and it's loud and bothersome, and prone to too much wear and tear. I found an exploded view on Makita website, searched for the product number of what I though was broken, and Replacement Parts had it in stock for 25% the cost of a new compressor. I ordered it, got it quick, installed it and voila! Problem fixed. One star deducted for high cost.
Guest -
January 11, 2022
Verified Purchase
Pressure switch arrived in good condition
Ordered on 7/3. Part was supposed to arrive 7/13 but came on the 15th which I understand with this Covid thing. The main thing is it started up great but I did not get any pressure build up which is the reason I replaced the old switch.Debating what to do next. Wish it were a positive review.
Guest -
July 19, 2020
Verified Purchase
t
t
t -
t days ago
Verified Purchase
eReplacementParts Team
t
Questions & Answers ?
Our customer Service team is at the ready daily to answer your part and product questions.

Ask our Team
We have a dedicated staff with decades of collective experience in helping customers just like you purchase parts to repair their products.
Does this fit my product?Questions & Answers for Pressure Switch
No questions have been asked yet
Customer Repair Instructions ?
All our customer repair instructions are solicited directly from other customers just like you who have purchased and replaced this exact part.
Needed a new air filter and pressure switch
Importacion - June 29, 2016
👍 9 of 15 people found this instruction helpful
Tool Type
Compressor
Difficulty
Medium
Time
30-60 minutes
Tools Used
Screwdriver, Wrench Set, Adjustable Wrench
Disconnect the compressor form the power source. Remove the old air filter by unscrewing it from the cylinder head, then screwing the new one in. Disconnect and remove the parts on the pressure switch that do not come with the new one. Take the cover of and remove the wiring, remembering where the wires go. Remove the old pressure switch. Attach the new switch. Open the cover and connect the wires. Close the cover. Connect all of the parts that were removed from the old switch to the new switch.
Did you find this story helpful?
Thanks for voting and helping fellow customers!
The off/on pressure switch was leaking air.
Phil - January 19, 2022
👍 1 of 1 people found this instruction helpful
Tool Type
Compressor
Difficulty
Hard
Time
1-2 hours
Tools Used
Screwdriver, Pliers, Socket set, Wrench Set
Parts Used
My 4-year-old, trouble-free Makita MAC5200 air compressor started leaking air from the off/on pressure switch, so I decided to fix it myself. It can't be that difficult, right? Well, what looked like an easy disconnect & unscrew of the switch turned out to be over an hour long (almost full) disassembly of the compressor but, as a former electrician and auto mechanic, I knew I could get it working.
I advise you to take clear pictures of the switch unit before you take it apart. The black and white wires in the power cord must be connected properly or there will be a big problem. AND make sure you DO NOT switch the "line" cord and the "motor" cord when you reconnect them onto the switch later. OK? Let's do this:
Check to see that the new switch is an exact replacement for the old one. Next, use a wrench to ensure that the little brass valve on the side of the switch is tight. Be careful not to bend its mounting bracket or it will cause an air leak and it's hard to get to it once the switch is reattached to the tank.
Disconnect all 6 wires of the 2 electrical cords from the old switch. You'll need a good pair of pliers to compress the power cord's "strain relief bushing grommet". Find the moveable side of it and squeeze it tightly then pull it out of the hole in the switch housing.
GENTLY unscrew and remove the U-shaped copper tubing nut from the side of the switch and the black plastic tubing nut from under the switch. Be careful not to kink or bend that copper tube.
At this point, I thought I could simply unscrew the old switch from the air tank but boy was I mistaken! I needed just 1/4 inch more of clearance from the motor and I could have removed the old switch easily. Instead, I had to turn the unit on its side and remove the 4 nuts that held the motor to the base to get it out of the way. Hoping it would give me the clearance I needed, it did not! The motor moved up a bit but STILL not out of the way enough.
I had to remove 2 small screws that were holding the upper plate to the frame. NOW I could move the motor up and out of the base to get that extra 1/4 inch that I needed. REALLY MAKITA! Finally, I was able to unscrew the old switch and remove it.
With a round wire brush, I cleaned the threads and the inside of the opening where the switch screwed onto the tank since there was some "crud" built up inside it. I put some Teflon tape on the threads for a tight seal. I screwed the new switch onto the threads and made sure it was tight and sitting perfectly vertical so the copper tubing will reattach properly.
BE VERY CAREFUL, when tightening the new switch, since there really isn't a good way to grasp it to tighten it. If you bend or damage the case or the little brass valve on the side, you will cause an air leak.
I reconnected the U-shaped copper tubing to the side of the switch. (There was no thread sealant on it from the factory, so I didn't use any). NOTE: Hand tighten the nut first making sure the flared end of the tubing is seated onto the brass valve properly or air will leak out. You will need 2 wrenches to tighten it. One to tighten the copper tubing nut and another to hold the small brass valve that it screws onto. BE CAREFUL not to damage or bend that little brass valve on the side of the switch or you will cause an air leak.
Now reconnect the black plastic tube under the switch. It has a small plastic, compression sleeve over the tube so be sure it's there and not damaged when you reattach it. (No Teflon tape needed there either).
Reattach the motor to the base with the 4 nuts and lock washers then reattach the top plate to the frame.
(You're almost done folks). If it came off the cord, reinstall the "strain relief bushing grommet" over the POWER cord exactly where it was before and carefully push it into the round hole in the side of the new switch housing. Look carefully at the 4 electrical screws on the new switch. There are 2 upper screws and 2 lower screws. The lower 2 are for the power cord (line) that you plug into the wall outlet and must be connected first. (It's very hard to see it but it says the word "line" on the black plastic). The upper 2 screws are for the "motor". cord. Again, make sure the black and white wires are connected to the proper screws.
Put the ground screw through the eyelets of the 2 green ground wires, screw them into the hole on the bottom of the switch case and closed the air release valve under the tank. Replace the switch cover.
I plugged it in and moved the switch lever down and the compressor filled itself up and made a good solid shutoff. What a good feeling! Best wishes folks!
Did you find this story helpful?
Thanks for voting and helping fellow customers!
Compressor bounced in my truck and broke the cover and pressure switch.
Mark - September 30, 2018
👍 1 of 1 people found this instruction helpful
Tool Type
Compressor
Difficulty
Easy
Time
30-60 minutes
Tools Used
Screwdriver, Pliers, Power Drill, Wrench Set, Adjustable Wrench
Parts Used
Removed what was left of the existing cover and pressure switch. Replaced both.
Did you find this story helpful?
Thanks for voting and helping fellow customers!
A little plastic component in the automatic switch broke.
Steve - December 28, 2015
👍 3 of 5 people found this instruction helpful
Tool Type
Compressor
Difficulty
Easy
Time
30-60 minutes
Tools Used
Screwdriver, Pliers, Wrench Set, Adjustable Wrench
Parts Used
Removed switch cover
Disconnected electric wires
Disconnected all air pressure fittings
Disconnected switch assembly from tank
Replaced fittings using teflon tape
Reconnected wires
Installed switch cover
Worked great.
Disconnected electric wires
Disconnected all air pressure fittings
Disconnected switch assembly from tank
Replaced fittings using teflon tape
Reconnected wires
Installed switch cover
Worked great.
Did you find this story helpful?
Thanks for voting and helping fellow customers!
Compressor would not turn on
Joey - October 12, 2023
Tool Type
Compressor
Difficulty
Medium
Time
15-30 minutes
Tools Used
Screwdriver, Socket set, Wrench Set
Parts Used
1. Unplug it.
2. Took off both hoses.
3. Unplug bolted the compressor. Only 4 bolts. Pulled it out of the way.
4. Took a picture of the wiring. Unplug the wires.
5. Unscrewed the pressures switch.
6. Put pipe tape on the threads.
7. Installed new pressures switch.
8. Wired it up.
9. Put compressor back in place. Tighten the 4 bolts.
10. Hooked up the 2 air lines.
11. Plugged it in and turned it on.
12. Adjusted air pressures.
Works great
Did you find this story helpful?
Thanks for voting and helping fellow customers!
compressor pressure switch not shutting off
Frank - March 10, 2020
Tool Type
Compressor
Difficulty
Medium
Time
30-60 minutes
Tools Used
Screwdriver, Wrench Set
Parts Used
Makita compressor, had to remove a lot more items than should have been necessary to facilitate turning the switch.
Did you find this story helpful?
Thanks for voting and helping fellow customers!
Pressure switch failed.
GENE - December 22, 2019
Tool Type
Compressor
Difficulty
Medium
Time
15-30 minutes
Tools Used
Screwdriver, Pliers, Nutdriver, Adjustable Wrench
Parts Used
Removed and replaced pressure switch, gauges and connectors.
Did you find this story helpful?
Thanks for voting and helping fellow customers!
Pressure swtch was damaged
ODEN - February 5, 2019
👍 1 of 2 people found this instruction helpful
Tool Type
Compressor
Difficulty
Medium
Time
15-30 minutes
Tools Used
Screwdriver, Socket set, Wrench Set
Parts Used
1. I removed the damaged switch
2. removed two lines from old switch
3. removed one fitting off old one.
4. removed up cover that holds gauges.
5. removed bolts holding compressor pump and motor.
6. moved pump over to install the new pressure switch on the tank.
7. hook up lines and power wires to new switch.
8. move pump and motor back in place and bolt down cover.
9. test new pressure switch.
Did you find this story helpful?
Thanks for voting and helping fellow customers!
Air leaking from rubber baffle
Dennis - October 1, 2016
👍 1 of 2 people found this instruction helpful
Tool Type
Compressor
Difficulty
Medium
Time
1-2 hours
Tools Used
Screwdriver, Pliers, Wrench Set, Adjustable Wrench, Wire stippers, terminal crimpers, teflone tape
Parts Used
1. Disconnected power cord and switch leg
2. Removed plumbing connections
3. Removed regulator and plug from pressure switch
4. Removed old pressure switch from compressor tank
5. Installed regulator and plug to new pressure switch
6. Installed pressure switch to compressor tank nipple
7. Install power cord and switch leg to new pressure switch
Did you find this story helpful?
Thanks for voting and helping fellow customers!
OEM stands for Original Equipment Manufacturer and means the part you’re buying is sourced directly from the manufacturer who made your product. At eReplacementParts, we sell only genuine OEM parts, guaranteeing the part you’re purchasing is of better design and of higher quality than aftermarket parts.
Our product descriptions are a combination of data sourced directly from the manufacturers who made your product as well as content researched and curated by our content & customer service teams. This content is edited and reviewed internally before being made public to customers.
Our customer service team are at the ready daily to answer your part and product questions. We have a dedicated staff with decades of collective experience in helping customers just like you purchase parts to repair their products.
All our part reviews are solicited directly from other customers who have purchased this exact part. While we moderate these reviews for profanity, offensive language or personally identifiable information, these reviews are posted exactly as submitted and no alterations are made by our team.
All our customer repair instructions are solicited directly from other customers just like you who have purchased and replaced this exact part. While we moderate these reviews for profanity, offensive language or personally identifiable information, these reviews are posted exactly as submitted and no alterations are made by our team.
Based on data from past customer purchasing behaviors, these parts are most commonly purchased together along with the part you are viewing. These parts may be necessary or helpful to replace to complete your current repair.
All our installation videos are created and produced in collaboration with our in-house repair technician, Mark Sodja, who has helped millions of eReplacementParts customers over the last 13 years repair their products. Mark has years of experience in selling and repairing both commercial and residential products with a specialty in gas-powered equipment.
This data is collected from customers who submitted a repair instruction after replacing this exact part. Customers can rate how easy the repair was to complete and how long it took. We aggregate this data to provide a repair rating that allows customers to quickly determine the difficulty and time needed to perform their own repair.