
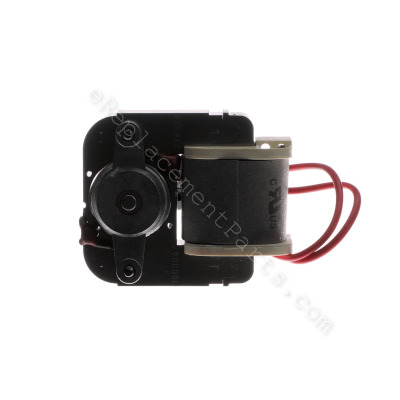


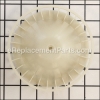
This replacement electric motor is a genuine OEM sourced item, not an aftermarket equivalent. It is specially produced for Nutone exhaust fans. This part is secured in the housing with a blower wheel attached to it that produced the airflow. Please note, this item is sold individually.
To complete this repair you will need a screwdriver.
• Remove the plastic cover
• Unplug the old motor
• Remove the blower wheel
• Remove the motor assembly
• Secure the new assembly in place
• Attach the blower wheel
• Power it up and secure the cover
Nt Srv Asm Motor S87547000
OEM part for: Broan, Nutone
Part Number: S87547000
$114.59
In Stock
Jump To:
Product Description ?
- Classification: Part
- Weight: 1.46 lbs.
- Shipping: Ships Worldwide
Frequently Purchased Together ?
Compatibility
This part will fit the following 12 machines
Nutone
757 Exhaust Fan View Diagrams & Manuals
769RF Exhaust Fan View Diagrams & Manuals
769RFT Exhaust Fan View Diagrams & Manuals
769RL Exhaust Fan View Diagrams & Manuals
770F Exhaust Fan View Diagrams & Manuals
V769RF Exhaust Fan View Diagrams & Manuals
VF707RCN Exhaust Fan View Diagrams & Manuals
Broan
757 Bath Fan - 70 Cfm / 3.0 Sones View Diagrams & Manuals
VF707RCN Exhaust Fan-Light View Diagrams & Manuals
770F Bath Fan/Light - 70 Cfm / 3.0 Sones View Diagrams & Manuals
769RFT Fan/Light - 70 Cfm / 3.0 Sones View Diagrams & Manuals
769RF Fan/Light - 70 Cfm / 3.0 Sones View Diagrams & Manuals
Show More Compatible Models
This item works with the following types of products:
This part replaces obsolete part #: 87547000
Customer Part Reviews ?
Average Rating (out of 5):
Click to filter by ratings:
5 stars
4
4 stars
0
3 stars
0
2 stars
0
1 stars
0
< PREV
- 1
Easy repair great parts
My bathroom fan is now quiet just like new!
Guest -
September 30, 2023
Verified Purchase
Fast
Was here faster than I thought and easy install
Guest -
October 5, 2020
Verified Purchase
Just the part I needed. It’s like getting a whole new vent.
The part came on time, and was exactly what I needed. It was well packed and the easy installation renewed my bathroom vent in no time at all. Took the opportunity to clean the whole vent. Work like new.
Guest -
September 12, 2019
Verified Purchase
Great part, we have a quiet fan again.
Took quite a while to arrive, but works great.
Guest -
June 14, 2019
Verified Purchase
t
t
t -
t days ago
Verified Purchase
eReplacementParts Team
t
Questions & Answers ?
Our customer Service team is at the ready daily to answer your part and product questions.

Ask our Team
We have a dedicated staff with decades of collective experience in helping customers just like you purchase parts to repair their products.
Does this fit my product?Questions & Answers for Nt Srv Asm Motor
No questions have been asked yet
Customer Repair Instructions ?
All our customer repair instructions are solicited directly from other customers just like you who have purchased and replaced this exact part.
motor in exhaust fan failed
Eric - November 11, 2015
👍 6 of 6 people found this instruction helpful
Tool Type
Ventilation
Difficulty
Easy
Time
Less than 15 minutes
Tools Used
Screwdriver
Parts Used
1. Turn off power to unit. 2. Remove light cover. 3. Unscrew light bulb. 4. Unscrew wing-nut and remove reflector (unplug it). 5. Unplug the motor. 6. Remove small screw near plug sockets. 7. Pull down base of unit on socket side (opposite tab side). 8. Remove two nuts holding on motor. 9. Remove retaining washers on fan cage. 10. Pull off plastic fan. 11. Dispose of old motor. 12. Push fan back on. 13. Push retaining washers onto top of fan. 14. Affix motor with fan to base of unit with the same two nuts. 15. Insert base tabs into slots as before (plugs will fit into cut out for them). 16. Insert and secure the base using the small screw. 17. Plug in motor. 18. Reinstall plastic fan cover and reflector plate using wing-nut. 19. Plug in light fixture. 20. Screw in light bulb. 21. Replace light cover. 22. Test.
Did you find this story helpful?
Thanks for voting and helping fellow customers!
The original motor was shot; it sounded like a banshee. I suspect a failed bearing.
Matthew - November 23, 2015
👍 5 of 5 people found this instruction helpful
Tool Type
Ventilation
Difficulty
Easy
Time
30-60 minutes
Tools Used
Screwdriver, Adjustable Wrench
Parts Used
The repair was easy. I removed the cover, then unscrewed and removed the pan holding the light. (The light needed to be unplugged.) I then removed the motor and fan housing, which came out as one piece. (The motor also needed to be unplugged.) I cleaned everything, which took more time than the repair. I then removed the old motor, and replaced it with the new motor. It fit perfectly. I then put everything back together. The motor is now barely audible, and the fan works like new.
Did you find this story helpful?
Thanks for voting and helping fellow customers!
Motor was screeching
David - May 10, 2021
👍 1 of 1 people found this instruction helpful
Tool Type
Ventilation
Difficulty
Medium
Time
30-60 minutes
Tools Used
Screwdriver
Parts Used
Found instruction manual on web, located part number, ordered from eReplacment after searching web for part.
Followed instruction manual (ony problem was a screw that need to be loosed was hidden in part of the manual but logically it had to be loosened/removed.
cleaned fan and al other parts. Reinstalled. Turned on. Worked. Took a nap (I'm 74 and working with my arms above my head is taxing).
Followed instruction manual (ony problem was a screw that need to be loosed was hidden in part of the manual but logically it had to be loosened/removed.
cleaned fan and al other parts. Reinstalled. Turned on. Worked. Took a nap (I'm 74 and working with my arms above my head is taxing).
Did you find this story helpful?
Thanks for voting and helping fellow customers!
Bad motor.
Manuel - January 26, 2018
👍 1 of 1 people found this instruction helpful
Tool Type
Ventilation
Difficulty
Medium
Time
30-60 minutes
Tools Used
Screwdriver, Pliers, Hammer and punch
Parts Used
1. Removed the plastic lens cover.
2. Removed the bulb.
3. Unplugged both the motor and the light.
4. Removed the butterfly nut.
5. Removed the assembly with the motor.
6. Removed two nuts holding the motor.
7. Cleaned all parts.
8. Removed the tension washer from the fan motor shaft.
9. Carefully tapped the motor shaft out of the fan.
10. Reversed the procedure.
Did you find this story helpful?
Thanks for voting and helping fellow customers!
Old fan motor died.
Stan - December 6, 2021
Tool Type
Ventilation
Difficulty
Easy
Time
Less than 15 minutes
Tools Used
Screwdriver, Nutdriver
Parts Used
replaced motor.
Did you find this story helpful?
Thanks for voting and helping fellow customers!
None !
Mary - February 10, 2021
Tool Type
Ventilation
Difficulty
Easy
Time
15-30 minutes
Tools Used
Screwdriver, Vacuum
Parts Used
Wing nut, screw and two bolt nuts ! Lot of vacuum cleaning out dust .Just like your video said !!
Did you find this story helpful?
Thanks for voting and helping fellow customers!
Trying to pull frame from ceiling can mount to gain access to motor, moisture and dust had made a seal of removal parts.
Arthur - November 8, 2019
Tool Type
Ventilation
Difficulty
Easy
Time
30-60 minutes
Tools Used
Screwdriver, box open end wrench
Parts Used
Broam gave instructions on you-tube and I followed what was shown. They should have given notice of the moisture and dust collected in seams making hard to remove the mounting plate used to support the motor.
Used common screwdriver to pry apart and brute force to pull the motor mounting plate from the ceiling can.
Used common screwdriver to pry apart and brute force to pull the motor mounting plate from the ceiling can.
Did you find this story helpful?
Thanks for voting and helping fellow customers!
Fan motor was very noisy
Sharen - June 15, 2019
Tool Type
Ventilation
Difficulty
Easy
Time
Less than 15 minutes
Tools Used
Screwdriver
Parts Used
Took out old motor
Put in new motor
Done
Put in new motor
Done
Did you find this story helpful?
Thanks for voting and helping fellow customers!
barrings burned out, motor very noisy
Laura - January 27, 2019
Tool Type
Ventilation
Difficulty
Easy
Time
30-60 minutes
Tools Used
Screwdriver, Pliers, Step stool, vacuum, and tooth brush.
Parts Used
Remove lens and grille assembly, by loosening wing nut the reflector will drop down and need to be unplugged. The blower wheel was the most difficult. To remove the keeper ring from motor shaft I used needle nose pliers and wrestled it off. Vacuum all and clean blower wheel with soapy water and brush. Reassemble with new motor. Running great. I am 65 yrs old and I think this will outlast me.
Did you find this story helpful?
Thanks for voting and helping fellow customers!
My bathroom ventilation motor stopped working and I had dripping coming down my vent from shower condensation.
Janice - January 15, 2019
Tool Type
Ventilation
Difficulty
Easy
Time
Less than 15 minutes
Tools Used
Screwdriver
We had a friend take down the old motor out of the ventilation mount and put in the new motor and wheel. It worked great. Fantastic service and part. I am so happy not to keep seeing water dripping down anymore from the condensation after taking a shower.
I am so happy I found your website and found my parts. There is no other way I could have fixed this so easy without replacing the whole vent and possibly having to cut a bigger hole in the ceiling for the a new vent to fit .
We could not even find the same size vent at the stores so finding this part to fit into the old vent receptacle was wonderful and so was your customer service.
Thanks again and I will recommend your website to anyone I know that ever needs parts.
Janice
Did you find this story helpful?
Thanks for voting and helping fellow customers!
Load More Install Stories
OEM stands for Original Equipment Manufacturer and means the part you’re buying is sourced directly from the manufacturer who made your product. At eReplacementParts, we sell only genuine OEM parts, guaranteeing the part you’re purchasing is of better design and of higher quality than aftermarket parts.
Our product descriptions are a combination of data sourced directly from the manufacturers who made your product as well as content researched and curated by our content & customer service teams. This content is edited and reviewed internally before being made public to customers.
Our customer service team are at the ready daily to answer your part and product questions. We have a dedicated staff with decades of collective experience in helping customers just like you purchase parts to repair their products.
All our part reviews are solicited directly from other customers who have purchased this exact part. While we moderate these reviews for profanity, offensive language or personally identifiable information, these reviews are posted exactly as submitted and no alterations are made by our team.
All our customer repair instructions are solicited directly from other customers just like you who have purchased and replaced this exact part. While we moderate these reviews for profanity, offensive language or personally identifiable information, these reviews are posted exactly as submitted and no alterations are made by our team.
Based on data from past customer purchasing behaviors, these parts are most commonly purchased together along with the part you are viewing. These parts may be necessary or helpful to replace to complete your current repair.
All our installation videos are created and produced in collaboration with our in-house repair technician, Mark Sodja, who has helped millions of eReplacementParts customers over the last 13 years repair their products. Mark has years of experience in selling and repairing both commercial and residential products with a specialty in gas-powered equipment.
This data is collected from customers who submitted a repair instruction after replacing this exact part. Customers can rate how easy the repair was to complete and how long it took. We aggregate this data to provide a repair rating that allows customers to quickly determine the difficulty and time needed to perform their own repair.