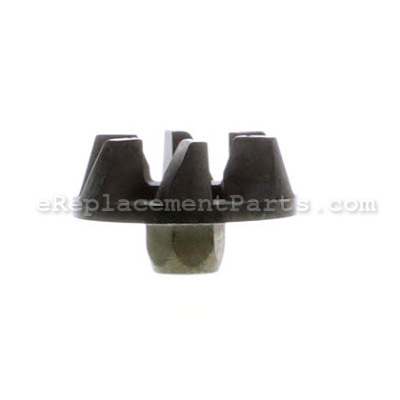
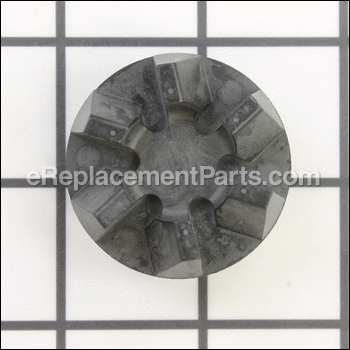


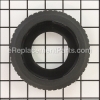
This is a genuine manufacturer sourced replacement part used on Waring blenders. The coupling is the part of a blender that transfers power from the blender's motor to the blade assembly. Over time, the teeth on blender coupling wear down until they no longer engage properly on the blade assembly. It is made out of plastic and it is sold individually.
Coupling 014009
OEM part for: Waring
Part Number: 014009
$14.89
In Stock
Jump To:
Frequently Purchased Together ?


Compatibility
This Coupling will fit the following 156 machines. Confirm this part works with your model, and view the detailed model diagrams and repair help we have to offer.
Waring
Show More Compatible ModelsThis item works with the following types of products:
- Blender Parts
- Mixer Parts
Customer Part Reviews ?
Average Rating (out of 5):
Click to filter by ratings:
5 stars
5
4 stars
0
3 stars
1
2 stars
0
1 stars
1
< PREV
- 1
Fast and good!
The part was in great condition, arrive quickly and fit perfectly. My blender is working great, ty!
Guest -
July 24, 2023
Verified Purchase
As advertised
Ordered a replacement coupling (the thing that makes your blender, um, blend), and it arrived in about a week and worked like it should.
Guest -
March 1, 2021
Verified Purchase
Easy repair and install.
Arrived quickly and repair quickly completed. I appreciated the purchase prompts on the website suggesting other parts that might have been related to this particular repair.
Guest -
April 22, 2020
Verified Purchase
Easy to use web page, decent price, fast shipping. I would buy from them again.
correct part the first time
Guest -
April 8, 2020
Verified Purchase
Easy repair
Did what it was supposed to do
Guest -
June 4, 2019
Verified Purchase
Blender coupling
Not particularly happy with the part when received. Gave model # etc. for my blender and the part that came in is not the one that fit the blender. I am going to have to return it for credit. I have used your company before and received my order and everything was correct and well satisfied. This just happen to be a fluke accurance.. Will use you again if need arises...
Charles -
July 8, 2019
Verified Purchase
Did not fit my blender
everything indicated that I was ordering the right part. When it finally arrived, it did not fit. The thread diameter was slightly smaller than my blender mount and wont fit. Still without a blender.
Guest -
October 2, 2019
Verified Purchase
Questions & Answers ?
Our customer Service team is at the ready daily to answer your part and product questions.

Ask our Team
We have a dedicated staff with decades of collective experience in helping customers just like you purchase parts to repair their products.
Does this fit my product?Questions & Answers for Coupling
No questions have been asked yet
Customer Repair Instructions ?
All our customer repair instructions are solicited directly from other customers just like you who have purchased and replaced this exact part.
Blender ran but blades would not turn with food.
John - September 12, 2018
👍 2 of 2 people found this instruction helpful
Tool Type
Blender
Difficulty
Easy
Time
15-30 minutes
Tools Used
Screwdriver
Parts Used
Removed old coupling by:
- Holding coupling with fingers and pulling up, it was partially stripped
- Held screw under the blender motor with screwdriver and removed coupling
- Screwed new coupling on.
done
- Holding coupling with fingers and pulling up, it was partially stripped
- Held screw under the blender motor with screwdriver and removed coupling
- Screwed new coupling on.
done
Did you find this story helpful?
Thanks for voting and helping fellow customers!
Female threads on coupling stripped. Top plate surface finish worn.
Robert - May 7, 2017
👍 1 of 1 people found this instruction helpful
Tool Type
Blender
Difficulty
Medium
Time
Less than 15 minutes
Tools Used
Screwdriver, Nutdriver
Removal of stripped coupling.
1. Coupler unable to be unscrewed from motor shaft due to stripped threads.
2. Used Dremel rotary tool with abrasive cutoff wheel to carefully cut coupler off of motor shaft.
Removal of top plate
1. Remove three screws securing bottom cover plate.
2. Remove four nuts securing top cover plate.
3. Remove and replace top plate.
4. Replace bottom cover.
Screw replacement coupler onto motor shaft. Use straight blade screw driver to drive motor shaft and secure to coupler.
Did you find this story helpful?
Thanks for voting and helping fellow customers!
Blade coupler was worn
William - August 3, 2016
👍 4 of 7 people found this instruction helpful
Tool Type
Blender
Difficulty
Easy
Time
Less than 15 minutes
Tools Used
Screwdriver
Parts Used
Held coupler with hand and inserted flat tip screw driver on opposite end of blender as there is a cut out. I turn it clock wise as the threads are opposite than normal and had the old coupler off and install the new one just hand tight.
Did you find this story helpful?
Thanks for voting and helping fellow customers!
Piece. Had worn down blade not spinning
Betty - February 19, 2016
👍 4 of 7 people found this instruction helpful
Tool Type
Blender
Difficulty
Medium
Time
Less than 15 minutes
Tools Used
Parts Used
Unscrewed the worn coupling by hand, then screwed the new one on.
Did you find this story helpful?
Thanks for voting and helping fellow customers!
Threads stripped in the impeller
David - June 25, 2021
Tool Type
Blender
Difficulty
Easy
Time
Less than 15 minutes
Tools Used
, None
Parts Used
One I cleared the remains of the stripped threads imbedded on the motor male threads, it was a piece of cake.
Did you find this story helpful?
Thanks for voting and helping fellow customers!
The motor was failing and some part were worn
Michael - July 31, 2019
Tool Type
Blender
Difficulty
Medium
Time
1-2 hours
Tools Used
Screwdriver, Socket set, Wrench Set, Nutdriver
Parts Used
I pilled the base apart and replaced the motor and a few seals. I used the schematic on your site as a guide.
Did you find this story helpful?
Thanks for voting and helping fellow customers!
Original coupler stripped threads
J - July 25, 2016
👍 2 of 4 people found this instruction helpful
1. Removed old coupler
2. Reverse threaded coupler installed using counter-clockwise rotation.
3. Finger tighten only. Will tighten more with use.
4. You are done.
2. Reverse threaded coupler installed using counter-clockwise rotation.
3. Finger tighten only. Will tighten more with use.
4. You are done.
Did you find this story helpful?
Thanks for voting and helping fellow customers!
Metal shavings from imbedded coupling nut, noisy
George - January 3, 2016
Tool Type
Blender
Difficulty
Easy
Time
Less than 15 minutes
Tools Used
Screwdriver
Parts Used
Thread old coupling from spindle. Then just thread the new one on the spindle.
Did you find this story helpful?
Thanks for voting and helping fellow customers!
Blade screw was stripped out
Richard - April 12, 2018
👍 1 of 3 people found this instruction helpful
Tool Type
Blender
Difficulty
Easy
Time
Less than 15 minutes
Tools Used
, Hands
Parts Used
Received the part and just screwed it in place.
Did you find this story helpful?
Thanks for voting and helping fellow customers!
The threads on the screw stripped.
Lisa - June 14, 2017
👍 1 of 3 people found this instruction helpful
Removed the stripped part and screwed on the replacement part. No tools needed.
Did you find this story helpful?
Thanks for voting and helping fellow customers!
Load More Install Stories
OEM stands for Original Equipment Manufacturer and means the part you’re buying is sourced directly from the manufacturer who made your product. At eReplacementParts, we sell only genuine OEM parts, guaranteeing the part you’re purchasing is of better design and of higher quality than aftermarket parts.
Our product descriptions are a combination of data sourced directly from the manufacturers who made your product as well as content researched and curated by our content & customer service teams. This content is edited and reviewed internally before being made public to customers.
Our customer service team are at the ready daily to answer your part and product questions. We have a dedicated staff with decades of collective experience in helping customers just like you purchase parts to repair their products.
All our part reviews are solicited directly from other customers who have purchased this exact part. While we moderate these reviews for profanity, offensive language or personally identifiable information, these reviews are posted exactly as submitted and no alterations are made by our team.
All our customer repair instructions are solicited directly from other customers just like you who have purchased and replaced this exact part. While we moderate these reviews for profanity, offensive language or personally identifiable information, these reviews are posted exactly as submitted and no alterations are made by our team.
Based on data from past customer purchasing behaviors, these parts are most commonly purchased together along with the part you are viewing. These parts may be necessary or helpful to replace to complete your current repair.
All our installation videos are created and produced in collaboration with our in-house repair technician, Mark Sodja, who has helped millions of eReplacementParts customers over the last 13 years repair their products. Mark has years of experience in selling and repairing both commercial and residential products with a specialty in gas-powered equipment.
This data is collected from customers who submitted a repair instruction after replacing this exact part. Customers can rate how easy the repair was to complete and how long it took. We aggregate this data to provide a repair rating that allows customers to quickly determine the difficulty and time needed to perform their own repair.